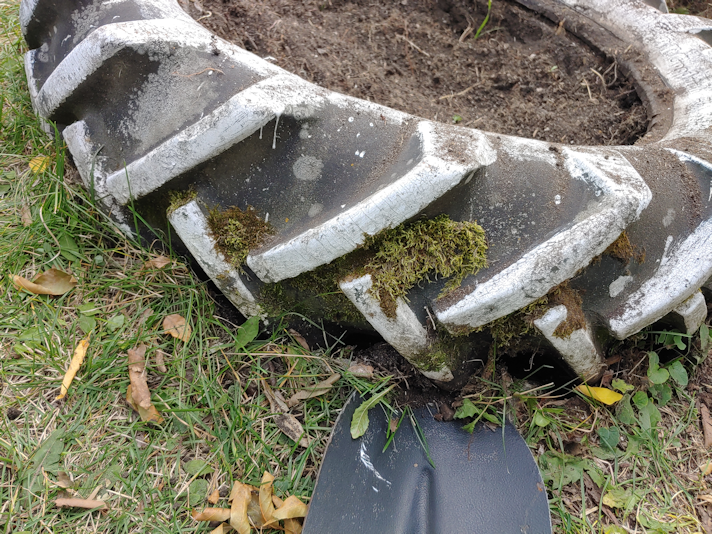
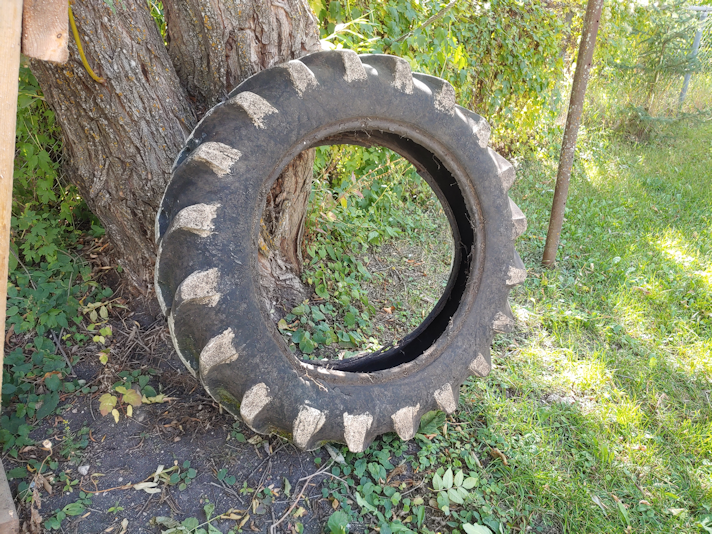
When we moved here, there were two tractor tire planters in the yard. One of them had been next to a willow for so long, it was actually damaged by the willow as it grew.
You can read about what a job it was to clear that out here, and here.
Thankfully, this one was not as big, and easier to get to!
The other one was likely about 130-140 pounds, so I’d guess this one was probably around 100 pounds.
Not counting any soil inside it.
The first thing to do was pull up the spent, self-seeded flowers, which I’d already done before taking the picture. Then I needed to loosen the soil and clear out the remaining plants, weeds and grass.
There had been a concrete block in the middle of this, to support the bird bath that used to be here. I dug it out to use in the fire pit, leaving a hole behind.
You’ll notice, there is no hole.
Junk Pile’s kittens LOVED playing in the dirt, and filled it in with their rolling around in it.
They were also very fascinated by me working on this, and were even willing to stay fairly close to watch!
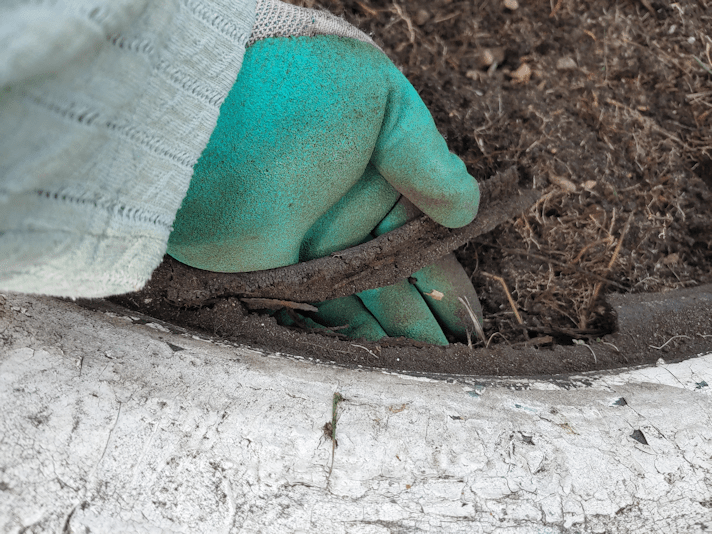
Though I could pull out a fair amount of roots, stems and bigger rocks with my hands, it still wasn’t good enough for the soil to go into the retaining wall blocks.
So I rigged a sieve.
This is the mesh from what had been a screen window that would be put over the window to the old basement in the summer. The wooden frame had rotted and broken, so we built fitted replacement. The old wood frame is trash, but the steel mesh worked well for sifting the soil. A slightly finer mesh probably would have been better, but it did the job well enough!
Well enough that I think I will build a new frame for it, for future sifting jobs like this!
After filling the wheelbarrow with enough soil to top up half the retaining wall blocks, I was at a point where I needed to start lifting the tire itself.
While working my way around the tire, I could hear roots tearing as I lifted it!
And yes, this has been here long enough for moss to start growing on it!
Since this tire planter wasn’t placed next to any trees to damage it, it could potentially still be used for something – in a better location! However, as I cleared the soil and roots away, I could see there is still a fair bit of damage from weathering. I was even pulling broken pieces of cable out.
Eventually, after clearing enough soil to finish topping up the retaining wall blocks, I had removed enough soil to actually lift it up.
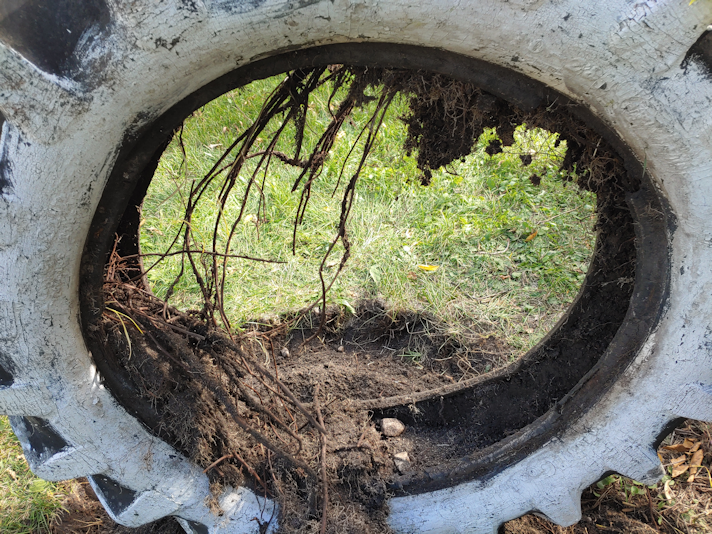
As you can see, there’s still a lot of soil in there!
Soil that is jam packed with roots.
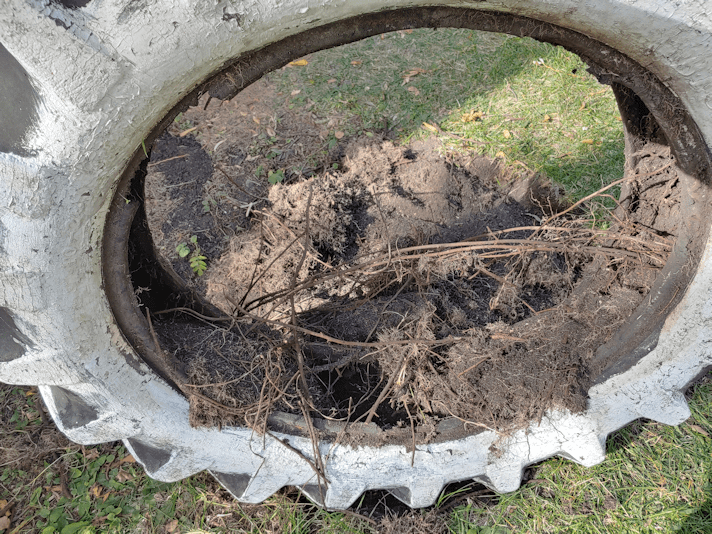
I tried loosening the soil with a garden tool, but the root mats were so dense, it was hard to break it loose. It ended up falling over in the process.
Which did a much better job of knocking the root filled soil loose!
In the end, the easiest way to clear it was to roll it a bit, pull it back, bounce it, roll it again, pull it back, bounce it…
I finally got it all out! You can see the pile of roots in the back, where I’d pulled out the biggest, vine-looking ones. I don’t know what they were from; they look like they’ve been dead for a long time. Certainly nothing growing in the planter since we’ve been here came from those long roots!
The tire was just been set aside for now. We might still try to find a way to use it, but not as a planter!
For anyone reading this, thinking of re-purposing tires as planters…
Don’t.
Just… don’t! :-D The tires do degrade quite a bit, they are difficult to work around, and they are a huge job to clean up!
Speaking of cleaning up…
Yay!! No more tire planter!
That thing was such a pain to mow around!
All rakes up and ready to have some grass seed added, next spring.
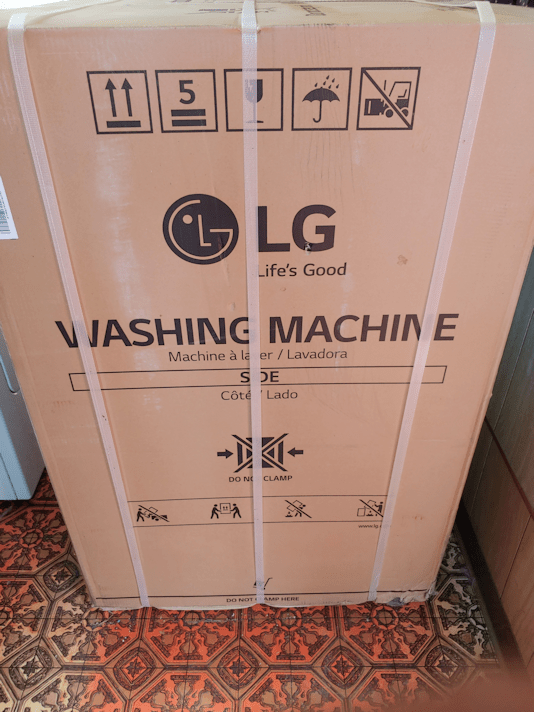
When I got back from the city with our new washing machine, I just had to go around back to see how the painting went for the girls.
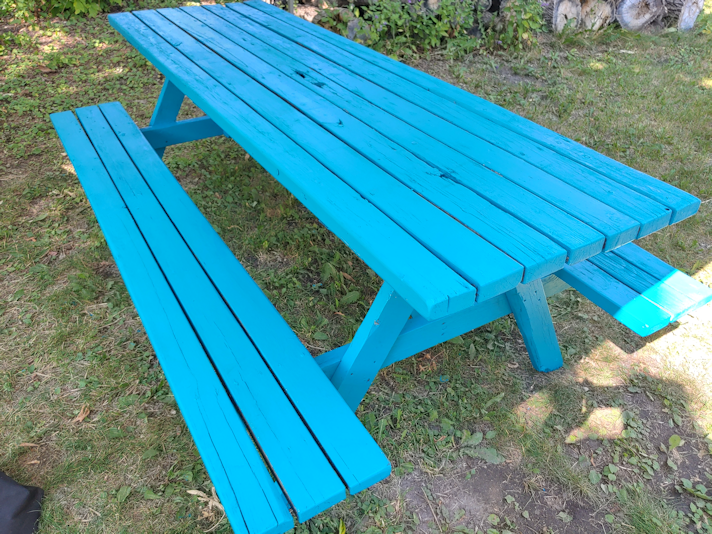
The first coat of paint is done!
You know, when I first picked up this shade, I was afraid that once it was on large surfaces like this, it would be too much. I’m happy to say that, now that I see it, I’m loving it even more!
The bird feeder had also been started.
Since these photos were taken, the girls were able to go back and do another coat on the picnic table, then flip the bird feeder to finish the rest of the top side and give the roof a second coat.
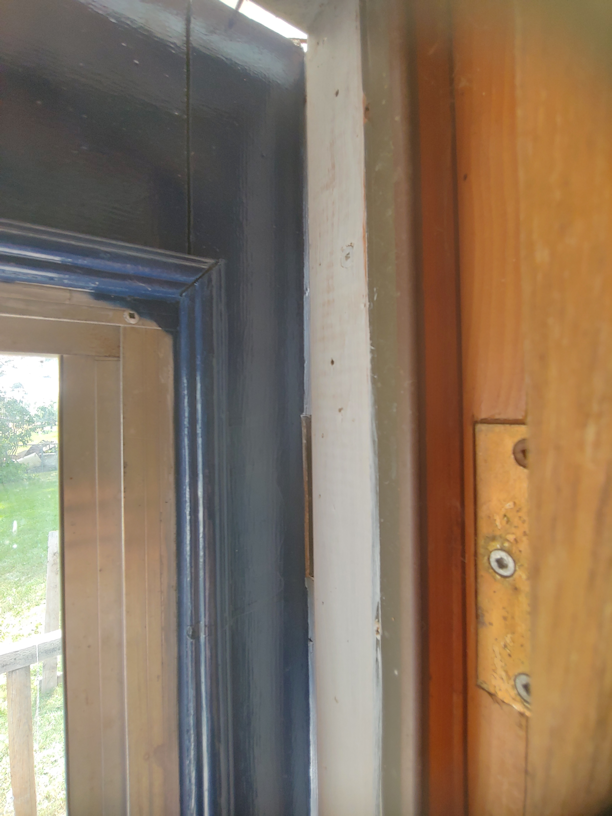
I might have to get another can of this paint! The window frame for the basement screened window didn’t get done, but that’s okay. There is no rush on that. We’re also going to wait for the paint to fully cure before we add the spray on rubber stuff for the bottoms of the picnic table legs. Since they’ve already been painted, there’s no rush on that, either.
These are going to look great, once they’re done and set up in the yard!
Which is quite a surprise, since we got a call from the shipping company a couple of days ago, letting us know they didn’t have it, and that they’d call when they did. Home Depot gets weekly deliveries, so we were expecting to get a call next Thursday.
Then, I got a call today.
It was an automated survey to determine delivery satisfaction.
Delivery?
What delivery?
So I hung up on the survey, then phoned the store. It’s been a while, so while I got the guy who sold it to me, he didn’t remember the details of our particular order. He was just as confused about the survey call as we were. Once I mentioned we thought the store itself might have it, and he realized it was supposed to be delivered to them, he said he would check and call me back.
Sure enough, it was there!
So I basically dropped everything and headed out! :-D The girls prepped the entry for dragging the box through, then worked on painting, while I was gone.
Once the washing machine was loaded in the van, I took advantage of the situation and found some of the spray rubber stuff, for the bottoms of the picnic table legs.
Like the stove, it juuuuuust fit through the doorway – and because of the arm bar, we had to pull it in on its side. This time, I was able to back the van up so that the bumper was over the steps, which made getting it to and through the door that much easier!
Getting it open was easier, too. The bottom piece was not attached to the box, so once the straps were cut off, we could just lift the whole thing.
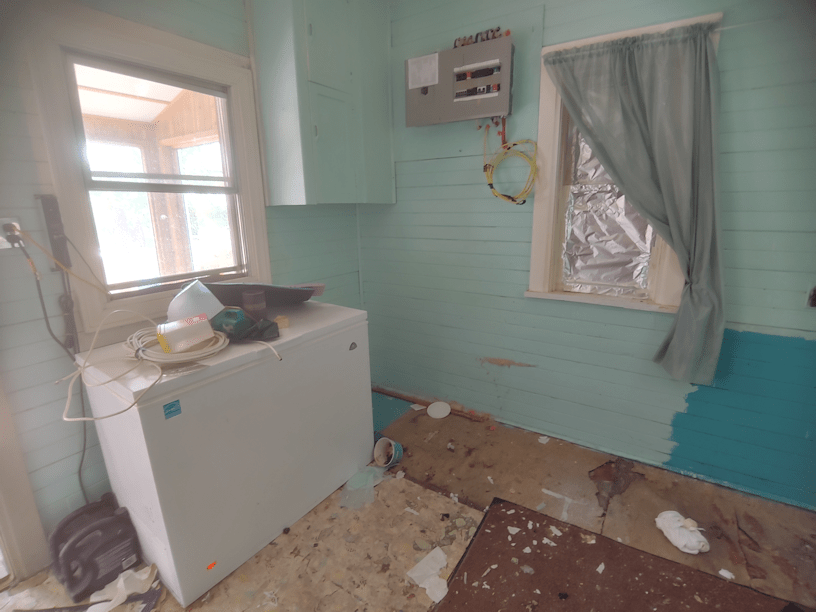
Then we set it up where the old machine was, while my younger daughter stayed squeezed in the back to hook it up.
We found one potential problem. The drain hose is shorter than the old machine’s. It just barely reaches the stand pipe. If we could have the machine with its back to that wall, it would be fine, but then we wouldn’t be able to use the machine.
So it is not tight against the side wall, and right up against the step leading into the dining room. It should be fine, but there is no wiggle room on that.
Thankfully, now that the old kitchen and sun room are done, my husband’s walker is now in the sun room. This way, he doesn’t have to do any stairs to get to the walker, nor does he have to lift it up and down the steps to the main entry. Being a larger than average man, he’s got a much larger walker than typical, making it heavier, too. Not something a person with a back injury should be struggling with! We used to keep it folded up right in front of the washing machine, but now that the machine has to be so far forward, there’s no room for his walker.
Once it was hooked up, we leveled it.
It turns out the floor sags a fair bit towards the middle, but my daughter was able to adjust the legs on one side. Then she squeezed out and we pushed the dryer back, moving it forward to line up with the washer.
There is now quite a lot of space behind the machines.
I’m sure the cats will enjoy it. :-D
While going through the manual, I found that it has a “test before using” function. So I tried that.
I don’t know if it worked.
The manual said to turn the power on, then push the spin and soil buttons simultaneously, until a particular letter/number code showed up on the screen.
The code never came up. A number did. I tried hitting start anyhow, and the machine started doing things, but I wasn’t sure if it was doing what it was supposed to!
In the end, I ended up powering it off. I noticed that the machine only uses the HE type of detergent. The detergent we have isn’t HE.
So I headed off to town to pick some up.
Once the water is no longer needed for anything else, I’ll try again, then start some laundry.
I’ve never been this excited to do laundry before!!!
Before I start on how things went with the clean up, I have another update. I just got off the phone with Canada Cartage – the company shipping our new washing machine.
They didn’t receive it at this end, so they will call us with a new delivery date when they have it.
I might still call the guy at Home Depot tomorrow morning, to see if he can pull a few strings. We’ve opted not to go into town to use the laundromat, and have instead been washing the necessities in the bathtub.
Oddly, my clothes have never been cleaner or softer. Ever. And all I’m going is leaving them to soak in hot water and detergent, then swishing them around a bit before rinsing them.
Weird!
I am happy to say that we have got the old kitchen done, and everything that needed to go back, has been brought in.
I’ll start with the old kitchen.
There wasn’t much left to take out of there. Most of it was behind the wood burning cook stove.
Which, interestingly enough, also hid another outlet.
No wonder insurance companies are such sticklers about wood burning stoves and furnaces!
That basin may well be older than I am.
I left it there.
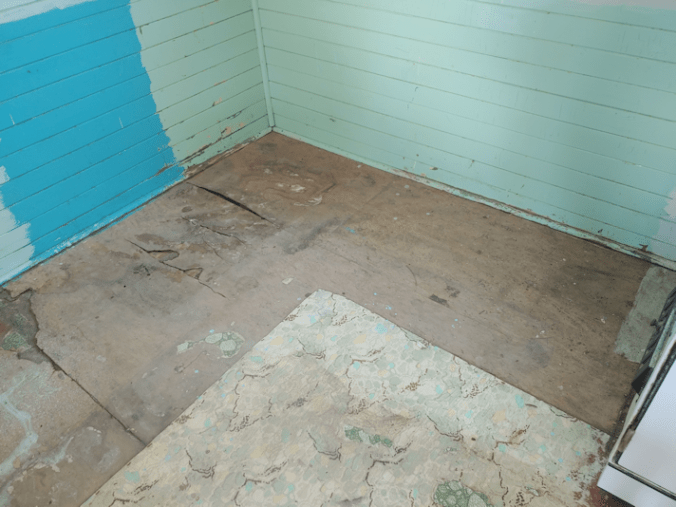
Once everything was out, including the floor mats (which were carefully picked up so that I could pour out the crud over a large garbage can!) and random nails and whatnot were swept up, I took stock of the floor.
This corner is the worst.
And there’s nothing we can do about it, right now.
I am guessing the previous freezer my parents used to have here cause this damage when it finally died.
The best I could do at this point was take the little shop vac to the area.
I vacuumed the window of what may well have been decades of dead bugs, too. I even vacuumed parts of the stove a bit.
A container of nails and… dirt? had fallen in here. I got most of them, but we have found so many random containers of rusty nails, I just swept up and threw away the rest.
I just had to remind myself of what was in this cupboard.
We will deal with this another time!
The weather outside was getting really, really windy, so the girls and I pushed to get everything inside. We will likely change things around later, but for now, it’s all in!
We considered moving the freezer back into the other corner and putting the couch where the freezer is. In the end, I just pulled it closer to the door, to make more space for the shelves we put back where they were before. They are extremely sturdy shelves, and are great to stand on when we need to access the breakers.
I decided to put the rocking chair in the old kitchen, too. More because of how I wanted to arrange the sun room.
A small shelf that was in the sun room is now tucked behind the stove. At some point, we can put a small lamp in there, so a person can sit on the couch and read, and have somewhere to put down a drink or something. There was even still room for a small garbage can.
The prie-dieu that I still have plans to refinish, fits perfectly in the nook on the other side of the stove. As do the folding camp chairs, some window screens, and even my dad’s old wheelchair tucks partway in.
So that’s done for now! I’ll be finding somewhere else for the giant enameled container that is handy. My mother used that for everything from washing and soaking cucumbers to make pickles, to making bread dough. We’ve made use of it ourselves, already. Finding a container that large – with a lid, too – is not so easy, anymore, so we’re not about to put it away in storage. (We put even more stuff into the storage house today, too. :-( )
When it came to the sun room, the focus was on anything tool and gardening related.
This is where that plastic couch used to be.
The yellow shelf in the corner used to be in the old kitchen. Previously, we had a dresser under the shelf across the window as my “tool box”. The wood at the bottom of the drawers ended up warping so badly, it took quite some finagling to get it open. So, out the dresser went and we grabbed that shelf from the old kitchen to replace it.
It was full of jars, and a plastic bucket of nails and screws that was so old, the plastic disintegrated when I tried to pick it up.
We’d put the shelf under the window, on bricks, in case water got in (it did), but this time, we decided against putting any shelf against that window. Partly because the shelf has a metal top that will be a great work surface. Partly because the inner pane of the double pane window is badly cracked. At some point, we’re going to have to take the pieces out, so no one gets hurt.
The bins used for cat kibble and bird seed now have their own spots, out of the way. Before, they were just on the couch. No way the skunks can get those lids open in there! :-)
Not that that will be an issue anymore, but I’ll cover that later.
The small garbage can is there told hold our wiener roasting sticks, and other fire pit supplies.
Here is the other side.
The swing bench is close to where it was before, and the cube shelf went back to it’s previous spot. We now have a tall box to hold the long and weird stuff, in the corner, and the table saw is easily accessible.
I’ll probably shift some things around later, but this will do for now.
Then there is the door…
I can lift the replacement door to close it, but when I do, this is what the hinge is like at the bottom. It has only 1 screw, and it’s not all the way in, which is a good thing. I wouldn’t be able to close the door, otherwise.
At the top…
The top corner of the door is actually flush with the door frame.
I remember fighting with the old door to get it closed, and having to lift it. While I did check the bottom of the door frame, for some reason I never thought to look at the hinges. At least, not that I can remember.
Basically, that means that this has always been a problem. Right from when the old door was first hung.
Much of the sun room is salvaged materials, including all the windows and both doors. So I guess they just made do and lived with it. No one thought to fix the problem.
No wonder the previous door started to fall apart.
I’m going to have to jerry rig it myself.
*sigh*
Once that is done, then I’ll double check how much I need to trim the 2 pieces of door frame that we took off. For now, though, the door stays closed because it’s stuck at the bottom corner, where I have to lift it over the door jam. With the outside door closed, the inside door will now stay closed (it blows open easily, otherwise).
We can now keep the sun room closed. The cats can shelter in the old dog house my brother provided us, and no more skunks coming in!
Which means no more animal damage, urine or feces to deal with.
We can actually start using the sun room… as a sun room again! :-D
The girls took care of a huge job for me, in emptying out the old kitchen!
Well. As much as it will be.
Here is how it looks now, while we take a break and get out of the heat.
When we first moved here, my younger brother had his larger freezer where the one in the photo now sits. They moved it out shortly after we moved in, freeing up some space for us.
There was a shelf in the corner, filled with a variety of things hidden behind a curtain. My mother had a thing for putting curtain rods on shelves, then hanging light and lacy curtains to hide the contents. I don’t think she understood that she was damaging the shelves in the process. Mind you, with most of the shelves, it really didn’t make much difference.
This corner is where our current freezer, which had belonged to my parents, used to sit. When I was a kid and we were still using this kitchen, there was a fridge in this corner.
I have zero memory of there being a fridge in this kitchen!
When I started cleaning up the old kitchen before, I had put a utility shelf in this corner. In no time at all, things ended up dumped in front of it, because we had no place else to put them, and it became completely inaccessible!
That corner is where we will be putting the plastic couch from the sun room.
After taking this picture, I took down the curtain over the window that doesn’t have aluminum foil on it. It has a screen, so I tried opening it to get some air circulation, but it would only open half an inch. Ah, well. Better than nothing!
The window with the foil over it is supposed to get replaced. The replacement window is actually leaning against a wall, between the doors to the house and to the sun room.
We are not going to be replacing the window just yet, but I will keep that in mind as we set things up again.
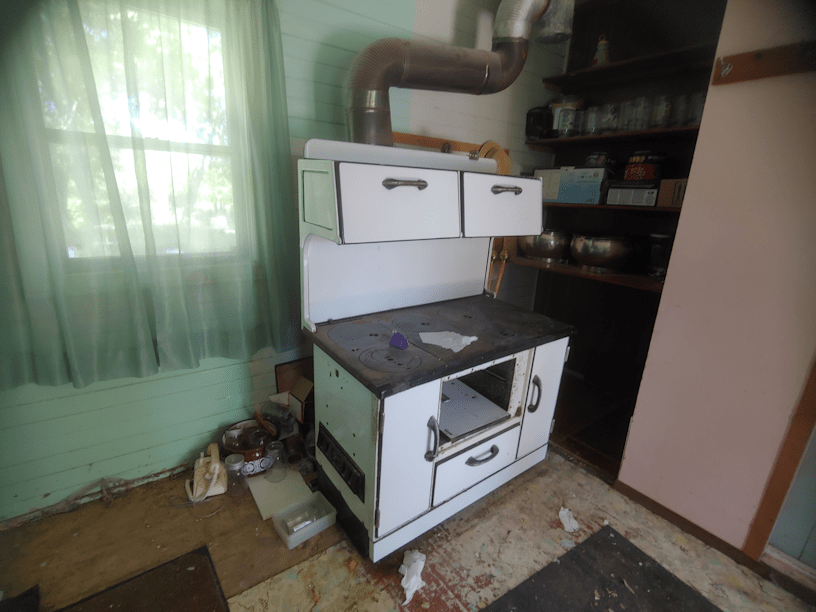
Ah, the old wood stove! This is what my mother cooked on, until the addition was added to the house and we got an electric stove, to go with having running water and an indoor bathroom.
The hinges on the door are broken, as if someone tried to stand on it while open.
There are still ashes in there!!
Eventually, I want to clean it up and pick up some stove blacking – I even found some in one of our local hardware stores.
It’s amazing that this stove was going almost all day, every day, and the kitchen never caught fire. There is NOTHING protecting the walls and floor.
We will not be doing anything to what’s on the shelves in that little nook just yet.
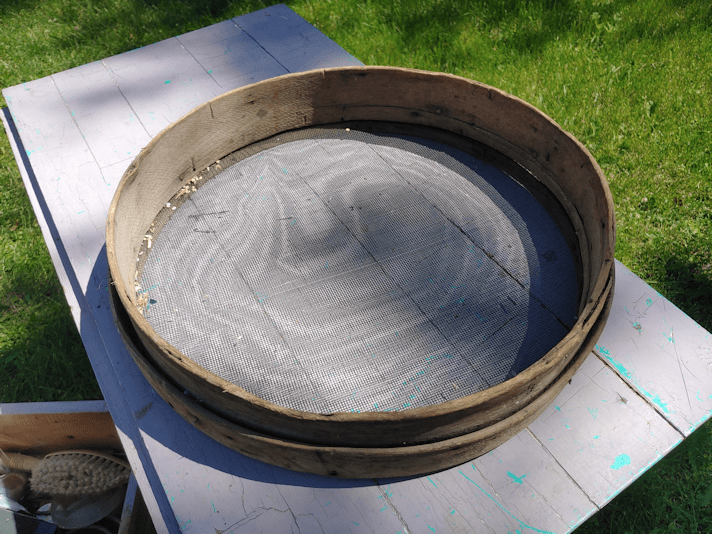
Of course, there were all sorts of things the girls cleared out. The dresser in the photo being one of two larger items, plus lots of things like this sifter screen. It was used to clean the chaff and dirt out of seeds. It’s old and the wood is rotting, but it’s being kept. It’s very likely my dad made it himself. The screen is ordinary metal window screen. The wooden frame was very likely salvaged from a peach basket or something like that.
As the girls took things out, I started hauling some of the stuff either to the junk pile, or into the storage house, which is where that sifter went. I hate that we’re adding things into there. We’ve made no attempt to start cleaning it out. When we do, we’ll definitely need to use masks and gloves. If I can find some coveralls that would fit us, that would be good, too.
Among the things I took in were a large and a small shop vac. When my daughters started talking about using a shop vac on the floors, one of them wondered if the large shop vac worked. I had taken a look at it while carrying it over, I thought that, while it might run, it probably doesn’t vacuum anymore. The little one was
(Aaaannnd… that’s it. I’m done for the day.
As I was writing the above, the phone rang. My sister had taken my mother to the cemetery, and accidentally locked her keys in the car. Long story short, it turns out her car has a combination touch screen she’d forgotten about, but since they were in the area, my mother wanted to see the yard. I am now completely drained. We’ll finish the job tomorrow.)
Where was I?
Ah, yes. The little shop vac. It was wrapped up in a plastic bag, so my daughter didn’t realize what it was. The old kitchen had (and still has) lots of jars that we put into the wagon, so before my daughter had to go back to work, we brought the wagon to the storage house and assembly lined passing them all up the stairs and stacking them in a space I’d prepared for them. Then I brought the little shop vac to the sun room to plug it in and test it out.
It works! So we have a little shop vac – small enough to fit into a grocery bag! – to help clean up the floors. This will be a huge help in the old kitchen, with it’s bits and pieces flooring.
After doing the glass, we stopped to take a break, and I started on this post. Then I got the call from my sister. It turns out she’d tried to call several other people first, including her husband who has spare keys, before being able to reach me. The concern was, there is no shade at all in the cemetery, and it was way too hot for my mother to be in the sun.
So I headed out to go get them, thinking to bring them here to wait for my brother in law – or I could take my mother straight home.
It turned out to be a moot point. I got to the cemetery, and there was no car! Clearly, they’d gotten it open.
Then I saw a car I’d passed on the way over, coming back up the road. I haven’t seen my sister’s newer car in a while, so I hadn’t recognized it. I learned she’d gone to the house closest to the cemetery (which is off the main road and cut into the bush) to make the calls, since her cell phone was locked in the car along with her keys. After reaching me, she got through to her husband, who told her to just use the combination. She’d forgotten there was one! Along the frame of the driver’s side window is basically a touch screen of numbers. She didn’t remember the combination, but her husband did, so they were able to get in. I guess they were on the way to the farm when they saw me going by and turned around.
Since they were there, my mother wanted to come see the yard. She insisted, she didn’t want to come into the house (stairs are difficult for her). I had already told them we had emptied the sun room and old kitchen, and everything was spread out in the yard. They were okay with that, so I sent a message to my family to let them know the situation, and off we went.
What does it say that I get better cell phone reception at a cemetery in the bushes than we do here at the farm? :-D
Once we arrived, my sister parked in the shade of the yard. I asked her if my mom had brought her walker, and she hadn’t, so I went and got my father’s walker. We keep it handy for times like this (and in case I ever need it!). My sister and I also moved the plastic couch into the shade of my mother’s white lilacs, for later.
We then did a tour around the yard, and it was about what I expected. My mother had no real interest in the progress made, and all the interest in the things she didn’t like. Oh, I’d pulled up the spirea over there! Yes, Mom. It was spreading and killing things off. I want the lilacs, not the spirea.
Which is when she told me she had also tried to keep up with pulling them out of that spot, too.
And why did I want those piles of sticks all over the place?
I don’t want them there, but we have to put the branches somewhere. They will be cleaned up in time.
We went around to the old stone cross my late brother had salvaged off a building he’d demolished, which was another area I’d pulled up spirea. I’d been given a hard time about that, too, but now the area is filled with wildflowers. My mother had already graciously given me permission to pull up the spirea in that area. There is one patch of spirea by the storage house that we are keeping. The butterflies and other insects just love them, and it’s a place where we can keep it under better control. My mother was, at least, happy to see how well the grapes are doing (no comments on their no longer being buried in spirea and now on a trellis, though), only to launch into how I need to water them. I really have to water them, because they’re under a roof (meaning, the eaves of the storage house), and they’ll do really well if I just water them.
…
Yes, Mom, I know how to water plants.
She didn’t know what to make of the cucamelons.
Then we started walking towards the old garden area, and she could see the sunflowers at the far end.
What are those sunflowers doing there? Did you plant them?
Yes, Mom. We’ve been talking about that a few times, now.
What are those over there? Are they squash?
Yes, those are squash.
*long pause*
Oh, there used to be such a beautiful garden here! It used to be so beautiful!
*sigh*
She couldn’t, of course, go into the garden, because it is so rough. My sister and I went down to the end of the apple trees, and she had a few things to say about the horrible plow job. The summer before we moved here, she and her husband were the ones trying to cut the lawn in the area. The problem is that, instead of plowing in straight rows in the same direction, so the furrow overlap each other, my younger brother had gone in circles, instead. That left the mounds the were are now struggling with. We’re not sure why he did it this way, but my sister suspects alcohol was involved! :-D
Since I’d mowed a path, my mother was able to go through the maple grove with her walker, all the way to the old willow tree that we’d lost a big chunk of in a blizzard last fall. My sister remembers that tree being huge, even when visiting at the farm before my parents bought it. Then we went over to the fire pit, and I told my sister about how I found the bricks around it. She was amazed, partly because she remembered those bricks being there, and didn’t realize they’d been completely covered.
I tried to talk to my mother about some of the plans we had, but she wasn’t interested. Instead, she wanted to go to the storage warehouse, where almost all the things my parents left behind are now packed away in. I managed to convince her to first stop for a rest in the shade. After a nice rest and hydration, we made out way over.
She actually insisted in going inside, struggling up the few stairs to get in. The building is jam packed, with only a couple of narrow areas to walk in, but she squeezed her way through. Some of the cardboard boxes have started to collapse under the weight of their contents, and I found some things that could not be boxed where knocked onto the floor, including a little mirrored altar of my mothers. The original crucifix was long gone, and another had been put in it’s place. We found that on the floor. My mother decided to take it with her. It turned out to be the first gift she and my dad received, when they got married! Then she started pulling out the large framed pieces, eventually digging out a print of Mona Lisa.
She ended up taking that with her, even though she had nowhere to hang it!
Then she started digging at the end of the path, trying to reach something. There was a bunch of curtain rods from when we cleaned out the sun room, originally. I convinced her to let me get them for her, but when I asked which she was after, she’d completely ignored me. So I grabbed several and held them for her while she picked a couple of the least damaged ones.
My sister and I eventually persuaded her to stop trying to rearrange things and start heading out.
Then she decided she wanted to go into the storage house.
!!!
My sister immediately pointed out how difficult it would be for her to get up those stairs. I had to plead with her, not to go in. I reminded her of her breathing problems, telling her I’d been in and out of there several times, and my own lungs were starting to burn from it (as I type this, I can still feel my throat burning from talking so much, after being in there). I promptly got told that I needed to leave the doors and windows open to get the smell out. I told her it needed a major cleaning, plus there are no screens on the windows, and I didn’t want anything to get in and get trapped (my sister says that’s probably how the dead squirrel that is now a skeleton on the kitchen floor got trapped in there). She still insisted I should leave the door open and open windows.
What was it she was after in there? Maybe I could get it?
It turns out she was worried about a pair of brass candlesticks, and whether they were still there. They are actually a pair of menorahs, and I assured her, they were still on the shelf, covered with a light curtain. Oh? I didn’t cover them! was her response. Well, someone did. They’re still there.
In the end, my sister and I ended up going into the storage house, and we each grabbed a candlestick, took them to the door and showed them to her.
As we put them back, my sister and I were talking for a bit, but I just couldn’t stay in there any longer. My lungs were burning. Even my sister was already noticing it affecting her, so we headed out. I got more lectures on how I needed to leave the door open, and how I need to clean things. Eventually, my sister pointed out that I had stopped cleaning things, and they should probably leave so I could get back to it.
Which they did, but by then, I was done. That hour or so with my mother drained more energy out of me than two days of working on the sun room and old kitchen. I would so love to have a better relationship with her, but she just can’t seem to find anything good to say, without undermining it with by making sure I know what a bad job I’m doing, or how wrong what I’m doing it, etc. I’ve reached a point in my life where she can no longer hurt me, but my goodness, it just sucks the energy right out of me! She couldn’t even resist making a snarky comment about the sweatpants I was wearing; the ones I wear when I know I’m going to be doing dirty manual labour, that used to be my husband’s. They have elastic around the ankles, to help keep the wood ticks out. No recognition at all that I dropped everything to go and get them when they were stuck at the cemetery, and that’s why I was still in my grubbies.
But I did get a lecture about how she won’t be around forever, and after she’s gone, we’ll remember and miss her.
*sigh*
I wouldn’t be surprised if my mother lived to be 100. For all her complaining, she’s got an amazing constitution. Even when she had abdominal surgery and they kept her in the hospital for a week, she recovered faster than when I had a much less invasive day surgery! I was about to say she could get hit by a truck and survive, but… she’s already done that.
So I’m done. Wiped out. Exhausted. Not physically, but mentally.
My daughter headed out to secure some of the stuff so they won’t blow away. I’m going to go do the watering with fertilizer I’d planned on doing, once things cooled down a bit.
I’ll at least be able to say I finished one thing, today, after that!
Today, I finally started on a job that should have been done at the start of spring! Between the rain and the heat wave, and various appliance catastrophes, we just never got to it.
It’s still 24C (75F) out there as I write this, so it was still uncomfortably hot for the work, but it’s much more bearable than what we had last month!
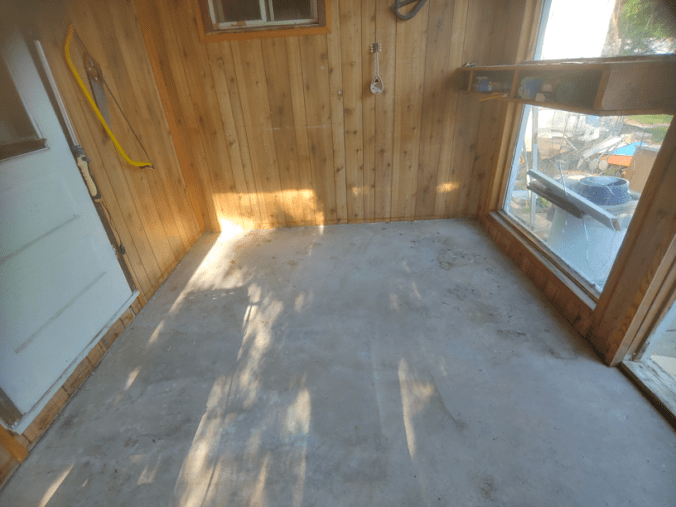
My goal today was to empty out the sun room, so I could sweep up the concrete floor.
Here is what it looked like once I emptied it (except for the table saw; I’ll move that when I’m ready to use it).
This is after 2 winters of the sun room being used by the yard cats as a shelter, and 1 summer as a kitten maternity ward.
Also, visiting skunks. Most of the poop on the floor under where the plastic couch was sitting is skunk poop, which is distinctively black in colour.
Here is how it looks now.
It was a pretty gross job, but still nowhere near as bad as it was when we first cleaned it out.
Washing the floor will wait until we are done with a whole bunch of other stuff, first.
The cushions from my late father’s swing bench – one of his favourite things was to lie on that for a nap in the sun room! – have been hosed off and are hanging to air out. I set up the kiddie pool we ended up using to mix soil and peat, and it now has some of the dirtier old blankets, pillows and cushions we’d given to the cats, soaking in it. Other items are draped and got hosed off, and the biggest blanket is waiting for its own soak, tomorrow.
I hosed down some of the furniture and shelves, too, and it will all stay in the yard overnight. Tomorrow, the girls will empty the old kitchen out, as much as possible. Once that’s done, I’ll do what I can about the floor in there (I doubt I’ll be able to wash it), and the plastic couch will go into there instead of the sun room. The utility shelf currently in the old kitchen will go into the sun room.
I’ve also finally taken off the parts of the door frame I need to trim narrower, so we can finally close the replacement door. Once they were off, however, I discovered something odd. In spite of being sized to the old door, carefully measured and trimmed, I still couldn’t close it once the frame pieces were off. It was hitting the bottom. I had to lift the door in order to close it.
I remember the old door did that, too.
Once I lifted it and closed it, I looked at the hinge side and discovered that the frame itself is wider on the bottom than on the top. !!! So the door is hanging at an angle, and that’s why it needs to be lifted to be closed. Which, of course, pulls the hinge away from the frame. From the looks of it, that’s been a problem for a very long time!
Well, I’ll just have to figure out how to fill the gap, then rehang the door.
Replacing the old broken door turned out to be a much more complicated job than any of us expected!
By the time we’re done, though, we should not only have the sun room reclaimed, and my husband will be able to use it again, but the old kitchen should be a usable space, too. Other than to just shove things in that we have no other place for, that is! LOL
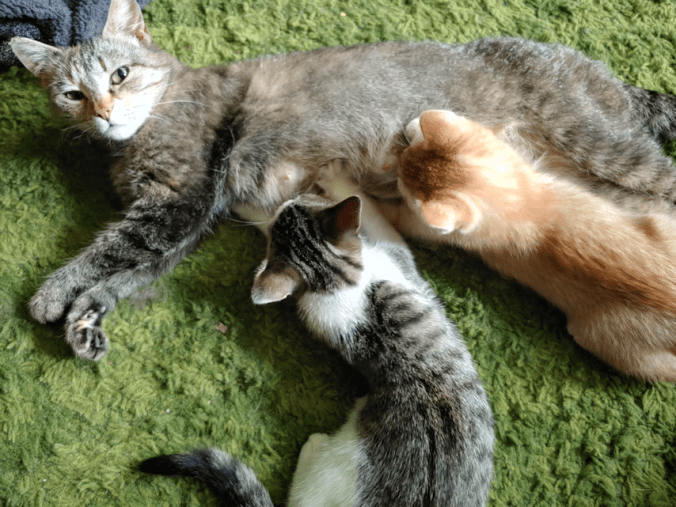
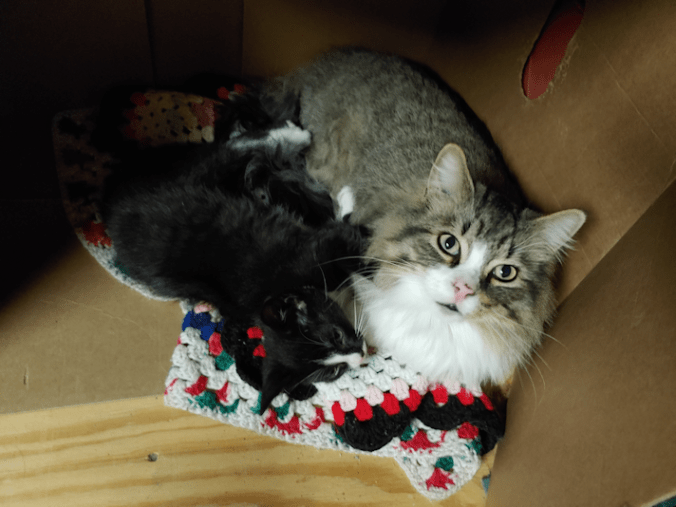
The kittens have taken to napping under the couch regularly. Beep Beep can just barely squeeze under there, herself. A little while ago, my daughter saw her squeeze part way there, then start wiggling oddly. Moments later, some sleepy kitties came out. She then flopped on the floor for them to nurse. She actually woke them up for lunch! :-D They’re more than old enough to be weaned, but it’s still great bonding time. :-)
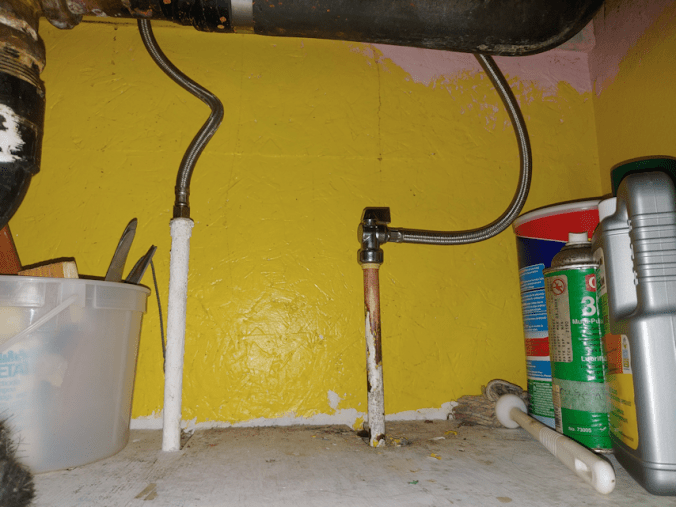
My daughter got the broken flexible pipe replaced. She did just the one for now.
The other has been left for now, partly to make sure the cold water is working fine and there are no leaks. With the hot water, there is at least a shut off valve at the hot water tank. When we replaced the tank shortly after moving here, the plumber added one on for us. When it’s time to replace the other piece, only the hot water to the house will need to be shut off, and not all the water.
For some reason, the copper pipes are painted, including the end of the flexible hose. My daughter tells me the pipes to the old sink in the entry way, which now supply water to the washing machine, were also painted.
Why paint copper??
As for me, I headed outside for a last bit of mowing.
That’s 4 days of mowing, now, and I’m skipping some places!
I did do an extra bit, though.
I mowed a path to and around the old Farm Hand tractor. Next, we’ll be going in there with the weed trimmer. Once we can access the tractor, we need to cut away the trees that are growing through it. We aren’t able to maintain the tractor itself, but we can at least prevent some types of damage to it!
For the last couple of summers, I’d been able to keep an area to the back gate mowed, large enough to drive through. This year, between the rain and the heat, I just never made it that far.
Today, after mowing the area in front of the storage shed, I decided to mow a path to the back gate. It’s our “emergency exit”, so I don’t want to leave it entirely.
A path, however, is all I was up to!
I cranked the mower up as high as it can go – which is higher than the riding mower can go – and only managed a path twice the width of the mower itself. I actually took 8 passes, just to get it as good as this! The first pass, I had the front wheels up almost the whole way, just to get the height down enough to not choke out the mower.
My daughter suggested it would probably be easier to use the old scythe in the garden shed, instead of a mower, for this stuff! She’s probably right. This is hay that’s being cut! Heck, if we had the equipment (well… working equipment), we could probably get a couple of large round bales just in this section! :-D
I’m hoping to at least keep up a path to the back gate. I don’t expect to make the wide “driveway” I’d kept clear last year. I’d hoped to do more, since the area becomes quite the fire hazard, but we just can’t keep up with it all. More time is being spent on the lawn than anything else right now. As much as I love mowing the lawn, there are other things that need to get done! Ultimately, the goal is to have less lawn, with trees in some areas, and raised garden beds in others. Maybe even a greenhouse or two. Other areas, I hope to replace the grass with moss.
Until then, though, there’s an awful lot of grass to cut!
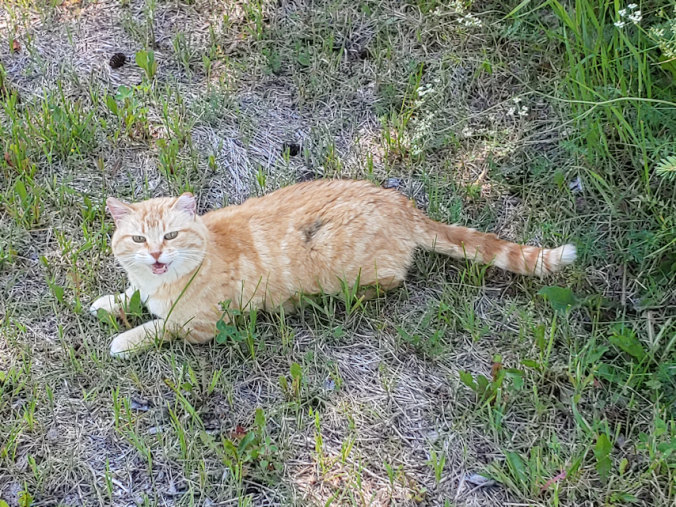
One of the things that is quite visible when the grass is tall, is a path through the grass, worn down by cats, leading from the yard to under the storage shed. While I was working on the path to the back gate, and was turning to make another pass, I noticed Junk Pile cat, sitting in the newly mowed grass in the shade of the shed, watching me. I think her kittens might be under there. When I told my daughter about it, she said she saw them this morning! Junk Pile cat had brought them to the house for food. :-)
I look forward to seeing them more often and, hopefully, being able to socialize them at least a bit. And their mom, too!
After our incident with the kitchen pipe, yesterday, I headed into town as early as I could. Of my morning rounds, the only thing I took the time to do before I left was to make sure the outside cats had food.
There is an employee at the hardware store that I was very happy to see. Quite a few times now, I’ve been able to get help from him that went above and beyond. For all the times I’ve talked to him, he’s becoming aware of the state of the house we’re in, so he makes the effort to ask extra questions and give extra information.
This morning, I told him about what happened last night (I am extra glad I bought that box fan yesterday, because that was set up last night to dry the floor under the sink!), then showed him a piece that had come off my daughter had given me, just in case there were other types and sizes.
He’s never seen that part broken off like that before!
So he went over the different types of flexible pipes available, and I ended up getting a pair of 24 inch ones with built in shut off valves. We’ll just go ahead and replace them for both taps. He then asked if we had copper pipes, which we do, so he brought me over to a display sample in another aisle that had copper pipe in it, describing to me how to cut off the end, while popping the display piece apart to show me how it should look after abrading it…
Cut off the end. Of course, we have no cutter!
He found one for me.
Once I had the necessary bits and pieces, I picked up some other things my daughter put on the list for me – some of it are for the next time something like this happens! :-D
The down side is having to go into our contingency fund, to pay for all this. :-( But at least we have one!
Now, it’s up to my more able bodied girls to do the installation! They’re just going to wait until everyone is done using the water for a while, before shutting water for the whole house down again.
Once home again, I finished my rounds outside which, today, included using more of that anti-wasp stuff. I’d found a wasp nest in a corner of the house. We’d found one there last year, too. I’d hosed it away, and I thought they were gone, but last night I hosed it one more time, just in case.
Wasps started coming out again.
Somewhere in there is a crack, and I think they’re getting into the roof above the old kitchen.
When I checked it this morning, there was no sign of wasps, and no sign that the nest was being rebuilt, but that’s what I saw last night. I sprayed it anyway. Sure enough, wasps started falling out of… somewhere.
Thankfully, this stuff will contact kill, so any wasps that are somewhere in the crack would not be able to get out without coming in contact with the spray. I made sure not to use up the whole can so that, if I need to, I can spray again. At least a little.
Of course, in my rounds, I checked on the garden plots.
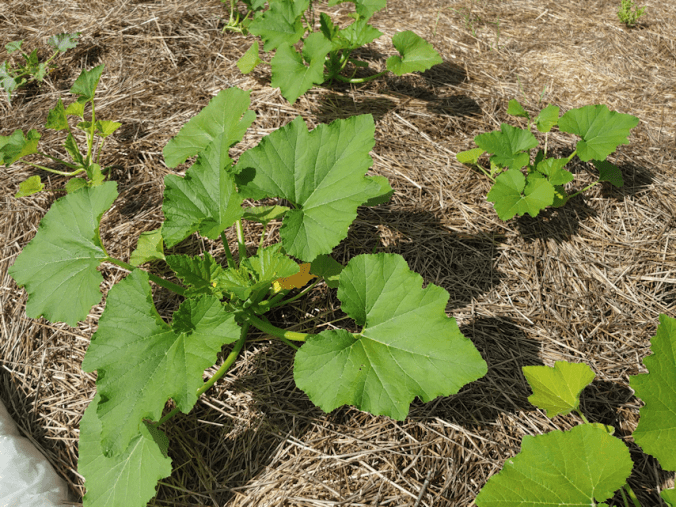
More squash are blooming. :-)
The size difference between some of these plants is rather remarkable! Some are still so tiny. I don’t know how much of that is due to the different types of squash, or to any health problems or weather damage. The first squash bed has just a few survivors, struggling to grow. This is the one that got frost damaged, even though we covered them for the night. The rest were all transplanted at the same time, so it’s more likely the differences there are due to type, not damage.
It should be interesting to see what we get out of these.
I am in so much pain right now. Chances are, I’ll hardly be able to walk tomorrow. But it was worth it!
Let’s back up a bit.
This morning, I got a call from the pharmacy, letting me know my husband’s painkillers were ready to pick up.
Oh, what wonderful news to start the day!
I skipped my morning routine, which my daughters were kind enough to do most of for me, and headed to the garage.
The first thing I did was hose down the area the wasp nest was in. They were still hanging around, but I was able to get the door open and drive out.
I left the door open. :-D
Once in town, and the prescriptions were picked up, I swung by the hardware store to look at what they had for wasp spray. I basically had only two choices: a foam type and a non-foam type. They were also both designed to be used on the nests themselves. I talked to a staff member and ended up going with the non-foam type, as it was also supposed to contact kill for some time after use. Since the next itself was already destroyed, I needed to spray the area to keep them from coming back and building a new one.
Once at home, I made sure to park in the yard, then headed for the garage with the wasp spray. I couldn’t see any wasps, though I could hear some. I closed the garage door from the outside…
… and there they were! They were bouncing right off of me. I moved away and headed for the house, figuring I would give them time to calm down, but they followed me!
I’m glad I happened to be wearing a golf shirt, with thicker fabric. At one point, I looked down and there were two wasps on my boob, stuck in the fabric, trying to sting me! I was able to pull the fabric away from my body and blow them away.
It was only later than I realized, I did get stung! Right on the boob. I never really felt anything. It took a while, but I realized why it didn’t hurt. Some 20 years ago, I had breast reduction surgery. With the amount of tissue removed, it was basically a complete reconstruction. I was warned in advance that, since nerves were being cut, I would lose some sensation, and that it might never return. I did regain most of it, but I do have areas where I don’t feel anything at all. It looks like the wasp stung me in one of those areas!
Which is… good? LOL
Since I didn’t want wasps around the house, I went back to the garage and went in through the back door. I could see some of them going through the opening in the wall, but not as many as I was hearing.
I then proceeded to spray the heck out of the area where the nest was, up to the underside of the roof peak, and along the beam on either side of where the nest was above the door.
What I didn’t count on was how quickly I’d run out. I had intended to spray the opening from the outside, but by the time I went out there, the can was pretty much empty.
When I was done spraying, I went to switch out the trail cam memory cards, which was the only part of skipped morning routine left for me to do.
I had company.
She is not meowing at me in this picture. She is hissing! Oh, what a mean kitty she is! :-D
I checked on it the garage throughout the day. I only ever saw one dead wasp on the ground. From the inside, I could see wasps land in the opening, start to come in, then leave. So they could tell that something was amiss.
By the end of the day, when I had to put the van back in the garage (we’re expecting more storms tonight), I was no longer seeing or hearing any wasps. So I hope this took care of the problem!!
Today was another hot one, but there were a few things that just needed to get done. One of them was to finally put those latches on the new basement window. With the distraction of the wasp nest, I never did get it done yesterday.
I only gone one side done, though. When I went to do the other side, I discovered the hole for the post to go into was just a bit smaller than the first one. New latches of this time all have a standard size post, no matter what size the rest of the latch is. I’ll have to find – or buy – a round file to enlarge the hole just the tiniest bit, before I can put on the new latch.
So that’s only half done.
I then had to start mowing the lawn. Between the heat and the rain, the yard had gotten really over grown. With another storm looking like it will hit tonight, decided to go for it.
For the first time since getting the new mower, I kept the bag on to keep the grass clippings for the entire time I mowed. The grass was so tall and thick in the first area I worked on, I had to empty the bag about every 50 feet or so!
In the end, I got only a small section done before I had to stop, go inside and cool down.
The best place to cool down is the basement! It was a great excuse to check on the old basement.
What a difference! The area the dehumidifier is in is almost completely dry. I checked the hose and, to be honest, I couldn’t really tell if water was dripping through there, but I’m assuming it is. The water that was all over and around the well pump, from condensation, is almost completely dry.
The section under the window is also noticeably drier, though it still had big wet patches. There are still damp spots under the furnaces, so I changed the angle on the blower fan to face the floor under there. The last thing we need is for the new electric furnace to start rusting!
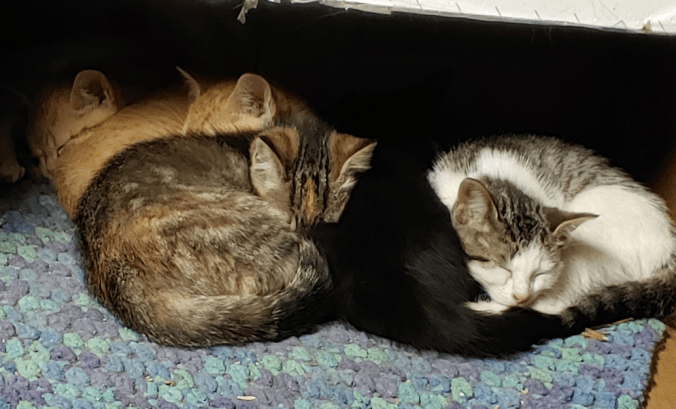
My making a commotion in the old part basement attracted attention, of course. I had a whole bunch of kitties at the divider, watching me and wanting to play!
So I went around to the new part basement and joined the kitties for a while. Though I’d washed up after coming inside, my clothes probably still smelled of bug spray, so they actually left me alone a fair bit.
A few days ago, I’d started another hair pin using lilac wood. I’d roughed it out to the sanding stage, so I finished it off today.
Given the size and shape of the piece of branch I used, there wasn’t a lot of options for what to do with it. I still wanted to highlight the colours inside, so I made a simple spiral cut. This picture is after it was completed and oiled.
My daughter is ecstatic with it! :-D It’s longer than the first one I made, too, which is much better for her mass of curly hair.
By the time I was done with that, I found the kittens were all done, too!
I had hoped in this time, I would have gotten enough rest so I could go back outside and continue mowing, but it wasn’t. I ended up needing to nap! This meant I was going back outside at the hottest part of the day 28C/77F, with a real feel of about 32C/90F! Thankfully, though, the sun was low enough that the areas I needed to work on were mostly in the shade. After moving the van to where I’d already cut, the grass, I then spent several hours working on the lawn, with many, many stops to empty the grass bag.
I now have plenty of clippings to mulch the new garden area where the wood pile used to be. I added a lot around the grape vines, to help keep down the things that are trying to encroach on them. The old kitchen garden has piles all over, which the girls will spread out for me, tomorrow. When working on the north yards, I added the clippings to the compost pile already there, and it’s now full.
We need to start a new compost pile.
I love this new mower. With the frequent stops to empty the bag, it got harder and harder for me to pull on the cord to restart it. No matter how rubber my arm got, though, it started every time! With the old push mower, I would have had to stop long before finishing.
I’m so glad to finally get that done. Everything looks so much better now! I still need to go around the old garden area, then the garden area itself – today, I just mowed around the potatoes, which are coming up quite nicely – but that can wait for another day! I got the main parts done, and the rest can wait a bit longer, if the weather doesn’t co-operate.
It’s been a bit frustrating this year. As much as I appreciate the rain, between that and the heat waves, the lawn is about all we’ve been able to keep up with. I’ve barely managed to do any clean up near where we plan to build the cordwood outhouse, and we certainly haven’t been able to start on clearing where we will be building it. This year, I was supposed to continue clearing the spruce grow – I even have a working chain saw to make that job easier! We’ve done nothing.
With my husband being in the hospital for 3 weeks last spring, and so many follow up medical appointments, it’s no surprise we fell behind on this stuff last year. It’s now feeling like we’re going to lose another year, this time to weather!
Maybe we’ll have a long and mild fall to make up for lost time. Here’s hoping!
I’m just happy I managed to get done as much as I did today. I expect that tomorrow is going to be a major pain day because of it, but it was worth it to finally get this stuff done! The yard look so much better now. It’s more of a psychological boost than anything else, but those are important, too!
I am happy to say that I got the window for the old basement built – with considerably kitten interruptions!
While I did that, the girls installed the new kitchen faucet set. It turns out there are no shut off valves on the water. They had to shut off the main valve for the entire house.
On the list of things to do: add shut off valves all over. I’m pretty sure the bathroom sink doesn’t have any, and I know the toilet doesn’t. In following the pipes through the basements, the only valves we found where the ones for the outside taps, that just shut off every winter.
Also, the cold water pipes and well pump are all just dripping with condensation!
So we now have a nice, tall faucet on the sink that we can actually fit my big stock pots under. :-)
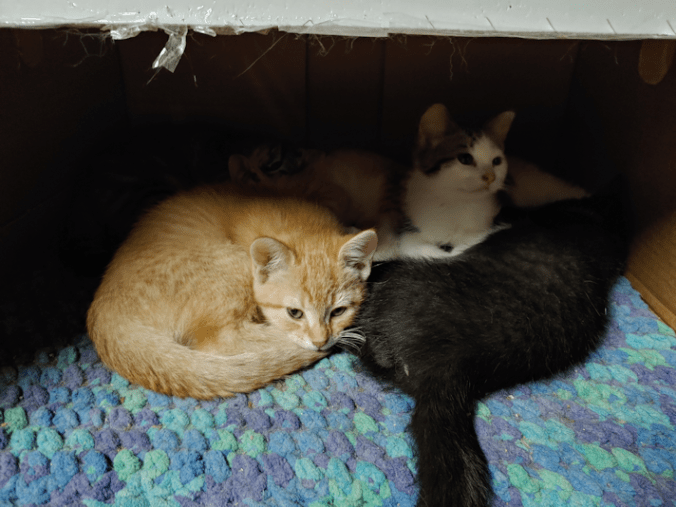
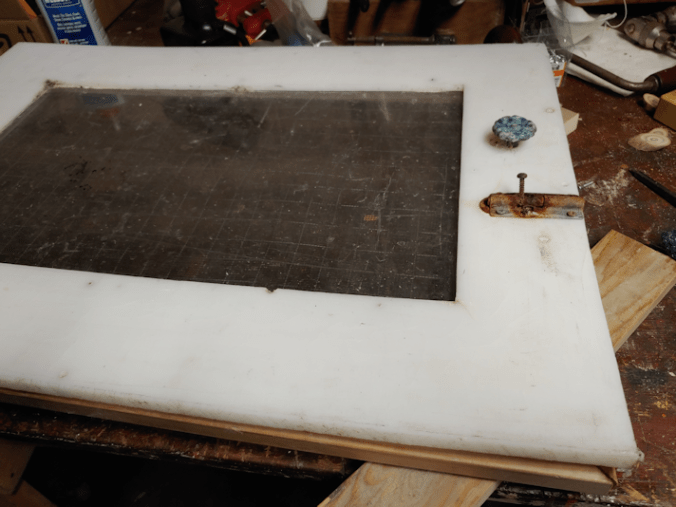
As for the window, this was my template.
As you can see, I have an enthusiastic helper!
This is the window we leave on throughout the winter, with 3 inch thick foam insulation on the inside. When it warms up, we would take it out and place a wire mesh “window” over the opening to allow air circulation to help keep the basement dry. It is much bigger than the window opening, and the wood framing the metal mesh is old and rotting. It finally broke apart last winter. Right now, we still have it leaning on the wall, but with the broken frame, critters could easily squeeze through, to the insulation is still in the window opening.
I used a piece of some of the wood I’d brought from a shed and used to make the screen door so we can leave the old basement door open. One piece was enough, even after cutting away the water damaged end.
I used the window to size the pieces, then double checked the sizing after cutting. The back of this window has self-adhesive foam weather stripping around the edges, but half of it is missing, so the pieces can’t lay flat, but it’s close enough.
Also, it’s very interesting to use a miter box with kittens trying to climb all over me and my work table! I had some trying to chew on the miter box, while others would take flying leaps at my legs, then climb up onto my shoulders.
The little beasts! :-D
The next step was to ready the right angle plates I got for this.
This was my original plan; I’d use a combination of wood glue and these plates to secure the corners. I thought to put them on the inner edges of the corners, first, but changed my mind and decided to put them on the outer edges. I marked out the screw holes so that I could drill pilot holes, later.
It…
Didn’t work.
I started by using wood glue on a corner, then putting on the plate, only to discover the screws I had were a fraction of an inch longer than the wood was thick! It was juuuuuusssssttt enough that I screwed the corner to the table a bit.
The other problem, however, was my pilot holes. They were shallow holes; I just wanted enough to make getting started, easier. A few of them ended up being ever so slightly off centre, then some of the screws started going off on angles.
The end result was that the angle plate ended up making the corners less squared!
So I took off the couple I’d put on and left it for later. I had already glued the pair of corners, which were supposed to be clamped for 10 minutes. I don’t have right angle clamps. One didn’t really need it, but I did end up using a C clamp on the other.
It was a good thing I had to wait for the glue to set for a while, because at that point, I was being thoroughly loved on and cuddled by Big Rig. Then Leyendecker joined us. Then they fell asleep on me! After a while, Big Rig took off, but Leyendecker stayed. I finally had to move, and discovered David settled in one of their box caves, so I put them together – and Leyendecker stayed!
Until my husband came down, and he ended up with kittens nursing behind his butt. :-D Finally, Beep Beep got tired of that – and she joined David!
David is such a sweetie will all the cats and kittens!
I was, eventually, able to continue with the window. :-D
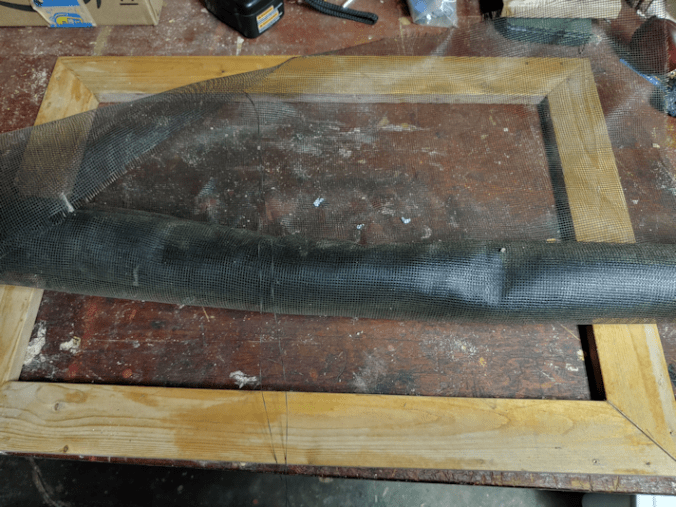
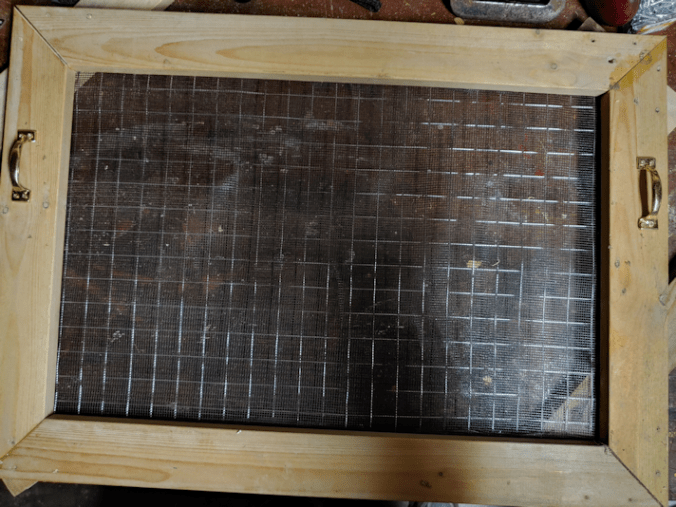
One of the things I found among the many, many things shoved onto the support beam, between the floor joists above, was a roll of window screen. I dug it out and, after gluing the remaining two corners of the frame, used it to measure off a piece of screen.
I actually ended up throwing away the first piece I’d cut, as it turned out to be damaged.
I don’t know how long that roll had been sitting there, but it was just caked with dust!!! Enough to make unrolling it very… sticky. :-/ I cut the mesh larger than the frame, so that I could fold the edges in, for extra strength.
I also cut some of the wire mesh to size.
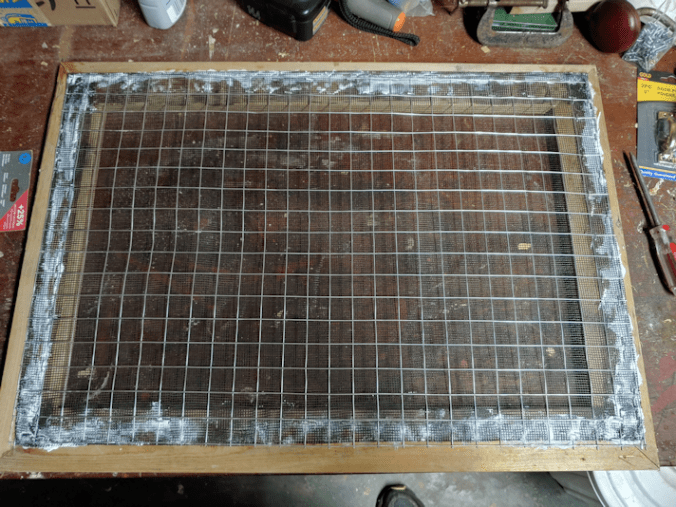
After fighting with the window screen for a while, trying to get the edges folded under, it occurred to me that I was working on the “pretty” side of the window frame, and that the screen and wire mesh needed to be on the “ugly” side, that would be facing inside the basement.
No, the wood glue wasn’t dry enough to hold, yet. Which was fine. After I flipped it, I just stuck it back together and kept going.
It took away longer to get those edges to fold under than I expected! Here, I’ve tacked the screen to the frame at the corners with a staple gun.
Once it was tacked in place, I got out some Weldbond adhesive and applied it to the edges, then used a cast off piece of wood to spread the adhesive and push it through the screen.
Then I added the wire mesh.
I was going to say I went overboard with the staple gun, but to be honest, I seriously considered adding even more. Every wire around the edge has a staple, alternating between the outside edge, and the next wire in.
The corners each got at least 4 staples. :-D
I’m hoping that, between the Weldbond and the staples, no critter is going to be able to force their way through.
I wasn’t gone yet, though!
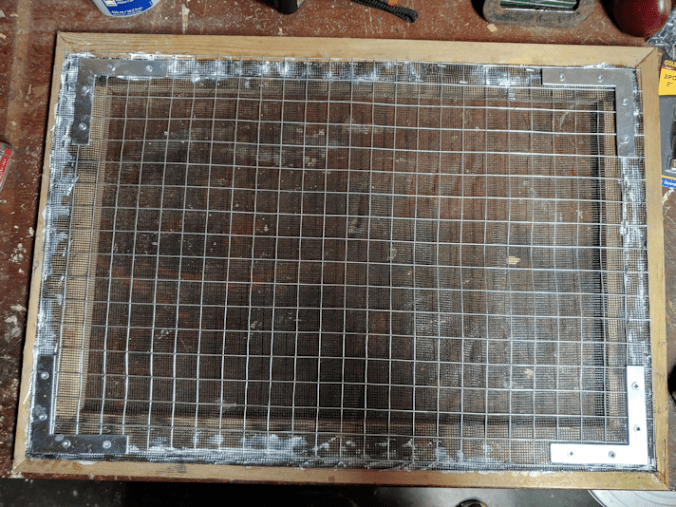
Remember those plates?
It took some hunting, but I did find some shorter wood screws to use. The plates were positioned based on the wood based on where the wire was. As long as the point lined up with the corner joins, I just needed to not have a wire in the way of the screws.
Between the plates and the wire screen, this frame is not moving!
Next, I needed to add handles. I used cast off pieces of wood under the metal plates, to keep the adhesive off the worktable. I’d already accidentally screwed it to the table. I didn’t want to glue it, too! :-D
The weather stripping on the back of the window wouldn’t let it lie flat, but I could at least line up the edges. I then marked the sides of the new window frame at the latches, and at the knobs.
I then added the handles with the bottoms lined up with where I’d marked the placement of the knobs.
The latches on the window fit into holes in the window opening outside. Once in place, the window is flush with the wall around the window opening. The wood is much thicker than the plastic, so I know at the very least, it will stick out from the wall. What we might end up doing is adding another pair of latches, so the outside of that window opening will have the fittings for both windows on them.
We’ll make that decision later, though. It will all depend on how it fits.
For now, the window is finished. I’ll leave the adhesive to dry overnight, and tomorrow, I’ll see if I got it right and it fits – or if I screwed up! :-D
Once I know how it fits, we will be able to see what would work best for fastening it in place.
After that, the only thing left will be to paint it. We have several things that will need painting, so we’ll wait until later in the season and do all of them at the same time.
Happily, we are now able to cross a couple more things off the to-do list. The list isn’t going down as fast as I’d like, but it is going down! :-)