I was feeling lazy today, and wanted to make something quick and easy for supper, to go with the meatloaf I had in the oven.
I decided to make kluski. Well. I suppose the proper name for them is kluski kladzione, since kluski is a generic Polish word for all kinds of dumpling type things.
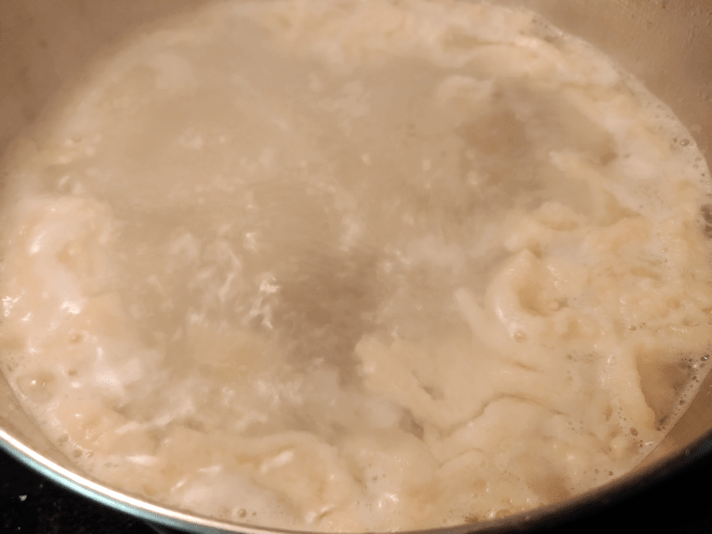
These work up really quick, so start a large pot of salted water going, have a slotted spoon handy, and place a colander over a bowl nearby.
I finished mixing the dough well before the water reached a rolling boil.
The recipe is simple. Three cups flour, three eggs, a bit of salt… (the recipe in the link above uses only two eggs, but I followed the quantities I got from a video I found, so things can be flexible)
… and enough water to make it a batter-like dough.
I use a little over a cup of water to get it to this consistency. It just needs to reach a consistency that’s almost something you can pour.
I mixed by hand, but an electric mixer can be used. I just didn’t feel liking something else to wash. I just kept beating it by hand until the water was ready.
Traditionally, the drop noodles are made by putting some of the dough onto a plate, then scraping pieces off into the water when it reaches a roiling boil. Or, they can be dropped directly into a soup.
I didn’t want to wash a plate, either. I’d used an 8 cup measuring cup to mix the dough, so I just scraped small spoonfuls over the edge of the bowl, instead of the edge of a plate.
They cook up very quickly, too. The pieces I scooped out were pretty small, so they were done very soon after they all started floating on the top. I just gently stirred after dropping them in, to make sure none were stuck to the bottom.
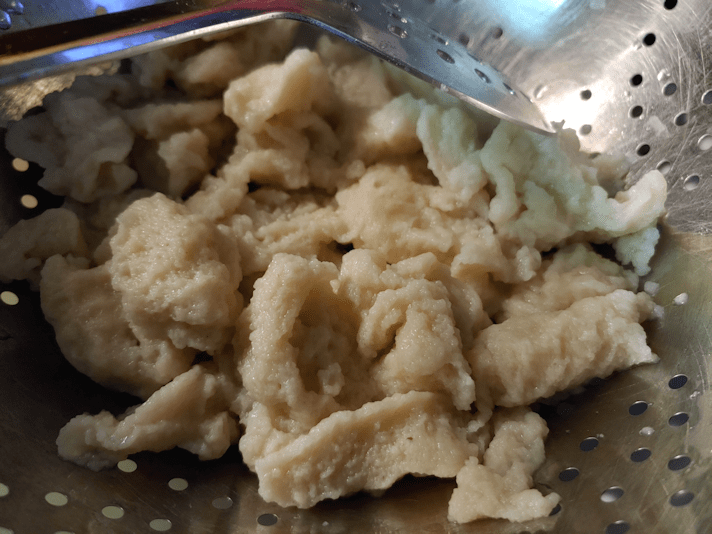
Once a batch was done (I did it in three batches), I used the slotted spoon to scoop them into the colander to drain.
They can be eaten right away at this point, just tossed with a bit of butter and seasonings. I decided to keep following the video I found, though. This next part isn’t necessary, but the video I watched did it, so I gave it a try this time, too.
I took the colander over to the sink and rinsed them with cold water.
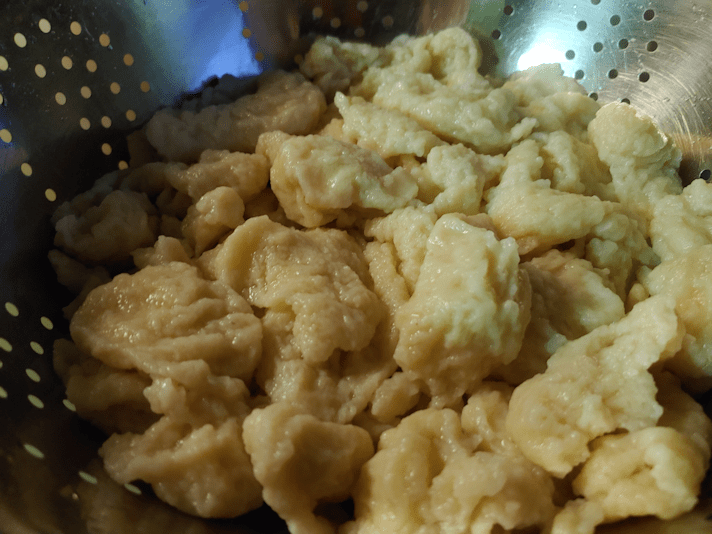
They were then dumped into a hot pan with generous amounts of melted butter.
After frying for a minute or so, they were done and ready to serve!
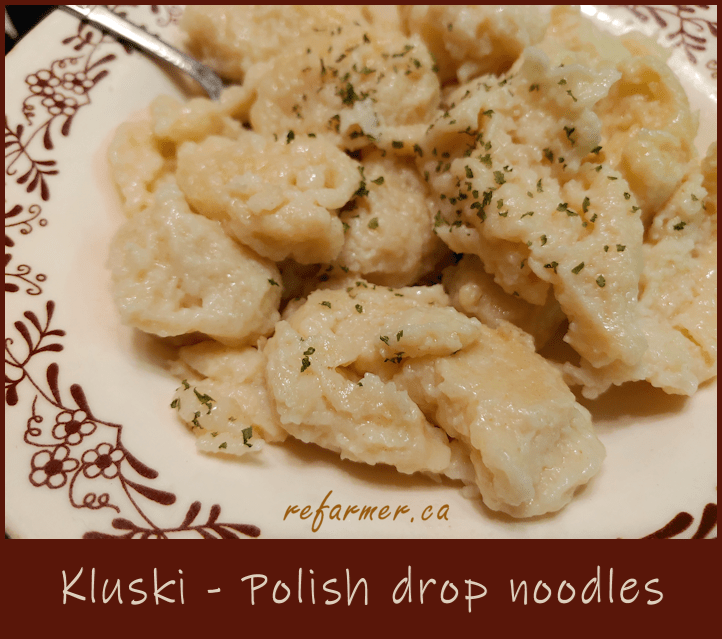
Except my meatloaf wasn’t even done yet.
The resulting little dumplings have a soft, toothsome texture to them, and taste wonderful. I found I didn’t even need to add more seasons. Just the butter it was fried in was enough! Unfortunately, my meatloaf did not turn out all that well, but at least I had delicious kluski!
This is the video I found, when confirming my quantities to make these. I think Grandma Lipinski is adorable!
For the next while, as I remove part of the dough from one batch to use in the next batch, I will be taking out slightly larger pieces of dough, to make larger batches of bread with it, next time.
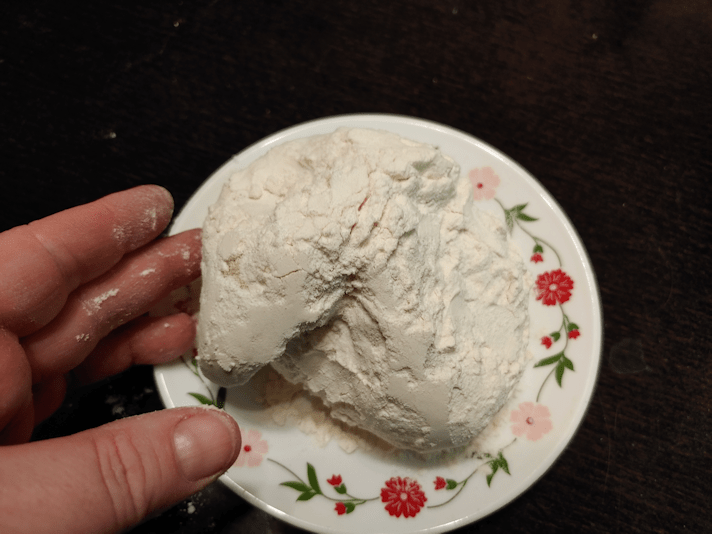
Our flour canister is tall and narrow, so I’ve made a point of flattening the dough baby a bit before burying it in the flour. When I opened the canister last night, I found the dough baby had grown enough to emerge from the flour like a mushroom!
I think today’s dough baby will the the last one I can fit into the canister! I’ll have to start burying them directly in the flour bag. They get so big! Which is encouraging, since that shows how lively the yeast is, so it’s a good problem to have. :-D
The dough baby was light, with a slightly crunchy dry shell, and a thick bubbly interior. The larger size made it a bit harder to tear apart to put in the little crock to soak overnight, so the pieces were a bit on the large size. That did not seem to make a difference to how it looked in the morning.
I soaked it in 2 cups of warm water overnight then, because I wanted to increase the amount of dough I was making, I cheated a bit and let maybe a tablespoon of commercial yeast proof in another cup of warm water. Right now, I’m getting enough to make the equivalent of 4 small loaves, and I eventually want to be making the equivalent of 4 large loaves. I don’t plan to get to my Babcia’s level of a dozen loaves at a time! :-D Making enough for 6 or 8 loaves, maybe, but not a dozen!
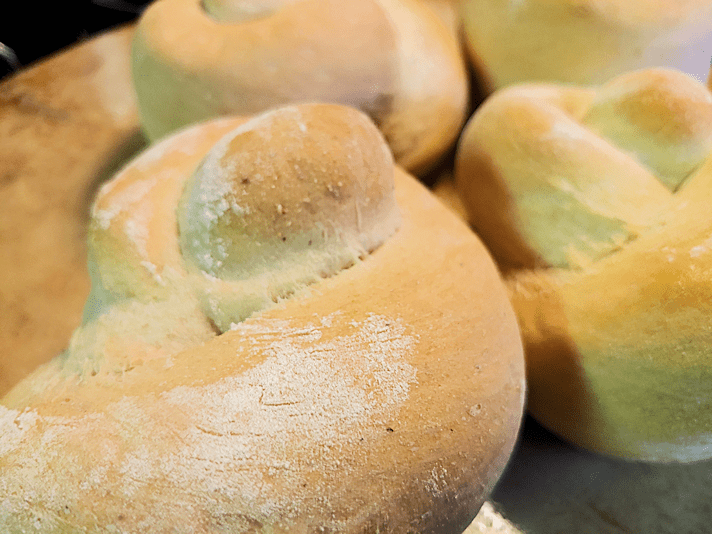
Once again, I used a mix of all purpose and Durum wheat flour, and let it rise only once before shaping. When I am no longer using commercial yeast, I’ll add an extra rising again. I also split it to do one half plain, and one half fancy. For the first half, I made it into 4 knotted buns and used a cast iron pan to bake them in again, which is working out very well.
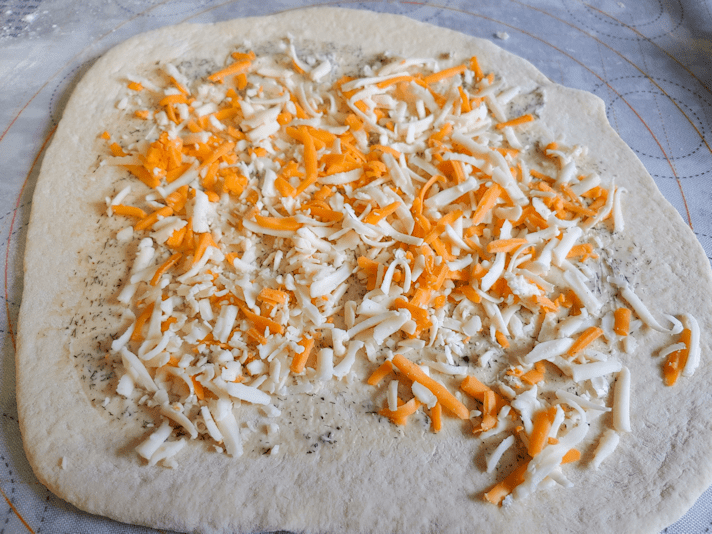
The second half got divided again, to make a pair of rolled loaves.
Each piece was rolled out, then small pieces of leftover ham were scattered evenly, followed by generous amounts of shredded sharp cheddar, mozzarella and Monterey Jack cheese.
Before rolling them up, I did dampen the edges with water, but I did not try to seal the dough.
Once rolled up, the ends were tucked under, and they were left to rise.
The knotted buns were baked first, and turned out quite adorable.
The ham and cheese rolls, as expected, did leak out the bottom seam!
That’s okay. It just got crispy on the bottom of the pan, for some extra deliciousness. :-)
I would not recommend doing this without using parchment paper. :-D
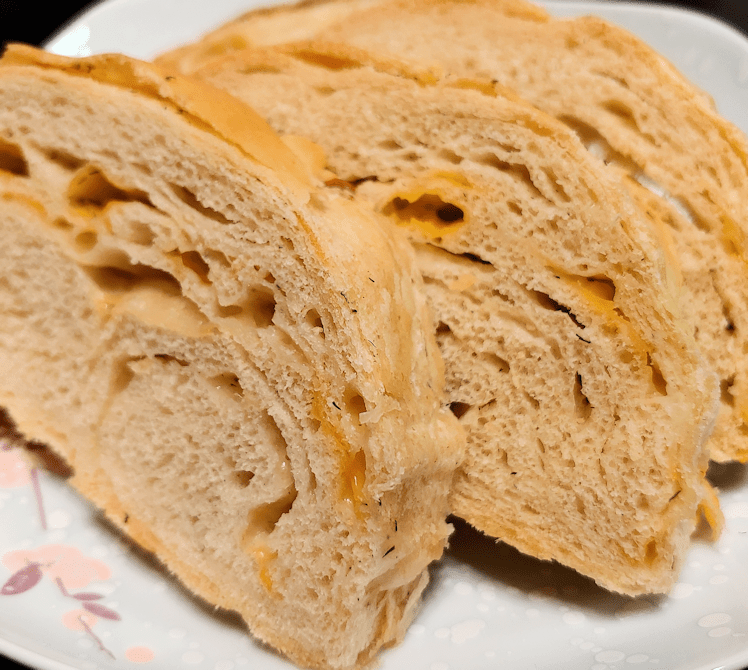
A huge bubble formed under the top, as the cheese melted and the layers collapsed below. That did make it a bit hard to cut through! :-D
The ends that were tucked under were a lot more substantial. I the slices where the large bubble formed, the top crust was almost like a fancy chip! :-D
We had them for supper with tomato soup. It was a very nice combination! :-D The crispy cheese bits made for a lovely little treat, too.
For those of you who have been following this blog for a while, you may be wondering what happened with our cider vinegar.
Yeah. The stuff we were supposed to taste test 2 months ago, to see if it was done!
It’s been sitting in the old kitchen all this time.
Given how cold it gets in there, I wasn’t too worried about it.
For those who are new to this blog (welcome! Happy to see you!), you can check these posts out. All the links will open in a new tab, so you won’t lose your place here. :-)
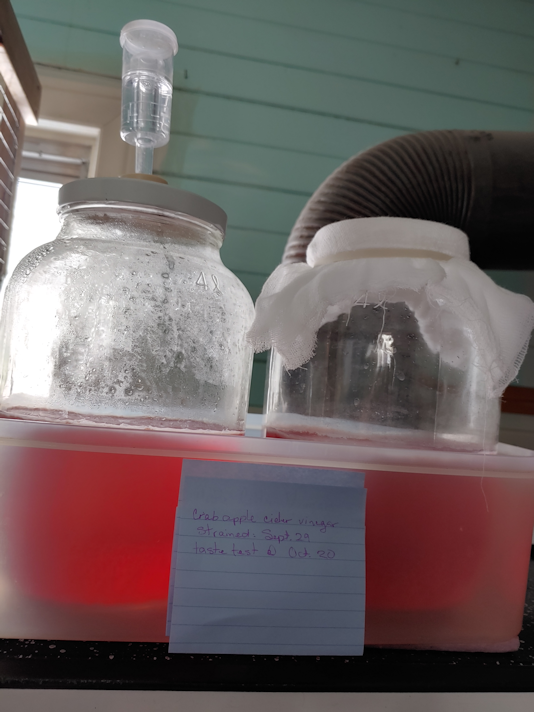
One of the issues I had was, what to store the vinegar in? The last time I made it, I could just use a quart jar. What did I have that was big enough, easy to pour from, and that I could close? I discovered that one of our 1 gallon (4L) glass jug that we have for making mead has a top that fits the same caps from the 3L jugs currently holding hard apple cider vinegar (which is also ready for bottling), so I was able to use that.
Once I had the bread dough rising, I brought the ACV in out of the cold!
Both of them had visible mothers, floating on top. There was very little visual difference between the airlock and the cheesecloth jars. The airlock one had some condensation near the top of the jar, and that was about it.
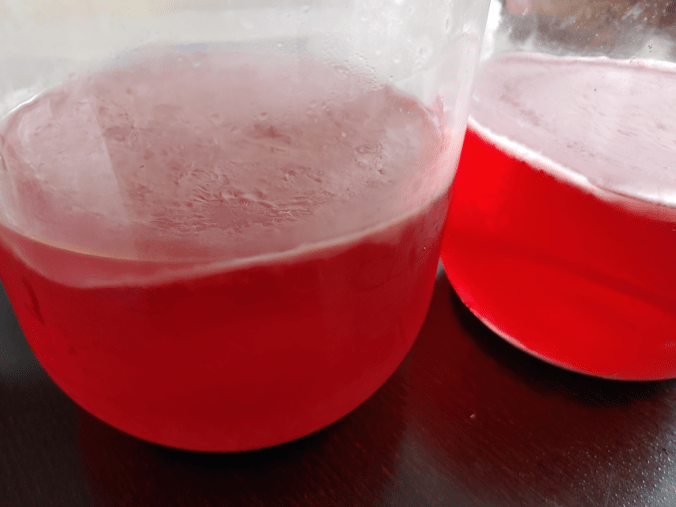
I drew some out of each jar, using a turkey baster, to taste test.
Both of them had a mild, vinegar smell to them. Both of them were also had a VERY strong vinegar taste!
The girls taste tested them, too, and we all agreed that there was a slight difference in taste between them. The cheesecloth one (the girls did not know which glass was from which jar when they tasted them) has a slightly milder, more pleasant taste.
Meanwhile, I did a bit of research on what to do with the mother. We won’t be making this again until next fall. Can the mothers be kept for that long?
It turns out they can.
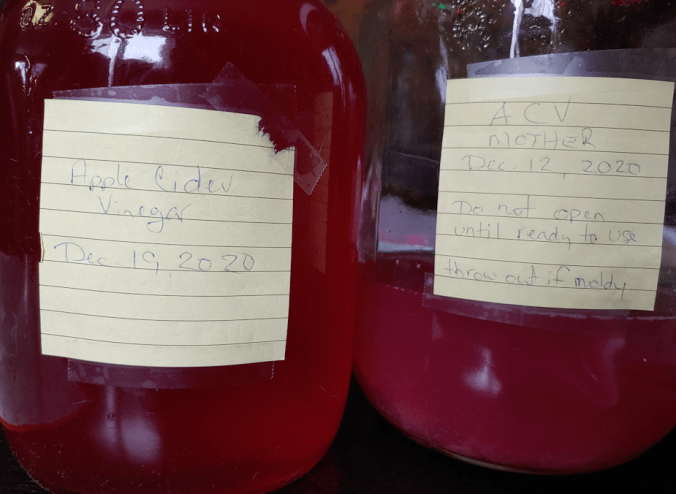
I was able to remove the mother from the cheesecloth jar before pouring, but didn’t have as much lock with the airlock jar. :-D So I put a small strainer over my funnel when I poured the vinegar into the cleaned and scalded jug. There wasn’t enough room for both jars in the jug, though. Yes, I mixed them together. I’d have kept them separate, if I’d had another small jug, but I did not.
Which was okay. I read that the mother has to be immersed in vinegar, and kept air tight, for storage. So the remaining vinegar was left in the jar, along with both mothers.
The gallon jug of ACV will go into the fridge for later use.
The jar with the mothers was sealed, and is now back in the old kitchen for storage.
I am quite happy with how this turned out. Having left it for so long, it’s a lot stronger than if we’d bottled it back in October, like we originally intended, but that’s okay. Using our own crab apples, from the one tree with the best, sweetest apples, not only resulted in a gorgeous colour, but it’s own unique flavour.
We will definitely be doing this again! Next time, though, we will just use cheesecloth and skip the airlock.
Now we just have to do a hydrometer test on the hard apple cider and see how it is. It would be awesome to have some of our own hard crab apple cider to enjoy with Christmas dinner! :-) Hopefully, I can get that done in the next day or two.
After yesterday morning’s cat disaster, the girls were kind enough to drop their own projects and take over cleaning up.
While I was doing my rounds outside, the furry little monsters created another mess. One of the jade plant posts I’d managed to shield from their digging got knocked to the floor. *sigh* I was able to repot the plant. Not sure if it will survive. Once again, the girls took over the clean up so I could take care of other things. At least I wasn’t bread baking today!
The one down side of using my grandmother’s method to bake bread is, once I take the dough ball out of the flour and start it soaking overnight, it must be used the next day. There’s no way to postpone it if other things happen!
By the time we were doing cleaning up and putting things away, I started the bread baking much later than planned.
I did, however, cheat a bit. I wanted to mix up more dough, so I could take off more to set aside, for larger batches in the future. As it was, the overnight soak was not looking as active as I would have liked, so I did end up adding some yeast and a touch of sugar, and let that bubble up some more.
Then, since I have it, I used half all purpose flour, half durum wheat flour.
This is after it had about an hour to rise.
I notice a definite difference in the dough, when using the durum wheat flour. The dough feels smoother and more elastic. It was very noticeable when making the pasta, but even at half-and-half, for the bread, it is much nicer to knead.
My grandmother would have used whatever flour they had, so mixing it up like this is probably not all that different from how she did it.
After removing a portion to set aside for the next batch, I split the dough in half. The first half was left plain, though I did have some fun with it, anyhow.
I split the dough into 4 pieces (because there’s 4 of us), and made knots.
The resulting bread was a bit denser and chewier with the durum wheat flour in it. We all like our bread on the toothsome side, so we quite enjoyed it.
For the other half, I was going to do a cheese roll, but my daughter suggested rolling and folding it. With the extra gluten in the durum wheat flour, it could actually handle that, so I have it a try! This time, I made two loaves.
After rolling the dough out flat and as thin as I could, I used some of the herb butter my husband had made. I don’t know what all he included in there, other than a LOT of dill (the container slipped…), some caraway seeds, and a touch of lemon juice.
Then I added some shredded cheese. It’s a mix of sharp cheddar, mozzarella and Havarti.
Then I folded it in on itself.
It then got rolled out slightly and folded again, before final shaping. I had to use a touch of water to get the edges to stick closed.
Once in the pan, I flattened them out a bit more with my hands, before leaving them to rise.
Of course, some of the cheese did make its way through the dough as it baked, but my goodness, it looked and smelled wonderful!
It was quite flaky on the outside. On the inside, the dough absorbed much of the butter, leaving cheesy little pockets all over!
It was quite enjoyable! I don’t know that I would go so far as to do the folding method again (though it would be awesome to do that again with some sliced green onions, to make a version of green onion cakes!), but I definitely do it as a cheese roll in the future.
Until then, I am not going to have some with my lunch!
Today, we got to use our pasta machine for the first time, while making pasta for the first time. :-)
Granted, I have made pasta-like noodles before, before, but nothing quite like this.
Of course, I did some research first. I wanted something really basic for a recipe. This turned out to be just flour and eggs. Most places I found went with a ratio of 2 eggs per 1 cup of flour. I did find one that used a ratio of 2 eggs per 3/4 cup of flour. As for quantities, it was recommended 1 egg per person.
Based on that, we could have gone with 4 eggs and 2 cups of flour, but I went ahead and did 6 eggs with 3 cups of flour.
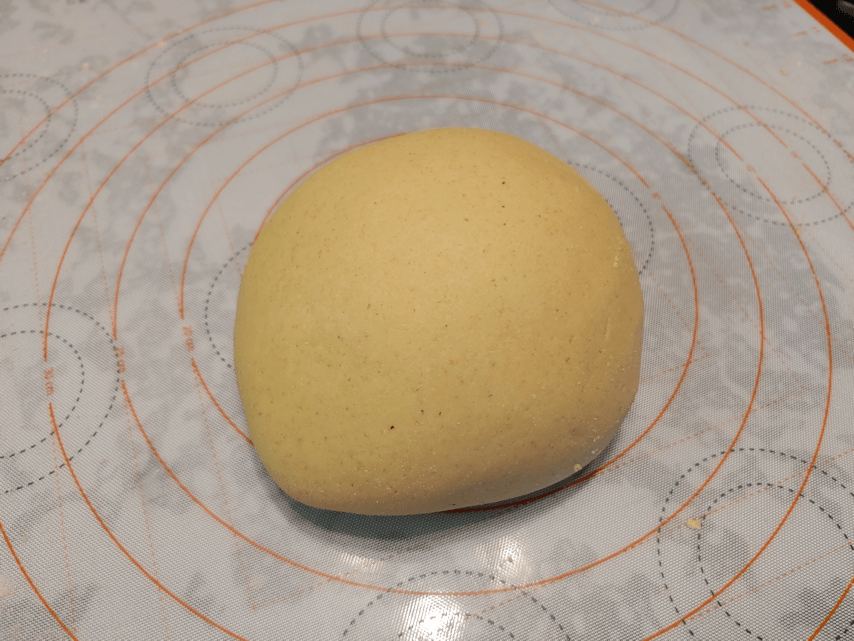
I worked the dough in a bowl until the dough was well formed, then turned it onto our kneading mat.
This turned out to be waaaayyy too dry! I would expect relative humidity would affect the dough, like it does with bread, and we are very dry right now. I simply could not knead in the rest of the flour.
The flour had bits of dough in it, though, and I wasn’t about to let that go to waste.
If you are a pasta aficionado, you may want to look away right now… ;-)
I remembered that one resource I found that used the 2 eggs: 3/4 cup flour ratio. It had a recipe calling for 7 eggs to 3 cups of flour.
I decided to add an egg.
Of course, I couldn’t just knead in an egg, so I beat it in a bowl first, then beat in the flour that I couldn’t work into the dough. I even broke off some pieces of the dough and mixed that in, to get it thicker.
I then opened up the dough so I could add the additional egg mixture into the middle, then fold the dough over it.
Kneading that in was pretty messy, anyhow!
Once it was thoroughly worked in, I only needed to add perhaps a tablespoon of flour onto the mat to clean up the stickiness, then I kneaded it for 10 minutes.
I’m sure I broke all sorts of rules or committed some terrible faux pas in doing this, but hey – it worked! The dough was wonderfully smooth and elastic, and just barely sticky.
At this point, I covered it with some plastic wrap and let it sit for 20 minutes.
While I was looking things up, there were a few points I kept seeing repeated. One was that the pasta cooked extremely quickly, so before I even started it, I made a use-watcha-got meat sauce. The other thing I kept seeing was to use extra salt in the water the pasta would be boiled in. Since they cook so quickly, they don’t have the chance to absorb salt from the water, if the usual amount was used.
So while the pasta was resting, I made a few final touches on the meat sauce, then prepped a pot of salted water. No one mentioned how much more salt to add, so I winged it. :-D
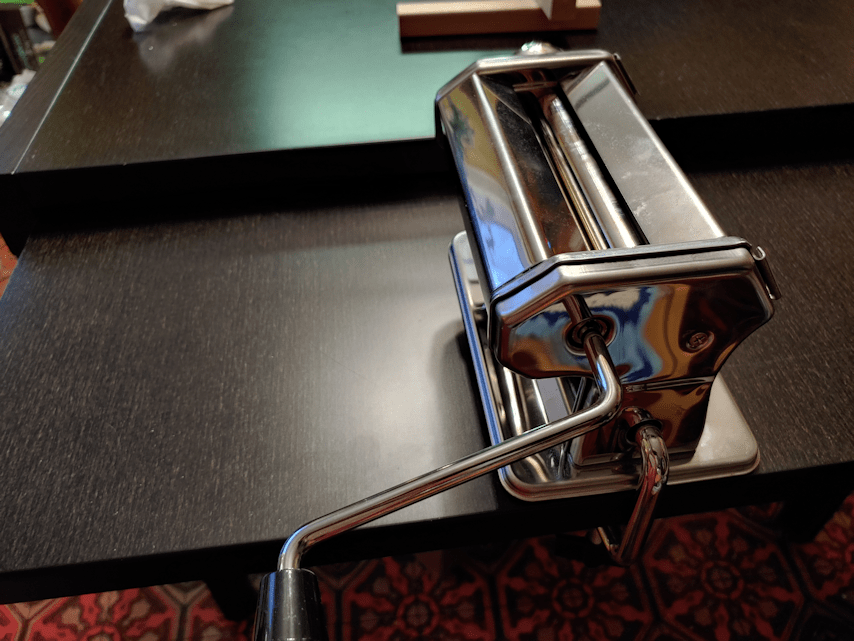
The next thing to do was set up the pasta machine.
What’s hilarious is that the first image has the pasta photoshopped onto the machine completely wrong. It shows cut pasta coming out of the flat rollers. :-D
The machine comes with a clamp to attach it to a table, but our table has a different design. It can expand to twice its size. The two halves of the table top slide one over the other when it’s closed, with a support piece running under them at each end. The whole thing is about 6 inches wide – way too much for the clamp to fit around.
It worked out though.
I was able to partially slide out the extension, and still have a stable surface to clamp on to.
When it was time to start rolling the dough, I started with only half of it. The first time I rolled it through the machine, though…
It just tore apart!
I spent some time going through the instruction manual to figure out why. I ended up using a rolling pin to thin it out more, first, and dusted more flour on each side. That seemed to do the trick.
Another thing I kept reading was to make sure to roll the dough thin enough to see through. I kept reading that the pasta will thicken as it cooks, so it’s better to roll it thinner.
In reading the instructions, it said to set the machine at 1, for the widest setting, rolling the dough through, folding it in half, rolling it again, about 5 or 6 times, then working it thinner and thinner until about 3.
There was one problem with that.
The numbers on the machine are backwards from the numbers in the instructions! The widest setting is 7, not 1. :-D Which doesn’t really matter, as long as it works, but I did find that funny.
It took a while to get the hang of it. One problem I encountered was that the crank handle kept falling off! The pasta also tended to go off to one side. After a while, a daughter was able to come give me a hand, too, which made things much easier to handle.
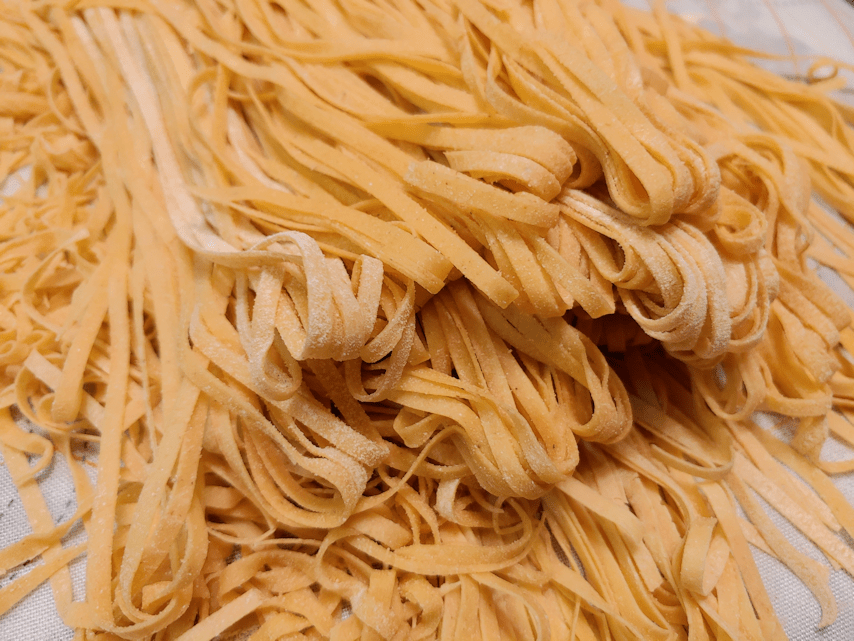
The pasta sheets kept getting longer and longer, and I ended up having to cut them in half. Then do it again! In this photo, we have the 4 sheets draped on the pasta drier, ready for us to put the cutter attachment on and start cutting them.
I have to add that I’m really glad I waited until we found Durum flour for this. We could really feel the difference in how well the pasta held out to all the stretching and handling.
The first ones we cut were still hilariously long, so we cut the remaining sheets in half again.
Their widths might have been consistent, but their lengths certainly weren’t! :-D
After finishing the first batch, they got to dry while the second half of the dough was prepped. This half went much faster, now that we knew what we were doing! Also, we split the second batch of dough in half, right from the start.
Once they were done, it was time to get the water boiling. After a while, I took the longest pasta pieces and broke them in half, to make them a more reasonable length!
Just before the water was boiling, I took them all off the drying rack, to make them easier to handle and carry and break any really long pieces that got missed..
Don’t they look pretty?
And yes. I did cook the whole lot!
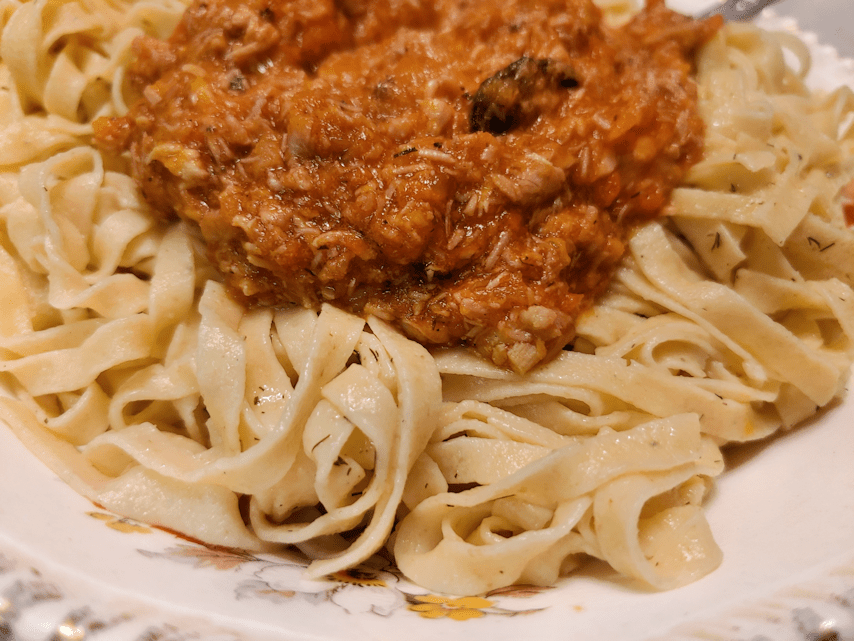
Here, I have pretty much just added them to the water. It hasn’t even come back to a boil, yet, and already the pasta is half cooked!
I boiled them for 2 minutes, but that was probably at least half a minute too long! :-D
After draining them, I tossed them in some herbed butter my husband made earlier in the day.
There was have it! Fresh made pasta, with meat sauce.
So, how did it taste?
Many of the sites I found with recipes raved about how good they were, and how you’ll never want to eat store bought pasta again, and so on.
It was good, but I don’t know that I would say it was that good! At least, not when considering the amount of physical labor involved. The family did all really enjoy it, though.
I actually found the pasta a bit thin. I like a toothsome pasta. In rolling it out, I went to the recommended “3” on the knob, based on what I’d read (the instructions with the machine suggested going to 3, but with the numbers reversed on the knob, that actually meant 4). It was certainly thin enough to see through, but I think that, next time, I’ll just bring it down to 4 on the machine.
It does use a lot of eggs, though. We’ll have to buy more, before we can do this again! Or we could make it with just water. The instruction manual has a recipe, too.
We definitely can do some experimenting! :-D
All in all, I’d say this was a success, and I am quite glad we got the machine to make the job easier! Even with the handle falling off so often! :-D
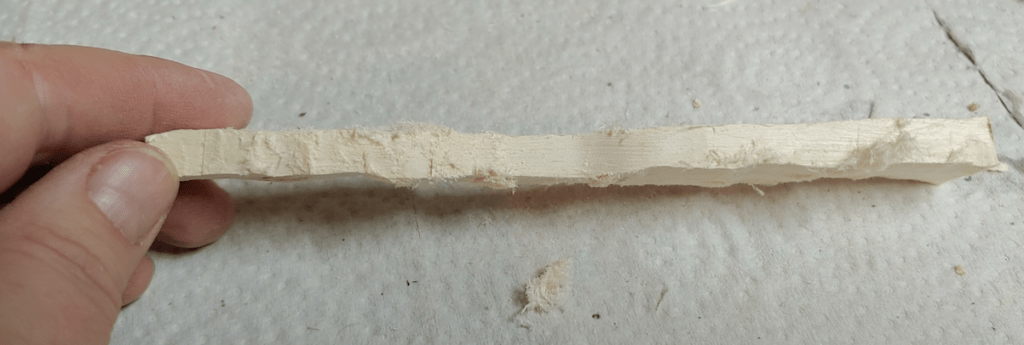
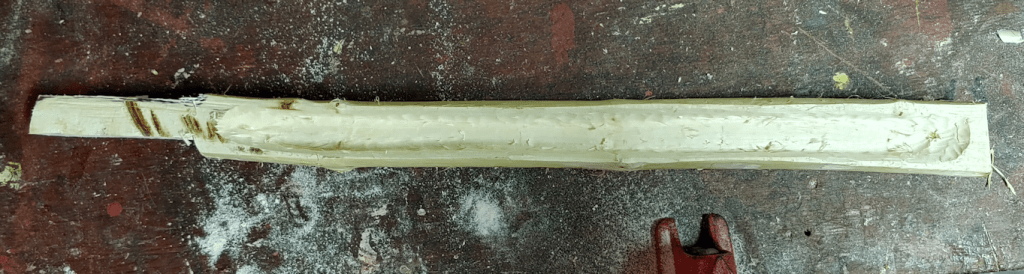
Having made an olive server, using my new gouge, I thought it would be good to use some of the remaining wood to make a spreader and olive fork.
After cutting a length off, the first thing I did was split the wood down the middle.
Here, you can clearly see the rotted out core that I had to work around with the olive server.
The utensils I wanted to make would be well away from that core, though, so this was okay. I split off some excess wood from the opposite sides, then debarked the remains.
In sketching out the spreader and fork, I decided not to include the knot at one end. It may have added visual interest, but I just didn’t want to fight with it.
Once rough sketches were made, I rough cut away excess wood. A band saw would make the job easier, but I don’t have one that works, so I made do with a little Japanese pull saw that I got last summer, and a coping saw. The coping saw has been a problem, as it won’t lock at the handle end anymore, so it tries to rotate while I’m using it!
For the spreader, I added another rough sketch on what would become the top. I wanted a slightly wider bit at the start of the spreader blade as a sort of stopper, more for visual interest than anything else. I wasn’t too worried about matching the sketch closely, since it would depend more on how much I had to cut away from the core of the wood.
Next up was using carving blades to do more shaping and trim away excess wood at the core, to take out that rotten strip.
Then I broke out the Dremel.
After trying out different tips, I ended up just using the sanding tips. They are a course grit and did a good job of taking off the excess wood, grinding away the remaining saw cuts, and shaping it more.
Then it was back to the carving knives for more delicate clean up and shaping, then sanding.
Ready for oiling!
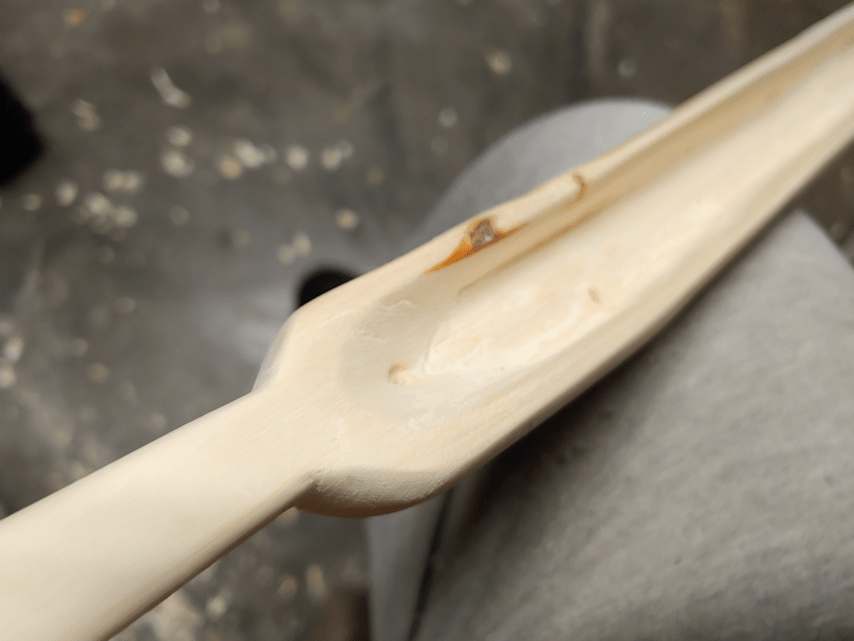
That knot in the blade was why I switched to the Dremel. I like how it looks in there, but my goodness, it was brutal to work around!
Next, the olive fork.
For this, I just went straight to the Dremel and used the sanding tips to rough shape it.
I then used carving knives to clean it up and work on the tines end to narrow it down even more. Once it reached the point where I would otherwise have started sanding, I made the tines.
My Dremel set includes tips for carving and engraving, and I used one of them to drill a hole where I wanted the tines to join. Then I used a cutting wheel down the length of it.
There was a knot right in the middle. The Dremel cutter did NOT like going through that knot!! :-D
After that, it was back to doing more detailed shaping until it was ready to sand.
Doing those tines was a real pain in the butt!
It actually worked out much better than I thought it would, though.
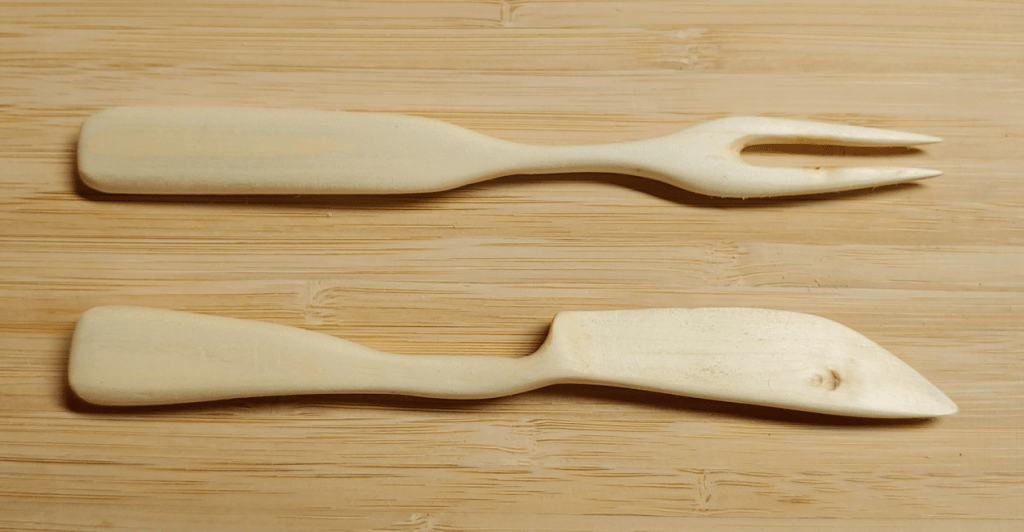
For both the spreader and the olive fork, I worked my way through increasingly fine grits of sandpaper, finishing with 220 grit. Because that’s the finest grit sandpaper I have.
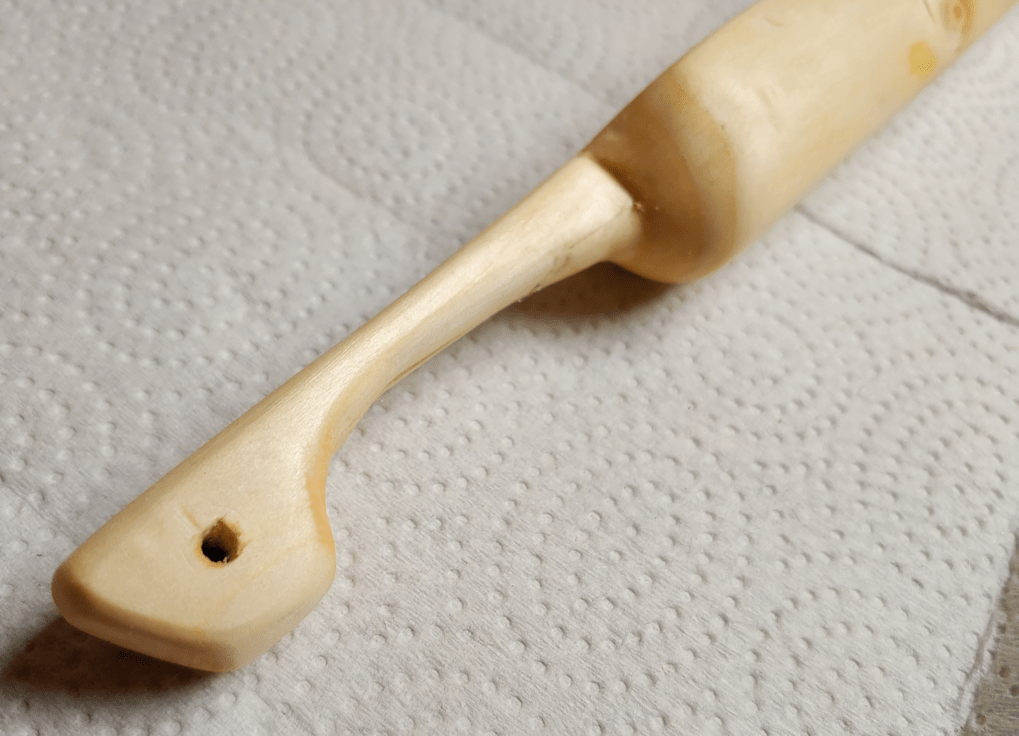
There they are, ready for oiling!
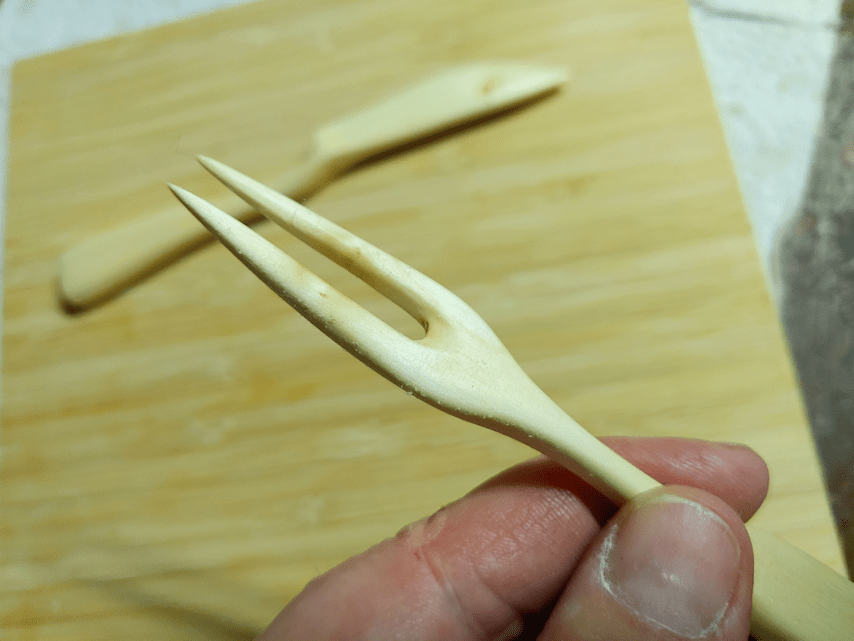
You can see the edges of the knot that was cut through to make the tines much more clearly, after oiling!
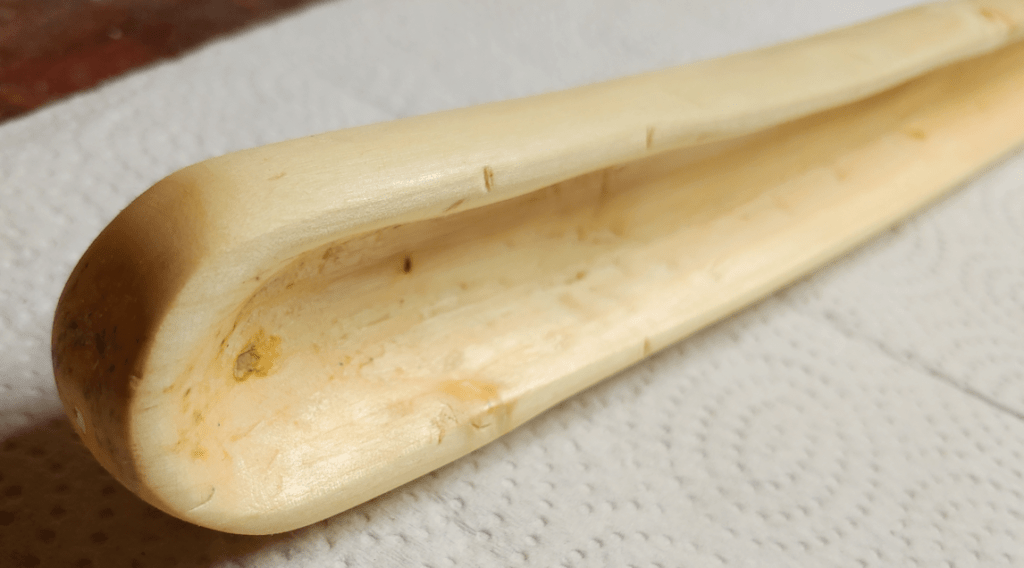
The slightly wider bit on the spreader turned out to be a perfect thumb rest!
When sanding the blade of the spreader, I actually had to be a careful not to make it too sharp. It’s meant for spreading, not cutting! It’s remarkable how sharp a wooden blade can get.
A closer look at the tines of the olive fork.
Then I wiped off all the sanding dust that got onto the oiled surface! :-D
They fit! I had not actually planned this, but it makes sense, since they’re from the same piece of wood, but I’m really happy to discover they fit so perfectly inside the olive server.
I am quite pleased with these. Not only with how they turned out, but how quickly they worked up, too.
Okay, so after accidentally killing off our ball of old dough “yeast”, I had to start over. Since I have no idea how my grandmother got her first ball of old dough, this is all a guessing game, anyhow!
This time, I went with another old technique: the sponge.
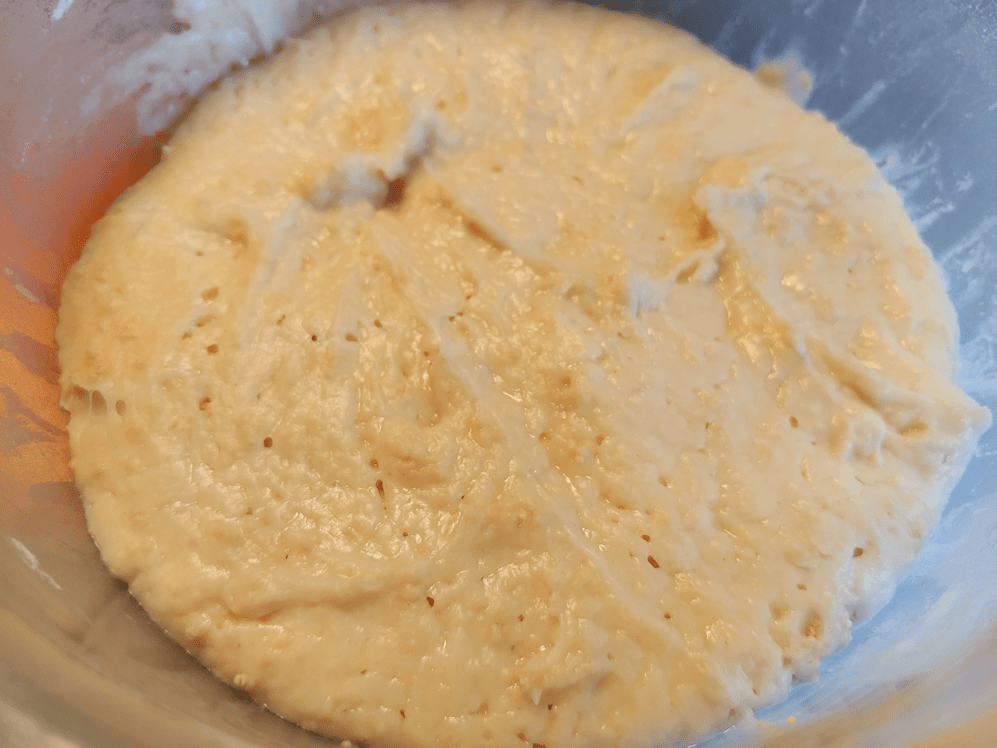
It’s just 2 cups warm water, 2 cups flour and 2 Tbsp of yeast, mixed together. This is the sort of thing one might put into the fridge overnight, to bake in the morning. Instead, I put it in the oven that was warmed up to its lowest setting, then turned off.
After about an hour or more, the resulting sponge was all soft and fluffy!
I added another half cup of warm water, which also made it easier to transfer it to my big mixing bowl, then added the salt and flour, as usual.
Once I’d kneaded in as much flour as I wanted (I have to catch myself and not add too much!), the dough was set aside to rise in a floured bowl. Once again, it went into a warm oven to rise.
But not before I took out a dough baby! My mother described my grandmother as taking dough out for the next batch after the second rising, when she was shaping the loaves. Since I’m using actual yeast in this, I did only one rising before shaping the loaves. I flattened the ball out this time, to see how that changes things as it sits buried in the flour.
As for the rising dough, it ended up taking about 2 hours, even with using commercial yeast!
This would have been a 2 loaf recipe, but I decided to play around a bit.
I made 4 plain mini loaves, first.
Yes, there are only 3 in the picture. My husband already ate one. :-D
After taking the picture, I ate one, too!
The other half was used to make surprise buns. During our city shop, I’d found a gouda-like cheese (I can’t remember what it was actually called) with truffle in it. There was still some left, so I cut it into small slices and wrapped them inside the dough.
I did try and seal the dough well, but as you can see in the photo, the cheese still made its way out, and started bubbling in the middle!
I can hardly wait to try it out!
With our new dough baby, I will have to make a point of using it every few days again. Since I didn’t start out with an “instant sourdough” yeast, it will take longer to develop that sour flavour. At least, that’s my assumption.
I will also keep taking the dough baby out for the next batch at the start, as the dough it being setting aside to rise. That way, I can do things later on, like knead baking soda in again, or knead in things like herbs or shredded cheese or anything else that catches my fancy.
Ah, I was afraid of this. I managed to kill the dough ball.
My mother describes how her mother would bake only once a week. So after working using the old dough after letting it sit in the flour few a few days, this time, I left it longer. Last night, I took it out and prepped it to soak overnight, as usual. Unfortunately, I did not have my camera with me.
The dough ball didn’t look any different on the outside from before. The extra time did mean the inside was drier, which I did expect. It was basically a hollow ball. Being drier, it was easier to break up into small pieces. I added 2 cups of water that had been boiled and allowed to cool to the right temperature (because of concerns with our well water), and it was set in a warm oven with the light on, overnight.
This is what it looked like this morning.
Yeah. That yeast is dead.
In stirring it up, the dough was completely dissolved, but no hint of yeast activity.
I can say with confidence that the extra time buried in flour did not kill the yeast. I could have dehydrated it completely, and it should have reconstituted and kept right on going.
One of the things I mention in there was that I “cheated” by using baking soda. If you’ve worked with sourdough recipes that called for baking soda before, you know what happens! There is a lovely chemical reaction that results in a light, fluffy dough or batter.
My mistake was, I didn’t take the dough ball out before I added the soda. That chemical reaction would have continued after I buried the dough ball in the flour, which is why it still developed a hollow center. However, as I thought might happen, the yeast was spent in the process. I didn’t remember to take the dough ball out until too late in the process, but I hoped that maybe it would still work. Alas, it did not.
Well, this IS and experiment!
So I am restarting the process. I don’t have the “instant sourdough yeast” I used before, so I am using regular yeast to make a sponge, which is currently in a warm oven to get all spongy. I’ll post the details later, but it is also a very old technique. It will slow down my bread baking plans for the day by quite a bit. Ah, well. That’s okay. It’s a learning process, and that’s the whole fun of it!
Lo and behold, I had an open day today! Which means I finally had the chance to do a bit of wood carving and test out the wood gouge I got a month ago.
I had a particular piece of maple from clearing behind the pump shack that I wanted to use. After looking at ideas for a while, I decided to make an olive server. Something along the lines of this.
It took me about 5 or 6 hours, but I got it done! :-D
Photo heavy post ahead! :-D
Here is what I started with.
This is about half the length of the original piece. The length was decided by a bend in the wood. :-)
I now needed to create a slightly flat bottom, and take about 1/3 off the opposite side to create the top of the bowl.
I used what tools I had on hand, which was this beast of a knife.
We’ve dragged this thing around for many moves! I’ll have to get my husband to tell the story behind it. :-D It turned out to be perfect for the job. Especially that little sunken in part of the blade, near the handle. It was the perfect width to set at an end of the wood, then I hammered it with a rubber mallet to split off the pieces I needed to remove
Then I used it as draw knife to debark it!
Once that was done, I made a rough sketch on the wood.
The narrower end is where I placed the handle, and I decided to leave a little bit of a “foot” for an extra touch of stability.
Before I started carving, though, I decided I should try and use my new angle grinder to level off the flat parts, take off excess wood, and maybe even shape that handle.
It came with 2 metal grinding wheels. Not wood.
I tested it anyhow, just to get to know the machine. All it really did was leave some marks in the wood. :-/ Ah, well!
Finally, it was time to use the gouge!
This thing is awesome! Oh, my goodness, it cut through the maple like nothing. I could also switch hands with it. I can use my right hand, but I am left dominant. The sloyd knife from my carving kit is for righties. I can use it with my left hand, but it takes some doing, and I still need to use my right hand to control the blade. I did use the sloyd knife a bit, to give my hands a break, since it is held in a completely different way. As I got deeper, though, it just wasn’t possible to use the sloyd knife any more.
Which is exactly why I wanted the gouge!
As I went deeper, I hit the middle heart wood, and discovered it was rotten!
This would not be an issue for the bowl part of the server, since I would be cutting it out completely, but would it affect the handle or the end?
The bowl portion is done!
Along with the gouge, I used carving knives to thin the wood at the top edges, which made it easier to set the gouge to go deeper.
You can see a spot of discoloration at the near end of the bowl. That’s the heartwood. It’s really small, so I’m hoping it won’t be an issue.
The next thing to do was remove excess wood to shape the outside.
I was going to use my coping saw for the handle part, but the darn thing keeps trying to spin on me. So I used a different hand saw, and a chisel to take off the wood under the handle. I almost took off a bit too much, though. !!
The next several hours were spent using carving blades to shape the handle and ends, and smooth out the inside. The handle and the ends were a real pain to work on!
Then it was finally time to sand.
Sanding the inside of the bowl was also a real pain! Getting the curved ends smooth was the worst of it, but sanding the inside in general was really awkward. Still, working my way through ever finer grits of sandpaper, I finally got it to where I was happy with it. It’s a good thing I wanted to keep some of the “rustic” texture in there!
Here it is, all sanded.
It was worth the fight! :-D I am quite happy with it.
Here’s a closer look at the handle end of the bowl.
Hmm… Do you see that little divot?
That’s the heartwood.
While shaping the handle, I did end up reaching the soft heartwood from underneath, so I was very careful not to expose any more of it.
Oiling the wood should help protect it. Before I did that, though, I made a last minute change.
I decided to drill a hole though the “foot” of the handle, for a hanging cord of some kind.
Finally, it was time to oil it! I use mineral oil, as it is food safe, and does not go rancid.
I love how the oil brings out the beauty of the wood, as well as protecting and preserving it!
Just a couple more detail shots. :-)
I have since threaded some twin that’s almost the same colour as the wood, though the hole.
I think I will give this to my brother. They may never use it, but I know he and his wife will appreciate it. Especially since it was made using wood from maples I had to clear away to fix the pump shack window. :-) A little piece of the farm!
The other experiment I tried was to make a baking soda and cornstarch dough (which I wrote about here), which was supposed to be good to roll out and use cookie cutters on. These are supposed to result in a bright white final product, that was also quite hard and durable, which would take paint or other embellishments well. The dough ended up way too soft and sticky, so my daughters used it to make more sculptural stuff, though one did try and do some cookie cutter ones when the dough seemed to have dried up enough for it.
After leaving them to dry for a while, we ended up having to put them in a cool oven (they were supposed to dry slowly, to avoid cracking), because… cats.
Cats who leave paw prints behind, as they do dastardly things!
All of the cookie cutter ones have had to be thrown out. They just crumbled.
Plus, the cats seem to be desperate to get at them! I had to take them out of the oven to put the decorated orange slices in, and had to get really creative in covering them, while still giving them air flow to dry. There is still some hope for the more sculptural pieces, but they will need at least a few more days to fully dry.
If we can keep the cats out.
As for the orange slices, the cats have been after them, too! They ended up knocking over the tray on the table they were laid out on.
I’m happy to say that the glue worked very well.
Several of the decorations were scattered on the floor and, while the glue was not yet completely dry, it held! This was a bottle of WeldBond that came with a case of crafting materials given to us. I have no idea how many years it was there, but it was long enough that the plastic and cardboard pieces of the original packaging came apart.
Clearly, the cats are not put off by the orange slices and cinnamon sticks.
Today, I decided to add ground spices to 7 of the 13 slices.
First, I rigged up a cardboard box that I could use to spray them with adhesive.
I also decided to use a combination of ground cloves, allspice and nutmeg, with a tiny sieve to apply them evenly.
After crowding the decorations close together, I tried to spray just the orange slices, not the strings, then dusted them with the ground spice mix.
They are now set aside for the spray adhesive to set. The box set up allowed me to put something over them in case a cat decided to jump into it.
Since I started writing this, I’ve had to go put the cover back and add weight to it, because the cats had already knocked it off.
The main thing about doing this craft was that citrus and all these spices that smell so good to humans are supposed to deter cats.
Our cats apparently did not get that memo.
*sigh*
I’m still holding out hope to having a tree, somehow, but these spicy, fragrant decorations are definitely not going to keep them away. If anything, it seems to be attracting them, instead!