Yesterday, my daughter was a sweetheart and racked it to another 1 gallon carboy.
It is now back in its little corner, all swaddled like a baby.
The mead was very clear before it got racked, but between the raisins floating on top and the sediment on the bottom, a fair bit was lost in the process. The jug wasn’t full anymore, already, and now it’s about 2/3rds full.
We’re still going to keep it in the 16C – 20C range, though I’ve read that cooler temperatures are just find by this point. We really could have bottled it, but we will leave it to ferment with an air lock for a while longer.
Now that it’s separated from the sediment, it should not develop any off tastes. At least according to what I’ve been reading. Any fermentation that continues at this point will be very slow.
I figure a couple more weeks, maybe a month, we’ll bottle it and do another test with the hydrometer to check the alcohol level. Given how much was lost to racking away from the sediment, I’m hoping we get 2 full bottles, plus a some left over to test and taste. :-)
For those who have recently started to follow this blog (welcome!), here are the previous posts about our second attempt to make mead. All links should open in new tabs, so you won’t lose track of this page. :-)
Since then, we have been monitoring the Baby closely. While there has been virtually no visible activity in the air lock, when we looked at the liquid itself, we could see that it was clearing up, and there was a steady stream of tiny bubbles of carbonation moving upward. If the temperature dropped to 16C, we would turn on the warming pad, which would typically bring it up to about 18-19C.
Recently, its temperature would drop to 16C a lot faster, and we could no longer see the carbonation. It was looking a lot clearer, and we could see a fair bit of sedimentation at the bottom.
However, it was less than 2 weeks since we started the second fermentation. While I’ve read a mead can be ready in that time, most videos and websites I’ve been looking at showed active fermentation for about a month, and gave advice on how to reactivate fermentation if it stopped to early.
Since that was the problem we had with our first attempt, we debated. Is it done and time to bottle it? Should we rack it into another bottle to get it away from the sediment and leave it longer? Do we add something to boost the fermentation?
I’ve read various ways to boost fermentation in mead, including those that recommend adding a chemical that is used in wine making.
Or we could just add some raisins.
So that’s what we decided to do.
With a 1 gallon carboy – and it’s not full – not a lot of raisins would be needed.
We added three.
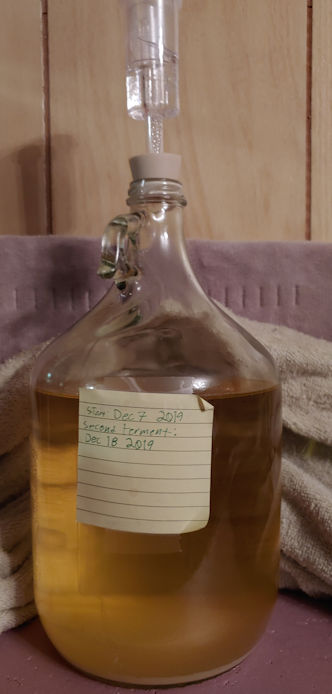
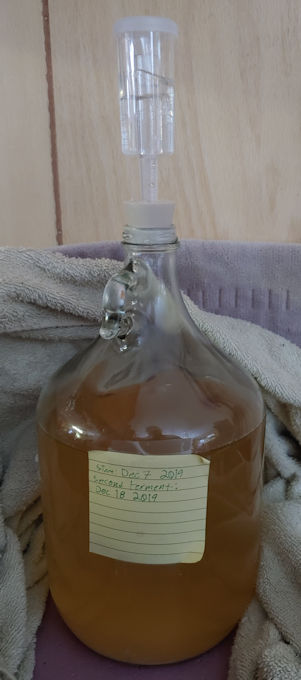
Here are photos, taken a day apart, showing before and after we added the raisins.
As you can see in the photo on the left, the mead had gotten quite clear, and there’s a pretty thick layer of sediment on the bottom. It’s hard to tell with the reflections, but in the second photo, you can actually see a couple of the raisins floating at the top. The mead is cloudier, but when we shine a light into it, we can once again see that steady stream of bubbles going up to the top.
We’ve been checking its temperature regularly and, aside from an initial warm up after adding the raisins, it’s been keeping its own temperature at 19C.
Right now, the plan is to leave it until we can no longer see those bubbles, rack it into another carboy to get it way from the sediment, then leave it for a while longer before bottling it.
A lot of the information about mead making I’m finding is conflicting, but one thing that all our sources agree on is, the longer the mead sits after bottling, the better it tastes. Most recommend at least a year.
I doubt we’ll wait that long, but with bottles at 750ml, even with having less than a gallon in the carboy (and I expect we’ll lose more after racking it again), we should still be able to get 3 – 4 full bottles out of it, so we can have one right away, then try the others at different ages.
So if we want to start a malomel (mead made with fruit) as we planned, we should pick up another air lock and two, so we can have multiple batches going at once.
You know, for someone who doesn’t actually like alcohol all that much, I find the process of making it quite enjoyable!
We’ve been keeping a close eye on our baby mead, keeping the temperature at the warm end of the temperature range recommended. If it dropped to 16C, I would turn on the electric heating pad to the “warm” setting, and that would bring it back up to 18C.
We could see bubbles inside the airlock, so there was still active fermentation – something we’re pretty sure had stopped completely well before this point in our first batch. The “burp” had dropped to about 23-27 seconds apart and seemed to be staying there for the past few days, so my daughter and I planned to transfer the must to another 1 gallon glass carboy for a second fermentation today.
Mead Baby 2.0 has had its first night in the new set up.
About an hour or so before heading to bed, I checked the temperatures. The ambient temperature had dropped to about 13C, while the ferment dropped to 17C, so I turned the heating pad on for about an hour.
I checked again, first thing in the morning, and it was at 18C!
After I did all my running around this morning, I checked it again, and this time, I could stay to watch the airlock.
The ambient temperature was back at 14C…
While the ferment had dropped to 17C, so I turned the heat pad back on and starting watching the airlock. When I first started, there were bubbles about 8 seconds apart. I remembered that I have a timer on my phone, so tried using that (which is more of a pain than just counting “one thousand 1, one thousand 2…). When I first started, it was already up to about 7 seconds apart, and by the time I was done, it was up to 6 seconds apart.
So this set up is definitely working! I’m really happy that it was able to maintain its temperature overnight.
Mead Baby 2.0 is now tucked away in a corner of the living room. I cleared off one of the shelves that were in the house when we moved here – it used to be a TV, back when they made the boxes out of real wood – that is next to one of the extension cords coming up through the floor we’ve found throughout the house. It was being used being used more as a catchall space, so this was an excuse for me to do some organizing. :-)
Though the shelf is wood, I still put the rigid insulation down first. I used a crocheted book mark to hold the electric heating pad in place around the towel, set the heating pad to “warm”, and left it to shut off on its own in 2 hours.
I came back to it 3 or 4 hours later.
This was the ambient temperature of the room.
At 14C, it is just a touch cooler than the dining room we were set up in before.
This is the reading I got from the must.
Woo Hoo! At 18C, it’s now at the higher end of the temperature range it should be at.
The yeast also seems to like the new temperature. The CO2 “burps” in the air lock are now happening every 4 – 6 seconds. More 4 than 6. :-)
This evening, I’ll probably turn the heating pad on the warm setting again, for when the house temperature drops during the night. We’ll see what the temperature of the must is again, before we do.
It’s been pretty cold lately, which means the house is pretty chilly, despite the thermostat setting (and I’m not about to crank it because bits and pieces of the house don’t get heat). The carboy is set up near an interior wall in the dining room, which has one heat vent across the room, under the window. The only other heat vent in this part of the house is in the living room, also under a window.
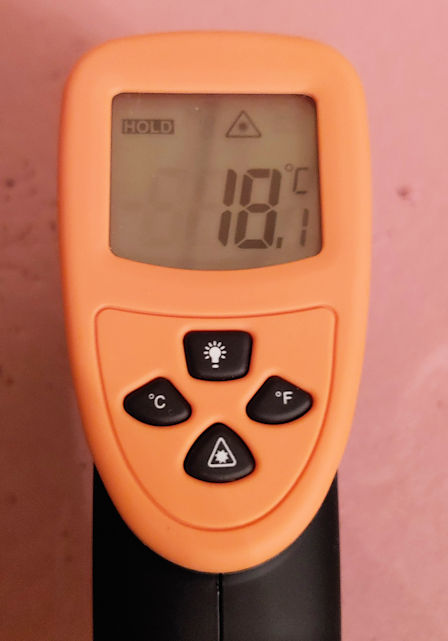
The must should be in a temperature range of 15C – 20C. We don’t have a temperature strip, but thanks to a gift from a thoughtful friend, I am still able to get a reading.
16.7C This is encouraging. It’s at least in the range is should be, if on the low side.
This was the ambient temperature of the room, taken right after I checked the must.
The room is only 14.6C
This means the mustis generating some of its own heat, and the towel wrapped around it as a sweater is helping keep that heat in.
The fermentation activity is slowing down faster than I am comfortable with, though. Watching the airlock, the “burp” of CO2 went from about every 6 seconds (which was already slow for this early in the ferment, based on what I’ve been reading) to about 8 1/2 seconds, at the time I took these temperature readings.
I’ve read a number of suggestions on how to keep things warm enough, and I’ve already implemented one of them. I took a scrap piece of rigid insulation (that stuff is coming in so handy!!!) to put under the carboy. This way, it won’t lose warmth into the table top, and we don’t have to try and keep the towel bunched under it, making it more stable.
I’m also thinking of running a towel through the dryer when we’re doing laundry, and then switching towels while it is still warm. We don’t need to do laundry all that often, though. Another recommendation that is practical for us is to use the little electric heating pad I recently picked up for my daughter, since our two old ones are no longer working. There are actually special versions of these, made specifically to wrap around carboys, but we’re not at a point to invest in anything like that right now. What we have will do. It has a low temperature setting, and turns itself off after two hours. We wouldn’t wrap it directly around the carboy, but around the towel, so as not to warm it too much or too quickly. We’ll have to move the carboy to somewhere we can plug it in.
It’s only been two days, but with our set up being more in the open, I thought I’d show what the active fermentation looks like.
Even in the still shot, you can see that the water in the airlock is carbonated, with all the bubbles on the sides.
In the video, you can see that a “burp” comes up about every 6 seconds. It’s a bit on the slow side, from what I’m reading, which could be temperature based.
Now, we’re also supposed to be aerating this twice a day for the first few days, which was easy to do when using the fermentation bucket. We haven’t done that at all, yet. The spoon that came with our wine making kit is too big to fit into the opening of the 1 gallon jug.
I’ll have to see what I’ve got that’s thin enough, and can be sanitized.
This stage should take about 7-12 days, and watching those bubbles and burbs are supposed to help us know when it’s time to do that. So we’ll be keeping a close eye on that airlock. :-)
Today, we started up a second – smaller – batch of mead.
I hope.
I documented our first attempt, throughout the process, which you can revisit at the following links (they will open new tabs, so you won’t lose your place. :-) )
Part 1 getting started Part 2 early stage maintenance Part 3 early stage maintenance, completion Part 4 transferring for second fermentation Part 5 bottling and initial results
The mead was left in its second fermentation for longer than 4 weeks, but it seemed to have stopped fermenting much earlier. It’s really hard to see the airlock where we kept it – we basically had to shine a light at it – but there didn’t seem to be any bubbles in the water.
This being our first attempt, we didn’t want to mess with it and just let it be.
Before going in to town to pick up 3 cases of bottles, however, we did take the carboy out to check it.