Clean up: progress on the old wood cookstove

Looking at the weather forecasts, it’s looking more and more like our planned outdoor gathering with family to celebrate multiple birthdays and anniversaries is going to be an indoor celebration!

So today, I focused on tidying up the Old Kitchen a bit more, so my mother, at least, can sit in it comfortably. Between the Old Kitchen and the sun room, we should be able to fit all of us, if a bit tightly. Of course, if my mother is up to doing the stairs between the old and new parts of the house, we can always move to the dining room.

While wiping things down, I started doing a more thorough cleaning of the old wood burning cookstove. It’ll probably just have a tablecloth thrown over it and be used to hold the food, but I wanted to get some more progress in cleaning it out. Including several decades old ashes in the fire box!

Here is how it looked after I removed the top pieces, and brushed the ashes through.

I should be able to remove the metal plates at each end, which would allow me to remove the grate at the bottom, but I couldn’t see how to do that. For now, I just tried to sweep away as much as I could.

Doing so revealed something strange about the inside wall.
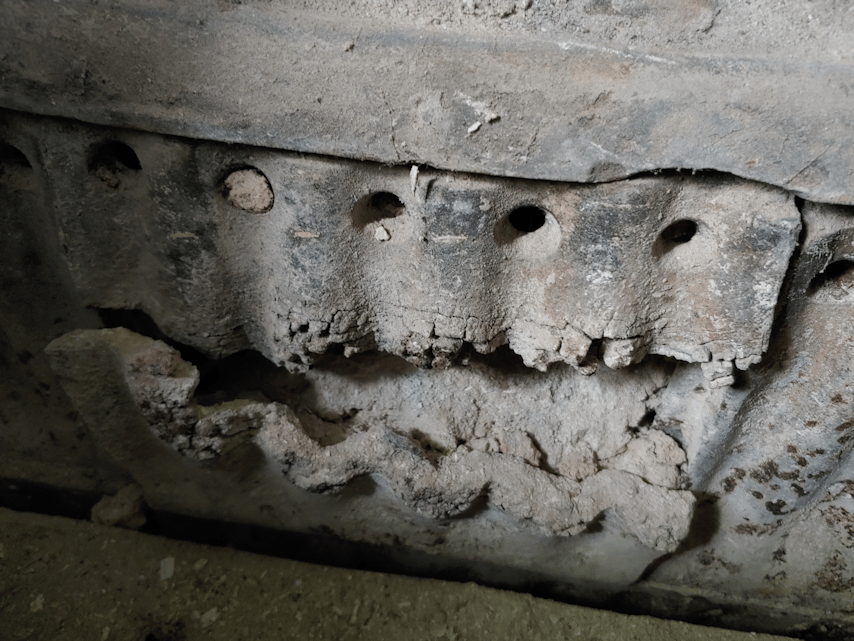
The middle plate looks absolutely destroyed!

I left that for later. First, I wanted to get rid of the ashes. Under the grate are three rollers that can be turned from the outside; a crank handle to do that seems to be missing, but I was able to turn them with my fingers. This allows the ashes to fall into the box below.
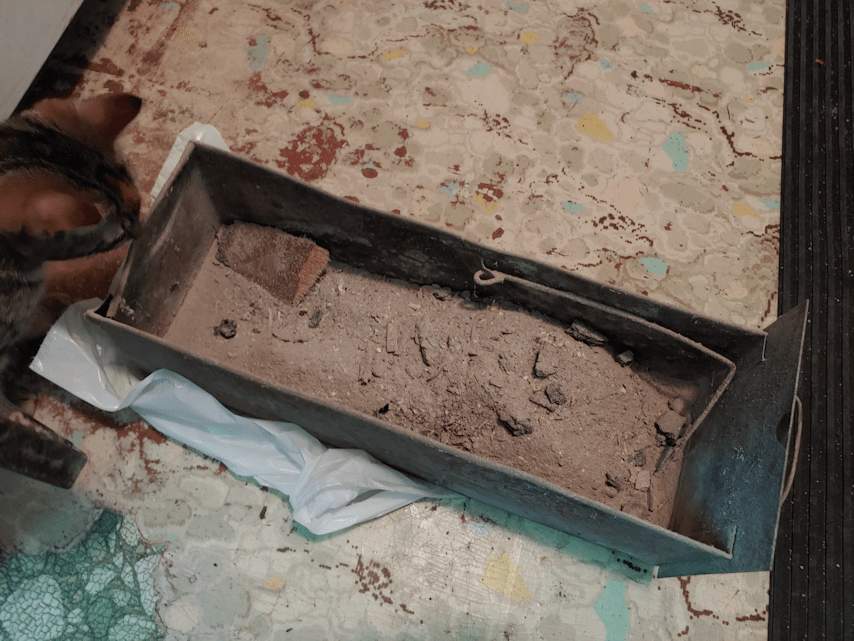
I had mostly emptied this box before, so this is all ashes from the fire box.

I’m not sure where that unburned piece of… paneling? … came from. I might have simply missed it, before.

The piece to hold one end of the handle is broken.

After taking the ashes out to the compost, I hosed it down. Then used a chisel to scrape off things stuck to the sides and bottom that were definitely not wood ashes. :-( After hosing it down again, I set it aside to dry, then went back to working on the fire box.

I ended up taking out the bottom of that destroyed panel completely.
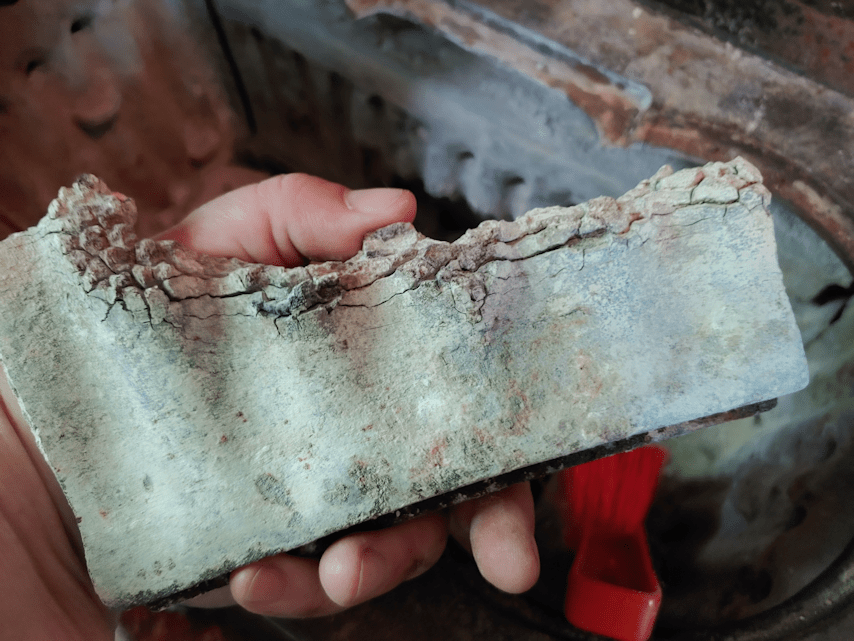
This is thick, cast iron. Just how hot did things get, for this top happen?

Once it was out, I tried to sweep away more ashes.

I ended up knocking out chunks of packed ashes, like this one. More was jammed behind the top piece of the metal panel, and I took that out to get at the rest.

Ashes are not supposed to be able to get in there!

I then started sweeping out the space the ash box fits into. In the ashes I swept out, I found some odd things, like old nails and…

What is this???

That, my friends, is the screw end of a light bulb.

Later, I found the filament in the ashes, too. No glass, thank God!

Why on earth would someone toss a light bulb into the fire? The nails, at least, I can see happening. Scrap wood would have been burned, and if they had nails in them, no one would have taken the time to pull them out, first.

But a light bulb???

Then I used the miracle of technology that is my phone camera, to see what I couldn’t see otherwise!
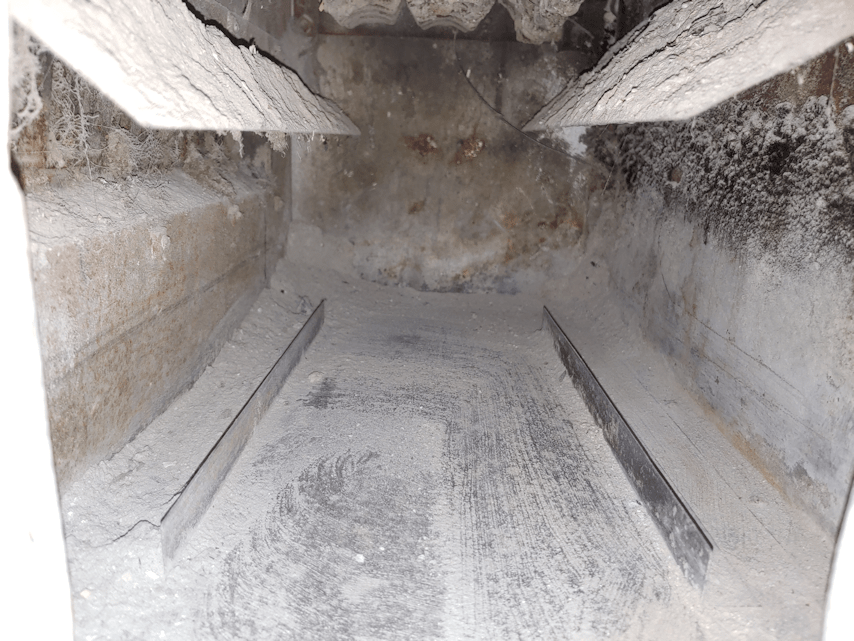
This is where the as box slides in. The flaps above divert the falling ashes towards the box.
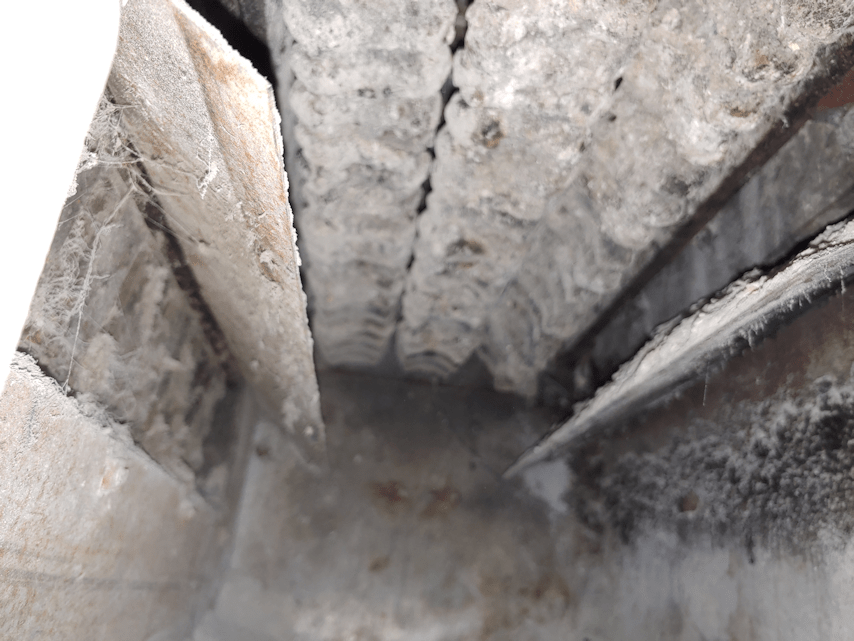
The camera focused on the flaps, but you can see the rollers above, that keep the hot coals from falling into the ash box.

I did as much as I could for now on the fire box side. Next was the cook top above the oven.
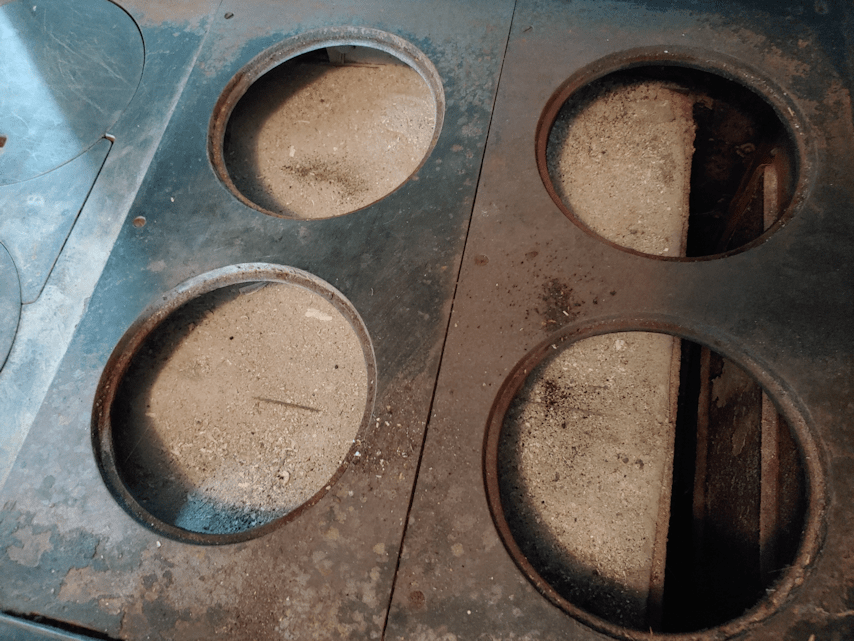
As you can see, the oven box is covered with ashes. Now that I’ve seen the broken panel piece in the fire box, I know why.

I didn’t even try to get those out. The metal pieces can be removed for easier access, but…
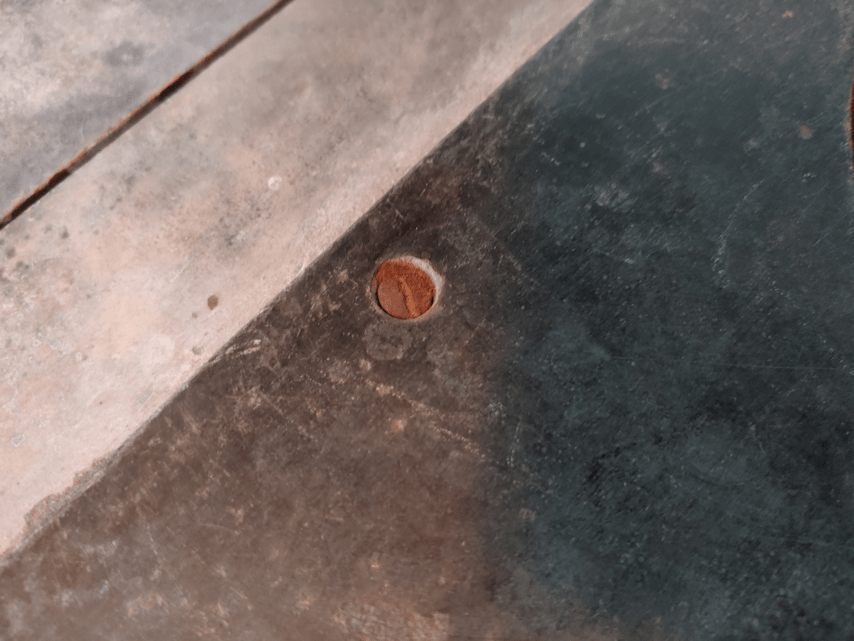
… they are held in place by screws, and there is no way I’m going to try and take those screws out now!

Though I’ve taken the ring plates out before, somehow I never looked at the bottoms of them.

!!!

It seems the fire was allowed to be built up too big and too hot to cause all that damage in the fire box, which then lead to ashes and sooty smoke getting into the space around the oven box. I was quite young when this was still being used, and don’t remember much about it, but I may well have been among those causing the damage. :-/

I really wonder, at times, how we didn’t burn the house down back then!!

I just brushed off as much as I could from the underside of the ring plates. The panels over the water reservoir didn’t need as much.

I didn’t even try to clean the inside of the water reservoir this time.

I did go into the drawer under the oven. The handle and a piece of hinge from the broken oven door is in there, along with …

… the lifter for the ring plates.
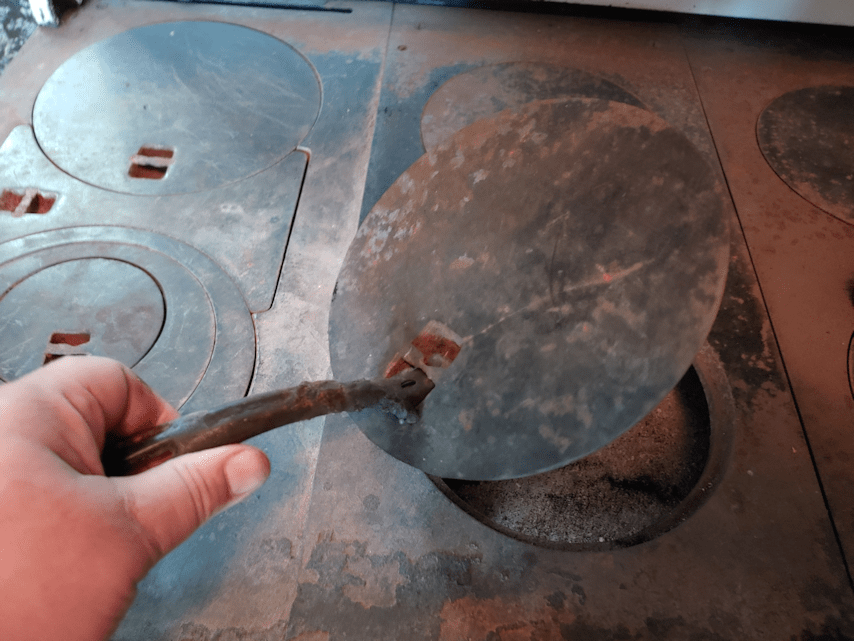
I just used my hands to lift them, but when the stove is in use, this tool is vital.
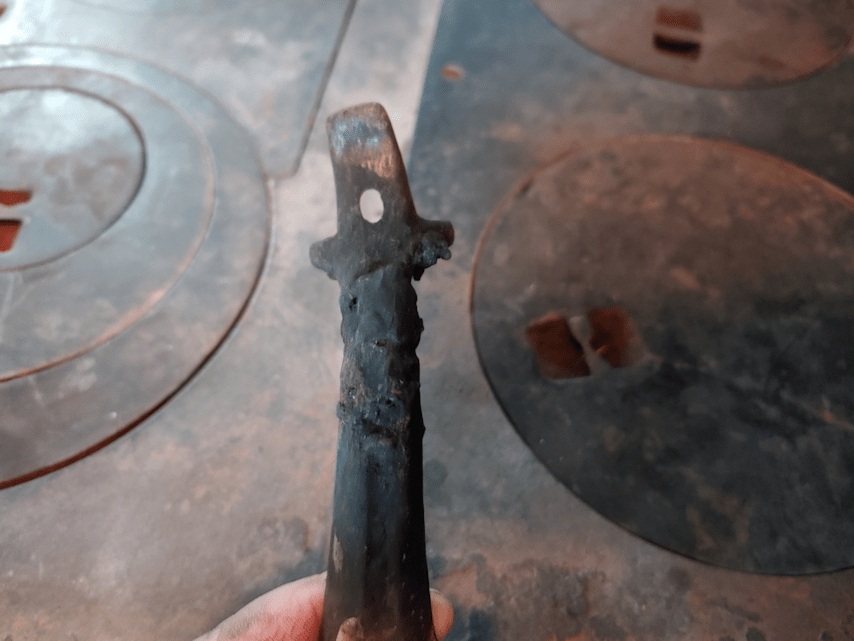
I… can’t imagine what was done to it to cause this damage. !!!
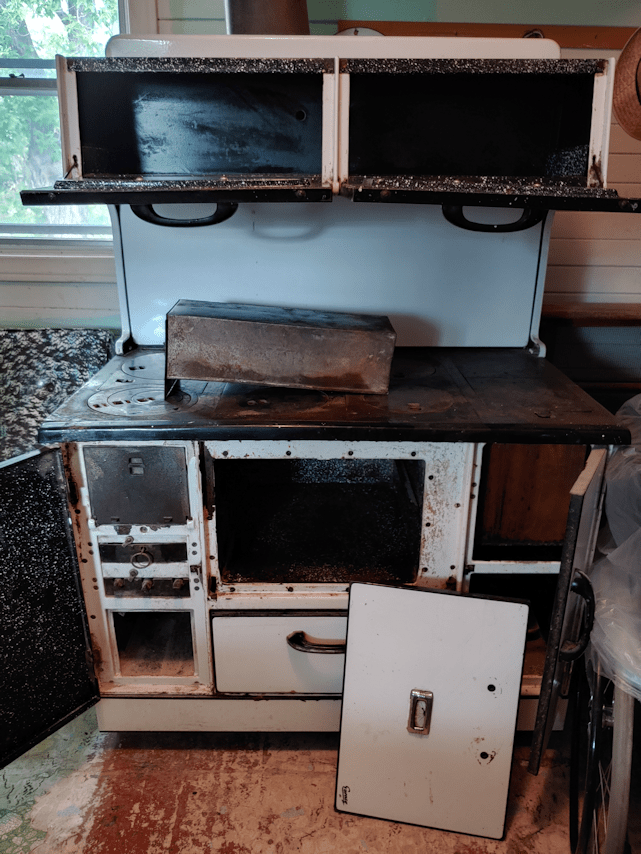
The final thing to do was give it all a wipe down, then leaving it to dry completely before closing it up and putting everything together again. The cook surface and parts like the front of the fire box, and the panels below it, are the only things that are not enameled. Eventually, I want to use stove blacking on those parts. The rest still needs a very thorough scrubbing and rust removal, but I really don’t know far I’ll bother to go with that. We can’t use it – partly because of the damage, partly because we’d lose our insurance if we did – so mostly, I just want to keep it from degrading further. It would be great if we could get it all fixed up but… I’m not sure that it’s worth it. Especially since, there is another one in the storage shed that I know my late brother used, back when that building was his workshop. As far as I know, it’s in good shape. It’s not as old as this one, but is almost exactly the same design.

Who knows. When we finally build our outdoor cooking area, maybe we can include the wood cookstove as part of it. I think I’d really like that.

The Re-Famer

Good morning, Baby!

I was a little late in doing the outside part of my morning routine.

Which meant there were hungry kitties wondering where I was!

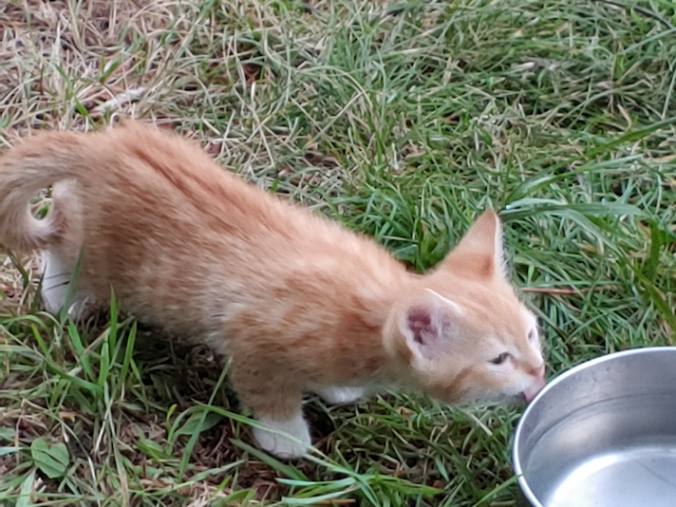
Little Braveheart was not only willing to let me come fairly close, but she kept going for the food bowls by the sun room, even when I added kibble to the bowl near the spirea they like to hide and play in.

Oh, those beautiful, beautiful eyes! :-)

The Re-Farmer

Fur babies, and garden finds

Today was our day to head into the city for our monthly shop. We will be making another smaller trip, later in the month, but the big stuff is done. We normally would have done it a few days ago, but doing Costco on a weekend just didn’t appeal to us! :-D
So that took up the bulk of our day. Which made it one of those days were some plenty of stuff got accomplished, but it doesn’t feel like it, since much of the day was spent driving. :-D

While doing my rounds this evening, I was able to play with Butterscotch’s babies again. :-)

The orange babies were quite eager to play, while the calico and the orange and white kitten (which was sitting in the broken barrel planter at the time this picture was taken) looked like they were falling asleep where they sat!

Later, I headed over to check on the sunflowers. There are still only 2 seed heads that are opening, but there’s at least one that looks like it may start opening tomorrow.

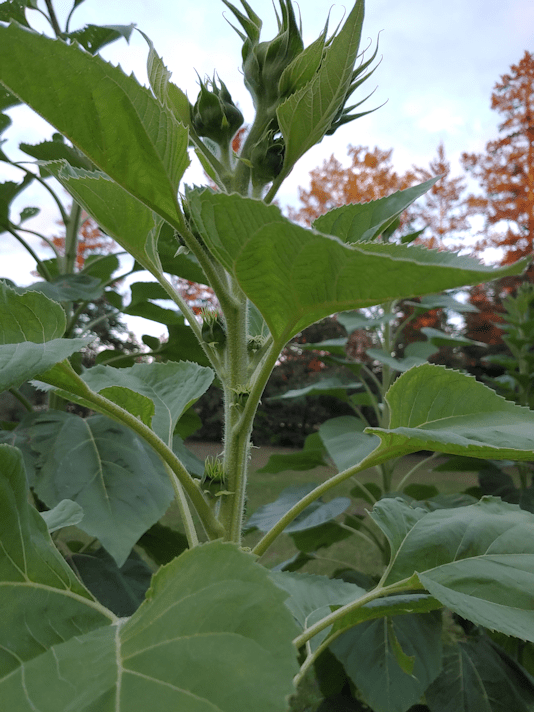
Then I noticed something… different… about one of the sunflowers.

Very different.

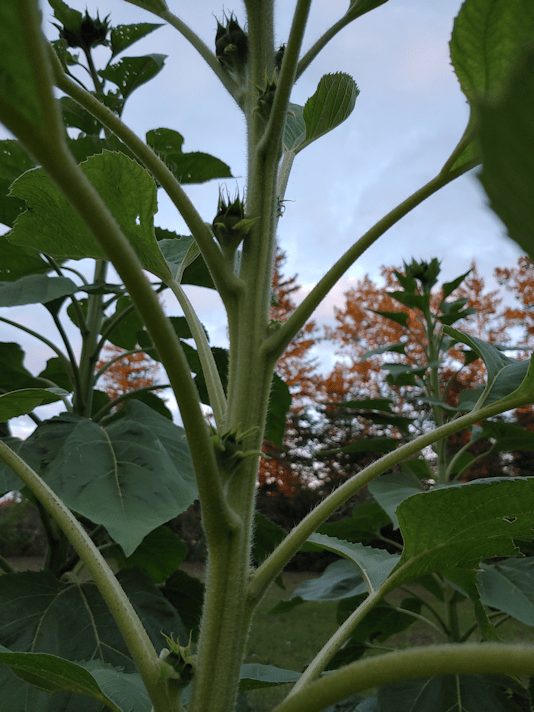
It is covered with developing seed heads.

I started counting them. I got to 21, and I’m sure I missed some. Along with the several at the very top, every single leaf on the stalk has a seed head developing in the “elbow”. Some of them were absolutely minuscule, but they were there!

I looked at every other sunflower in the rows, and there are no others like this. All the other plants (that aren’t too deer damaged) are developing just one seed head. Which, for these giant varieties, is to be expected. This one plant is among the many that tower above my head now, so it is definitely one of the giants, and not an ornamental type that found its way into a seed packet.

It looks amazing! I really look forward to seeing how it progresses!

Speaking of progress, I made sure to check the pumpkins, too.

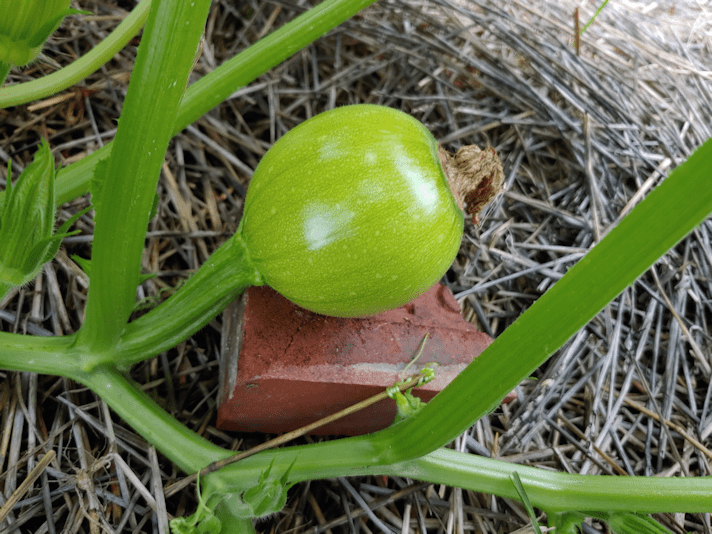
The first pumpkin to develop is growing nicely, but it was the the next plant that had me smiling.

The pumpkin plant in the middle mound has finally developed a pumpkin! I made sure to put something under it, so it won’t develop rot from the damp ground.

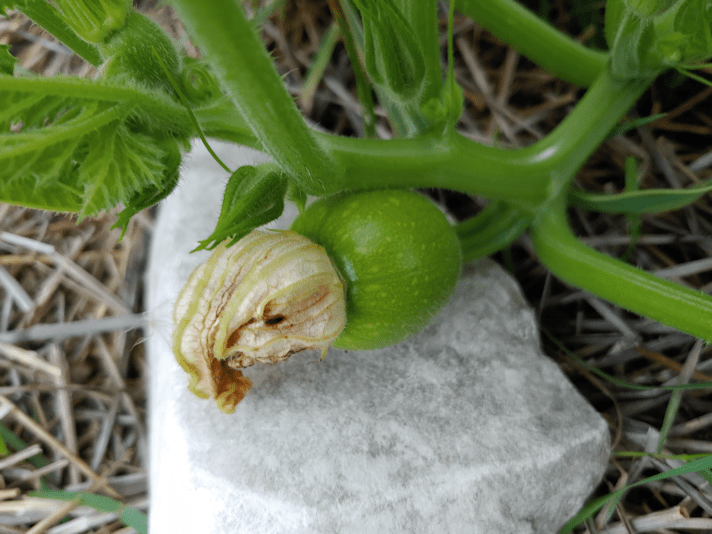
The third pumpkin mound had a surprise for me, too.

There’s a new baby pumpkin developing!

Our squash beds had one last surprise for me tonight, too.

That, my friends, is the tiniest of birdhouse gourds! :-D

There’s just one that has started developing. I can see no sign of gourds on the others, but they are all so small, I honestly wasn’t expecting any to develop at all.

It should be interesting to see if this one gourd will survive. Especially as we start to get some actually chilly overnight temperatures.

Before it got too dark, the girls helped me with one last thing outside. We moved my daughter’s tent, then moved the picnic table under it.

September is a month filled with birthdays and anniversaries, so we have decided to celebrate them all at once. On the long weekend – weather willing – we will set up by the fire pit and have…

Chinese food.

And birthday/anniversary cake.

And maybe roast some hot dogs over a fire, too. :-D

The tent has one solid wall that we will add to the far side to act as a bit of a wind break, since that is the direction the wind usually comes from. We also have screen walls, in case bugs are a problem.

If the weather isn’t co-operative, we now have the sun room and old kitchen cleaned out and organized, so we can move into there. The old kitchen is downright pleasant to sit in now, plus it’s close to the bathroom. More importantly, there are no stairs, so my mom can get in and out more easily than into the new part of the house. Plus, there is also a door we can keep closed, and keep the cats out! :-D

This is planned for almost 2 weeks from now, so we have plenty of time to make sure everything is clear and accessible for my mother.

Hopefully, it will all work out. A lot can happen in 2 weeks! :-D

The Re-Farmer

The wonkiest

Today I found myself heading into town for a trip that included a stop at the hardware store. I took advantage of being there to look for some Dremel tips.

The didn’t have the individual tip I was looking for.

I ended up getting this, instead.

I think I’ve got enough tips for quite a few projects, now! :-)

So, of course, I had to find a reason to use it. :-)

A while back, I posted about making a maple spoon.

You see that chunk of wood beside it?

That’s what I worked with, today.

This is that same piece of wood, roughed out.

Not for a spoon, though. Today, I was determined to make a fork!

For this project, I used everything I had around to remove the excess wood. The 4 way rasp got a lot of use, but I also used several of my new Dremel tips, the big K-bar knife, and a couple of my fine saws.

Basically, I see no point in dulling the blades on my carving knives any more than I have to! :-D

I saved cutting the tines for when I was ready to start using sandpaper on the rest of it.

I used a carving knife, as well as a fine tip on the Dremel to shape the tines.

Unfortunately, while sanding them, the wood broke off the tip of one of the inside tines.

Which meant I had to shorten all the others to match.

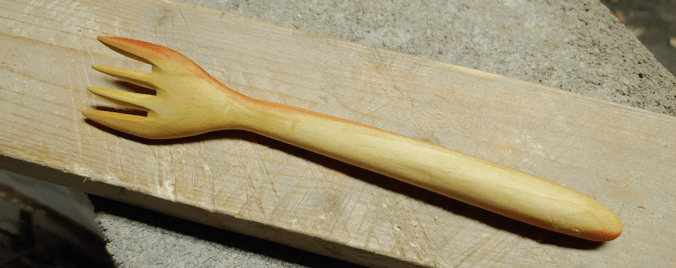
Here it is, after sanding.

The end result is the wonkiest of forks!

But it’s still a fork. :-D

Here is it, after oiling.

Oh, gosh, it’s the funniest looking fork, ever! :-D

Here it is, next to the spoon made with the same wood.

The spoon could use another coat of oil!

Well, I at least accomplished what I set out to do. Even if it does look totally wonky!! :-D

I still have wood left from the piece I used for these. I suppose my next project should be a knife. :-)

I’m looking forward to it!

The Re-Farmer

Kitten therapy

Last night, as I was finishing up my rounds, I spotted Butterscotch and her babies, lounging in the old barrel planter.

So, of course, I went over to say hello.

I wasn’t able to touch any of them, but they are willing to come closer!

Then I spotted a surprise at the other end of the yard. I zoomed in with my phone’s camera as much as I could, because I knew they’d run hide, once I started moving closer.

Junk Pile cat and all THREE of her kittens were playing on the log and among the flowers. Junk Pile is to the right of centre, sitting by the log. Tabby is in the grass on the far left. Little Braveheart is near the end of the log, looking up at the Shy One.

This was the best I could get of Shy One!

This morning, though, when I came out to refill their food bowls, I found all three kittens by the old doghouse my brother brought for the cats. I keep a dish of kibble either in front of, or just inside, the opening. This time, it was inside, and it was the only container that still had food in it, and the kittens were quite interested!

This evening, I made a twisted rope of yarn and attached it to a stick, for a simply toy for Butterscotch’s kittens.

They quite like it!

Even Creamsicle liked it. :-)

One of the kittens wasn’t too sure about Creamsicle, though…

It was quite funny to hear the tiny little hiss when Creamsicle tried to sniff the kitten’s nose!

I have to admit, today I rather needed some kitten therapy. I don’t know why, but today was one of those “down” days, right from the start. Part of it is, I’m feeling the year slip by so quickly, and so little of what I had hoped to accomplish this year was done. Granted, we had the garden this year, but really, once it was in, it wasn’t a lot of work. Spring had so much wonderful rain, so I don’t mind that delaying some things, but then the heat hit, and that was pretty relentless. In my younger days, I would have been out there in the heat, anyhow, but this old body just can’t tolerate heat like it used to. Then there were all the things breaking down, and the expenses coming with it.

Now, it’s almost September, and it feels like I’ve accomplished so little. There were so many things on the list to work on, with many of them being “do this; but if you can’t, do this other thing instead”, rather than being a checklist. Yet, as summer winds to an end, what did we manage? We painted a picnic table. Got the fire pit cleaned out and set up. Mowed the lawn a lot, until the heat hit and the grass stopped growing. Very little clean up in the spruce grove has been done – and only part of that can be blamed on wasps! Even keeping up on the areas we cleaned out previously slacked off this year, mostly because of the heat.

Anyhow.

Normally, I just plug away and don’t really think about it. Every now and then, though, I just have one of “those” days. Today was one of them.

Kitten therapy helps. :-)

The Re-Farmer

First!

Among the things we chose to plant for our first garden since moving out here were Yukon Gem potatoes. My view when it comes to planting potatoes is, since they are so inexpensive and easy to find in the grocery stores, we’ll choose a variety that are not available unless we plant them ourselves. Yukon Gem are a yellow flesh variety that is supposed to be more resistant to disease, and are good for both fresh eating and storage.

We only got 6 pounds for our first try, so we’re not expecting to have any to store. At least not for long! :-D

The biggest thing we did differently, though, was to use the Ruth Stout method. When my mother had her garden in this location, she had my dad or my brothers to plow it for her, every year. She had a working tiller (we’ve got 4 or 5 lying about, and none work), and 5 kids to help pick rocks.

While the area did get plowed before we moved here, no one’s been picking rocks for ages, and the plow job was a bad one. So what we’ve got to work with is rock hard soil, full of rocks, and very little equipment. The traditional method of growing and hilling potatoes was simply not manageable.

Among my recommended posts is a Canadian gardener who tried the Ruth Stout method in his own garden. He sowed his potatoes on top of hard, grassy ground, covered them with a thick layer of hay for mulch, and at the end of the season, he had lots of potatoes, and the ground beneath was greatly improved.

I figured it was worth a try!

We didn’t have hay, so I used straw from the bale we got last fall. What we don’t use to cover our septic tank gets used for mulch, and we still have plenty left this year. Mulch was already a big part of our plans to improve and amend the soil.

Well, the potato plants seem to struggle through the mulch, and never got really bushy. They did bloom, however, and at one point I dug around under the mulch to see if I could get some baby potatoes to try.

Even though this was after a rainfall, and the straw was damp, the ground beneath was bone dry. The only potato I could find was the mushy seed potato.

So… I was beginning to think this was a write off. I don’t know if it was because I used straw instead of hay, but it seems like the straw absorbed all the moisture, and it never made it to the soil.

While going through the garden over the past few days, I’ve been watching the potatoes. Some of them have already died back completely.

This morning, I decided to dig up the 3 potato plants that had died back on one end of a potato bed.

After moving the straw, there wasn’t much to see.

That is the seed potato, and no sign of any others. Only after digging, did I find one tiny potato under this plant.

It wasn’t a complete loss, though.

A few others were visible once the straw was moved, and they were looking pretty good.

Time to carefully dig around with the potato fork and see what I could find.

The first thing I noticed was how different the soil was. Even with plenty of rocks to dig around, the soil itself was much, much softer. I even found worms, as well as a single slug. :-D

So even if we don’t get a lot of potatoes out of here, we will have at least improved the soil!

How many potatoes did I find?

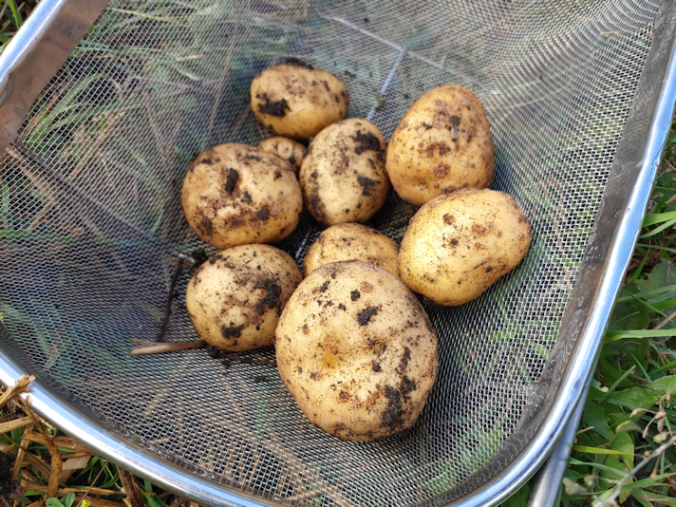
Here they are! Our first potatoes!

I’d say these were from 3 plants but, really, they’re from 2 plants. You can just see the itty, bitty potato that I found by the seed potato of the third one.

Of all the larger potatoes, one had a hole in it from a bug. The rest were solid.

I’m rather pleased! After what I found earlier, I was really wasn’t expecting to find much of anything.

Now to think about how to cook them for supper this evening. :-) I’ll likely make them very plain, so we can get a sense of how this variety tastes, compared to what we usually have.

I’m really looking forward to them!!

The Re-Farmer

Butterscotch baby – progress!

Last night, I was able to spend some time on the log seat near the junk pile, and work on getting Butterscotch’s kittens used to human interaction.

I saw all four were out when I was heading to the nearby garden beds, so I left the garden for later. They all ran off, but after I sat down, Butterscotch came over for pets. After a while, she started making some comforting noises, and the kittens emerged.

I had a twig to wiggle at them, and one orange kitten in particular really likes that. Mostly, they just sort of wandered around me, then hid, then tried to sneak around behind me.

I could hardly see the kitten in the above picture, from where I was sitting, but was able to reach my arm around to get the photo.

They really love the collapsed barrel!

Now that I’ve cleared away some of the undergrowth, I realize I was wrong about it. It is a half-barrel, not a full barrel like I’d thought, and I can now see the dirt inside, so it was, indeed, another barrel planter that got knocked over.

The kittens are using the dirt as a litter box! :-D

The one kitten that really likes to play with the stick is also the one that is willing to come the closest.

Yes, I got to touch him. I was even able to pick him up for a few moments! He wasn’t too sure about that and wanted down very quickly, but he also came back again, quickly. Mostly, as long as Mom was around, they were willing to play with me there. So that is some major progress!

Now, if only we could do that Junk Pile’s babies! It’s much harder when the Mom isn’t willing to come near us, herself.

The Re-Farmer

Follow up: ground wasps

While doing my rounds this morning, I made sure to check where I’d found wasps while trying to clean up yesterday.

I was surprised by what I saw.

First, there was the hole in the ground. I didn’t expect to see an actual hole like that.

Also, do you see the light brown stuff scattered around? Particularly in the grass to the left?

Those are pieces of nest cells.

When I was spraying the area with the hose, I couldn’t see any of this. I’m not sure if it was because I was so focused on the wasps, themselves, or if some critter came through during the night and dug things up even more.

I also zoomed in to the root or stick across the hole in the ground.

The wasps on the stick/root itself were quite still and just sitting there. Like they were sleeping or something. The other wasps were more active.

I don’t know what kind of wasps these are. They are smaller than the yellow jackets I’m used to seeing, and have more black to yellow on their bodies.

Well, whatever they are, we have to get rid of them.

I used the hose again, filling the hole. I saw a lot fewer wasps flying around than before, so I hope that means they are moving on to somewhere else. Until they do, we’re going to have to be careful. Especially when trying to interact with Butterscotch’s babies.

Which one of my daughters was able to do, last night!

I saw through the window that all 4 of them were out and playing, so my younger daughter went out, sat on the ground and wiggled a stalk of wheat (self-sown from the straw we’ve been using as mulch this year) at them.

Two of them even came close enough to sniff her sandal, and when one of them turned away to start eating, she was able to pet its back – until it noticed that she was touching it! *L*

Progress!!! :-)

The Re-Farmer

Come a little bit closer…

It was worth getting eaten alive by mosquitoes.

Little Braveheart was willing to come closer for a wiggling flag, than a wiggling stick. :-D

The bit of fur visible at the bottom of the picture is Potato Beetle, who really, really wanted cuddles!

I didn’t stay too long, though. Tabby was hanging around, and I spotted their even more elusive sibling making several attempts to get to the freshly refilled food container. I didn’t want to keep any cats from being able to eat!

The Re-Farmer