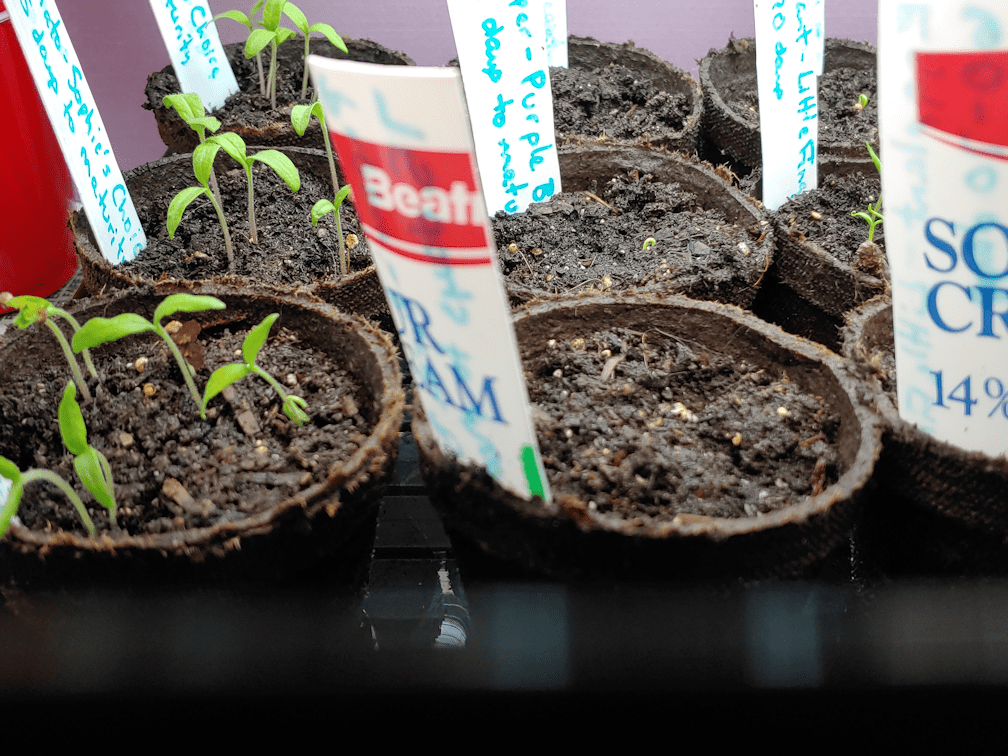
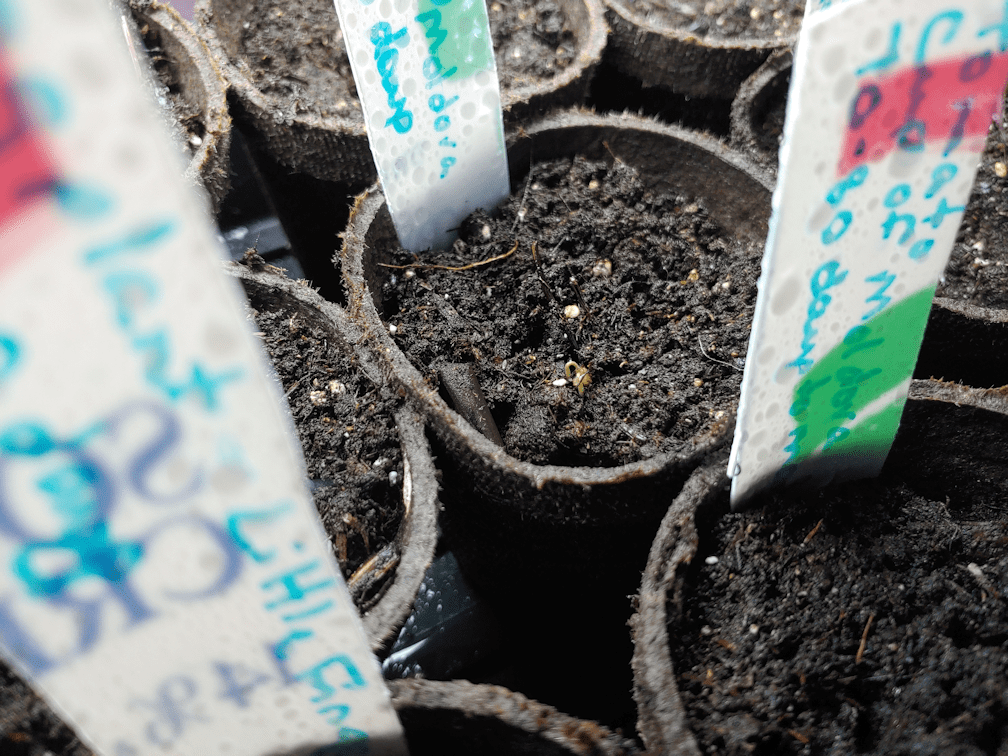
While tending the seed trays last night, I spotted a new first sprout. This morning, it was big enough to get a photo of.
Barely!
There in the middle, you can just see our very first Purple Beauty pepper sprouting!
Which means that, at this point, the only thing in the tray that has not had any sprouts at all are the canteen gourds. The luffa still has just the 1 sprout. It looks like all the tomato seeds have germinated by now, and there are more eggplant and onions sprouting, too.
Oh, there are no Wonderberry yet, either. They are the ones planted in the double cups next to, but not on, the heat mat, so that might be why.
I am very happy with what looks to be a very high germination rate, so far!
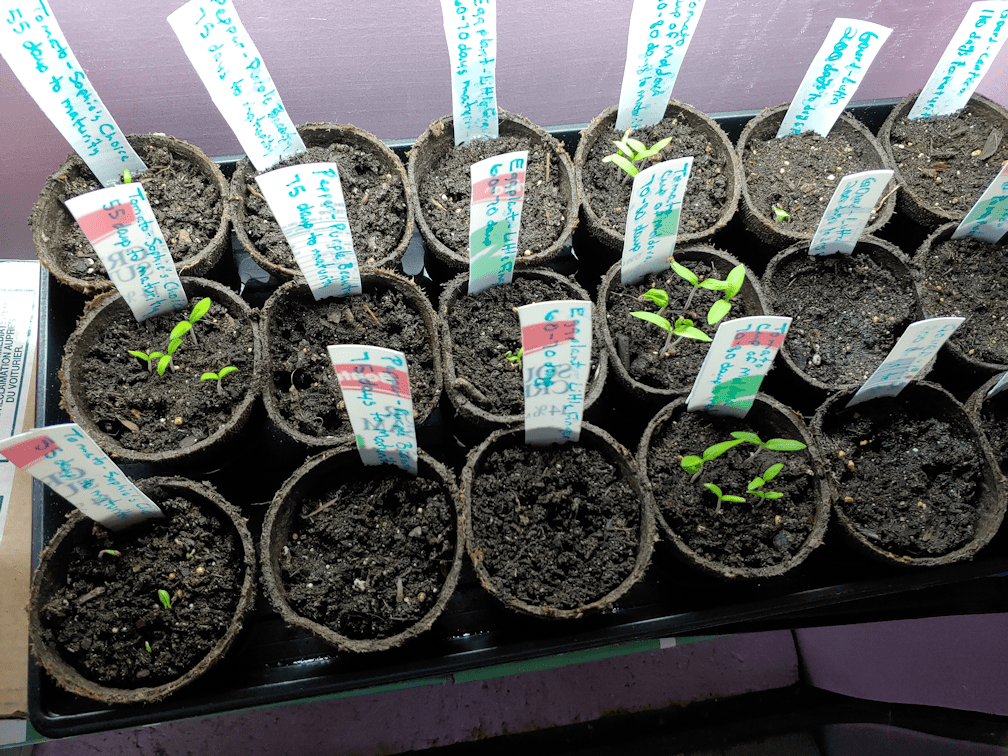
This morning, I opened up the large aquarium greenhouse to refill the water tray over the heat mat, and give everything a spritz. This involves moving mini fan off, setting one light fixture on top of the other and pushing them back, then removing the wire mesh covers to access inside.
Once the covers were off, I took the opportunity to take a picture of the sprouts.
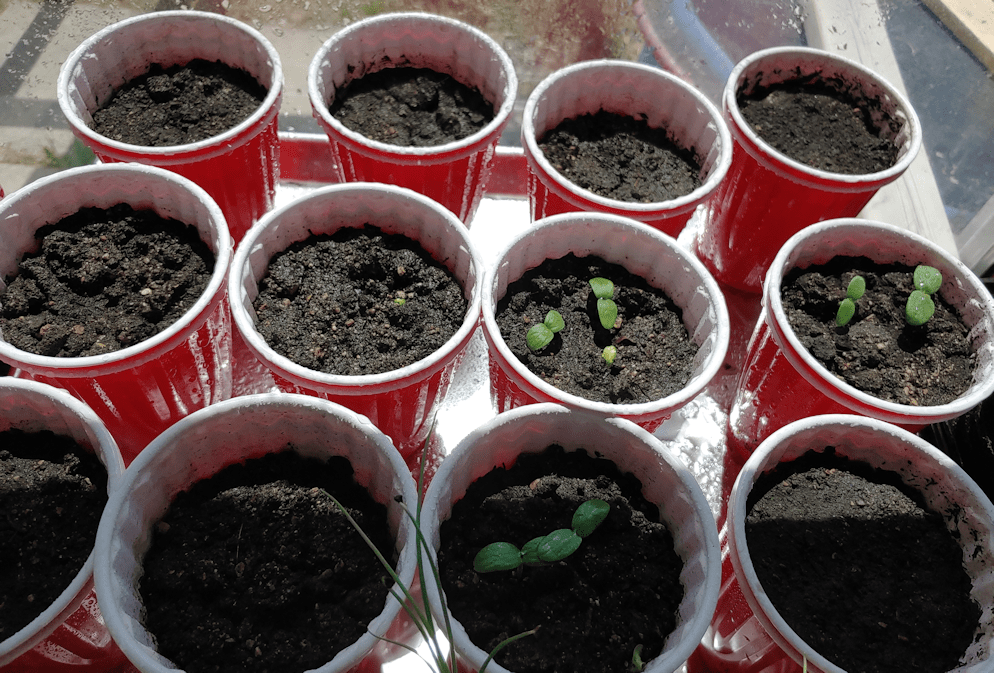
Here, you can see that the Sophie’s Choice tomatoes are now sprouting in all three pots, and the Cup of Moldova growing bigger every day. The eggplant is still slower, but the ones that have sprouted are definitely looking bigger.
But wait… What’s that?
Over on the right, near the back corner.
Is that…???
Yes!!! Yes it is!
A luffa has sprouted!
I went back to look again, and I still could not see it from standing next to the tank. I could only see it in the photo taken from above.
I am so thrilled!!!
Last year, it took ages for the various types of squash and gourds to germinate. The luffa did germinate earlier than others – and some never germinated at all – but I absolutely did NOT expect any gourds to germinated this early.
I am crediting the heat mat for most of this. For the luffa, the scarification and pre-soaking probably helped, too.
Wow! I was just checking something in my WordPress dashboard, and realized that this post is number 3,500 for this blog! What a chatterbox I am. ;-)
This morning, I opened up the large aquarium greenhouse, to spray the pots and add more water to the tray on the heat mat.
There were more sprrrooots!
It is still only the Cup of Moldova tomatoes that are showing, and they are growing remarkably fast!
The aquarium greenhouse set up is working quite well. Even the little one is working out. The cats had repeatedly knocked the screen window being used as a cover off the top, by jumping on the overhang. A couple of days ago, I discovered where the cats had been getting into the space in the basement that was supposed to be a dry bar, but never got finished. We’ve got all kinds of breakable things stored in there. Somehow, a cat managed to create an opening in the blocked off rafters above. While picking things back up again, I noticed a smaller screen window. It turned out to be exactly as long as the small tank, though a bit wider, so there it still an overhang. Just not much of one. It hasn’t been knocked off since.
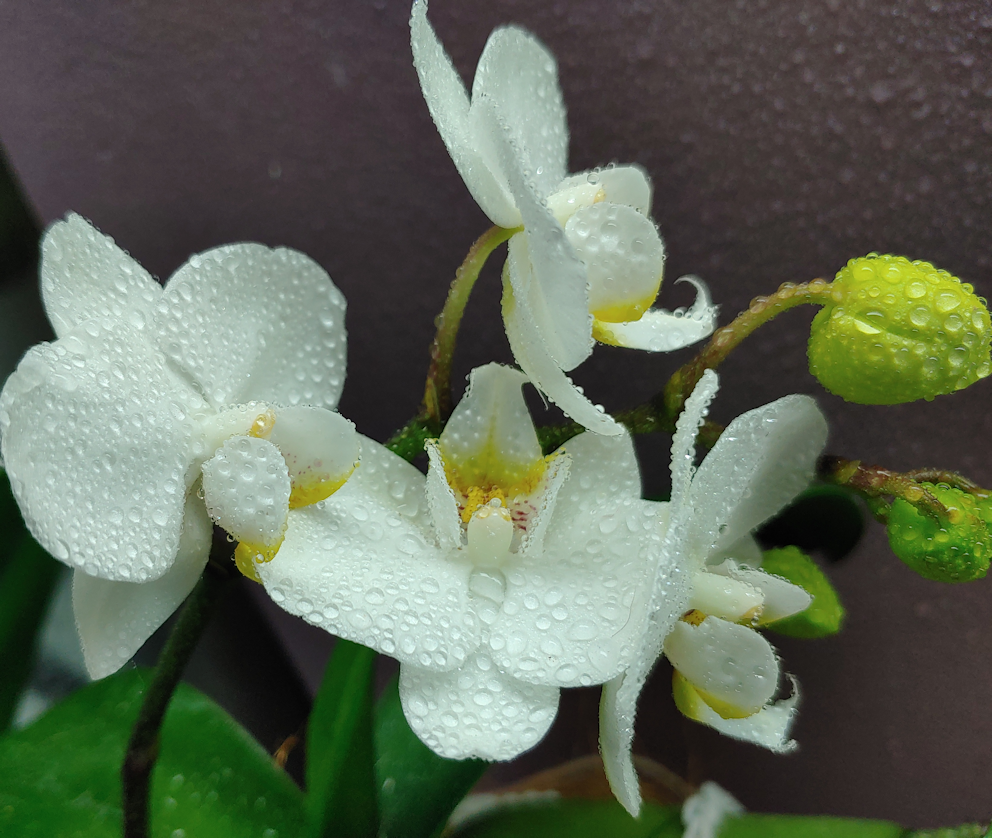
The larger tank has my daughter’s remaining orchids in it, and they are really liking the space!
One of them is blooming with the strongest looking flowers I’ve ever seen on it!
Since I was spritzing the seed starting trays, I sprayed the orchids, too.
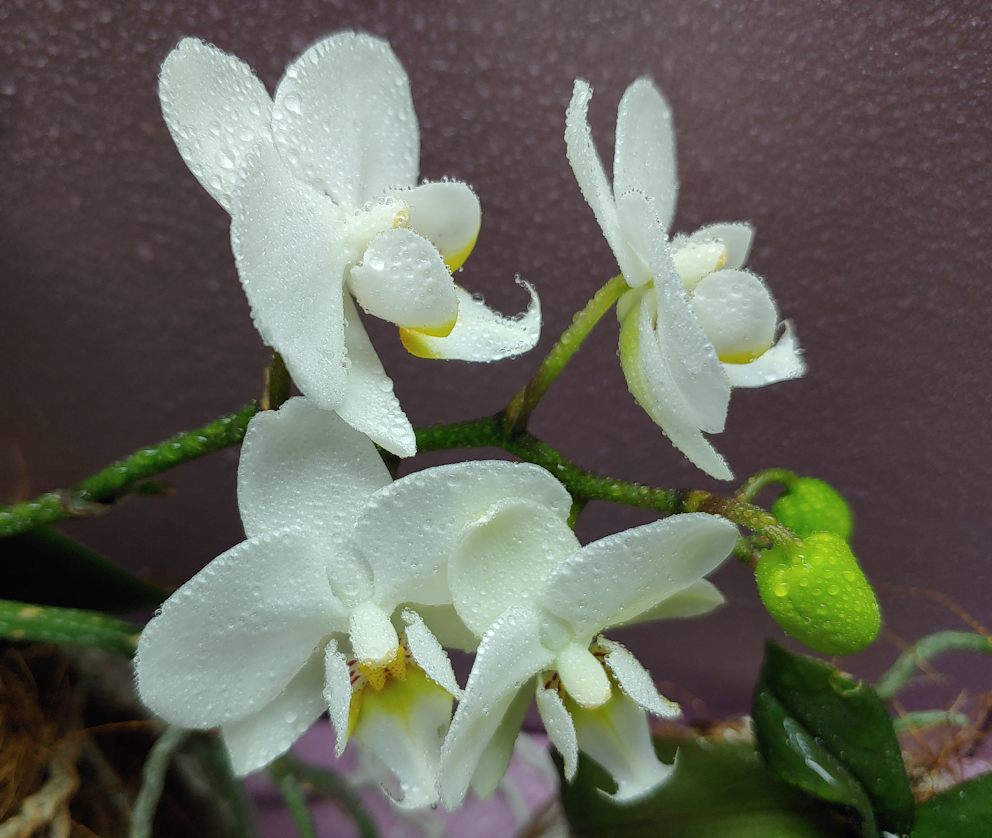
The second orchid is a lot smaller, and my daughter is not quite sure how it’s doing. It was an unexpected surprise to find that hanging them in front of the living room window, while safe from the cats, turned out to be too cold for them once winter hit. If I remember correctly, she lost one while it was still at the window, and another died shortly after they were transferred into the tank. These are the only two left.
I think I might get her another orchid for her birthday this spring. :-)
While on the subject of seedlings and growing things, I made an unplanned order last night. It was through someone on a hardy fruit and nut tree group that I’m on.
I got tree seeds.
The person I got them from is in Ontario. Most of his seeds are zone 4 and above, and he was sharing about his paw paw seeds, which are a zone 4 tree, though some places rate it as a zone 6. I talked to him for a bit about growing them in zone 3. Previously, I did find one tree nursery that advertised having zone 3 paw paws, but when I asked people on the group about the company, I got an overwhelmingly negative response. One of those negative responses is that they get their zones all wrong (and also had a habit of shipping dead trees!). So while it would be time saving to buy saplings from a nursery, we were going to wait on that. However, we might have better luck growing them from seed, ourselves.
The other seeds I got were tulip trees. They are another zone 4 tree, but that might just mean they grow more slowly in our zone 3, like with black walnut. I looked them up, and tulip trees can get quite huge.
The seeds we get will already be cold stratified, so when they arrive, we can go straight to germinating them. Both will be grown in containers for the first year or two, and we can overwinter them in the sun room or the old kitchen, until they are ready to be transplanted permanently.
Because of their large size at maturity – potentially 70-130 ft/21-40m tall (for comparison, the spruces in the grove near our house are about 65ft/20m tall), with 30-60 ft/9-18m wide canopy – if we get any surviving tulip trees, they can be planted either along the north property line, or well to the south of the outer yard, to be part of our shelter belt. These would be a tree for the pollinators and wildlife and, potentially, for a valuable wood.
The paw paws are a much smaller tree, and I can see these being planted in the old garden area, further from the house, where we are planning to plant berry bushes, fruit and nut trees already. They can reach 15-25 ft/4-7m in height, and 15ft/4m wide. Growing from seed, we’re looking at about 6 years, before we can expect any fruit.
Buying trees as saplings may shorten the time, but buying the seeds are a lot cheaper. We’ll be getting a dozen paw paw seeds and twenty tulip tree seeds, all for less than $20 – and that includes shipping. Even if we have an only 50% germination rate, that’s potentially 16 trees. The only thing I’d want to buy special is extra deep pots to start them in, to have room for their tap root. I already have the instructions for how to get them started, care for them in their containers, and transplant them.
As for growing in our zone, the person I’m buying them from can only guarantee them to zone 4. He’s never had anyone try the tulip tree in zone 3, however he’s had someone successfully grow their paw paws in zone 2b, getting hit with temperatures as low as -40C/-40F without extra protection, and surviving. Even in the group, when I’d asked in the comments about zone 3 for the paw paws, I had someone share that they’re growing them successfully in zone 3, though their seedlings are still too young to be producing fruit, yet.
I do hope this works out. If not, however, we’ll only be about a few bucks for a total of 32 tree seeds. Unlike the mulberry tree we got, which cost over $60 for the one sapling, got killed by an unusual, out of season, cold night, then even the remaining stem got eaten by deer.
I figure it’s worth taking the chance.
And if we’re going to be growing food trees, with how long they take before they mature enough to produce, we need to be starting as soon as we can.
Looking back and how long it took for tomatoes to sprout, in this same aquarium greenhouse, last year, I’d say having that heat mat may have made the difference!
As I sit here, I can see more snow coming down in the security camera life feed. Seeing just this one little sprout makes the end of winter feel so much closer, despite the new snow on the ground!
I needed some garden therapy today, so I got some onion seeds started.
We have seeds for 3 types of bulb onions, 1 of shallots and 1 of bunching onions. Today, I focused on the bulb onions.
Last year, we planted our alliums in Jiffy Pellets, repurposed K-cups and cardboard flats from eggs (don’t use those. They suck. Literally. The cardboard sucked all the moisture out of the growing medium!) before finally using doubled Red Solo cups to try and make up for losses.
This year, we’re doing things very differently. I’m going to try bulk sowing. Here are a couple of videos about that.
This next video shows the transplanting.
Obviously, we are in a much colder zone than he is, so I’m adjusting accordingly.
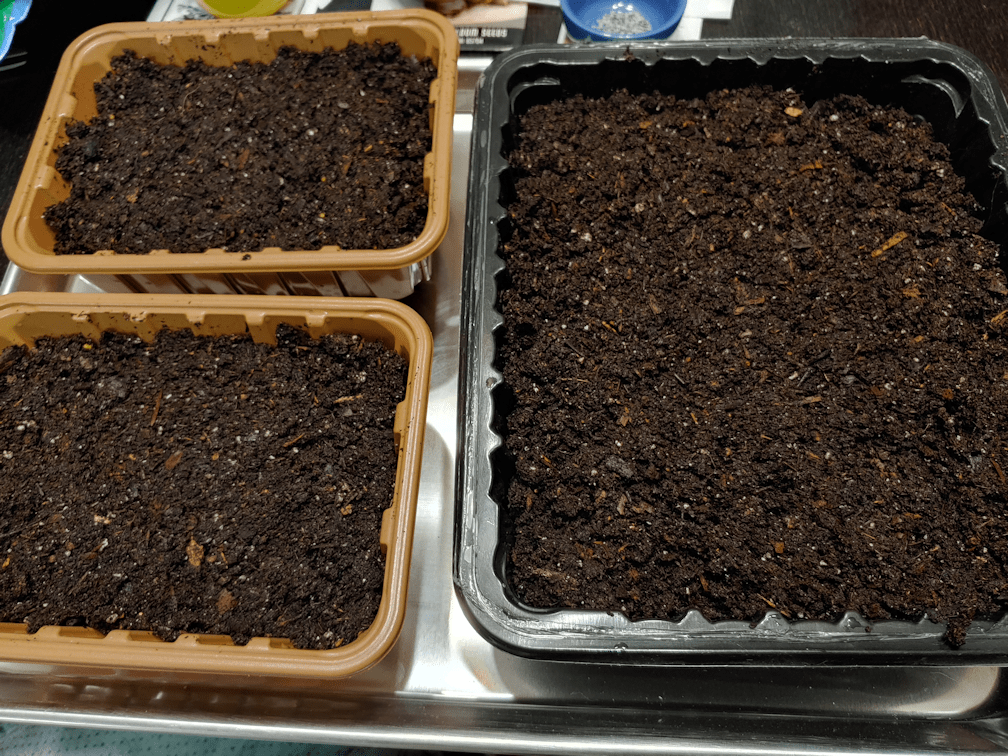
We already had our small aquarium greenhouse prepped. The first thing I needed to do was see how many seeds we had of each type.
The Red of Florence had the most seeds in its packet. The grey seeds from Veseys are Oneida, a yellow onion. The fewest are the rarer Tropeana Lunga which, like the Red of Florence, are an elongated red onion.
We are using re-purposed trays from the grocery store this year. The smaller ones were from mushrooms. I think the big one was from ground beef. We’ve had it for a while, so I can’t quite remember.
They got a good cleaning, and drainage holes were punched into the bottoms, then they were set into a baking pan.
They were filled with pre-moistened seed starting mix; I just dumped the remains of a bag into my largest mixing bowl and mixed in warmish water until it was evenly damp. Onions don’t need things as warm as other seeds, so no heat mat needed, but our house is on the cold side. I figured slightly warmer water would not go amiss.
The seed starting mix was pressed down just enough to make sure there would be no air pockets.
Then it was time to scatter the seeds.
Gosh, it feels so weird to sow them this densely!
I like that the grey seeds of the Oneida are so nice and visible. :-)
The seeds got a very fine misting at this point.
Then they were topped with about a quarter inch of seed starting mix, again gently pressing to get rid of air gaps. The tops got another misting, and water was added to the baking tray and left to be absorbed, while I cleaned up.
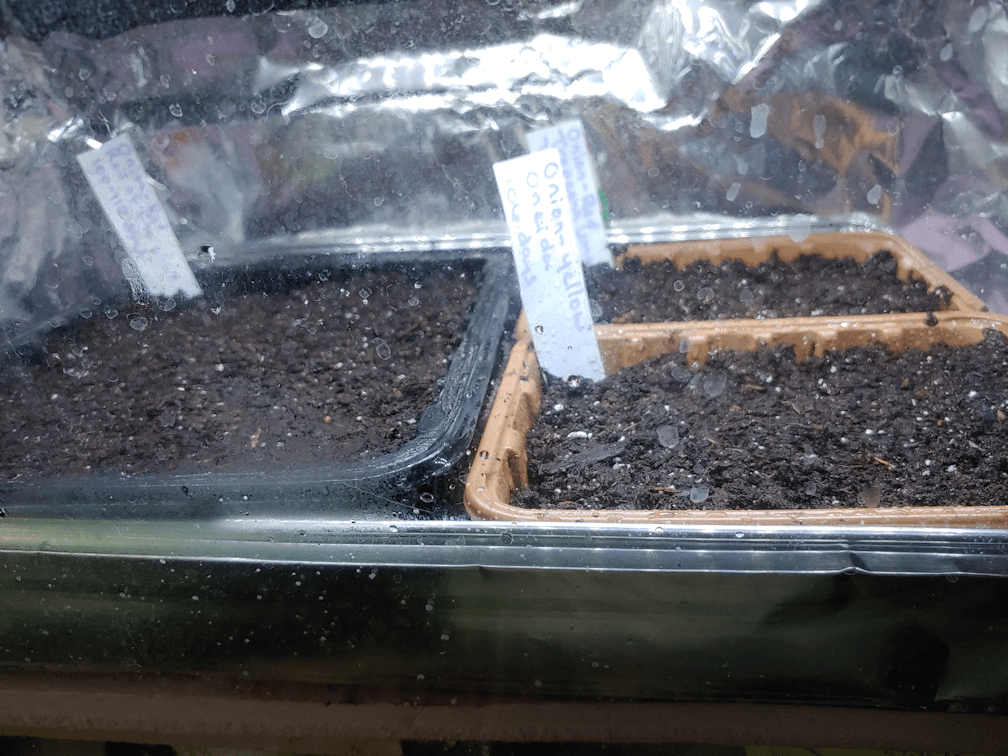
Finally, they went into the small aquarium greenhouse. The three trays fit perfectly in the oven liner tray folded into the bottom. More water was added to the oven liner tray, to water from below.
This tank has aluminum foil around the sides because the light we have for the tank is not as bright as on the big tank, and all that reflective light will help keep them from getting leggy. At least, that’s the theory!
This leaves the shallots to start next. Their days to maturity is a bit shorter than for the bulb onions. The Red Baron bunching onions need only 60-65 days to maturity, so they can be started much later.
I’m not sure how we’re going to be able to work it with the shallots, as far as space in the aquarium greenhouses goes. We’ve got some time to figure it out before they need to be started, but not much.
As for the other seeds we have in the big aquarium greenhouse, they seem to be doing fine, so far. Nothing has germinated yet, of course, so it’s too early to tell if the heat mat is making a difference. We just keep checking and adding water to the tray and misting the tops, as needed. The tray over the mat has been needing refills regularly, but today is the first time I added more water to the outer cups of the Wonderberry.
We need to get the rest of those Cup of Moldova tomato seeds started, since we want to grow a lot more of the paste tomatoes. I’ll likely start those using the doubled Red Solo cups, though we’d have to find a cat safe place to move the aloe vera pots, to make room for more seed starts. Which is a shame, because they are doing so well under the lights of the tank! So are my daughter’s orchids, one of which is blooming very enthusiastically right now, but we should be able to leave those in the tank until it gets warm enough to safely hand them in front of a window again. The aloe, however… the cats just love digging them up! :-(
Ah, well. We’ll figure it out. The main thing is that the bulb onions are started.
Plus, garden therapy was done its job. I’m feeling much more positive, now. :-)
Though it is very early in the year, we have our first seeds started indoors today. A lot of people in our zone have already got seedlings, while still others are saying, it’s way too early.
So which is it?
I happened on a video today, talking about planting peppers and eggplants, which we are doing for the first time this year. Both are plants we never grew when I was a kid, so I have zero familiarity with them.
This particular video mentioned something I’ve never heard before, yet had wondered about.
When reading the seed packets, they say things like “start indoors 4-6 weeks before last frost date”.
Last year, we had a lot of issues with some things not germinating. Some took forever to germinate. Others never did at all. This was particularly true of various squash, plus all the Hope Black Dye sunflowers – with did finally all germinate, when I started taking the trays outside, while hardening off other seedlings.
What got mentioned in this video, is that when they say “4-6 weeks before last frost,” it’s actually from germination, not from planting the seeds. So if you have something that needs to be started, say, 6 weeks before last frost, but the packet says the seeds take 7-10 days to terminated, then the time to start them indoors is 6 weeks, plus 7-10 days.
That actually makes so much more sense to me.
I’d already made a list of which seeds needed to be started when, and these were the ones that needed at least 8 weeks.
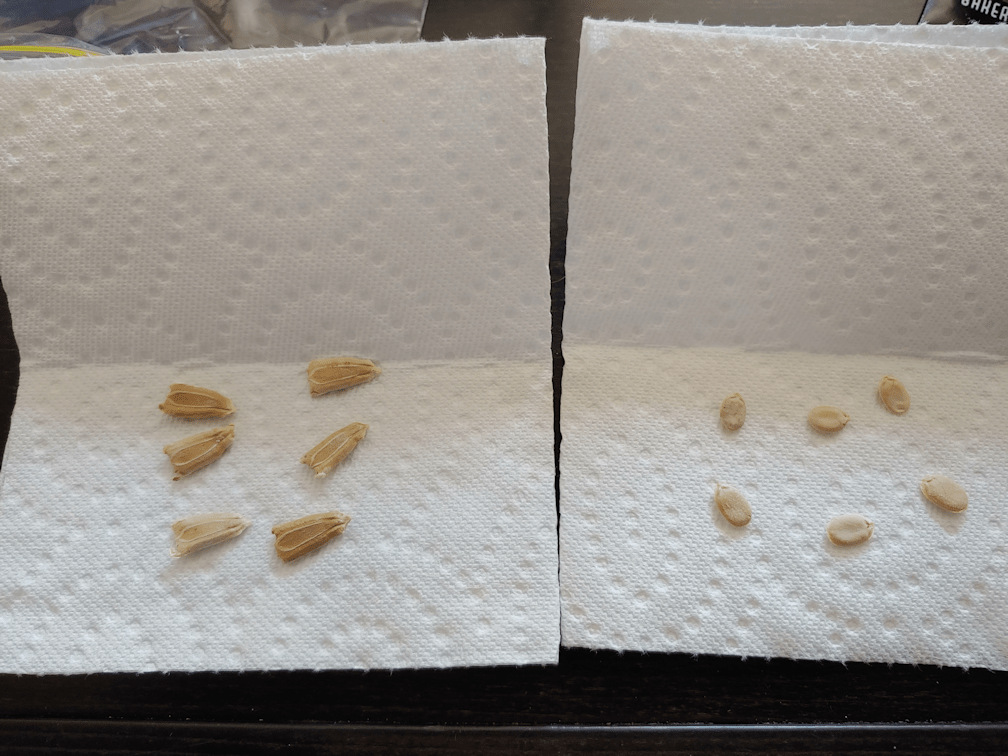
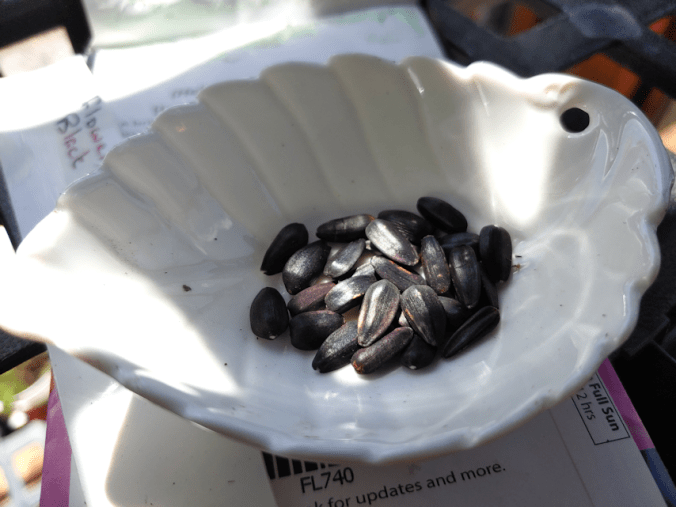
The gourds were started first, as they needed extra steps. Among the things recommended that I wanted to try was scarification and pre-soaking.
So that’s what I started this morning.
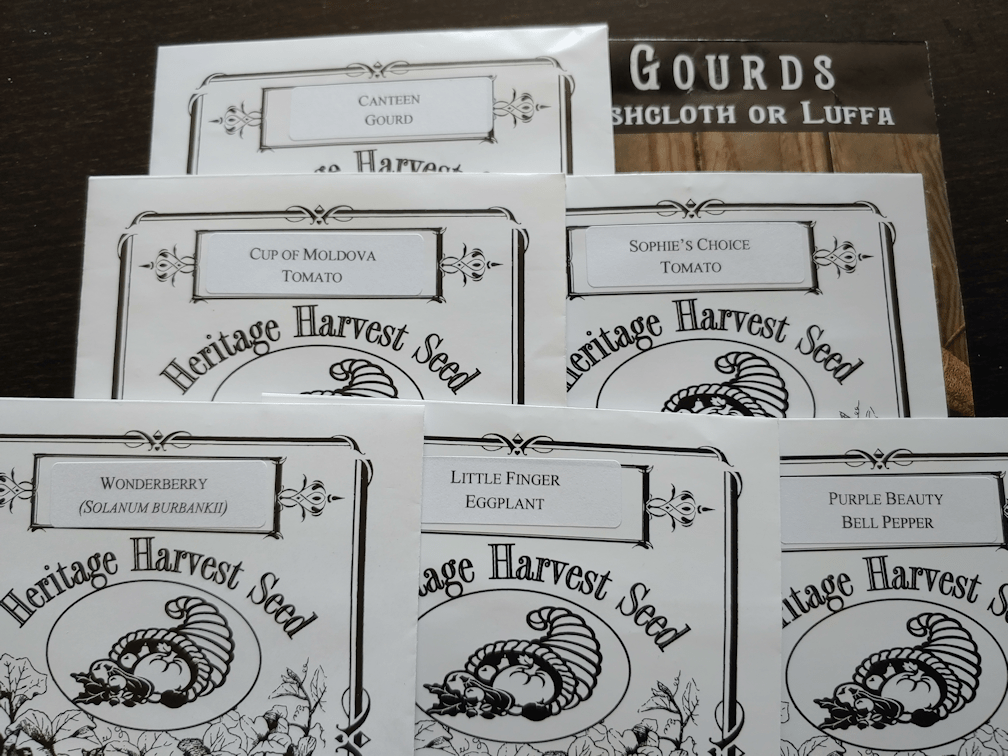
Of the gourds we will be trying to grow this year, I chose the Canteen gourd to start early, as the gourds are supposed to get quite large. The other gourds I want to grow are smaller at full maturity.
Which lead me to another thing. With the luffa, we’re not after “days to maturity”, which is 110 days, if I remember correctly. We’re after the sponges, so we need for those mature gourds to dry out. That puts them at 200 days. Even starting now, we might not have that long for them. It will depend on whether or not we get another really long summer again. Of course, in the end, everything depends on the weather.
I chose 6 of the plumpest, healthiest looking seeds from each, then carefully snipped their outer shells with a nail clipper, before putting them inside the folds of a paper towel.
Then they went into sandwich baggies, and the insides were sprayed with water, before being sealed and left to sit. Most places recommended leaving them overnight, but I left them “overday” instead. ;-)
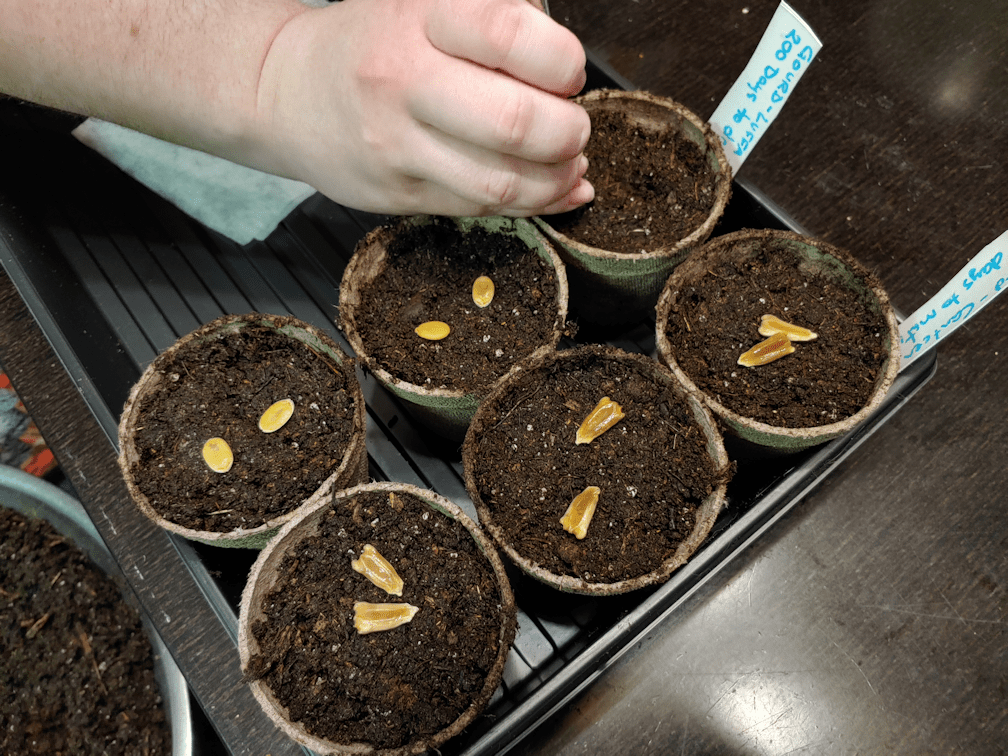
Then they went into planting pots filled with pre-moistened seed starting soil. My daughter used a chopstick to push them the inch into the soil they needed to go. Once covered, the tops of the soil got sprayed with water.
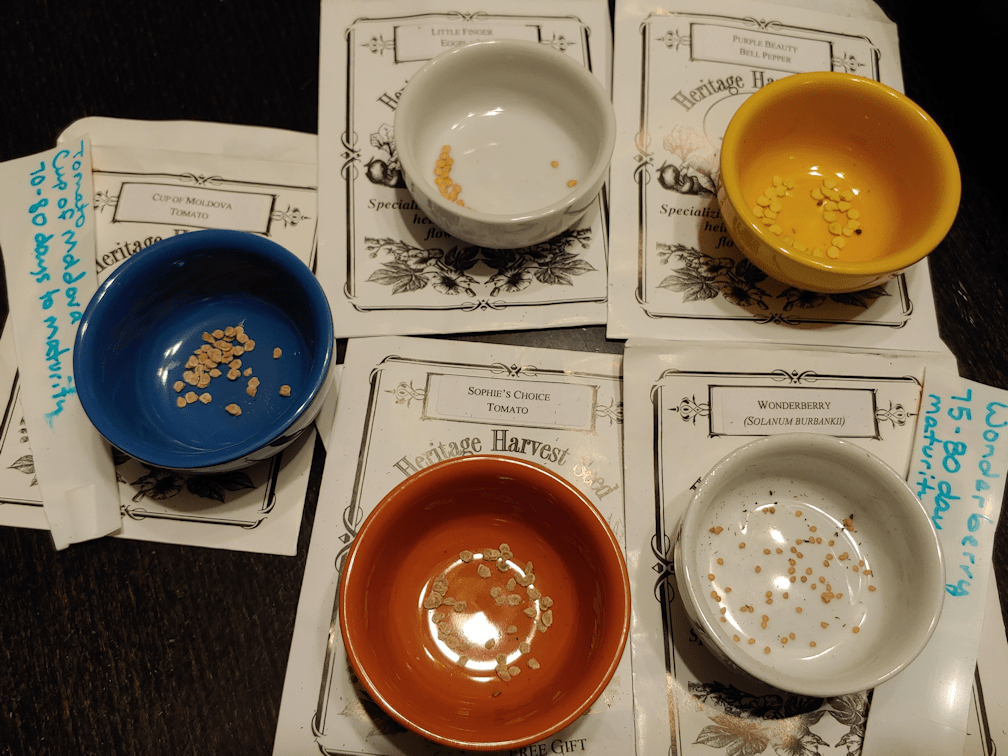
Then it was time to take a look at the rest of the seeds and see what we had to work with. None of the packets have a lot of seeds in them, but we are not after a lot of individual plants.
The Sophie’s Choice tomato was a conundrum for me. Everything I read about them said they needed to be started very early; a couple of weeks earlier than other tomatoes. Yet they are an early tomato, with only 55 days to maturity. At only 55 days, we could start them outdoors and they’d have plenty of time to mature. Odd.
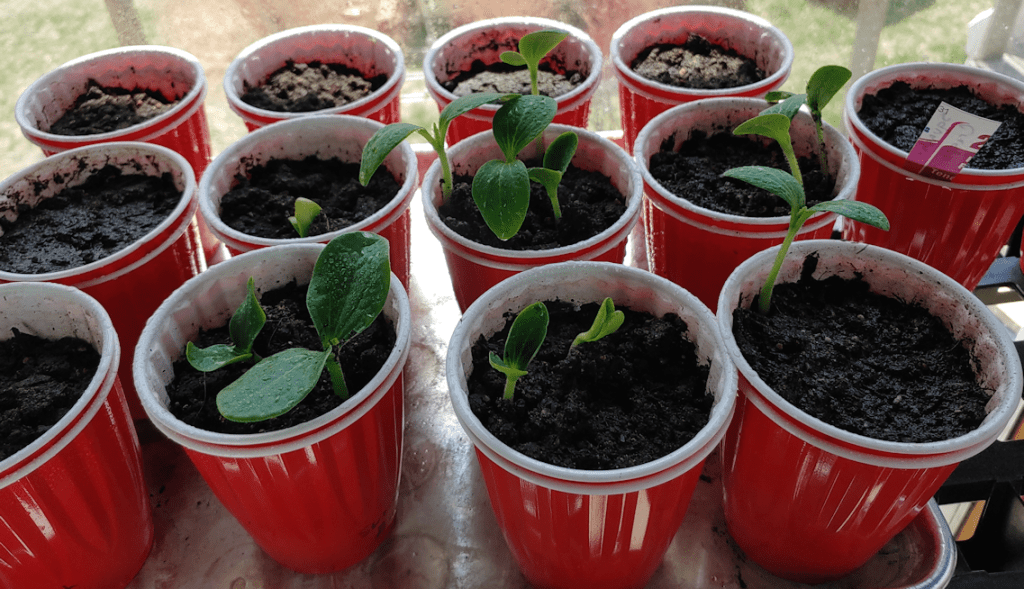
For all but the Wonderberry, we decided to plant about 5 seeds per pot, and three pots each. With the gourds, that filled an entire tray.
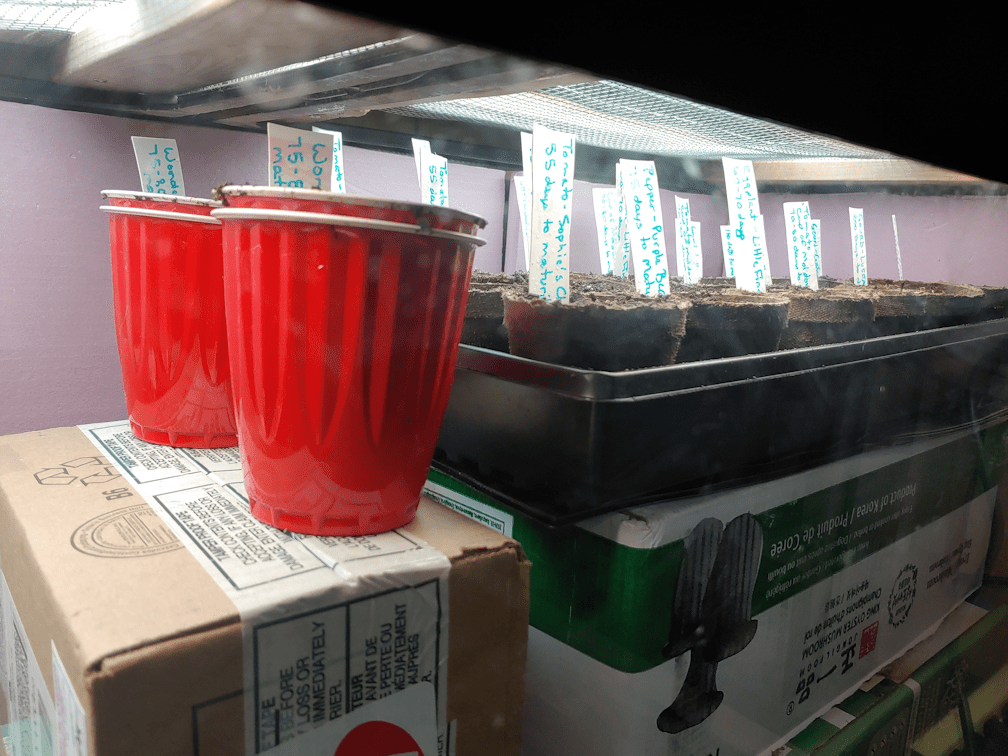
The Wonderberry got planted using the double cup method. I reused some of the Red Solo cups we used last year, with the inner cups having drainage holes in the bottom, so they can be watered from below, using the outer cup.
We still had seeds left over, even with how little was in each packet, so that’s nice.
We used more boxes to bring the tray and cups closer to the lights, inside the big aquarium greenhouse. The heat mat fits under the tray. I’m hoping that just being near the mat as well as close to the light fixtures, one of which does warm up, will be good enough to adequately warm the Wonderberry in their cups.
The double cups got water in their bottoms before they were put in place, and water was added to the tray once it was settled on the heat mat. We do still have a little fan blowing into the tank, though it’s over the orchids and aloe in the other corner. We won’t be able to cover these with a plastic dome, as typically recommended, so I’ll be making sure to use a spray bottle to keep the tops moistened, since the smaller seeds are so much closer to the surface. There’s quite a bit of water in the tray so, with the heat mat, that should help increase the humidity levels, with the fan hopefully keeping things from starting to mold.
The heat mat doesn’t have a thermometer, nor do we have a soil thermometer, so we’ll have to monitor these fairly closely. Everything is plugged into a power bar, which gets shut off every night, so there will at least be that break. If it seems to be getting too warm – unlikely, for what we’ve got planted in there – we can put something under the tray to elevate it. Once the seeds germinate, we can probably take the mat out entirely.
The next things we’ll be starting are the onions, which won’t need the heat mat, but when it comes time to start the rest of the tomatoes, and all the squash, we’ll need both the heat mat and space – and space is going to be harder to come by! We do have a mini greenhouse, the frame of which we are currently using in the sun room to hold the heater bulb for Butterscotch and Nosencratnz, as they recover. We did try to use it in the living room last year, as it does have a zippered cover, but the cats still managed to get into it. If we could find some way to keep the cats out of it, it would go a long way to helping with our space issues!
We’ll figure something out.
The main thing is, we’ve got stuff started that need that extra time indoors.
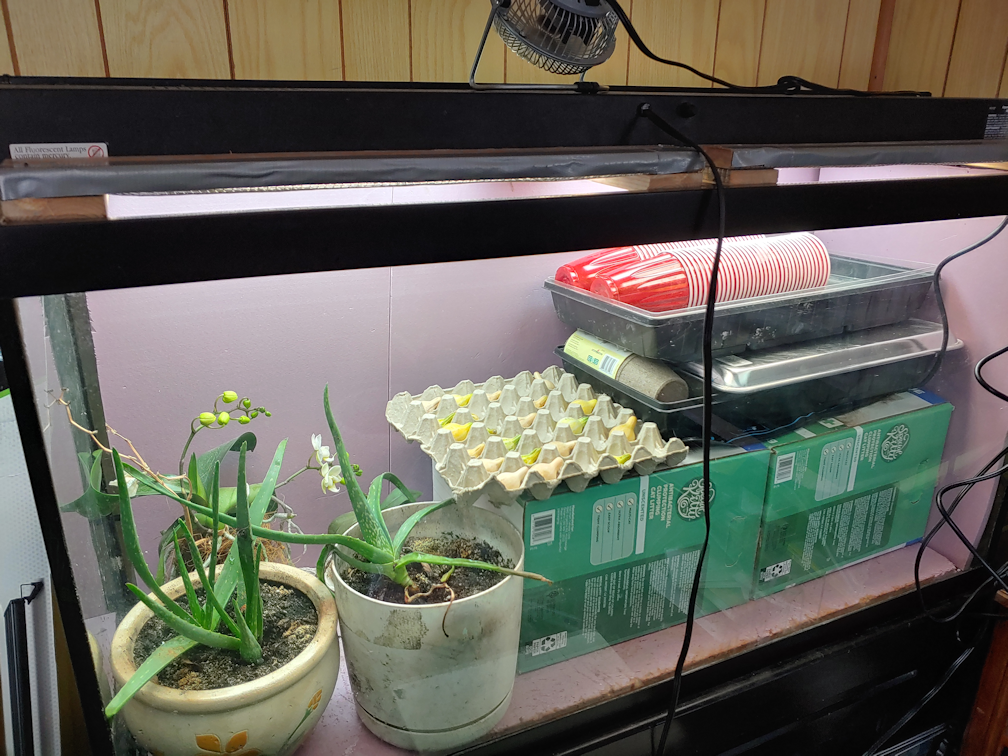
Last year, we converted two unused aquariums into greenhouses, where we hoped to protect our seed starts from the cats.
It mostly succeeded.
Today, I prepped the tanks for this year’s seeds.
The small tank – a 20 gallon tank – was a real problem with the cats last year.
Even when we pur the original hard cover back on at the end of the season, using the space inside to store the light, etc., the cats still got into it!
The foil around the back and sides were to provide reflective light for the seedlings. As you can see, the cats have torn up the foil, and even left scratches in the rigid insulation at the back!
Last year, we had tried using the lid that came with the tank at first, but the cats would reach through the opening for the water filter in the back, even if it meant fighting past whatever we put to block the opening. They managed to reach in and pull up the seed trays, anyhow. Having to block everything meant no air circulation, so what the cats didn’t destroy, mold did it’s damage. I finally rigged a window screen and that worked, though it was far too late to save the onions we’d tried to start in there at the time.
This tank will be for onions again. After seeing that onion seeds can be planted very close together, and they don’t really get transplant shock, I’m hoping to be able to get all 5 varieties of onions we have in hear.
The problem is the size and shape of the tank is too small to fit any of the commercial seed starting trays we’ve been using. I want to be able to water the planting trays from below, which meant having to find something to use as a tray for the water.
I decided to try aluminum oven lines. They are pliable enough to bend to size, and strong enough that I could fold corners without it tearing. It’s not deep, but it doesn’t need to be.
There’s still quite a bit of space left. If needed, I can fold up another tray and overlap them. I’ll just have to make sure they are attached to each other with a water tight seal. Or we can just use the doubled Red Solo cups again, and not need to have a tray under them at all.
Then the screen window was brought back into action as a cover. A pair of 5 pound hand weights get added to the back, in case a cat walks onto the overhang in front. The metal screen is strong enough to hold their weights. The heavier cats don’t try to go up there, just the tiny ones, so that has worked out. If necessary, we have more weight we can put on it. At some point, I want to build a screened cover to fit, but that’s not an urgent thing.
Since we can’t change the height of the light fixture, the egg cartons are being used to bring the seedling trays closer to the light, and can be taken out to lower the base as needed.
One thing we found last year is that this room is pretty cold, which is why we added the insulation around the back and sides. It was still difficult to keep it warm enough for the squash and gourds we had in there. Onions are a cool weather crop, so they should be fine in here, as far as the temperature goes.
Then there was the big tank to do.
I had to take out the biggest pot with an aloe vera in it to make space for the boxes that are being used to raise the seedling tray closer to the light. Previously, the boxes were under that sheet of insulation at the base to create a raised floor, but with the plants still in there, we can’t do that this time.
This is where we will be starting the luffa, and probably a few other gourds, at the same time as the onions. They will need the heat mat we got for under the seed trays, which is why they have to go in this tank. The mat won’t fit in the small tank. Right now, the mat is under all the trays and pots, so the weight can flatten it out a bit. There’s just enough room left to hold the curing Tennessee Dancing gourds.
At some point, we’re going to have to take the other aloe vera and my daughter’s orchids out. We’ll need the space for the tomatoes, eggplant and peppers, which are the next earliest seeds we need to start. After that, we will need space for the winter and summer squash. Hopefully, by the time they need to be started, we can start moving the onions into the sun room. The orchids (you can see one has started to bloom again!) are here because it was too cold for them to hang at the window in winter. The aloe is there to keep the cats from digging in the pots.
Which happened with the one pot I did take out, while I was setting things up in here! I caught Nicco, inside the barriers I put around the aloe vera. She’s so long and skinny, she snaked her way through the gaps! The little beast!
We had another, larger pot with an aloe vera in it in. It had been okay for months but, a few days ago, we came out to find the pot all dug up, and the only remains of the plant in it were a couple of leaf tips. We never found the rest of the aloe, and have no idea what happened to it! I’m sure we’ll find it, desiccated, under the couch or in a corner somewhere, months from now. :-D
As you can imagine, I’m not too keen on taking the plants out of the tank. They’re doing very well in there! But we won’t have a choice.
We have many things we need to start indoors, but a lot of them will have only a few seeds per packet used. Particularly with the squash and gourds. For the tomatoes, the paste tomatoes are the only ones we will be planting a lot of, since those are determinates being grown specifically for canning. The others are indeterminates and will be more for fresh eating, so we won’t need more than a few plants of each. We have enough varieties that, in the end, there should still be quite a few to transplant in the spring.
The other major thing we will need to start indoors will be the kulli corn, but those won’t need to be started until about the middle of May, at which point the sun room will be warm enough to use.
We are expanding the garden a lot this year, and will be expanding it more again, next year. I expect to be expanding it every year for quite some time. Which means that we will be needing lots of room to start seeds indoors every year. Until we are at a point when we can get a greenhouse or polytunnel, a goal of mine is to set up a corner in the sun room for starting seeds. We’d need grow lights, so that we wouldn’t have to constantly turn the trays for even sunlight, and we would need a heater sufficient to keep the room – or at least that corner – warm enough for germination. Or use more heat mats, but there is no outlet in that room. We are using an outlet in the old kitchen, with an extension cord running through a window to a power bar, right now. So warming the room would be more practical than using heat mats.
It’s funny. As we work on what we are doing this year, my mind is already on what will need to be done next year.
And the year after.
And the year after that…
As we work on things, we get a better idea of what plans we have will work, what needs to be modified, what needs to be re-priorities, or dropped entirely.
I don’t think we’ll ever reach the end of that process. Which is good, because figuring it all out is a bit part of the fun!
Okay, so today, we didn’t end up hauling dirt. Partly because we need to take a bit more of a break from that. We’ll just have to make up for it, tomorrow. The Dorinney corn can wait another day or two before direct sowing.
Before I get into another reason why hauling dirt wasn’t going to happen today, I finally remembered to take photos of our seedlings, while I was spritzing and rotating them this morning.
We’ve got some summer squash, winter squash and melons growing. The melons are almost all the Halona variety, but one little Pixie melon is starting to push its way through!
They were too small to even try for a photo, but the pink celery is starting to sprout, too. Still nothing with the gourds.
I did have quite a surprise, though.
Quite a few of the Mongolian Giant Sunflowers were starting to show! That’s the photo on the left. On the right, those two, tiny, barely visible specks?
Those are the Montana Morado corn! I can’t believe how quickly they’re starting to sprout!!
While watering outside, I pulled the plastic back on the carrot bed in the big garden to give it a bit of a soak and thought I might have seen some sprouts. I put the plastic back, but made sure to ask the girls to check again when they were doing the evening watering. Sure enough, there were sprouts, and they took the plastic off. The Strawberry Spinach was checked, and they had sprouts, too. I’m not positive, but I think I could even see flashes of green in one of the spinach beds while I was watering it this morning. :-)
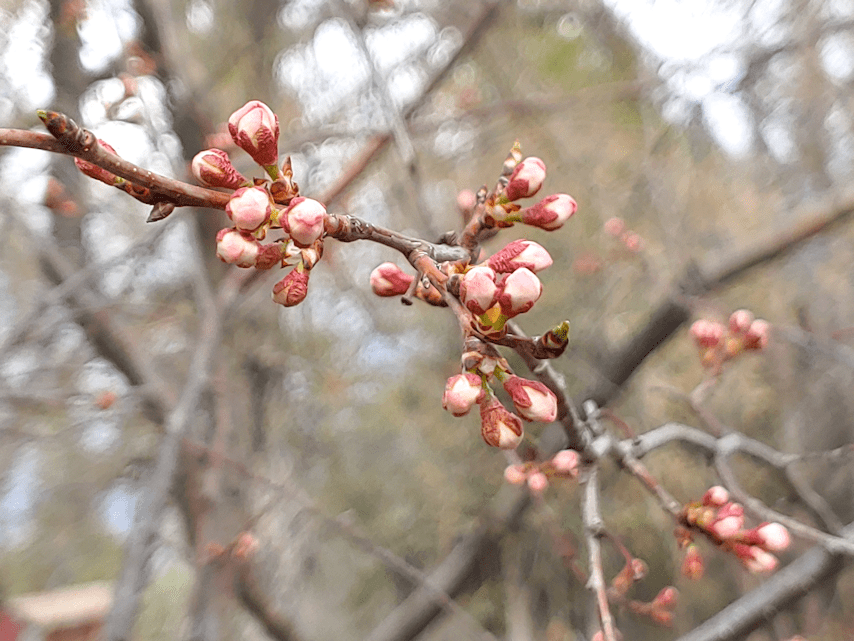
After we were done with our evening garden tending, the girls and I went to look at the crocuses, hyacinths and tulips. There are so many tulips pushing their way through the leaf litter now! They were planted under some plum trees, and I noticed the trees are starting to bud!
I love trees that bloom before they start forming leaves. They are so dramatic and spectacular in full bloom!
I aaallllmost got the camera to focus on the minuscule spider in its web!
In between all this, my younger daughter and I made a trip into town, which included a stop at the post office on the way home. We got packages!! More on that in my next post. :-)
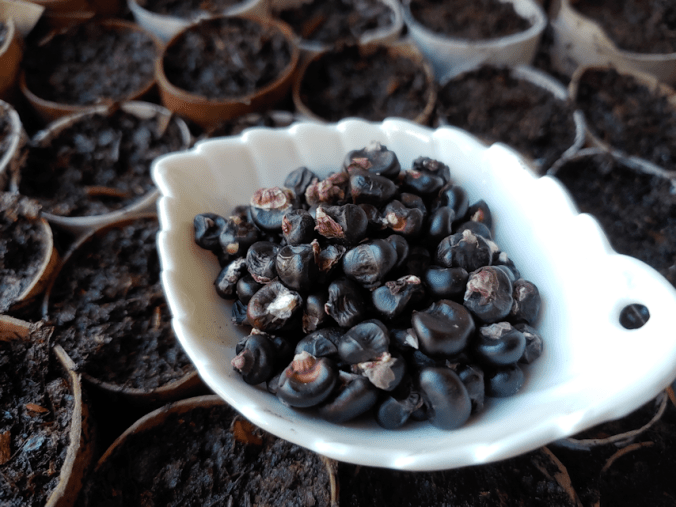
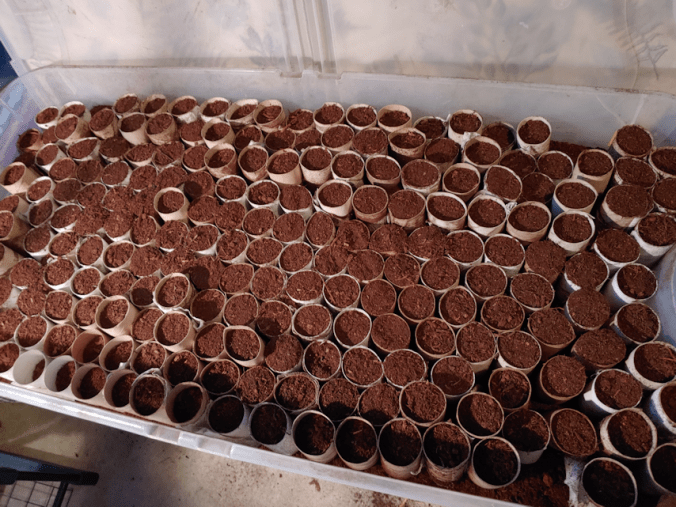
Today’s priority was to start the last of the seeds indoors. I’d been preparing a bin with toilet paper tubes, as something that would allow the least root disruption when transplanting (at least, so I’ve read). After a couple of days, it was time to start planting the Montana Morado corn!!
Aren’t they gorgeous?
The seed packet said “at least 75 seeds”. That’s a lot more than 75!
I started puttering with the peat filled tubes in preparation of planting in them, but something felt wrong. Ever after a couple of days, some of the tubes were still floating on a layer of water, and as I made holes in the medium, it seemed really dry below the very top.
I didn’t want to take a chance, and decided to crack open one of the tubes.
I am very glad I did.
It was completely dry inside!
Well, so much for that idea. If the peat didn’t absorb the water after all this time, it wasn’t going to happen.
For the next while, I opened every one of those tubes to empty them.
Once that was done, I kneaded it like bread dough, to work in the water. Then added more water and kept working the mixture until it was completely wet.
I should have done that right from the start!
I did work in the last of the sifted garden soil, too. The soil absorbs the moisture faster than the peat, so I thought that might help. The amount was quite small, compared to the quantity of peat!
As for the toilet rolls, they will not go to waste. These were dumped into the old kitchen garden, where they be composted directly into the garden, as we add soil.
The bin is still being used, though.
After punching holes into the bottoms of more cups and filling them, I ended up quite quite a bit of unused peat mix.
I made sure to water them from the top again, just to be sure, and left them to drain for a while.
For small seeds, I like to use a bamboo skewer to handle the seeds, but for larger seeds like this, I find a straw works great. It’s just the right size to push holes into the medium, and is perfect for pushing the seeds down to the right depth.
I knew I wouldn’t use up all the cups, so I didn’t cover up the seeds until they were all done, so I could easily see which cups were planted, and which were not.
Then I used some twine to wrap around and between the cups, to mark between the planted and unplanted cups.
I ended up with 33 cups with corn in them; 31 with 4 seeds each, and 2 with 3 seeds each.
I have some concerns about doing it this way, but starting corn indoors has been an active topic of discussion on several cold climate gardening groups I’m on. Most of the experienced Zone 3 gardeners say all corn should be started indoors (my mother never did; I would say the varieties make a difference!). Some insist that corn is too tender for transplanting, but the few who say that usually have many others commenting, saying they start their corn indoors all the time, and have never had issues with transplant shock.
So I’m hoping this works out. I really want to successfully grow this variety here!!
The remaining cups were planted with Mongolian Giant sunflowers. There isn’t a lot in the package, but the remaining 13 cups all got 2 or 3 seeds in them. I think there was a total of 33 seeds in the packet.
They all gone one last watering when all the planting was done.
The cover can be placed over the bin to help keep the moisture and warmth, if necessary. I think it should be fine, without, but we’ll see.
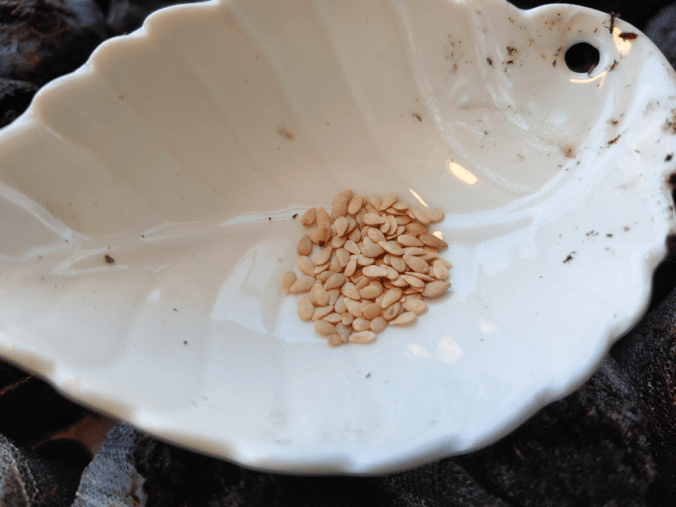
That done, it was time to plant the Hopi Black Dye sunflower seeds, and the cucamelons.
Again, there weren’t a lot of sunflower seeds in the packet. I’d forgotten how small the cucamelon seeds are! :-D
Since these were going into Jiffy pellets, the sunflower seeds each got their own pellet. It still filled less than half of the tray. There were 28 seeds in the pack, and I used the twine to mark between the two seeds. The cucamelons each got several seeds per pellet. I didn’t keep track of those. We still have the tubers from last year’s cucamelons, so it should be interesting to see which do better after they are planted out in June.
After these were done, we did the onions outside, which freed up shelves in the sun room. All the remaining seeds in the aquarium greenhouses are now in the sun room. I’m starting to be a bit concerned. Not a single squash or gourd has sprouted since the one Crespo squash germinated. That one is doing well (as are the dancing grouds), at least. I know gourds take a long time to germinate, but I would have at least expected more Crespo squash to germinate by now. I’m hoping the warmth of the sun room will be what they finally need to get them going. We shall see!
Starting the seeds indoors – and having to change plans on how to do some of them – took a lot longer than expected.
So did planting outdoors. Because, of course, things got changed up there, too!
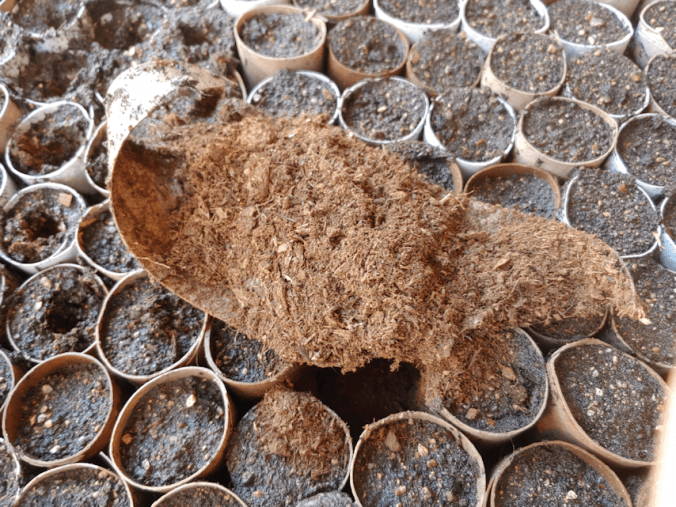
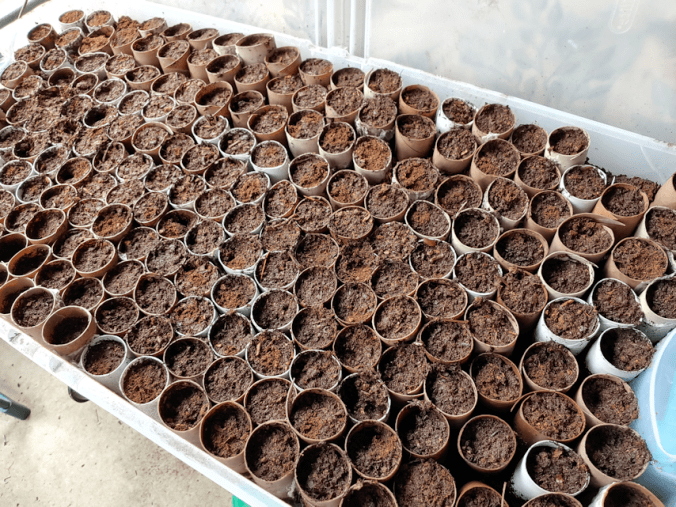
Today I took my mother to her doctor’s appointment, so I got very little garden stuff done today. Last night, however, I was able to start prepping the toilet paper tubes we’ll be using to start the Montana Morado corn in.
I picked up this coolant funnel long ago, because it’s perfect for jobs like this! :-D
I neglected to take photo of the next step. After filling all the tubes with peat, I used the 1/4″ hardware cloth I still have a piece of, laid it over the bin, then sifted peat over everything. Aside from topping up the tubes, I wanted it to get in between the tubes and fill the gaps to hold them in place. Especially in the spots where the wheels of the bin are, with a “fender” on the inside that I couldn’t put tubes on because it was too uneven.
After that, a whole lot of water was poured over all the tubes using a watering can. It would have been much easier to use a hose on “mist”, but by then it was night and too cold to use the hose.
The sun room was nice and warm still, though!
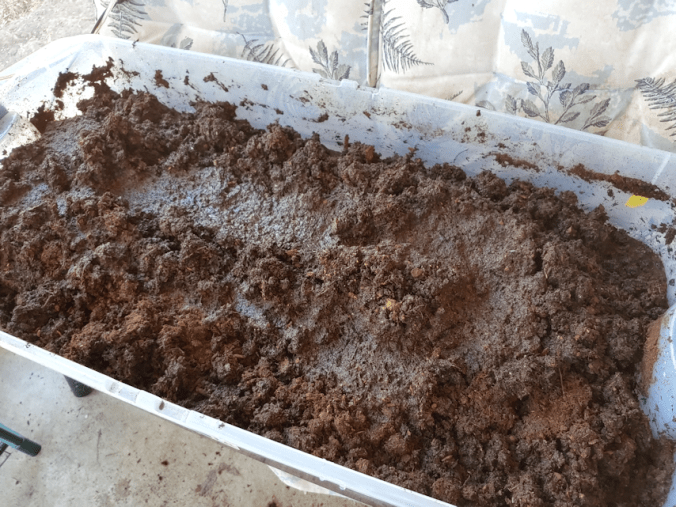
Adding the water had two unexpected effects.
The first was, the tubes started to float! I should have expected that. The problem was, you can’t actually see that it was floating. I’d added another watering can of water before I reached out to even the tops of some tubes, and the whole thing sank!
The peat may have been all light and floating, and it takes a long time to absorb moisture, but the tubes are a different story! They not only quickly absorbed water, but some of them started to come apart at the seams. Thankfully, they’re packed tightly enough to hold each other in place.
It did make be wonder if this would work at all.
I think it will. Here is how it looked this morning.
The cardboard actually seems to be helping the peat absorb more moisture. I went over the surface with a spray bottle. You can see in the photo that some of them still have dry areas. This is all being absorbed from bottom, though, so they should have been mostly moistened through. Normally, I would have premoistened the peat, but there was just too much needed for this job.
I’ll check it again tonight and see if I can start planting the corn, or if it will wait until tomorrow. There is still enough water in there that the tubes in the middle are still floating a bit, as the bottom of the bin is sagging from the weight of the water in that area.
After I got home from helping my mother, I made a quick run into town and made a special trip to a dollar store. I picked up some hula hoops. We haven’t been able to find row cover supports, so my daughter thought of cutting hula hoops and using those. If it works out, we can get more later.
I also cleaned the store out of pinwheels (they only had 6 left), plus I got some spinners and wind vines. When I did my rounds this morning, I found birds digging in the dirt in the bed we planted carrots in. :-( All those beds now have shiny metallic pinwheels in them. I’ve set up wind vines at the strawberry spinach, and as close to the garlic beds as I could. I put spinners in the ornamental apple trees over where the spinach was planted. We still have a few more of those, but we’ll save them for later. I will probably get more pinwheels after the store restocks. It would be good if we could replace the plastic grocery bags on the pea trellises with things like that. I noticed there was a solar motion sensor floodlight that would be good for startling deer, but it was out of budget. :-/
The girls and I were quick about putting the bird scarers out. I had hoped to cover the beds with plastic, but it was just too windy. So I watered the beds again. The water will help regulate the temperature in the soil as temperatures dip overnight. At least, that’s what I’ve read! I didn’t get any photos because, to be frank, I just wanted to get back inside again! When I checked the weather once I was inside, it said we were at 2C/32F – but the windchill was -6C/21F! It certainly felt like it was below freezing. Meanwhile, the thermometer in the sun room was reading about 28C/82F.
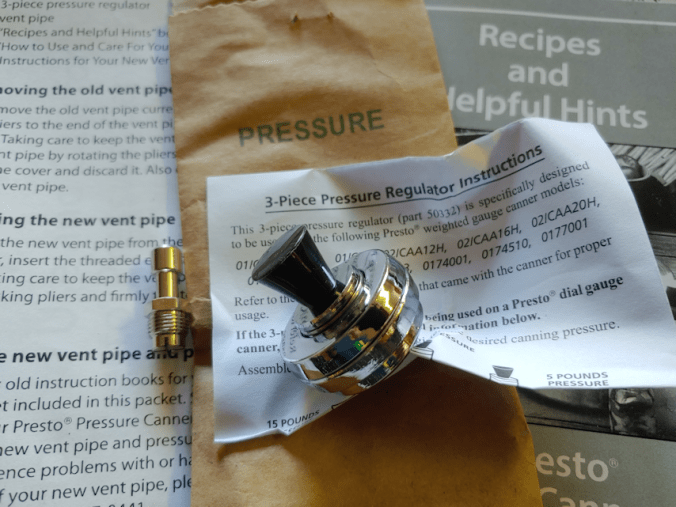
One of the things I made sure to do before I went to my mother’s was to get the mail. The last of our onion sets were in, but so was another pleasant surprise!
The kit to convert our pressure canner to use a weighted gauge (aka: jiggler) is in!!!
I can hardly wait until we can test it out!
That might be a while, though. We’ve got lots of outside stuff that needs to get done, and we won’t be in a position to continually monitor the canner while it’s being tested.