They were still nice and crunchy, which is nice. There is still that very mild radish flavour. They were much sweeter than I expected, though. Not a complaint, but I did expect more of a vinegar flavour, considering it used two types of vinegar. It was quite good, tasted on its own, and would be a nice little something on the side of any meal. In my sandwiches, they added a bit of a crunch, but are mild enough in flavour that they really weren’t than noticeable.
This is definitely something I would do again, and try out different brine recipes. I think they would do nicely with a garlic and dill brine.
For now, we’re just doing quick pickles. I am thinking that we might try to grow more for next year, to have enough to make it worth breaking out the water bath canner, to have some shelf stable jars for the pantry.
As someone who doesn’t really like radishes, I’m happy with how these turned out, and I think they may become a regular in our garden – as long as we’re able to sow the seeds in the fall, since they don’t tend to survive spring sowings.
There were four harvestable squash out of the three vines, though the first one to develop sort of stagnated early on, stayed dark green and never got very big. In the photo above, you can see it in the front row, third from the left.
The largest squash with the damage visible is the big Crespo squash we wanted to make sure to cook first. However, with losing our hot water and having to constantly heat water for washing anything, we didn’t get to it until now.
It was remarkably easy to cut into! I expected to have a harder time of it.
The colour is not only quite a deep orangey-yellow, it actually stained my hands a bit, by the time I finished scooping out the insides and removing the seeds. Which suggests to me that this squash has quite a bit of beta carotene in it.
I cut it into quarters, then cut out the stem, which you can see in the next image, before putting it in the oven. Aside from adding a bit of water to the bottom of the pan, nothing else was done to it. I want to be able to give it a taste without any seasonings, first.
In the last image, you can see the seeds, washed and draining. There were very few seeds that got rejected. I supposed we could roast some for eating, but I don’t actually have any interest in doing that. Later, these seeds will be laid out on a parchment paper lined tray to dry out.
I set the oven for 350F for about an hour before stabbing the pieces with a fork, then adding another 45 minutes. As I write this, they are soft and appear to be cooked through. I’ve shut off the oven and left them in there, just in case there were some undercooked parts I couldn’t reach.
Today, I was actually planning to get some stuff done outside but, while it is warmer than yesterday, it has turned out to be a rainy day.
Sort of.
It’s been raining off and on since last night. It’s supposed to start raining for real at about 7pm and continue raining through to about 10am tomorrow morning. Since some of what I hoped to get done today involved power tools, I decided to postpone it!
There is a bit of concern about the winter sown garden beds. When the seeds were sown, the beds were completely dry and did not get any watering. It’s cool enough that it’s unlikely they will germinate, but if they get wet and don’t germinate, the seeds may rot. If they get wet and do germinate, they may freeze. The heavy leaf mulch, however, should protect them from both possibilities.
I hope.
So today I’m focusing on indoor stuff, but still garden related. We had a box of San Marzano tomatoes in the living room that were fully ripe. Those are now soaking in vinegar water. Later on, I’ll remove the tops and tails, and get them in the crock pot for the night to make tomato sauce. There might be room enough to use some of the whole tomatoes we have in the freezer right now.
Once the oven is free, we have lots of peppers that have ripened and are starting to dehydrate in the living room. Those will get set onto trays to dehydrate fully and faster in the oven. Except, maybe, the hot peppers. There are so many of them. We might instead string them up and hang them above a heat vent, instead.
There was also a large colander in the old kitchen, full of tomatoes that were further along in ripening. Every now and then, I go through the bins and pull out the ones that are blushing and set them in the colander until it’s full. I went through those, setting more San Marzano, and a few mystery compost tomatoes, into a bin for the living room to continue ripening. The cherry tomatoes went into a small colander for general use and snacking in the kitchen. These are the Chocolate and Black Cherry tomatoes in there, a lot of which still need more time to ripen, plus a couple of little red tomatoes from the mystery plant that self seeded among the Red Thumb potatoes. When we harvested the tomatoes before our first frost, that plant had many small tomatoes on it, all still very green. I’m glad to see that they are actually ripening now. Judging from the colour and the size, I am guessing it is from the Mosaic Medley mix we grew in that bed a few years ago. That was a mix of cherry and grape tomatoes. These are so small, though, and with how the clusters were formed, I’m tempted to think they might be Spoon tomatoes. They’re big for Spoon tomatoes, but as something that has self seeded, it’s possible they reached a size they might not reach when grown as transplants.
Well, whatever they are, they are a tomato, and my family likes tomatoes, whatever the variety!
Aside from all of this, I hope to take advantage of today being an indoor day and start editing a couple of videos, including the October garden tour video using footage I recorded on Nov. 1. 😄
But first, lunch – and maybe a taste of that Crespo squash!
I’m heading to my mother’s this afternoon, then taking her to a medical appointment, so I thought I would bring some things from our garden to her.
I picked the potatoes from under just one Irish Cobbler plant, which had a pretty decent amount of larger potatoes. There were also small ones, so I just buried them and the plant roots again. There’s a few orange carrots, a zucchini we harvested earlier, some Roma and Indigo Blue tomatoes and a Sweet Chocolate bell pepper. While cutting some thyme, I noticed a shallot that got missed, so I grabbed that, then added a couple more we’d harvested earlier. I also cut some spearmint for her. I decided to add one of the Black Beauty tomatoes we harvested earlier, too. The softest one I could find among the lot. After bagging it up, I remembered to grab a head of garlic for her, too.
My mother being my mother, I expect to get a lot of snarky comments and backhanded insults. 😄 She’ll have issues with the brown pepper and different coloured tomatoes. She did ask me to give her some of the tomatoes to try, but then launched into a long speech about how bad it is to have not-red coloured tomatoes. And, of course, she’ll tell me how my sister brought her soooooo much from her garden, and it’s so much better, and she’s just one person, so it’s all too much, and how bad it was for me to bring more.
My mother is very predictable. 😁
But I’m giving them to her anyways. Who knows. She might actually show appreciation for a change. 😄
We did have one really nice, ripe Indigo Blue Chocolate tomato for my daughter to taste test. I’d picked three and put them in my pocket so I could use both hands. One was so ripe, it split when I bent over, so it needed to be eaten right away.
My daughter found them absolutely delicious. Nice and sweet. Juicy, but not too juicy, with a rich tomato flavour. We have others harvested that will need to be eaten quickly, and I don’t think that’s going to be a problem at all! 😄
The Indigo Blues are an indeterminate tomato, so I can expect to be able to harvest small amounts of them more often, from now one. The Romas are starting to ripen in mass quantities, so I might just wait on processing the ones we’ve picked, so we can do larger quantities all at once.
On another note completely, we did try to use the new bread machine yesterday.
Something went wrong, but I don’t know what.
I came into the kitchen to check on it, and it was off. There was still power to it – the display was showing the exact settings I started with for a basic 1.5lb loaf. It should have been showing a count down on the time. It just wasn’t running. The bread dough had been completely kneaded and was just sitting and rising the pan, so I left it. Later on, my older daughter took the dough out and baked it in the oven, so we now have one, perfect little loaf in bread jail to try.
Hmmm… I wonder. We keep our bread in a bin – bread jail – to protect it from the cats. I wonder if maybe a cat stepped on the controls while we were not around, and shut it off? We’ve set the bread machine up on the counter near the microwave, where it could be plugged into an outlet on a different breaker, and plenty of space around it for when it’s hot and baking. It’s the one counter the cats are allowed on, as they like to sit and look out the window.
That’s about the only thing I can think of, other than mechanical failure.
My daughter plans to try again, later, so we’ll see!
Who knows. I might come home to some fresh bread to try. :-)
Yes, here we are, Oct. 9, and there’s still things to harvest!
Well… half a harvest.
I’d been leaving the sunchokes along, and this is how they look after being hit by frost, then rain, then more frost. This being Thanksgiving weekend here in Canada, I decided to go ahead and harvest some of them to include in our meal. There were ten of them planted, and I decided to only harvest the nearer five.
I was a bit surprised by how they looked. A lot whiter than I expected, but that may be because they never got to reach their full size during this crazy growing year we had. This bed is right next to where some of the longest lasting flooded areas in the yard this spring. The bed was slightly raised, which was probably the only thing that saved them.
There wasn’t a lot to harvest, and I also made sure to rebury at least one of the largest tubers under each plant, for next year.
As for the plants, I did a chop and drop. I’ll add more mulch to this bed before things freeze over, too.
To prepare them, since they were so fresh, I basically just scrubbed them. I’ve never tasted sunchokes before. These are supposed to be edible raw, so I made sure to try a piece. I don’t know how to describe the taste, other than “mild”. There’s nothing else I can compare it to in flavour.
I added them to the other vegetables that I tossed with olive oil and seasonings. I liked them better roasted. They take on other flavours very well. Roasted, they have a very smooth texture. All four of us liked them, which seems to be a rare thing!
If all goes well, we will have a larger harvest of them next year. 😊
Well, here it is! The final product in trying to make my mother’s baking soda cheese.
Did it work?
Well… sort of.
First of all, this is not at all like what I remember my mother’s cheese looked like. That was a semi-hard cheese that could be sliced. This… is not. It’s more like a cream cheese in texture, but it wants to crumble more than spread. It can, however, be spread.
As for the taste… I have a really hard time describing it. It’s a young cheese so, of course, the flavour is very mild. Which means it would lend itself very well to the addition of herbs and spices and other flavours. As it is now, with just salt, there is a sort of tanginess to it that I can’t put my finger on. It somehow manages to be both mild and bold tasting, at the same time!
All four of us have had a taste, and we do have a consensus.
It’s very good. Delicious, even.
In fact, as I write this, I’m enjoying it on a slice of oatmeal bread, with a cup of Irish Breakfast tea.
What I should probably do is take some to my mother, so she can try it and tell me how it compares to what she made. After all, I only ever saw the finished product once, and that was many years ago. Based on my memory of it, I did not succeed in recreating it. However, the finished product is very good.
With the cost of milk these days, compared to a container of Boursin cheese at the grocery store, we’re not really saving any money by making it ourselves. If I were to compare to the cost of a block of plain cream cheese, we’d be losing money by making it ourselves.
Is it worth making again?
Absolutely. And we will, probably in larger quantities.
It may not be as I remember my mother’s soda cheese looked like (I can’t compare the taste too much, since hers had been flavoured with caraway seeds), but that’s just more reason to keep trying!
The Overview
Okay, so let’s look at why it might not have turned out like my mothers. What differences were there?
First up, quantity of milk. I’m now convinced that my original notes, which said “about 5 gallons” of milk was accurate. My parents still had a few cows at the time I visited and saw this cheese, and it was just the two of them, so they would have had a LOT of excess milk.
Second, she used raw, skim milk. My parents always ran the milk through the separator. While I’m sure they must have done it once in a while, I don’t remember my parents ever setting aside whole milk. Until it finally closed, my parents sold their cream to a local creamery for a bit of extra cash (though they sometimes took payment in butter!). Skim milk was for home use. Cream was for selling. I used the type of milk we usually buy; homo milk (3%). We never, ever buy skim, because we all find it incredibly disgusting. So what I made has a higher fat content than hers would have, plus our milk was pasteurized and homogenized. Hers would not have been.
Other differences include my hanging the cheese to drain, when my mother had just set it aside; my curds may have been drier than hers. She melted her curds in a frying pan before pouring it into a mold. Chances are, the frying pan she used was cast iron. If so, that too would have made a difference. She would have made hers in the summer, when the milk would have soured much more quickly. Even the natural yeasts in the air might have made a difference, and while my mother would have ensured everything was clean, she could not have sanitized things to the extent that home cheese makers can, now. The salt I used also would have been different. She would have used ordinary table salt, which would be iodized. I used non-iodized coarse salt that had been run through a coffee grinder to powder it.
There’s also the fact that she may not even remember some details, or had not thought to mention some because, to her, they were just so obvious she couldn’t imagine them not being done.
There are so many little things that could have made a difference, but until I actually take some to my mother to try, I don’t even know just how different ours is from hers! For all I know, I could be remembering her cheese completely wrong, or the cheese I remember is not the one she remembered and gave me her instructions for. We could have been talking about two different cheeses completely, and not known it.
I guess that’s just how it can be. I’ve had an interest in recreating ancient recipes for many, many years, and this sort of reminds me of that. When the ancient recipes were written down, they weren’t at all like modern recipes. Often, they were little more than a list of ingredients, with no or few quantities. The writer assumed the reader would already know the details. My mother just used what she had, in the quantities she had, done in the ways she knew.
I’m just fortunate I can still actually ask her for details, even if she can’t always remember them.
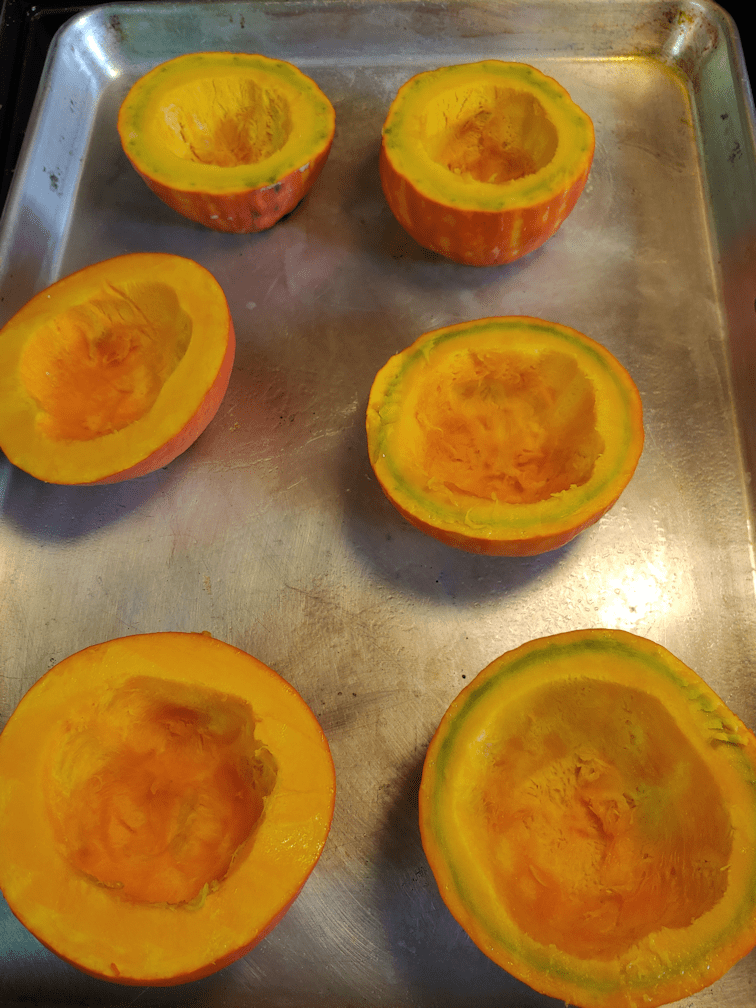
Okay, we finally gave the Red Kuri (also called Little Gem) squash a try!
We only had three that reached maturity (or close to it), and with the poor growing conditions, they did not reach their optimum size. I expect this has also affected their flavour, but we’ve never had this squash before, so we have nothing to compare them to, but each other!
I decided to roast them, as the easiest way to compare. While preparing them, I saved their seeds, including keeping the mutant squash’s seeds separate. If we liked it enough, we would try growing it next year, and see what we get.
The two furthest halves in the photo are the mutant. This is the one that had a different shape, and was a mottled green and orange, rather than a deep, reddish orange. It also has the most flesh to cavity ratio.
The two halves on the bottom and middle right, with the ring of green near the rind, is the one that was less mature, while the ones on the bottom and middle left are from the squash that matured the earliest and had the most time to ripen.
I added some butter and brown sugar to each one, and roasted them at 350F, with a bit of water in the bottom of the pan, until fork tender. The butter and sugar pooled on the bottom of each, so we could taste them all on their own, then again with the butter and sugar.
Once roasted, I split them up between the four of us, so that we had a piece from each of the three squash.
I didn’t even think to take a picture until we’d eaten them, though! Oops!
The results?
My husband didn’t like any of them. He doesn’t like squash.
As for our daughters and I…
The mutant: we all found it very dry compared to the others. Not a good flavour. My younger daughter couldn’t finish her piece. I was okay with it enough to finish her piece off. The seeds went into the compost bucket.
The ripest one: This one had a nice texture to it, and the flavour was good. Better with the butter and brown sugar, though.
The slightly under ripe one: this one had the best flavour of all! With or without the butter and brown sugar, it was quit enjoyable.
I’m pretty sure we didn’t plant all the seeds that came with the packet, but I now have seeds from the non-mutant squash drying. There is a possibility of cross-pollination with the Teddy squash beside them, so we might get something different next year… or not. They didn’t really bloom at the same time, much, so the chances of cross pollination is rather low.
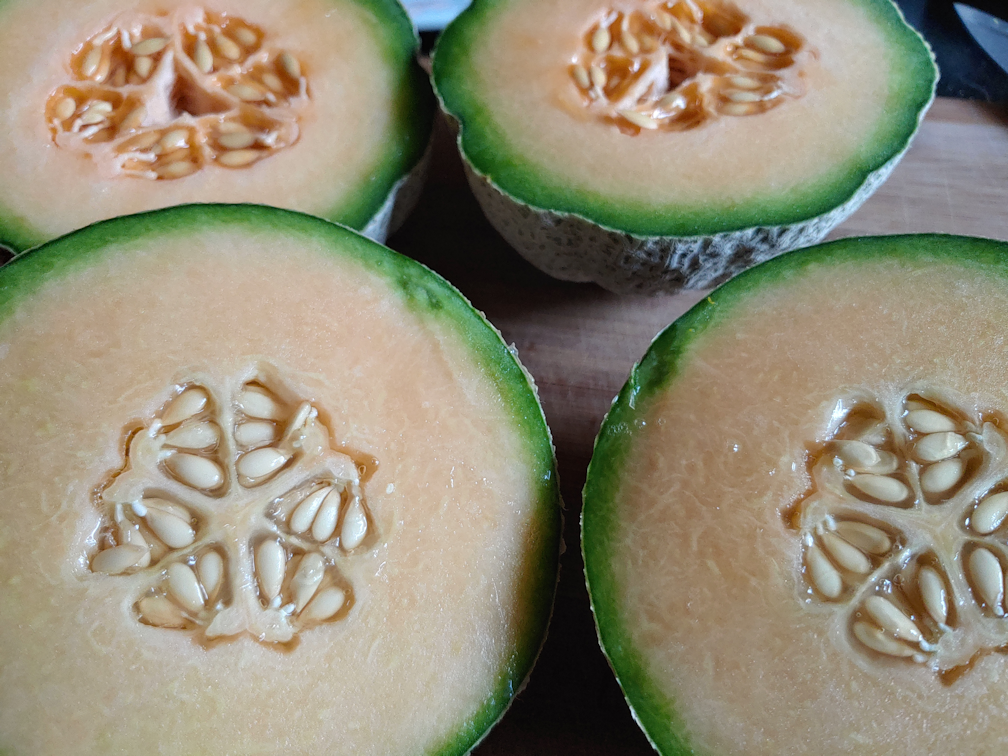
Last night, we went ahead and had the larger of the two Halona melons that were ripe enough to come off their stems.
When we taste tested our first melons, they were too early.
You can see how green the inside of the rind is, in both the Halona (top) and Pixie (bottom) melons.
What a difference three days can make!
There is almost no green visible, and the knife just slid right through. It was also incredibly juicy! After scooping out the seeds, there was enough juice in the cavity, it could be drunk!
The flesh was smooth and soft, but not so soft as to be mushy. The flavour was very much a cantaloupe flavour, and llightly sweet. The small size makes it perfect for a late night snack, too. :-)
Since it was so nice and ripe, I’ve kept the seeds to clean and dry for planting next year. It is definitely a melon worth growing again!
Today has turned out to be – so far – not as hot as predicted. On the down side, the smoke came back with a vengeance this morning. It has gotten better since then, thankfully.
While heading out to move the sprinkler, yesterday, I spotted Butterscotch and her brood.
I’m not sure if this is Bradicous or Chadicous. Either way, he’s adorable!
While tending the furthest garden beds, Butterscotch and her babies went through the squash tunnel on their way to the neighbour’s farm across the road. So much space they could have gone through, and they chose the squash tunnel! :-D
I also saw a lot of birds in the garden. They were appreciating the water on the ground from the sprinkler!
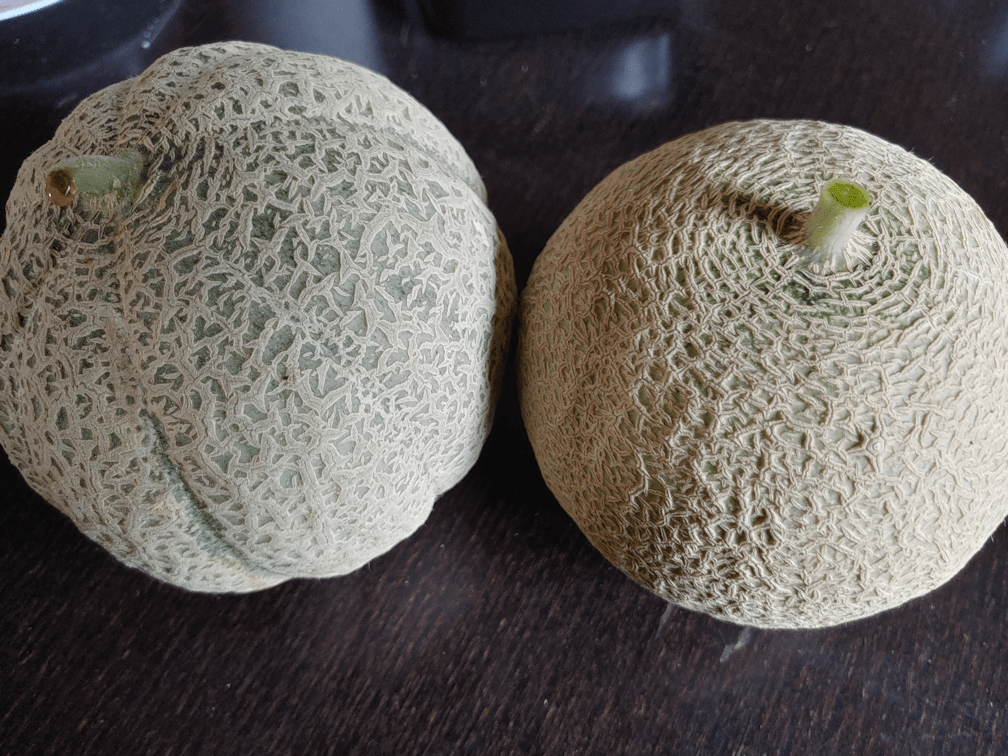
I decided to pick the two biggest, oldest melons to check them out. The one on the left is a Halona melon, and the one on the right is a Pixie.
Here, the Halona is at the top, and the Pixie at the bottom.
First thing I could tell is that they were not fully ripe yet. So we knew, when we taste tested them, that they were harder and less sweet than they should be.
They were still very tasty, though. General consensus is that we like the Pixie a bit better than the Halona, though it was really hard to pick one as better than the other.
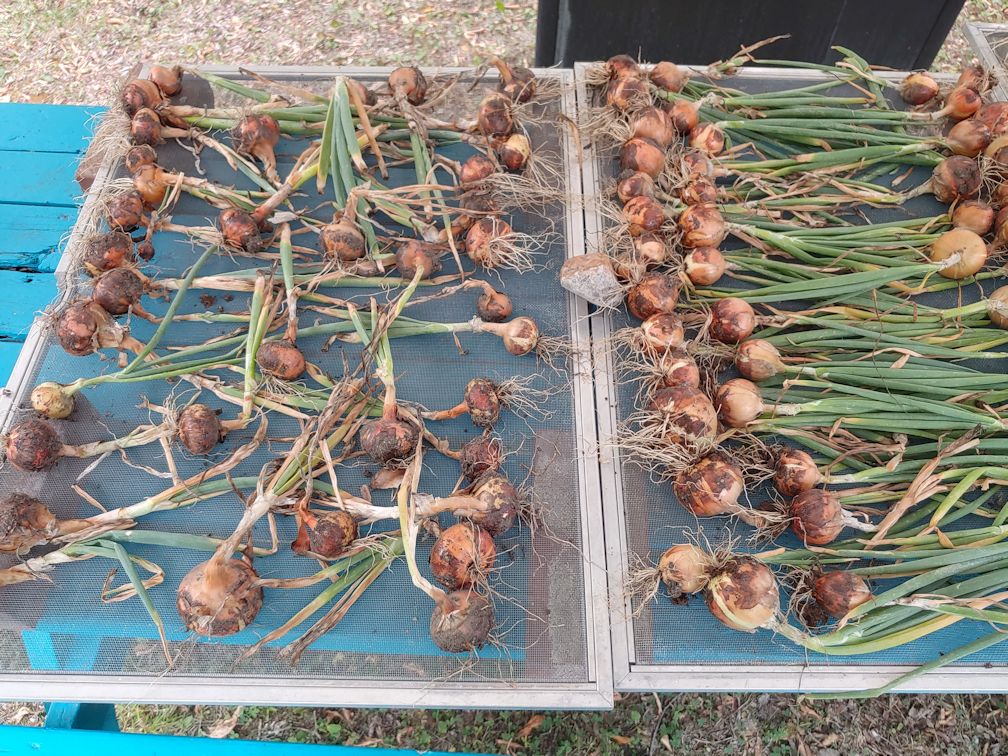
With the weather predictions including thunderstorms over the next few days, I decided it was time to harvest the rest of the onions.
The canopy has been moved over the picnic table, so that’s where we set up the screens to lay them out on.
The screen with the fewest onions on them are the ones grown from sets I bought locally. About half of those had already been harvested earlier and are hanging in the root cellar.
The red unions are the sets we got from Veseys, and the screen in the middle has the onions we grew from seeds. These will stay outside until the soil is dried enough to brush it off and trim the roots. At that point, I will decide if I will leave them under the canopy to cure longer, or set them up in the root cellar. It will depend on the weather.
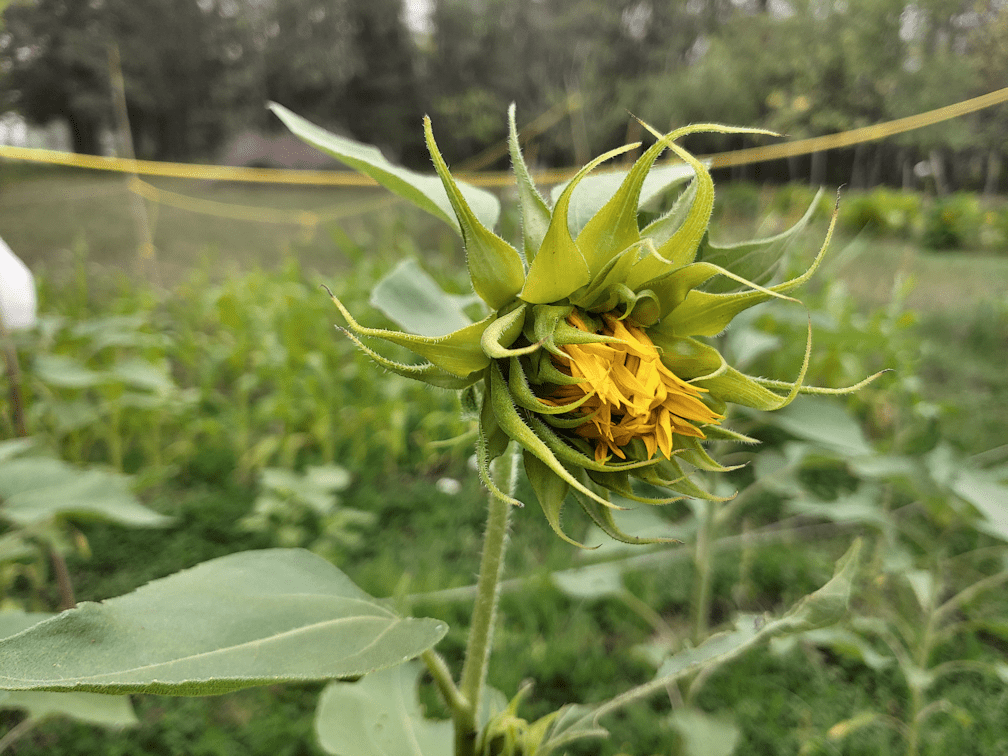
This morning, we are finally seeing yellow petals on the sunflowers! Most don’t even have heads developing yet. The Mongolian Giants are the only ones with developing heads right now. Given we’re in the second half of August right now, I don’t know that we have enough season left for them to develop. The sunflowers in the fields we pass are not only in full bloom, but today I drove by a field where the seed heads are already past blooming and starting to dry up.
In checking the rest of the beds this morning, I found this carnage in the purple corn.
Quite a number of stalks have been knocked down to the ground. From the looks of it, I think there may have been a cat fight in here or something. This is not the damage of a critter trying to eat the corn. I had to head out, so I left it until later today, when we’ll head out to clean up the mess. Hopefully, when it’s a bit cooler.
*sigh*
Anyhow.
Today I made a run to the nearer little city to do a Walmart run and pick up some more cat kibble, among other things. The smoke actually got thicker the further south and east I drove; most of the smoke we’d been getting before was from fires to the north. We are now getting predictions of possible thunderstorms starting tonight, which would go a long way to helping with the wildfires. I’m debating whether we should do an evening watering of all the garden beds or not. Some beds, like the tomatoes, got done already. Though we didn’t reach the predicted highs, I still had to run the hose into the rain barrel for a while, to get rid of the hot water, first. Otherwise, it would have scalded the plants. After letting it run, our well water still is not getting cold like it usually does. Even our ground water is warm! Which means there’s no danger of shocking the plants, I guess. I watered the potato bags, and those looked like something went crashing over them, too. Those, at least, can handle it better than the corn!
This year’s gardening has certainly been a learning experience.
After looking up and confirming when to start harvesting cucamelons, I went ahead and picked the largest ones.
The fruit doesn’t grow larger than 1 or 2 inches, and we read that if they are left too long, they get really seedy. Which makes sense.
Aren’t they adorable?
There was just enough for 2 each, so the girls and I tried them last night, while I left the last two in the little bowl on the table for my husband to try in the morning.
One of them disappeared.
Either we’re going to step on a cucamelon at some point, or a cat ate it. :-D
So… how did they taste?
Like cucumber, really. :-D The skin to flesh ratio is higher, so you do have more of that slightly bitter flavour of the skin, but just enough to make them distinct. They have a nice crunch, too.
From what we read, picking the fruit makes them more productive, and they will produce for a long time. I look forward to having more of them to gather, soon!
I think these are definitely keepers for future gardening. Apparently, in colder climates with shorter growing seasons like ours, you can even dig up the roots in the fall for spring transplanting, and have earlier production.
For those new to this blog (welcome! Thanks for stopping by! :-) ) we have made a couple of attempts at making mead. If you want to read more about how that went, you can visit here for the first attempt, and here for the second. Both links are for bottling day, but have links to the entire process as well.
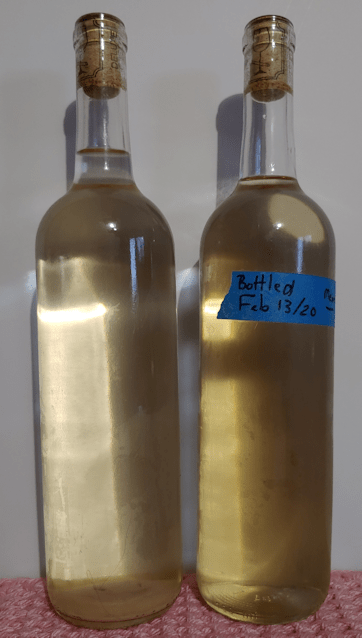
Today, I decided to open a bottle of each batch to compare them. Both of these bottles were kept in the fridge, so no additional fermentation would happen.
Both meads are very clear (any cloudiness in the photo is of condensation on the outside of the bottles), but the one on the left, bottled 6 months ago, has sediment – lees – on the bottom. All the bottles from this batch do. This means that it, potentially, could continue to ferment. Given that these are corked bottles, we don’t want that. There is a potential for bottles to explode, which is why they are being kept cold.
Mead Baby 2.0, bottled almost 2 months ago, is clear on the bottom.
The older mead is lighter in colour, too. This is likely because the honey to water ratio was lower in this batch, which was made in a 5 gallon carboy, while Mead Baby 2.0 was a 1 gallon batch. We had a 5 kilo bucket of honey for the first batch; about 11 pounds. We probably should have added 15 pounds of honey for the big carboy, but didn’t have that much. For the 1 gallon batch, we weighed out 3 pounds of honey for it.
I decided to take a hydrometer reading of both. I still don’t quite understand what it’s telling me, though the fact that these were both refrigerator cold would likely have affected the reading, too.
In pouring the mead into the test cylinder to get a reading, both meads were effervescent, bubbling up as though lightly carbonated. By the time I poured the tested mead into glasses, though, there was no carbonation left.
My hydrometer has 3 readings on it, and part of my confusion is that the scales on the hydrometer don’t match what’s on the printout it came with.
When we bottled the first batch, the Potential Alcohol by Volume reading was at only 1%. Today, it’s at 4%, which put the specific gravity reading was 1.032, and the Balling/Brix reading at 8. (My hydrometer says Balling, the printout says Brix)
Mead Baby 2.0 had an AVB reading of 8% on bottling day, and today it’s at…
…8%.
Specific gravity is at 1.062 and Balling at 15.
I should probably test them again after they reach room temperature, but… I just don’t feel like it. LOL Still, the fact that the reading changed for one, but not the other… it might mean fermentation is still happening, albeit very slowly.
So how do they taste?
The first batch has a light, almost crisp flavour and an aftertaste that I would definitely attribute to our using bread yeast. Also, it doesn’t taste like something with 4% AVB. I would think it’s closer to that 1% when we bottled it.
I don’t really like it.
Mead Baby 2.0 is REALLY sweet, almost syrupy, and much smoother. It tastes a lot like Port.
I like it better than the first batch, but… not by much.
Keep in mind, though, I don’t really like alcohol in the first place. I’m far more interested in the making of it, than the drinking of it. :-D
The flavours should continue to change with time, however. There are 2 bottles of Mead Baby 2.0 in the root cellar. One will be opened at 6 months, the other at 12 months, so I will likely do another comparison, then.
The next time we get a bucket of honey, we plan to make a batch using fruit. Hopefully, that will help resolve some of the fermentation problems we’ve had.