Apparently, we got rain while I would outside, watering the garden, too.
That would have been nice, but all we had was hot, muggy, thick air.
*sigh*
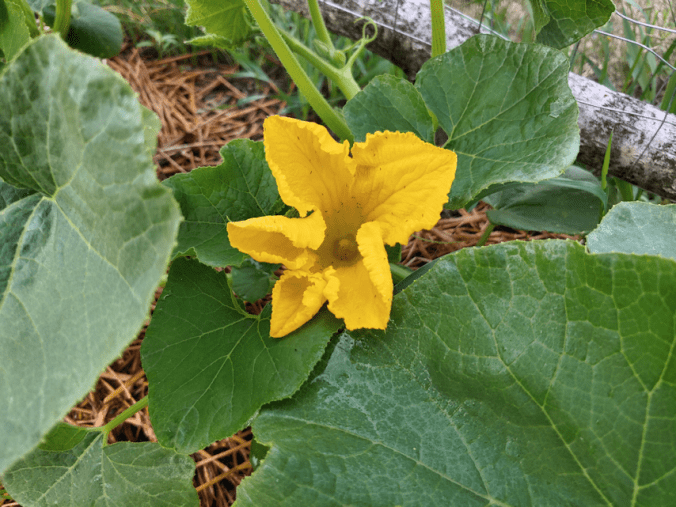
One of the awesome things about gardening is how fast things can grow. We’ve got a whole bunch more summer squash blossoms, more squash growing (still no yellow zucchini, though), and the squash that started earlier could probably be picked right now. I’m going to wait until they’re a bit bigger, though.
I was very excited to see our very first WINTER squash blossom! Those are starting to get quite big. As we are able, we’re moving them to train them up the trellis, and some are sending out tendrils and looking almost ready to be climbing on their own, as are more of the melons. We’re going to have to go back with some twine to string between the sections of mesh and fill in the gaps a bit for the few plants that are under them. I had remembered to look for twine when I was last in the city, and found a huge roll of it. It should last us until next year! :-D
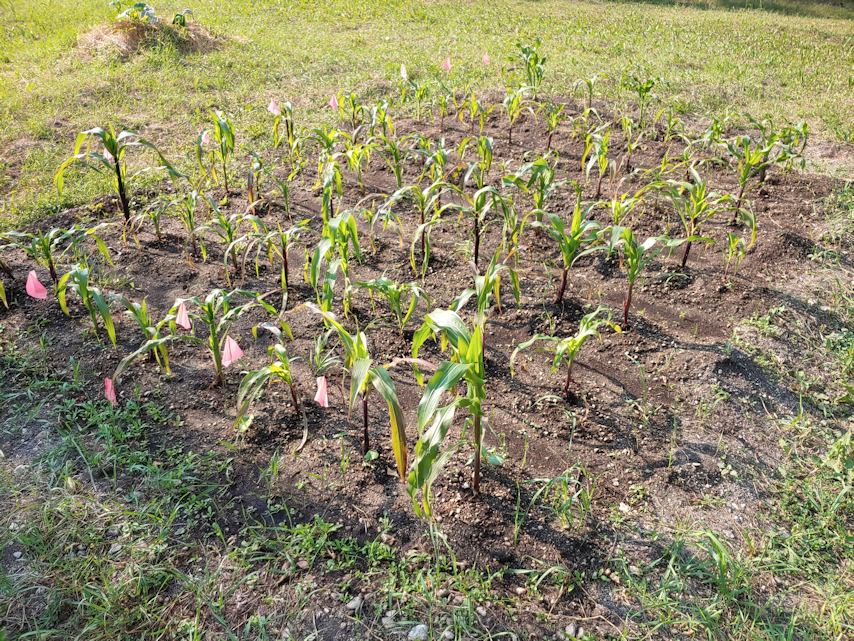
I am absolutely thrilled by the Montana Morado corn. This is the stalk that we are seeing silk on already. Pretty soon, it will have pollen, too! A few of the others are starting to show the little red bits, but they do not yet show corn silk.
We’re going to have to go in between these and “hill” the corn. With having to water so often, and not having a mulch, the water is eroding the soil at the base of the corn a bit. A couple were starting to fall over, so last night I worked the soil around their bases and secured them upright with it, but I want to do that with all of them. The ground here is so soft, though, we don’t walk in here at all unless we absolutely have to. I’d hoped to be able to add grass clippings for mulch, but with the heat and lack of rain, the grass hasn’t been growing.
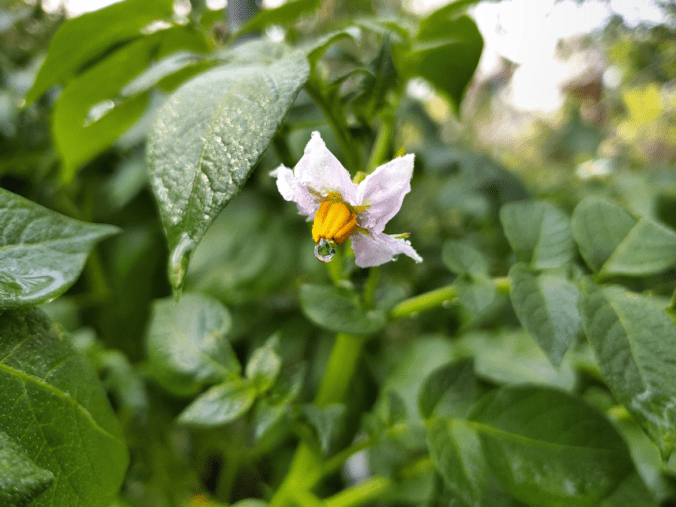
There are just a few potato blossoms that are fully open right now, but I am seeing many, many buds!
Of course, I’m always second guessing myself about deciding not to “hill” the potatoes more. As determinate type potatoes, it won’t result in more potatoes, but the plants have gotten so tall, it feels like they should be hilled! :-D
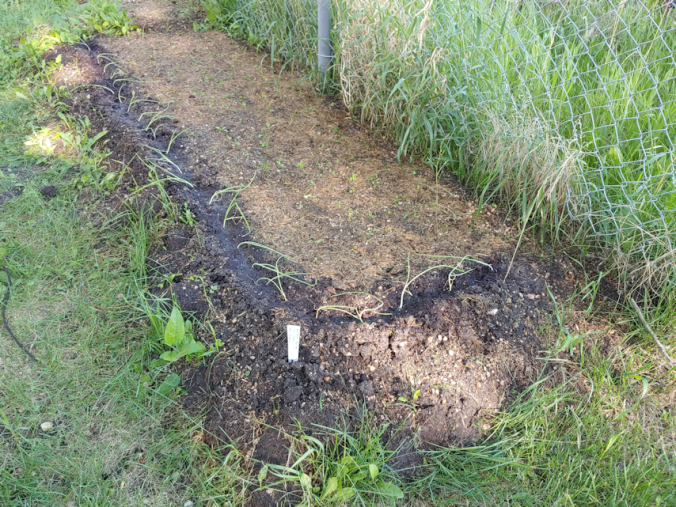
When I got to the old kitchen garden, I found the end of the L shaped beet bed was nibbled on.
I did see the woodchuck run under the garden shed this morning, but I’m not sure it is responsible for this. I think the carrots in this garden were nibbled on more, but I’m not sure. The motion sensor light would cover that carrot bed and the section of this beet bed next to it, and should be startling off any critters, but the section in the photo has a lilac bush between it and the light, so it wouldn’t be triggered by anything nibbling on the beets here.
I did see a deer going by the garden cam when I checked the files this morning. They seem to be just walking through, and not even going very close to the garden, now that I’ve put up the stakes and twine around the corn, and rope along the back of the Dorinny corn and the pea beds. I find myself wondering if a deer might have nibbled on the beets, since the woodchuck doesn’t seem to like beet greens, but that would mean the deer coming right up to the house, and pushing its way through the asparagus ferns and rhubarb, and I just don’t see that.
The beet beds in the old kitchen garden did get the Critter Ridder granules, but I was finishing off the container in the area in the photo, so there wasn’t as much there. It obviously doesn’t work to stop cats, since yesterday evening, we saw Junkpile and her kittens in the beets by the retaining wall. :-D
I still have to use the new spray we got, but it’s supposed to be applied on dry surfaces, so I’ll have to wait until later in the day.
Or until tomorrow, if we actually get the predicted storm!
It occurred to me that, while I’ve been posting lots of pictures of our garden, some areas get focused on more than others. As we are now in July, I figured it would be a good time to do a “tour” of all the garden, and review how things are doing so far.
This is going to be a very photo heavy post! :-D Which is probably silly of me, as our internet connection is horrible right now, so it will probably take me at least a couple of hours to get it done! :-D
Let’s get started!
Asparagus bed with onions
Our first photo shows both success and failure.
In the foreground is the asparagus bed. We planted 6 crowns of Purple Passion Asparagus. The crowns came in at the same time as our Mulberry sapling. I didn’t get a photo of that. It did not survive that one unusually cold night in late may. :-( But the asparagus did emerge, and we are very happy with them!
Along two sides of the asparagus bed are some tiny onions. These were some last minute Norstar onions we started indoors after having so many of the other onions seeds we started get destroyed, one way or another. They are incredibly tiny, and yet they are forming bulbs!
In the other bed is where we planted the Strawberry Spinach. That is a total loss. We have no idea what happened to them after they sprouted. I do want to try them again, next year, though. These are both intended to be permanent beds.
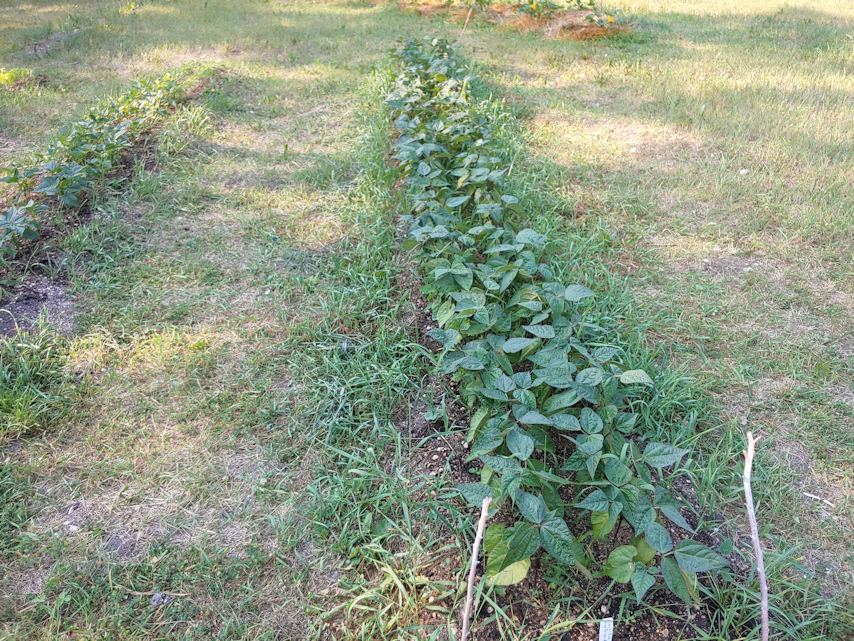
Royal Burgundy
Lewis Green
Golden Rod
Here we have our three bush bean beds, planted in a temporary garden location. The photo on the left has the Royal Burgundy beans. We are totally amazed by how vigorously they are growing! The middle photo shows the Lewis Green beans, and the final photo shows the yellow Golden Rod beans. It’s interesting to see how the colours of the leaves show differently with the different coloured beans!
I would call all of these a success, so far. Aside from the odd deer walking through them, or a cat rolling around in them, they have not had any external issues, and they seem to be growing very well. I’m really looking forward to eating fresh beans! We pretty much never buy them at the grocery store, as they never look good, so these will be a real treat. :-)
Robin beets with onions
This is the new bed in the old wood pile area, built this spring. It was seeded with Robin beets, a new variety we got along with some Merlin beets, which we tried last year. Later, when we planted onion sets, some were planted around the beets to act as a deer deterrent.
It didn’t work.
Need more onions.
The beets do seem to be recovering, though. A while back, shredded Irish Spring soap was scattered in the bed, and this morning I added the Critter Ridder granules, so hopefully, it will not be a deer buffet again!
This bed, and the two others near it, are intended to be permanent beds, and we will eventually build boxes around them, and figure something better out for the paths in between.
Beets and lettuce beds
Mixed beets bed
These are the rest of the beets, in the old kitchen garden. They have not been nibbled on by critters, thankfully.
The beets planted along the retaining wall blocks are of the Merlin seeds we got this year, plus seeds from last year, which was a collection of Merlin, Boldor and Chioggia. The girls planted them in blocks. There were still seeds left, and when we finished planting in the other beds, I went ahead and mixed all the remaining beet seeds together and planted them in the L shaped bed, so that is a beet surprise!
All of the beets here are looking to be quite a success. Mostly because the deer haven’t gone into the garden, and apparently our woodchuck doesn’t like beet greens.
We planted 4 types of lettuce in the retaining wall blocks, alternating with Lunix, Merlot, Lollo Rossa and Buttercrunch. We added the mosquito netting wall later, as a deer deterrent. The Lollo Rossa seemed to struggle, but the others were doing okay.
Right up until the woodchuck ate them all.
We will be planting more lettuce later this month, well after the current heat wave is over. The seed packets were together in a slide lock bag that got knocked about, and there was spillage, so they’re all mixed up now, so we’ll have lettuce surprise! :-D
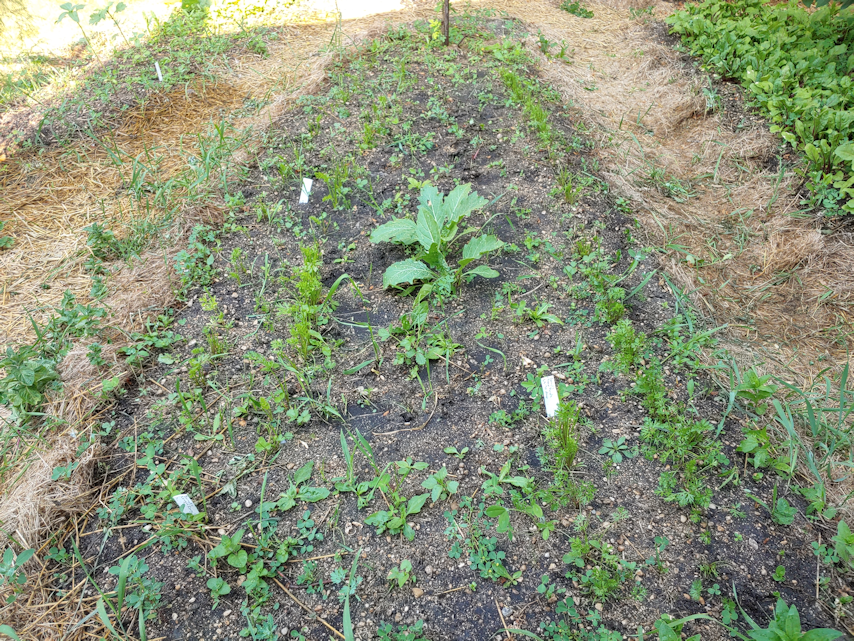
Napoli and Kyoto Red carrots
Deep Purple and Longe Rouge Sang carrots
Here we have our carrot beds. The large bed has two types of carrots; Kyoto Red, at the far end, and Napoli. These were pelleted seeds, which made it much easier to plant them without having to thin them later. We also had plenty of seeds left over for next year.
They had been doing so well, until the woodchuck ate all the greens! The wire cover isn’t going to stop a woodchuck, but will hopefully at least slow it down or discourage it. I’m still holding out hope that they will recover, and will be spraying around them with repellent soon.
In the old kitchen garden, we have two other varieties of carrots. Deep Purple and Longe Rouge Sang. There were far fewer seeds in these packets. I’d made a cornstarch gel to make planting them easier, which we did last year successfully, even though the gel was way too thin. This year, however, I made the gel too thick. When my daughters planted them, it came out unevenly, but it still worked out. These have, unfortunately, also been nibbled on, but not decimated like the others were. At the moment, we have a motion sensor light set up that will hopefully startle critters away, and this morning, I sprinkled Critter Ridder granules around this bed, and the beet beds nearby.
The two leafy things in the triangular bed are, I hope, white kohlrabi. These were seeds left over from last year, which had failed so spectacularly. Thankfully, we have seen no flea beetles this year. Still, I’m not even sure these plants are kohlrabi at all! I would call them a definite fail, unfortunately.
Next year, I want to try kohlrabi again, but will start them indoors. They are supposed to be good to sow directly before last frost, but they just don’t seem to do well that way.
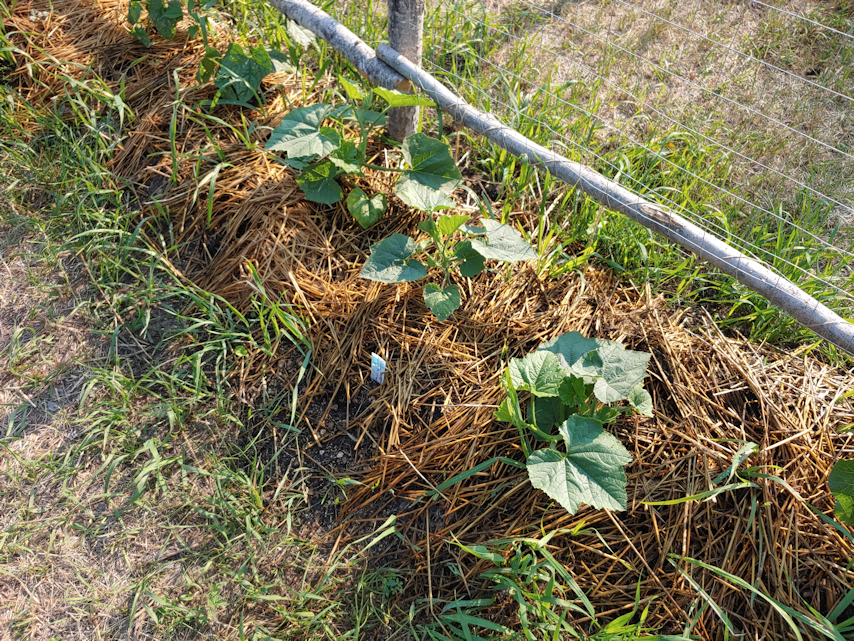
Cucamelon
Here we have our cucamelon transplants. We did these last year and, in spite of a poor location, they did really well. This is where we had intended to plant them last year, in the rest of the chimney blocks we have left over after using some for the retaining wall. I am hoping the increased sunlight in this location, plus the chain link fence to climb, will lead to an even better crop than last year. :-)
Montana Morado corn
Dorinny corn
Here we have our two experimental corn blocks!
The purple Montana Morado corn (the photo on the left) were started indoors and transplanted, and so far they seem to be a success. A few of them don’t seem to be thriving at all, but most of them look like they are doing just great.
The Dorinny corn were planted before last frost, and you can see the remnants in the photo on the right. Though they are a cold hardy hybrid that would have been able to handle a normal frost, it turned out they couldn’t handle the -8C/18F night we had in late May. The seeds that had germinated before then did look like they survived, but after a few days, they were gone. Thankfully, more germinated later, and of those, they are doing quite well. As long as more don’t get eaten by the deer! The ones that did get nibbled on seem to be recovering, but I doubt we’ll get any corn on those ones.
Just yesterday, I used one of the empty rows in the Dorinny corn block to transplant some Hopi Black Dye seedlings. I’ll talk about those more, later. I also transplanted the few, spindly pink celery seedlings. I don’t expect those to survive. They should have been started indoors much, much earlier. I want to try them again, next year.
Where the Dorinny corn is planted is temporary. Where the Montana Morado corn is planted will probably become a permanent part of our garden. I was really surprised by how much better the soil was in this location, compared to other parts of the old garden area.
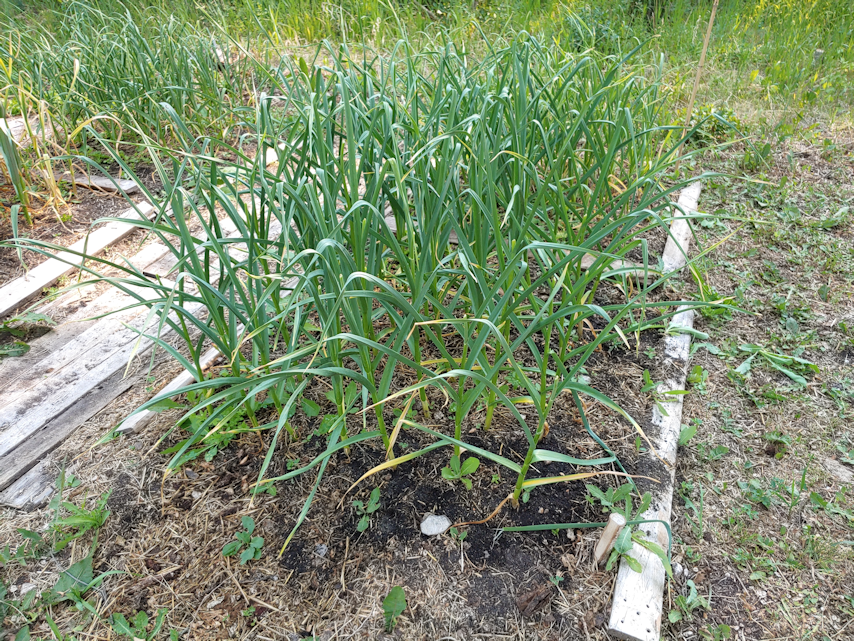
Porcelain Music
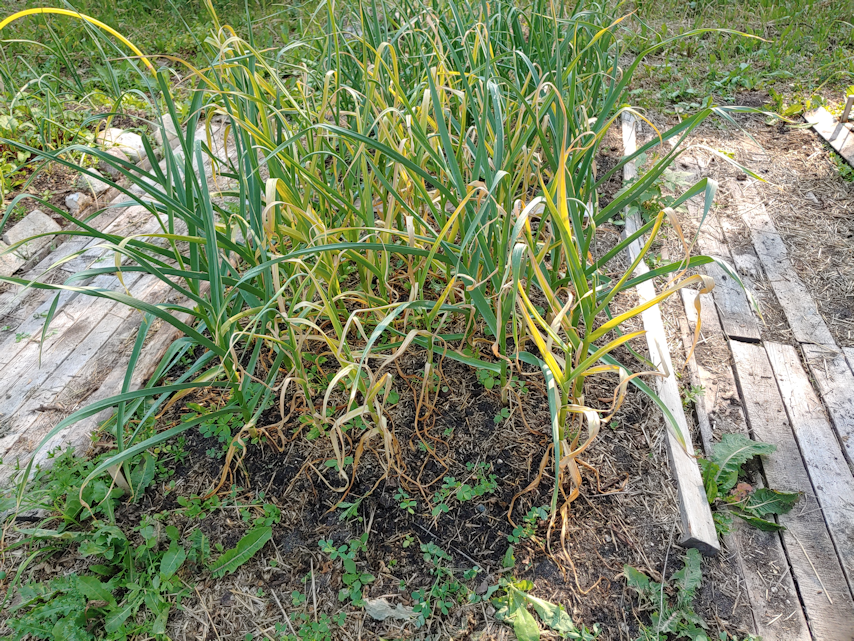
Purple Stripe
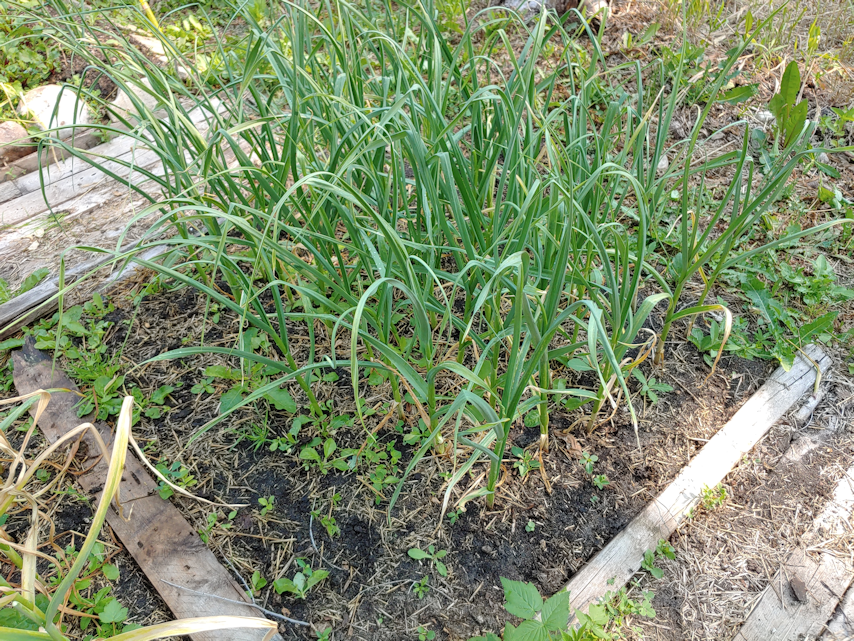
Racombole
Racombole
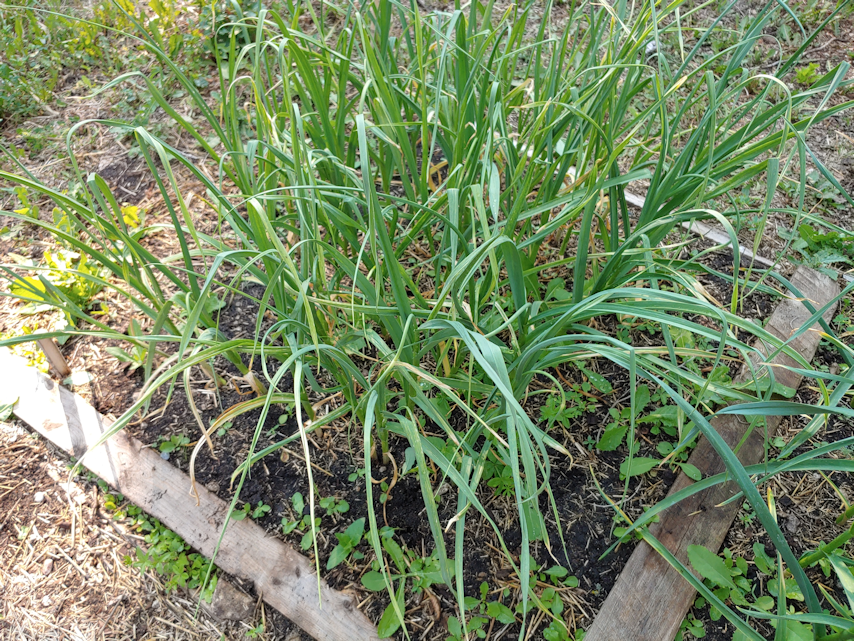
Here we have our hard neck garlic beds, which were planted last fall.
The Porcelain Music is looking amazing! Big, strong plants. They started showing scapes first. As I write this, we’ve gathered scapes from all these plants.
The Purple Stripe is looking like they will be ready to harvest soon – but they are still producing scapes! I’m not sure if this is a problem, or if this is normal for the variety!
The Racombole got split between the two beds. They came up later than the others, and the plants are smaller and slighter. They were also the last to start producing scapes. I don’t know if that’s normal or not for this variety. It’s possible, being on the East ends of the beds, they had slightly less sunlight than the others.
So far, these are looking like a fabulous success.
Now, we move on to the gourds. :-)
I honestly didn’t expect to have gourds this year. We started them indoors early, yet they didn’t germinate until much later.
These first ones are next to the cucamelons, in an area that will be a permanent bed.
Ozark Nest Egg gourd
Ozark Nest Egg gourd
These ones are the Ozark Nest Egg gourds. These had one plant germinated per pot, even though several seeds were in each. This morning, I noticed one of those seeds had germinated!
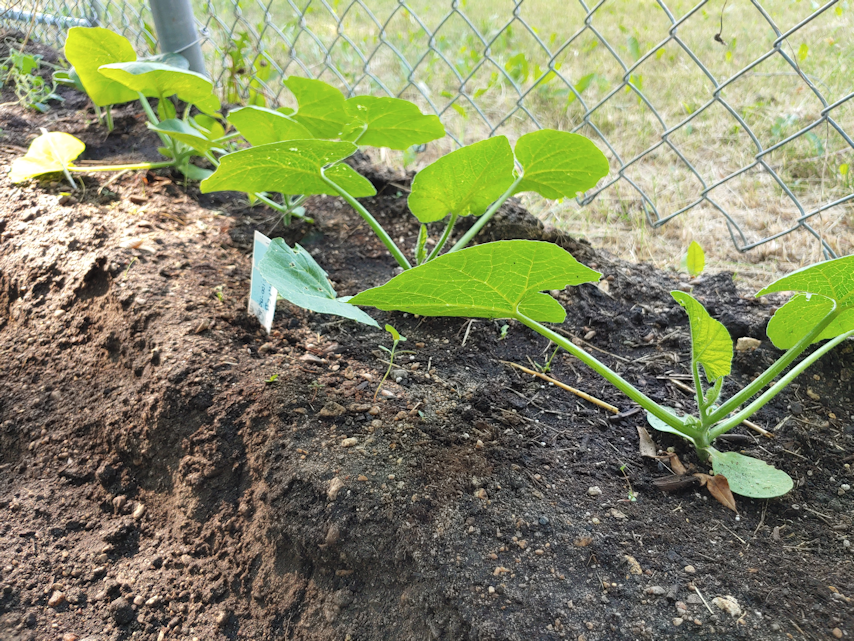
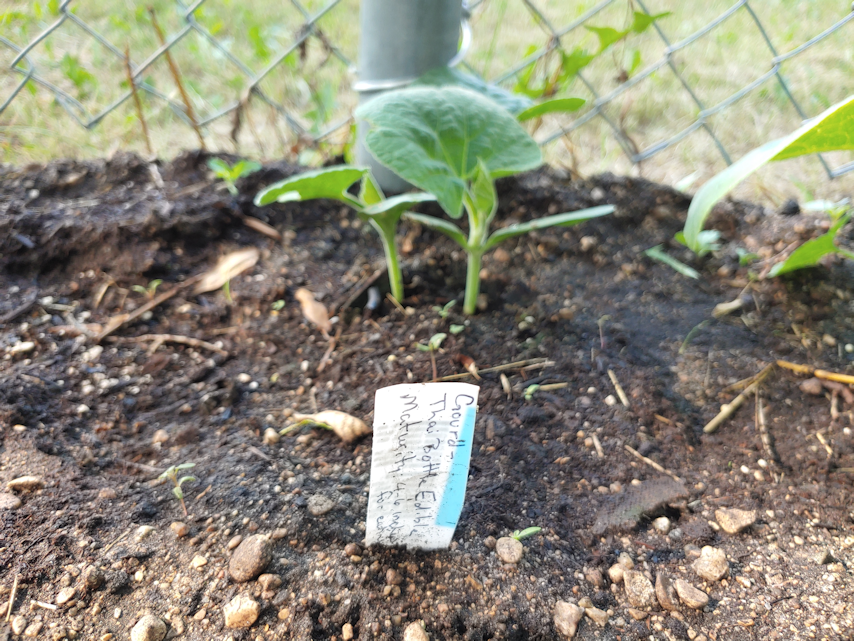
Thai Bottle Edible Gourd
Last time I posted about these, I mistakenly referred to them as the Tennessee Dancing gourd. Silly me. These are the Thai Bottle Gourds. There’s just the two of them.
Tennessee Dancing Gourd
Luffa Gourd
The Tennessee Dancing Gourd were among the first to germinate, and we got quite a few of them! If they are as prolific as I’ve read in reviews, we’ll be up to our eyeballs with them. :-D
It’s the luffa I am most eager to see how they turn out. They also germinated faster, though that’s not saying much, considering how long it took for the other gourds to germinate!
This area is temporary, even though we built a squash tunnel for them to climb. We intend to plant trees in this far-flung area, but this area, and the squash tunnel, might see another year of use. I’m pretty sure there is a telephone line buried under here, so we will probably not be planting trees exactly here.
As late as they all started, they all seem to be doing surprisingly well! They are really loving this heat wave. I’m looking forward to seeing how they climb the structure!
Here we have our grapes. There are two vines. We did not plant these. My mother did, but she does not remember what variety they are. I was talking to my mother today, and she worked out how long ago she planted them here, and figures it was about 12 years ago. !!! They had been completely engulfed by spirea when we first moved here, and we’ve been slowly working at getting them strong and healthy again. They are producing tiny clusters of grapes right now, and I look forward to seeing if they grow bigger this year, than last year. :-)
Halona Melons
Pixie Melons
I am really excited at how the melons are doing! We stared them indoors at the same time as we started with summer squash, but everything took a long time to germinate. That we ended up with so many is totally bonus. I love melons and really look forward to how these do! They are currently blooming, and starting to get big enough to train up the mesh, so I hope that means they’ll have a good summer’s growth.
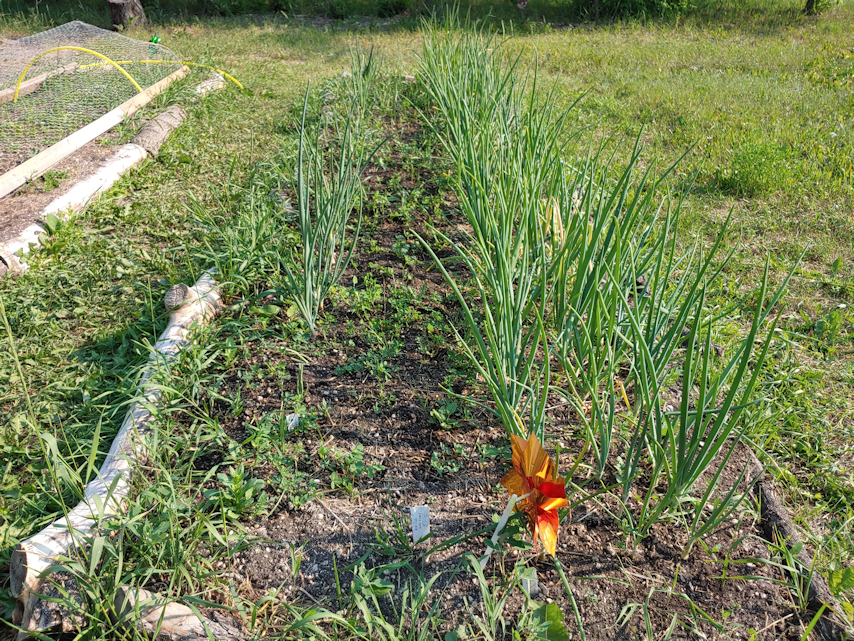
Norstar and Red Karmen onions
Shallots and Stuttgarter onions
Here we have more successes and failures.
The Norstar onions were started from seed, and they are growing nice big bulbs right now! They may have been small when they were transplanted, but they easily match the Red Karmen sets they share a bed with.
What you don’t see is what should be growing in that gap in the middle. The very first seeds we planted outdoors was purple kale; seeds we got for free with one of our Baker Creek orders. If they ever germinated, we never saw them.
Because the bunching onions and shallots we tried to start from seed died a glorious, cat induced death, we ended up buying sets. Unsure if the Norstar seedlings would survive, I picked up some onions sets when they came out in the stores. When I found shallots as sets, too, I grabbed a couple of bags. They both seem to be doing well.
However, they too should have a neighbor.
In the middle, our purple kohlrabi was planted. Like the kale, if anything sprouted, we never saw them.
I do want to try the purple kohlrabi again, but will start them indoors next time.
Dalvay green peas
King Tut purple peas
Here we have our peas. We planted all of the purple peas in the one row, while there were so many of the green peas, we were able to replant in spaces where peas did not germinate, and still have some left over!
They are currently blooming and growing pods, but I am not sure if they are actually doing well. They aren’t very big! It could be because of the poor soil in this temporary location. Quite a lot of whatever was trying to grow here before is now making its way through the straw and garden soil we added, quite enjoying the watering and feeding the peas are getting!
We shall see how they do over the next few weeks.
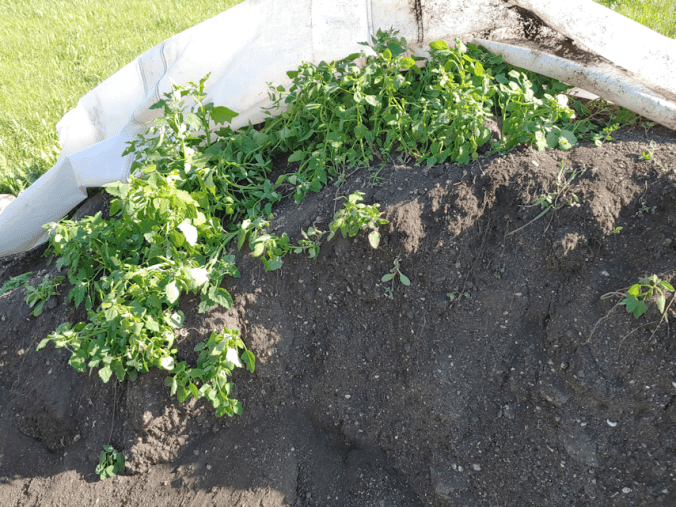
Here we have before and after pictures of our potatoes.
The first picture was taken four days after they were “hilled”. The other was taken 10 days later.
I can’t believe how huge they are! All four varieties are just thriving in these home made grow bags.
And now for something a bit different.
Heritage raspberries
Unknown raspberry variety
Raspberry bushes.
We bought raspberries for the first time this year, as a birthday gift for my daughter. She chose the Heritage variety. They were doing great after transplanting – until they got nibbled on by deer, and then hit by that late May frost.
They won’t do very well this year, but they will survive, and should be fine, next year.
The others are a combination of raspberries my mother transplanted many years ago, and other self-seeded plants we transplanted when we mulched the area that now has our main garden beds in it. They, too, were hit hard, not just by that one bitter night, but also the Polar Vortex we got hit with in February. Yet, they survived, and we will probably get raspberries from them this summer!
Crespo Squash
Crespo Squash blossom
Here we have our Crespo squash. This is another one we weren’t sure would work – and I’m still not sure we have a long enough growing season for them, even with starting them indoors. They seem to be doing very well, though, and one of them is starting to bloom quite nicely!
and now, the summer squash!
Summer Squash
Magda
Endeavor Zucchini
Sunburst pattypan squash
This morning, I finally saw some little Sunburst squash! They were our favourite, last year. We are also seeing the green Endeavor zucchini, and the lighter green Magda squash. Still no sign of the yellow Goldy zucchini.
This year, we are trying to grow them vertically, but not all of them are big enough to tie to the stakes yet. But we’ve already got squash forming on those little plants! I am so excited by these! :-D
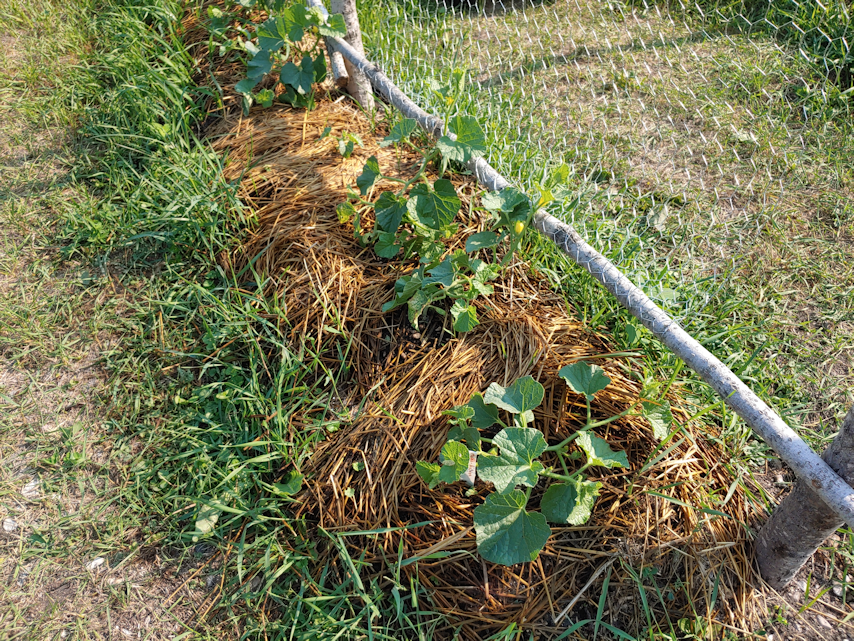
Winter Squash
Here we have our two varieties of winter squash, Little Gem and Teddy, both chosen for their shorter growing season and smaller size. They look like they are doing very well in this heat wave, too! They’re not big enough to train up the mesh, yet, but I do see some tendrils forming on some of them.
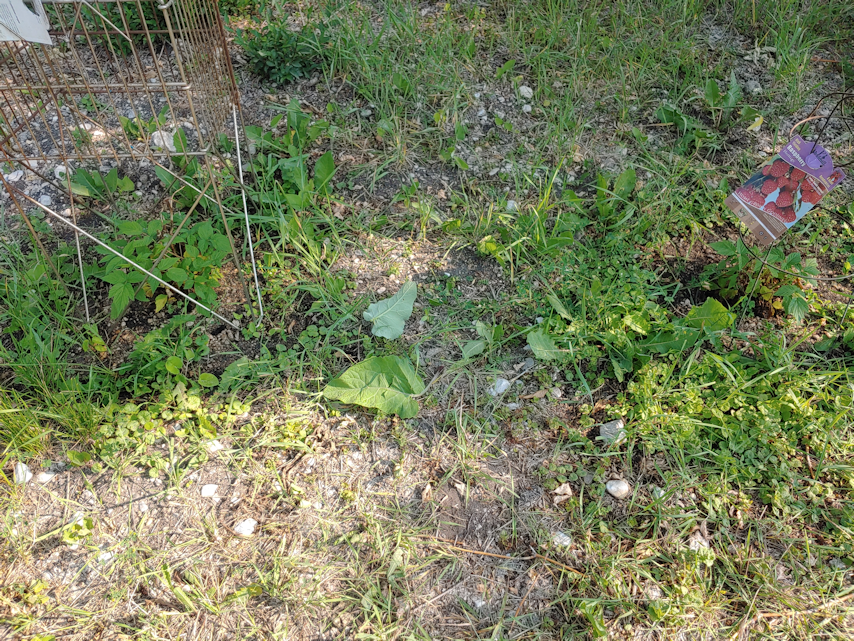
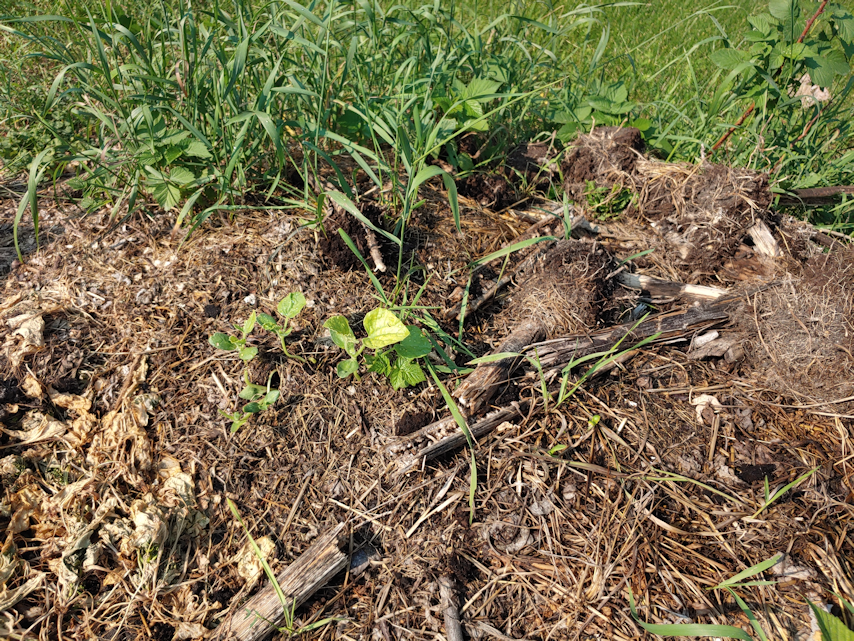
Mystery squash
Then there are these mystery squash, growing out of the old compost pile. We think they might be from the pumpkins we tried to grow last year. Hopefully, they’ll grow well enough that we’ll find out!
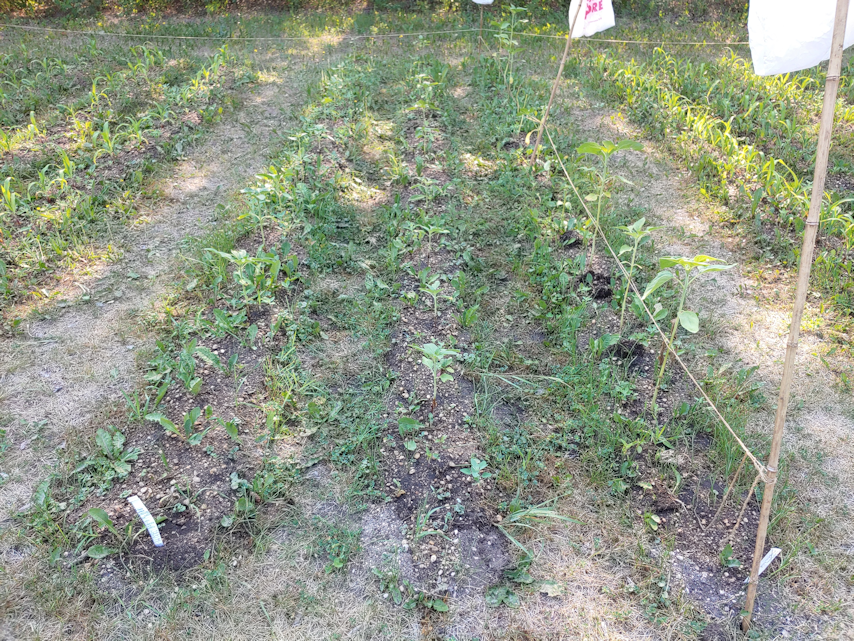
Mongolian Giant sunflowers
Hopi Black Dye and Mongolian Giant sunflowers
Here we have our sunflowers, in between blocks of corn. The corn are from a collection that included, Early Eh, Montauk and Sweetness. I didn’t bother taking separate photos of them. They are doing remarkably well, considering the poor conditions in this temporary location.
The sunflowers that are supported by twine are the Mongolian Giant sunflowers we started indoors, then transplanted. None of the Hopi Black Dye we started indoors had germinated… until they finally did! Long after these were done, which is why they are now planted near the Dorinny corn. Aside from losing a few to deer, I think they are doing well. At least as well as can be, in these conditions, and surrounded by weeds! Last year, none of our giant sunflowers reached full maturity before the first frost hit. I’m hoping at least the transplanted ones will have the time they need. If not… well, they make a good privacy screen.
If all goes well, we will be planting our first nut trees in the area next year.
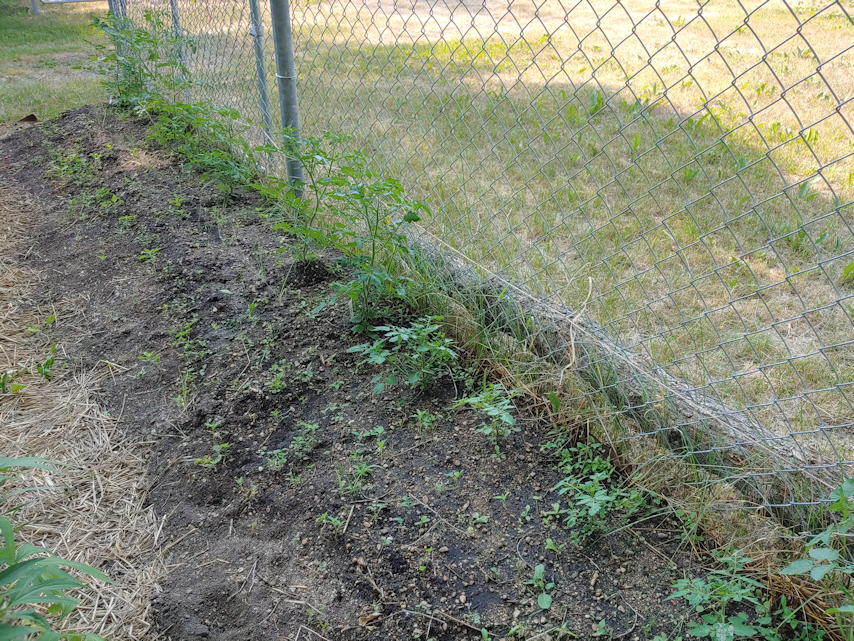
Mosaic Mix cherry and grape tomatoes
Spoon tomatoes
Here are our wee little tomatoes! The teeny Spoon tomatoes have fruit developing already, while the Mosaic Mix is still just blooming.
In front of the Spoon tomatoes, you can see tiny wisps of onions. Those are the Red Baron bunching onions, from a very late start with the last of the seeds, indoors. In front of the Mosaic Mix, we have little Norstar bunching onions, again a late planting of the last seeds indoors. Starting these were a bit of a Hail Mary, and I doubt much will come of them, but hwo knows? :-D
Here we have a bit of a mish mash.
The photo on the left is where we seeded the Giant Rattle poppies. They came up in patches, mostly beside the rhubarb in the background (which predates us living here!). At the tip of this triangular bed, my daughter planted an iris that was shipped for spring planting – only to get hit by that late May frost, which killed it off. Other irises were planted in a trench along the south side of the old kitchen garden. One type has come up. They are hard to see, but several are by the laundry platform in the middle photo, with a few along the edge in the left photo. The ones planted in the trench towards the rhubarb never came up at all.
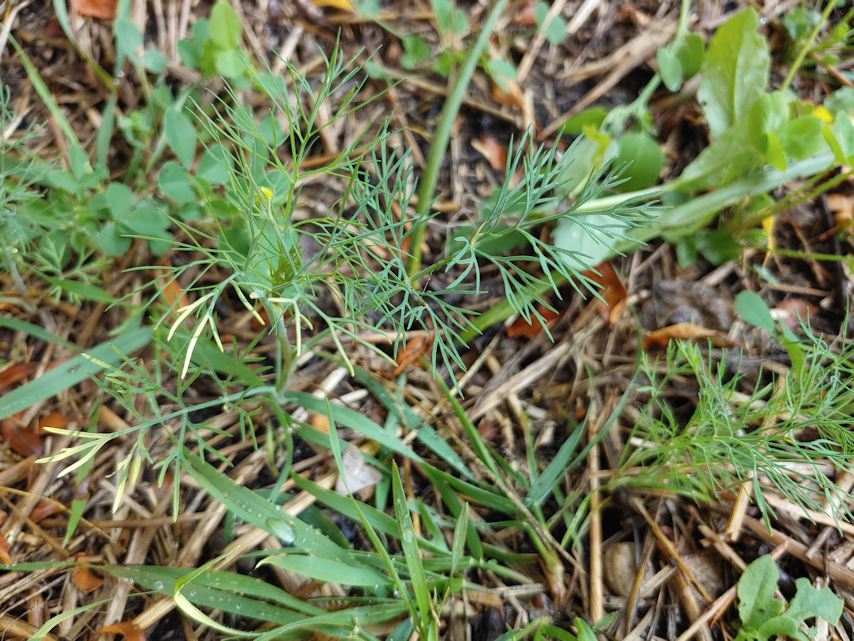
However, while trying to weed the area, I noticed something. You can barely see one in the photo on the right.
Dill!
All in a row, along the edge of where the trench to plant the irises last fall was dug!
We did not plant any dill. In fact, we have not seen any dill coming up since we moved here!
My guess is that, in digging the trench to plant the bulbs last fall, any dill seeds in the ground were brought closer to the surface, and this year, they could germinate.
I’m letting them be. We were intending to plant dill eventually, anyhow! :-D
Not pictured: our spinach beds. Because they’re all harvested and the beds are empty right now. The three varieties of spinach were a huge success, even with loosing some to deer. We will be sowing more in late July, for a fall crop. :-)
Also not pictured are our little pumpkins, Baby Pam. None germinated. We have seeds left over, though, so we can try again next year.
Also, also not pictures. The radishes we interplanted with the Peaches ‘n Cream corn blocks. They germinated, then disappeared, and we have no idea what happened!
That is finally it!
And now I hope I can actually publish this. I’ve lost internet over and over while trying to write this, almost lost the entire post while the editor was stuck on “autosaving” – and now it’s stuck there again!
I might have to do some browser magic to save this post and finally get it published… more than 4 hours after I started!
If you’re reading this now, I succeeded, and didn’t give up in a fit of rage. LOL
With the heat we’ve been having, and a heat wave hitting us starting today, it’s been hard on a lot of the garden. Not everything, though. The squash and gourds are just loving it! As long as we can keep up with the watering, of course.
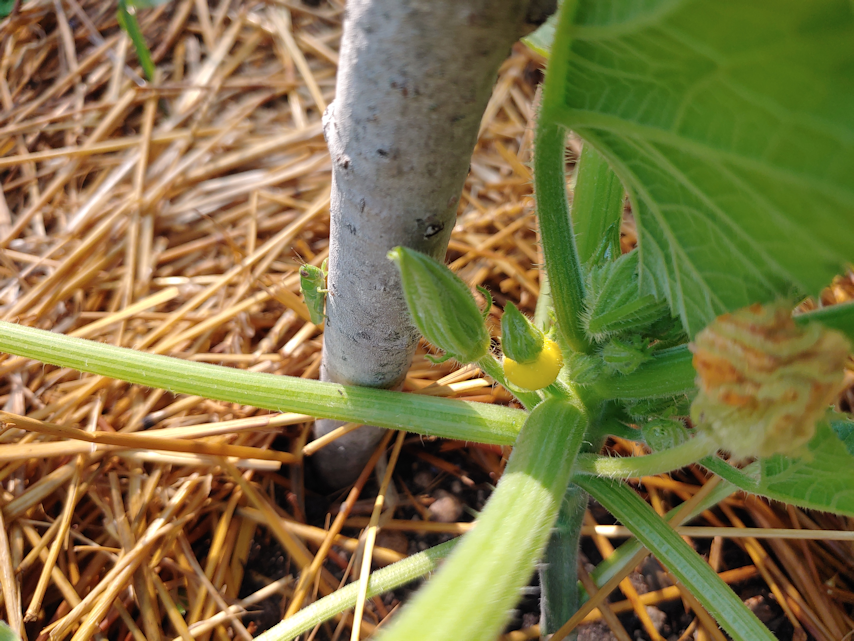
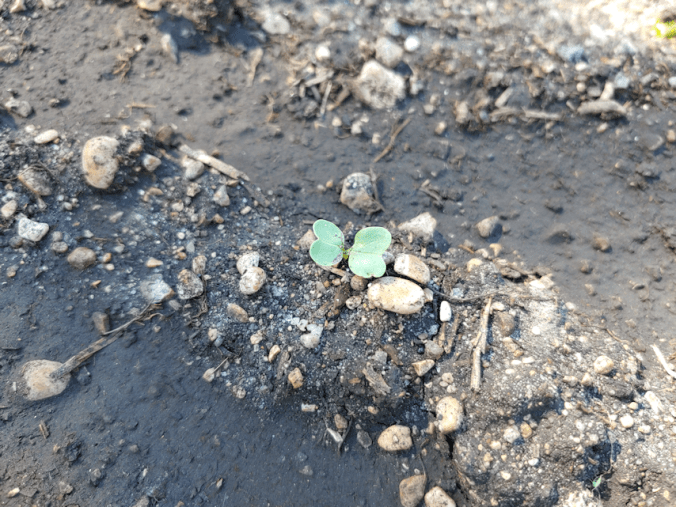
It was while watering the summer squash last night that I spotted the first bebby.
Yay!!!!!
I got this next photo this morning.
Several plants have little green bebby squashes growing. We have two types of green zucchini, and it looks like we have both starting. So far, no yellow zucchini and no pattypans. When my daughter transplanted these, she forgot to keep track of the different types, so they are all mixed up. It’ll be a surprise, every time we see new ones!
I noticed that some of the summer squash had gotten to the point where they could use support, so I gently tied a few of them to their stakes this morning.
When it got dark enough last night, I did make sure to head back into the garden to test the new motion sensor light. It has an on/off switch, but without being charged yet, and too much light, there was no way to know if it was actually going to work. It did at least get enough time in the sun to charge before dark.
It was indeed on, and working!
But was it doing its job?
I don’t know. I just checked the garden cam and saw a single deer go by in a couple of files. The first one stopped and snuffled at the edge of the corn block, but did not nibble anything. Then it kept going, walking right through a bean bed! The second deer didn’t stop to snuffle anything, but also walked right through the bean bed.
*sigh*
If either of them triggered the light, it was after the camera stopped its 15 second recording.
Unless we happen to be looking out a window when something triggers the camera, we just won’t know.
I might shift the garden cam’s stand a bit, to cover that area.
Meanwhile…
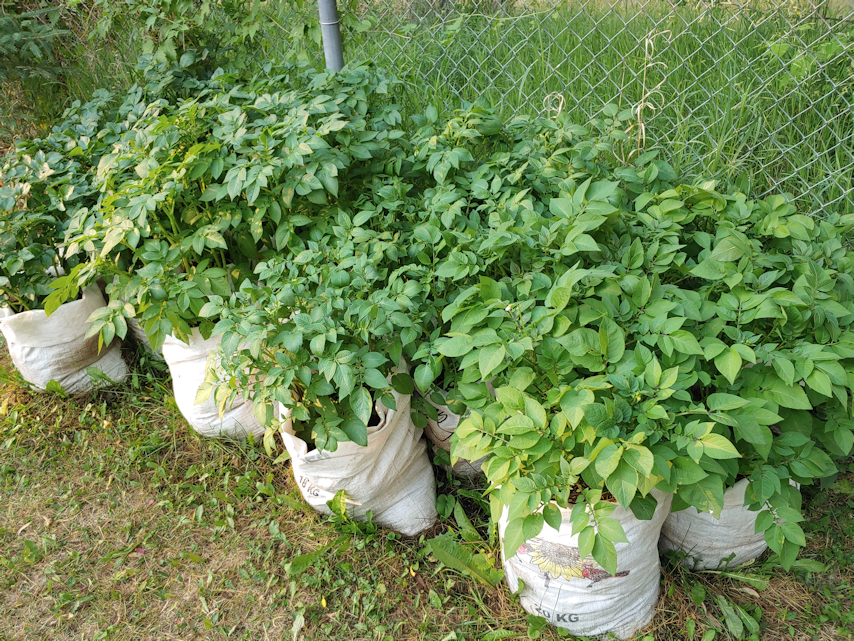
Check out those potatoes!!!
They are just loving these grow bags.
When we did these bags, the idea was to keep filling the bags as the potatoes grew, to have more potatoes in the bag. However, it turns out that potatoes, like tomatoes, come in “determinate” and “indeterminate” types.
Determinate types grow their tubers all in one layer. They need to be hilled to protect the tubers from the sun, but there is no benefit to keep hilling them higher and higher in a tower or grow bag.
Indeterminate types, on the other hand, will keep producing tubers up their stems if they get buried. So adding more soil or mulch and increasing the height will increase the yield.
Which meant I needed to figure out which we had. Seeing how tall the Norland potatoes are, I thought they might be indeterminate, but nope.
All of these types are determinate. Adding more to the bags will not mean more potatoes, and will not help the plants themselves. Hilling them as we already have is enough.
Well, that saves us a bit of work.
Also…
They are starting to develop flower buds!
Both types of fingerling potatoes have plenty of buds on them. One plant of the Norland potatoes has buds. So far, nothing on the Yukon Gem. Which is good. The fingerlings were chosen for their shorter growing season, and short term storage and eating, while the Norland and Yukon Gem are both types that mature later and can be stored longer. Not that I expect we’ll have enough to last us the winter, but we’ll at least be able to have them for a while after harvesting.
This year’s garden seems to be one of extremes: things are either doing really, really well, or not at all! :-D
While doing the evening watering, I found two pea plants with flowers on them. Both among the green peas. Nothing on the purple peas, even though they were planted earlier.
Most of the green peas aren’t even tall enough to start climbing the trellis! :-)
My daughter had noticed that some of the garlic scapes looked ready to harvest, so when I did my rounds this morning, I came prepared to grab them!
Our very first garlic scapes!
We’ve never had scapes before, and are really looking forward to trying them. Only 4 were ready to harvest this morning, but there are plenty more that we’ll be harvesting soon. So far, only one variety of garlic has scapes. A second variety is just starting to show the tips of them, while the third variety doesn’t have anything, yet. Between the three, we should have quite the extended season of them!
Now we have to figure out what to do with just 4 scapes. :-D
I also picked our first beet greens, lettuces and green onions this morning, along with more spinach. They’ve been around for a while; I just wanted to wait until the plants were robust enough before I went in among them.
Have you ever had scapes before? If so, what’s your favorite way to enjoy them?
It was a hot and windy day today, and my younger daughter and I ended up making a quick run into town, but we did get some decent progress in the garden.
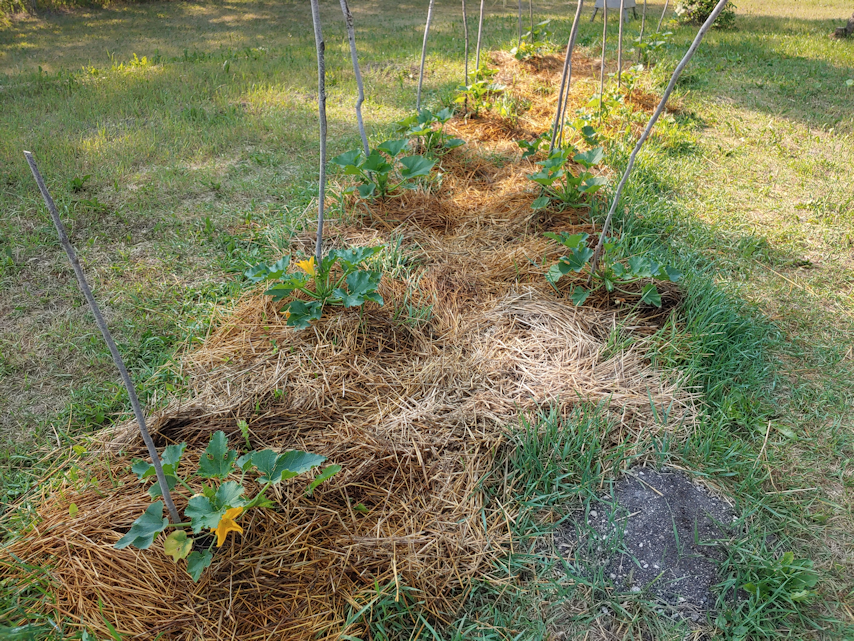
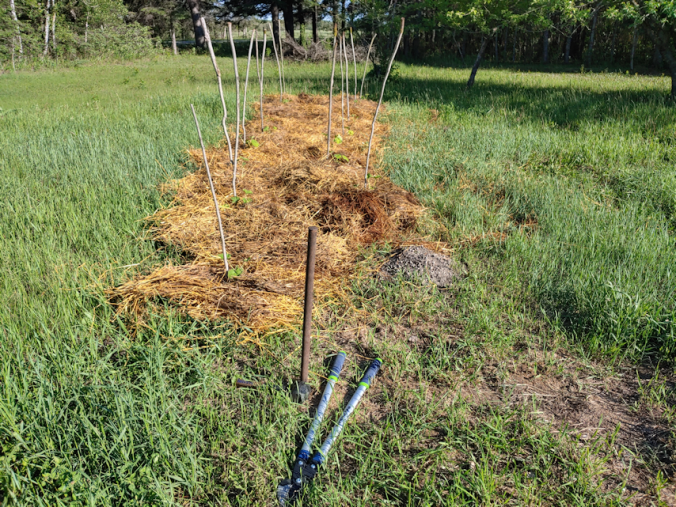
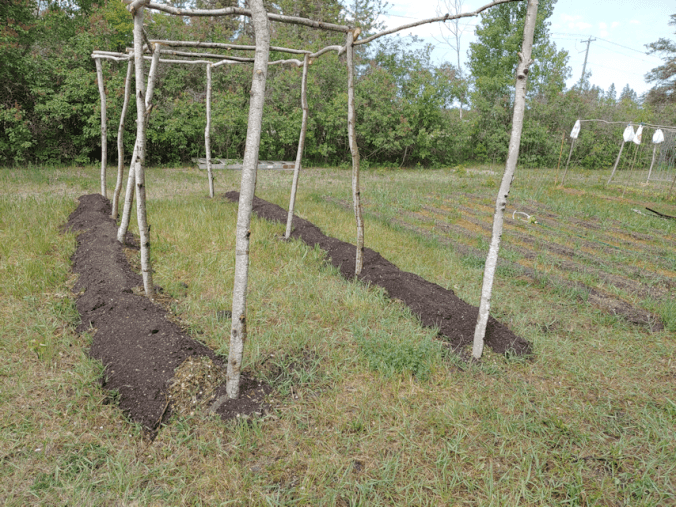
My older daughter braved the hottest part of the day and added more soil to the 15 summer squash mounds.
I waited until it was cooler.
I added a stake near each plant. The stakes are some of the smaller poplars we cleared our of the spruce grove, trimmed to about 3-4 feet in length. In the foreground of the photo, there is a metal bar stuck in the ground. It has a point at one end. I can’t remember at the moment, where we found it, but it was a happy find! I used it, and a mallet, to make holes in the ground. Then the stakes, skinny end down, were pushed in as far as I could, beyond what I managed with the steel bar, then the soil carefully stomped down to secure it. As close to the plants as they were, that meant mostly just on one side. Once those were in, the area was mulched with straw. The idea is to secure the stems of the squash to the stakes, as they grow, and pruning the bottom leaves, little by little. We shall see how that works!
Also, I really need to get this area mowed, before the next rains come!
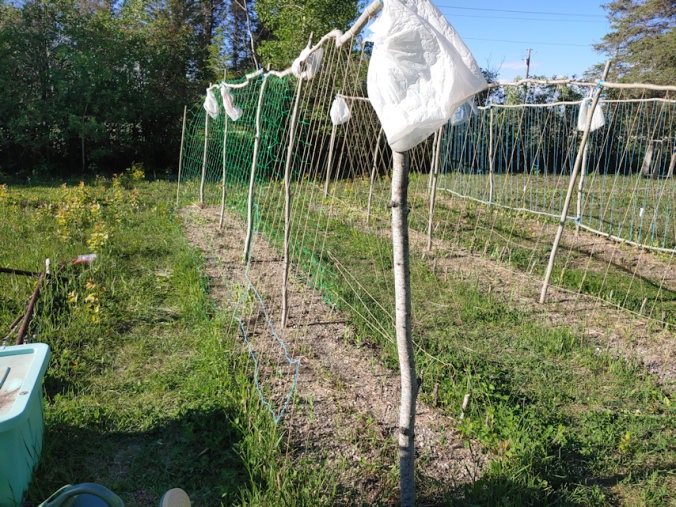
I had found some trellis netting, so my daughter finished the last sections of pea trellis with that, along with adding soil to the summer squash. The peas are getting tall enough to start climbing! The peas I planted later, to fill the gaps left by those that did not germinate, are sprouting, too. I’m really looking forward to having fresh peas! I can’t remember the last time I had fresh-from-the-garden peas.
If you look to the left of the photo, you can see what is a problem in this area: all those tree seedlings! They are spreading through root systems, like quack grass. Usually, I would have mowed over them by now, but we’re going to have to cut them back by hand this year.
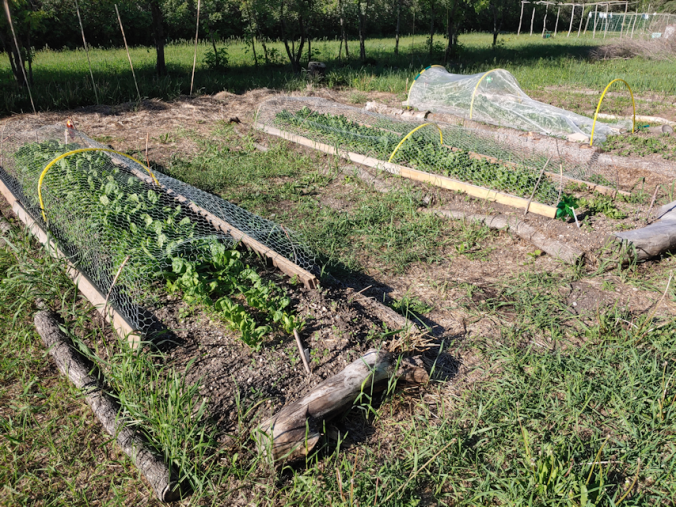
My younger daughter, meanwhile, went all out and thinned all three spinach beds.
Yes, this was taken after the beds were thinned!
The furthest one, under the netting, is the one that got the most deer damage, but parts of it are doing well. You can see at the end of the closer beds, the smaller spinach at the ends the deer got at.
With the spinach she gathered, I currently have two trays drying in the oven, and made myself a huge spinach salad for supper. The reason we went into town was to get ingredients to make spinach dips. Both cold and baked versions. :-) I’m really looking forward to that!
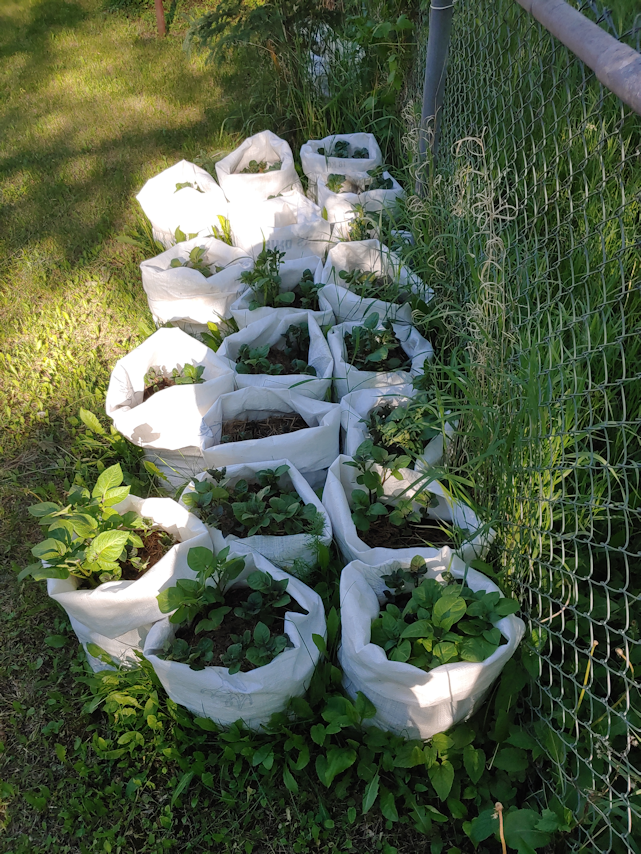
This last one is just to show how well the potatoes have been doing! At this rate, some of them are going to need topping up, soon! I’m very excited to see how productive these will be at the end of their season.
With today’s progress, my goal for tomorrow is to get working on that squash tunnel. The luffa needs something to climb! :-D
Today, I built what should be the last garden bed for the year. This one is for the climbers.
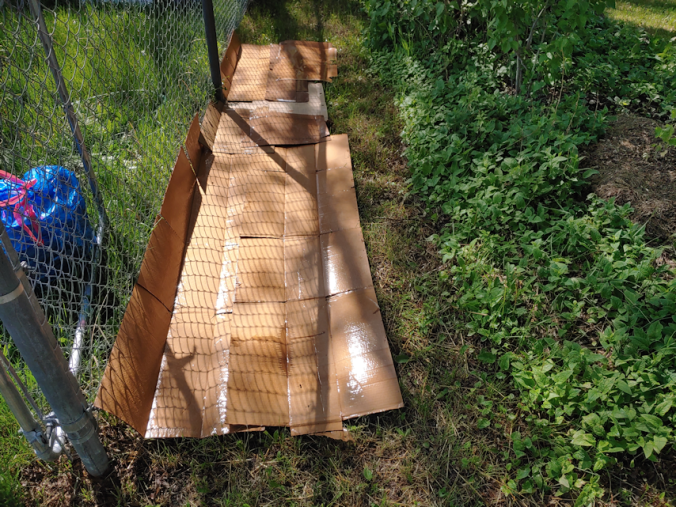
Here is what the space looked like when I started.
The original plan was to use the remaining chimney blocks, like the one in the photo, as planters along the chain link fence, but they remain in the basement until we can figure some thing out, and it is not a priority.
We’ve been saving up our cardboard, and had just enough to create a barrier layer, which got a thorough soaking.
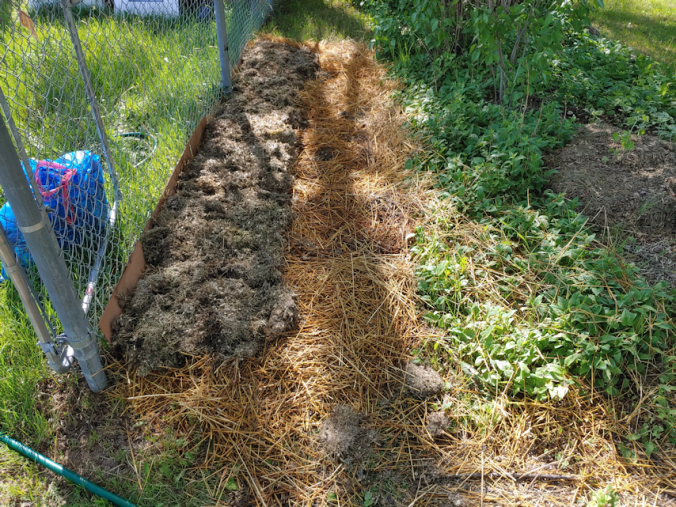
The next layer was the straw, which is also the mulch to cover the path between the new bed and the flower bed beside it. I was able to get some of the straw at the bottom of the bale that has had time to start breaking down, too, which was great! This layer, like all the layers, got a thorough soaking – after I beat it flat with the back of a fan rake.
Then, because we had some, I emptied our kitchen compost along the fence line, which got tromped on before a soak.
There wasn’t much. We don’t get a chance to accumulate much for the compost pile. It tends to get used right away!
We still have grass clippings, so a thick layer of it got laid down.
We’ve been keeping our compost-safe paper for shredding, and I had a bag full to add for another layer. After giving it a soaking, my daughter tromped it down for me, while I went to get a load of soil. This was from the nearby tarp covered pile in the outer yard. When I pulled back the tarp, I just had to call the girls over to take a look!
The white tarp allowed enough light through for the weeds to start growing, and grow they did!! They were huge!
These are mostly lambsquarter, which are supposed to be edible and very healthy. Better than spinach!!! At least that’s what the breathless Pinterest images that have started to show up in my feed are all exclaiming. Maybe some day we’ll try them, but for now, they are growing in places we want other things to be growing (or, in the case of our soil pile, nothing to be growing!), so we’re pulling them. Still, it was something else to see how big they got under that tarp! It actually is encouraging, since we plan to build polytunnels and high raised beds in the outer yard, eventually.
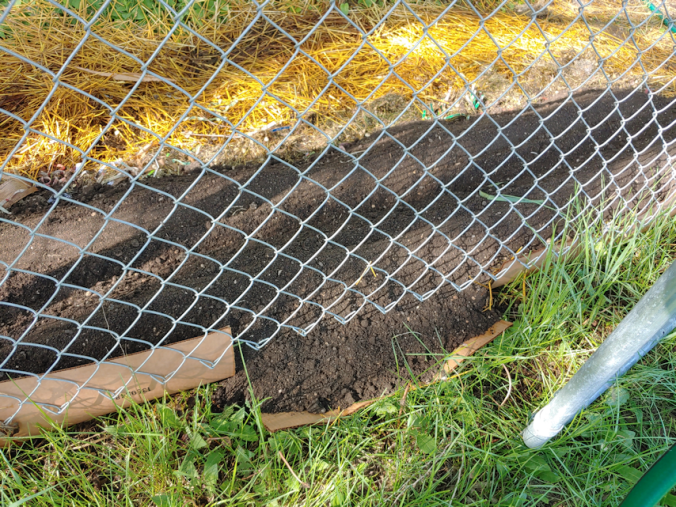
Finally, a thick layer of garden soil was added to the new bed, with a trench down the middle to hold water. My daughter did catch me before I made the new bed too wide. With the one we made for the tomatoes, we’re finding it a bit hard to reach, even though we ended up narrowing it down when we added more soil for the transplants. We’ve noticed the same issue with the beds of spinach, carrots and onions. They’re only about 3-4′ wide, but they are low beds right now, and we’re short. It’s hard to reach the middle while bending down so far; our balance goes off kilter. Especially for my daughters who, unlike me, have not had their generous proportions surgically reduced. That really affects center of balance! It would not be an issue with the tall raised beds we plan to build, but we need to remember that, for low beds, they need to be narrower. Especially if we can reach from only one side, like these along the fence.
One thing that was an unexpected issue is that the chain link fence on this side is higher above the ground at the bottom than on the other side of the gate.
Which means that the damp cardboard flaps against the fence couldn’t quite hold the soil in some places! Which is fine. We’ll work around it.
After filling the trench in the soil with water to soak it, I brought over the cucamelons that have sprouted (most did not, but that’s okay; we planted way more than needed!), as well as the gourds. The bucket and plant pot have the cucamelon tubers in peat that I dug up from last year, to see if they would grow this year. Time to dump them out and find out if they survived!
They did not.
Aside from a few wispy root clumps and what may have been the dried outer skin of a tuber, I found nothing. They had completely decomposed.
Well, that just left me with some peat I could make use of.
So I widened the trench I’d made before, added some peat to it, and watered it again.
Then it was time to do the transplanting.
The cucamelons were all in their own Jiffy pellets, so they were easy to space out. I planted even the tiny ones. If they make it, great. If not, at least they had a fighting chance! Our cucamelons from last year were quite prolific, even in less than ideal conditions. This location gets much more light, so I expect them to do even better, here. If all grows well, this fence will be completely covered with climbing vines!
Of the gourds, the pot that had 2 Ozark Nest Egg seedlings had sprouted a third! I’d forgotten I’d planted 3 seeds in the cups. The pot that first sprouted still had only one, plus there is the one Thai Edible Bottle gourd. These are in Jiffy pots, so the ones with just one seedling in them got planted whole. The one that had three in them, I gently broke it open along one side and sort of unrolled the contents to separate the seedlings. One of them just sprouted today, so it’s unlikely to survive, but who knows? It might do even better than the others. :-) I believe in you, little sproot!
That done, I had some more transplanting to do. I’d put the last of our Norstar onion seeds into a Solo cup, and they not only sprouted, but are starting to form bulbs!
The girls and I had talked about where to put them, and the border of the asparagus bed seemed the best place.
The onions are shallow growers, and there’s plenty of space between them and where the asparagus are, so this should be fine. At this stage, I doubt they will reach full maturity, but they will help deter critters and insects. There were more seedlings than would fit here, so I added the last of them in front of the Mosaic Mix tomatoes. There had been some bunching onions transplanted there before, but they were the tiniest, wimpiest ones that we probably shouldn’t have bothered with, and only 3 were still alive. Which is fine. There are more bunching onions in front of the Spoon tomatoes. We’ll see how these ones do!
That’s pretty much it for the transplanting. We should probably plant the one Hopi Black Dye sunflower that finally sprouted. Since there’s just the one, I’m thinking of planting it somewhere else, like in the old kitchen garden. The pink celery will go into a pot that we can move in and out of the sun room, as needed, but they are way too tiny to do anything with, yet.
Which means that tomorrow, it’s back to the other garden beds. The pea trellises need to be finished, the squash tunnel needs to be worked on, and the summer squash needs a garden soil top up, before getting mulched with straw. Somewhere in there, I need to actually mow around the main garden beds. It’s getting pretty out of control around there! For the old garden area, I’m seriously considering using the weed trimmer, instead. It’ll take longer, but I won’t have to worry about hitting rocks or lumps of soil with the lawnmower. Also, of course, weeding. Especially in the corn and sunflower blocks. All the stuff that barely grew there before have had the most moisture and inadvertent tending since… ever, and they’re really liking it! :-D
The main thing is that, aside from the pink celery and that one sunflower, we’re done the transplanting! Anything else that didn’t germinate by now, isn’t going to. We won’t be tending those pots anymore.
Aaaannnndd….
It was getting late, so I paused and took the pink celery seedlings indoors, then went ahead and transplanted the one Hopi Black Dye sunflower in the old kitchen garden, in the bed we planted the poppies in. So that’s done now, too!
We’re taking a break from our push to get the squash and corn transplanted today. Lots has been done, with lots more to do, but we just had to stop for a while.
My daughters didn’t take any photos of what they were doing, so I just have “after” pictures to show.
This is the summer squash. We have only 15 transplants; quite a few did not germinate, but we do have some of all 4 varieties. There’s an extra hill. Later on, straw will be added around the hills for mulch, and I will be adding stakes near the transplants, to train them to grow vertically. This is supposed to help prevent fungal infections or rot from touching the soil, increase air circulation, make it easier for pollinators to get to the flowers, increase yield and make it easier to harvest. The bottom leaves are supposed to be pruned away, and it will also be easier to water them at the roots.
At least, that’s how it’s supposed to work. We shall see!
Next, they started building the beds at the squash tunnel. Priority for planting here are the luffa and dancing gourds and the winter squash. Oh, and the little pumpkins. We have quite a lot of melons to transplant, too, but if there is no room here, there is a lot more space where the sunflowers were planted last year.
What they were working on those, I worked on the new corn block.
I had turned about 2/3rds of it last night, so I didn’t expect it to take too long to finish.
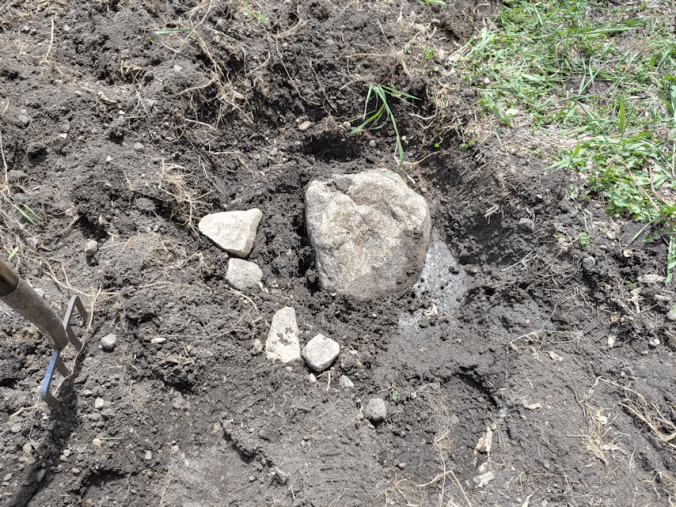
Then I hit something, right near the end. Of course, I was hitting rocks the whole time, but usually I could just move the fork a few inches and keep going. Not this time!
I ended up using a space to dig around the rock. I dug up a few other rocks, but part of it seems to continue below where the soil is still undisturbed.
I used water pressure to clear the stone and try and see how much further it went, but that wasn’t much. My younger daughter decided to give it a try, and ended up bending the fork, trying to move the rock!
So… it will stay. :-D
The next step was to take out as many roots, rocks and start leveling things off.
That stick coming out of the ground in the background is a tree root. I have to grab something to cut it with!
For this part, I had a garden claw with a long handle we found in the basement when we were cleaning it out. What a back saver! You can see, all around in the grass, where the roots, crab grass and weeds were tossed. Rocks got tossed under trees, so they wouldn’t be “found” with the lawn mower. Of course, it’s not possible to get all the roots out, but I got most of them.
Finally, I could go over it with the thatching rake, which picked up a few more roots that I missed, as well as some rocks, and leveled it off a bit. I chose not to bury the big rock again, as it was so close to the surface. I’d rather see it and know it’s there, than forget about it and plant something on top by mistake.
One thing about this area; it has the deepest top soil of any part of the old garden, yet! I didn’t reach gravel until I started digging deeper to try and get around the big rock, and while I found other chunks of rock, I just barely reached the gravel layer. This is the soil my mother is talking about, when she talks about how great the soil used to be. Except for the rocks. She didn’t remember the rocks! :-D
The next step was to mark out for planting. I counted the corn plants this morning, and there are 65, plus a couple of bitty ones that probably shouldn’t be transplanted, but I likely will, anyways. I wasn’t sure if I’d have enough space, but with rows 2 feet apart, and the transplants 1 foot apart in each row, I will have enough space.
While the soil may appear good, all the soil tests I did showed a lack of nutrients, so it will still be amended. I used the flags to lay down grass clippings. I lay them out in rows, but I don’t mind them spilling over into the paths in between, to help keep the weeds down.
After this photo was taken, I used a watering can and rainwater to wet down the grass clippings, since the hose and sprinkler were needed at the other end of the garden.
Then we headed inside. We reached 30C/86F while we were out there! So we will take a few hours indoors and let things start to cool down before we continue.
We have predictions for rain tonight, and possible severe thunderstorms by tomorrow afternoon. They might even hit us. :-/ If it does look like we will get a severe storm, we have things we can use to cover the squash to protect them, though the corn would be on its own. It is, however, in a more sheltered area of the old garden. We shall see.
We might still hit our goal to get all the transplants done here by this evening! After that, we have transplants for the south yards, but they are not as urgent and can wait a bit longer.
As for me, I’m seriously thinking of joining all the cats on my bed for a short nap. I’m so tired, I have been falling asleep while writing this!
I’m going to be hurting so much by the time all this done, but it’ll be worth it!
Pretty much all of the squash, both winter and summer, that we chose are small varieties that mature quickly. The one exception was the Crespo squash. Of the 6 seeds we planted, one came up and got quite large. After we moved our seedlings from the aquarium greenhouses to the sun room, a second seedling sprouted.
That’s good enough for me!
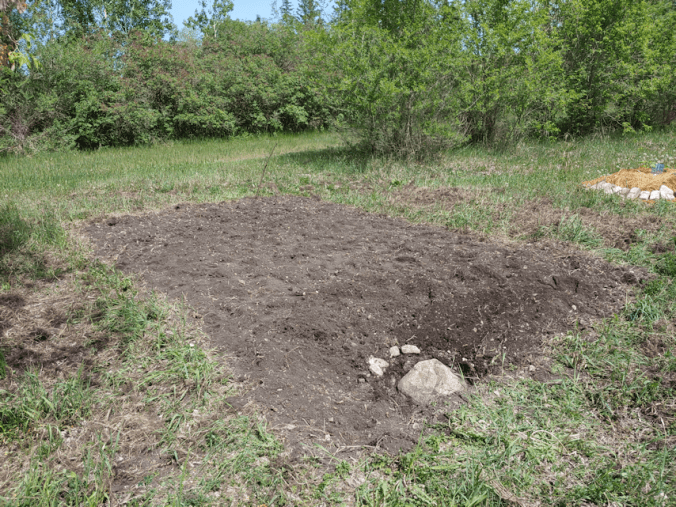
As these are supposed to grow quite large, we decided they will get their own space. Near where we will be transplanting the Montana Morado corn is a very rough area; one of the worst areas from the shoddy plow job that was done before we moved out here. The plow had been turned in this tighter area, creating a particularly large lump of soil in the process.
I figured, we may as well take advantage of it, and turn it into a squash hill!
Yeah. That’s basically a dirt and crab grass hill my garden fork is stuck on. I’d already started to loosen the soil at the top of it. The grass is so tall, you can hardly tell there’s a hill there!
I used the hose and water pressure to soak and break up the soil, which made it easier to pull out vegetation and roots. And rocks, of course. There are always rocks!
It was also the first level of watering, and boy did the soil need it!
The next step was to layer on some straw, which got thoroughly watered while a daughter brought over our kitchen compost bucket. When that got added in, it got another watering. If we had other organic matter I could have layered on there, I would have, but this will have to do.
Hhmm. I neglected to take a picture of the next stage, which was to bring over a wheelbarrow full of garden soil to top up the hill. After creating a bit of a hole in the middle, that got another level of watering, then a bit more garden soil was added, to level it off. That got another watering in the middle. After the straw was added all around it, everything got another watering. The straw will help keep the soil from washing away, as well as keep down the weeds and help keep the soil moist.
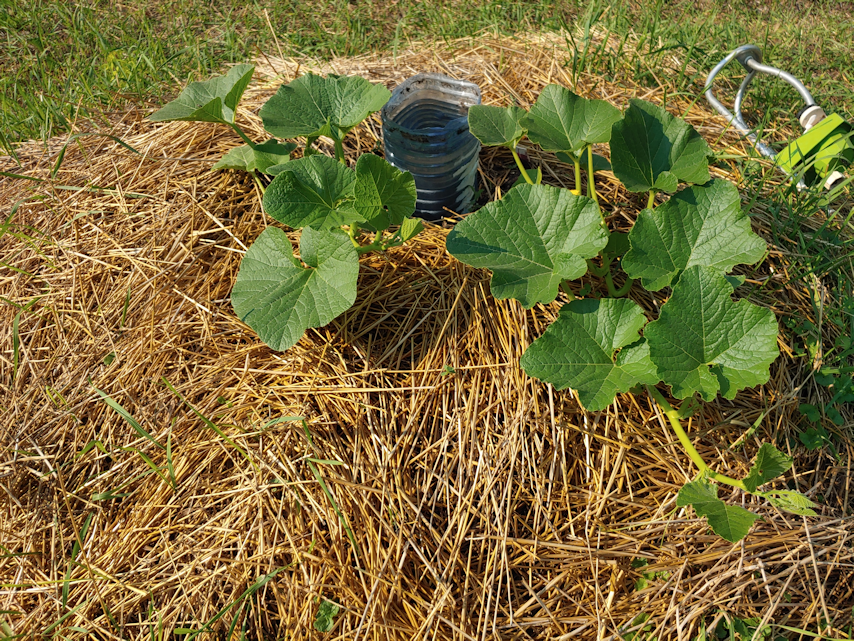
Finally, the squash got transplanted. Since there was one plant per cup, they got dropped right in, with almost no root disruption.
I still had a little bit of the peat and soil mixture we used for the tomatoes left in the kiddie pool we used to mix it in. That got turned back into dirt soup, and was added around the seedlings.
To help with watering them at root level, I cut the bottom off of one of the distilled water bottles we get for my husband’s CPAP, and buried it top down in the middle of the squash hill. Another spade full of soil was added around the container, because it kept trying to float out of the hole it was buried in! :-D
The final step was to pull some of the damp straw up around the seedlings.
While the plants are small, we will make sure to water the straw to keep it, and the squash hill, moist but once they get bigger, we’ll be able to deep water them at the roots, through the container in the middle, and avoid getting their leaves and stems wet.
The entire hill got another watering, and it was done!
I really hope this does well. I honestly have no idea how these will grow in our zone. In doing searches for it, I am just finding the Baker Creek seed listing, and my own blog posts!
Before I headed out to do my morning rounds, we had already hit 25C/77F. By the time I was done, it was already 30C/86F! Thankfully, there was still a breeze and some shade, so it didn’t feel too bad.
I made a couple of discoveries in the garden this morning, but before I get to those, I’ll back track to yesterday evening.
I used the cut off strip of mosquito netting left over from covering our lettuces and beets, some dollar store hula hoops, and lengths of old hose to cover part of the third spinach bed. This is just until we can make a wire mesh cover for it. I also took the trail cam from the tulips and moved it to overlook most of the garden. The only critter I saw in the files this morning was Nutmeg. :-D
After setting the netting up, I moved on to the far beds and blocks to water them. The water in the rain barrel is usually cool, but it was quite warm by the end of yesterday’s heat! On the plus side, it meant being able to use the watering can instead of the hose, and not shocking everything with cold well water, for almost everything. As the water level dropped below half, I started to refill it while still using the watering can, so it would be just cooler water instead of having to switch to the cold hose to finish watering.
I had company.
Rolando Moon has a thing about drinking from puddles! Once the water was absorbed by the soil, she decided to roll on the damp soil, then just hung out. I guess it’s nice and cool. At least she tended to stay in the middle, which is more of a trench for water, as the beans are planted on the sides. No beans are coming up yet.
Nutmeg was also hanging around. I caught him lying across some pea plants, chewing on the trellis twine! The little bugger! :-D
When I checked everything this morning, things were still damp and didn’t need to be watered, but I also spotted a whole lot of these…
The radishes are sprouting! The one in the photo is of the daikon type radishes, but I was seeing sprouts for the watermelon radishes in all the rows they were planted in, too. I was aware that radishes sprout quickly, but I’ve never grown them before, so this was a very pleasant surprise. They most certainly were not there when I was watering last night. :-)
Then I found another lovely sight.
The first potato leaves have emerged through their mulch! There are the purple fingerling potatoes. Sifting around in the mulch in the grow bags, I found other shoots coming through the soil, but these are the first ones to break through and leaf out. :-) I really look forward to seeing how these do in their grow bags.
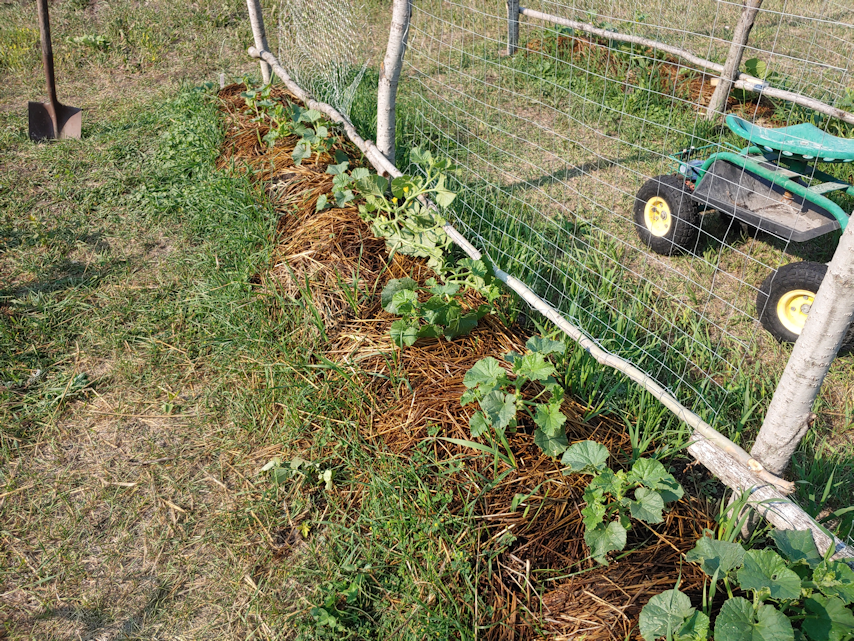
We have a whole lot of squash transplants ready to go out, but I’m starting to rethink what to do with the summer squash. The plan was to make more beds like with the beans and peas. However, we have that long arc where we’d planted the sunflowers last year. In removing some of the old grass clipping mulch to use under some new beds, I couldn’t help but notice how much better the soil is, underneath. It’s still rocky, but we basically have a long row of soft soil, bordered by concrete hard soil. I’m thinking we should take advantage of this. It will need far less amending than starting new beds. I’m also planning to try staking the summer squash this year, but with our without stakes, deer don’t like those prickly squash plants, so it could act as a sort of fence for the rest.
I sorted through our transplants while hardening them off, and we have a lot of nice, strong melons. Between those and the winter squash, and the two types of gourds that successfully germinated, we might not actually have room for it all on the squash tunnel. So I’m thinking we can plant as much as we can fit of each type at the squash tunnel, then whatever is left over can be planted in other areas. Without trellising, these should spread out quite a bit over the ground, and we’ll be able to give them lots of space, and we would just need to haul soil over to make hills, rather than beds. This would allow us to compare how well they do, between left to grow on the ground, or up a trellis.
What I might end up doing is getting the Montana Morado corn done, first. They are doing very well, but will start outgrowing their cups soon. Since the toilet paper tube pots didn’t work out, I’m really hoping they won’t suffer from transplant shock too badly. In zone 3 gardening groups. I’ve read from people who warn against transplanting corn completely, because they don’t handle it well, to people who say they do it all the time, every year, and have never had issues. I suspect type of corn can make a difference, and I seem to be the first person in all of these groups to try and grow purple corn in our zone!