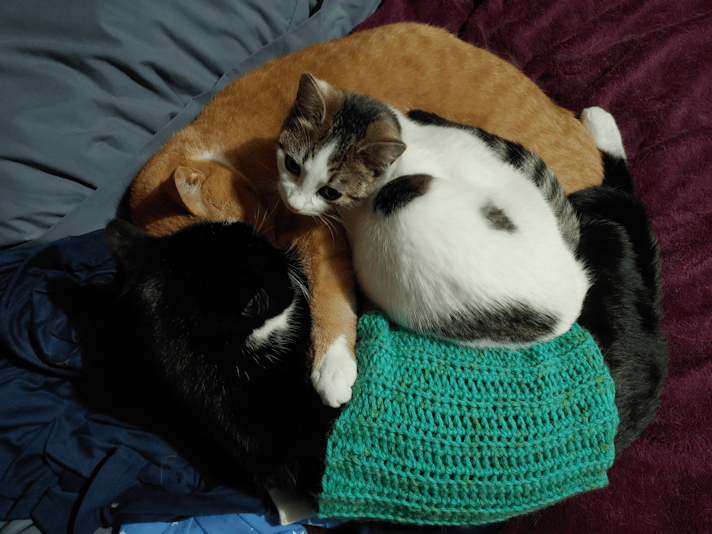
It’s been a while since I updated on the status of Little Braveheart, aka Tissue, now that she has been brought indoors.
For the first while, she hid out in the basement. She began to emerge more often when the cats were given their evening treat of wet cat food. My daughters would, whenever possible, spend time down there, coaxing her out and getting her used to company.
As she started going upstairs more often, the other cats were true to their own personalities! Some took to her, some didn’t. For some reason, the spice girls in particular would start hissing and chasing her.
Cheddar and David were the most relaxed with her, but it has been our old mama cat, that moved out here with us, that has been both a help – and a problem!
She has always been good with the kittens, and when Beep Beep resoundingly weaned them, they discovered that “grandma” would let them suckle. It’s been a battle to get them to stop.
Then Tissue discovered this.
Several times now, we’ve caught her and one of the spice girls, trying to nurse on “grandma” – and being very much encouraged to do it!
On the one hand, this is not good. I don’t think cats can be stimulated to lactate without having kittens, but the attempt to nurse on her has left her looking like her nips are about to bleed.
On the other hand, since they’ve become nursing sisters, Tissue and the spice girls have become affectionate with each other!
I’ve made a belly band for grandma that I put on her when we can’t stop them from trying to nurse. It’s loose and she can get out of it easily, but it’s usually enough for them to stop trying.
Tissue had been aggressively trying to nurse, so I put the band on. Grandma then lay down to cuddle with Cheddar. Tissue clambered on, trying to find a nip. Much to my surprise, Cheddar reached out and arm to block her!
So Tissue just curled up in a ball on top of both of them!
I think she is now socialized enough to put up for adoption! :-D
Not that anyone seems to be interested in adopting cats at all right now. We haven’t had a single person interested in any of the kittens this time. Not a single contact! :-(
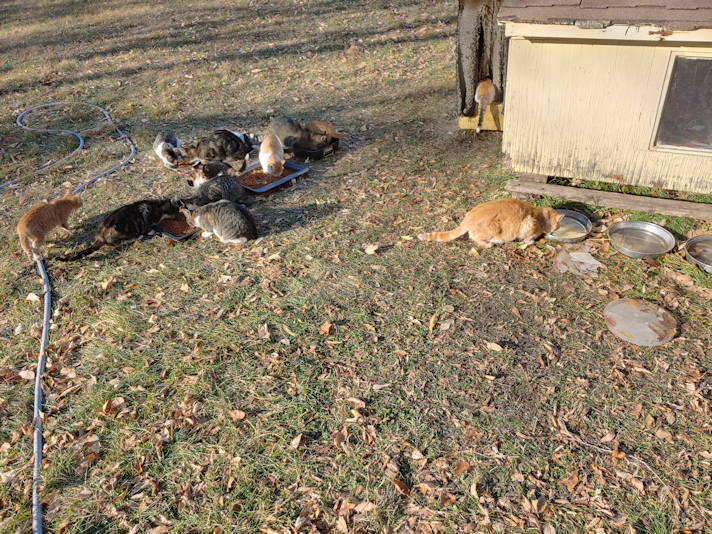
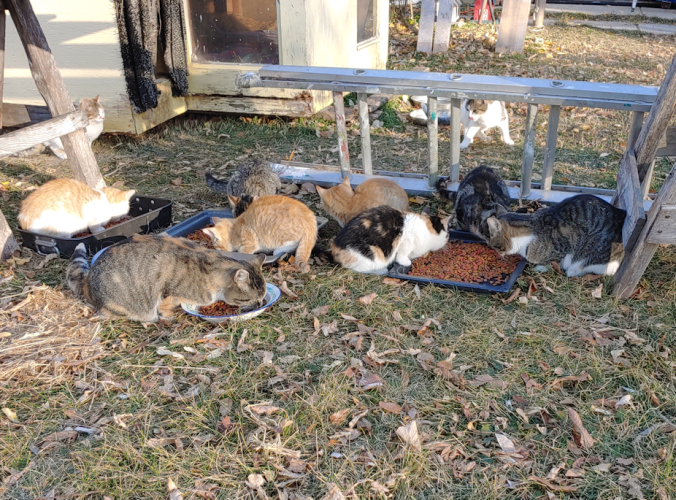
There are 12 cats in this picture. Happily, Rolando Moon is still hanging around, busily hissing at any cat that comes near. We haven’t seen Creamsicle in a while, though. I hope he is all right.
The cat butt sticking out of the entry is a hoot. That is Rosencrantz’s baby, and she seems to be the shiest of the bunch.
As you can see by the frozen blocks of ice, artistically embedded with leaves, it’s been getting a bit cold out at night! It did warm up a few degrees above freezing. Not good for paint, but it had to be done.
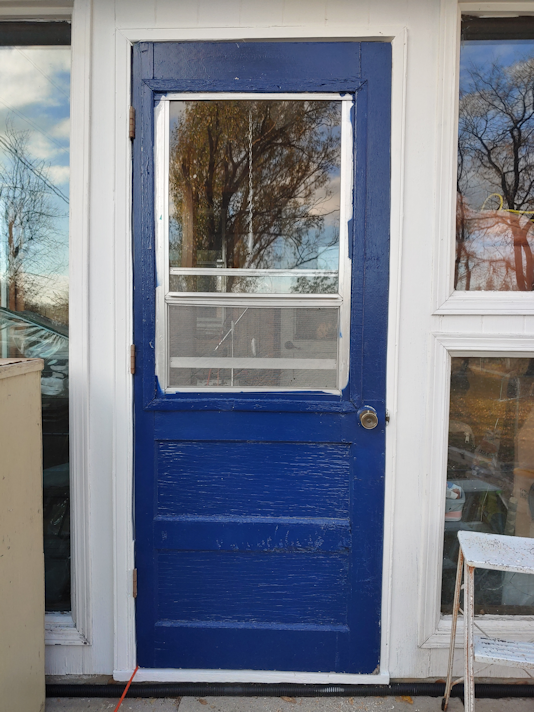
I can now officially say that replacing the door on the sun room is DONE!! I just came in from outside a little while ago, and the paint was dry enough I could close the door. What’s supposed to be blue is now blue, what’s supposed to be white is now white, and nary the twain shall have contact with each other!
Yaaah!!
No, I didn’t take pictures. I’m am tired of taking pictures of that door! :-D
The next project is the shelter for the cat food. It will be placed about where the kibble containers currently are. I want to position it so that it will also provide extra shelter for the entrance to the cat house. The heated water bowl can be plugged in, inside, but the bowl has to be outside, since there’s no way I’m going to be lifting that roof every morning to refill their water. ;-) The shelter for the food containers will help keep the snow off the water bowl, too.
It took a couple of hours, but I got the end pieces of the frame done.
Working with this wood we salvaged from the barn has been a challenge. Nothing is even, so about the only thing I can measure is length. After that, I basically just made sure all the pieces matched and lined up. Not being able to just take measurements meant I had to get creative in lining up the pilot holes. Just making the pilot holes was an issue! My drill bits that were the right diameter for the pilot holes are just barely long enough to drill through the wood. I went hunting in the basement and the garage and, while I did find longer drill bits, they were all too large.
Thankfully, the bits I did have were long enough that, after drilling the pilot holes in one piece, I could position them on the other piece, “drill” though the pilot holes again, and make a mark on the other piece.
It worked most of the time. With the uneven wood, there were a couple of spots where the bit just wasn’t long enough to leave a mark.
Once I’d marked the pieces, I could drill more pilot holes, then screw them together.
When we used this wood to make the goat catcher, I had 3 inch screws, and only used two per corner. This was meant to be temporary, but I still didn’t expect it to be so wonky, it would end up bending and breaking the screws! So this time, I got 3 1/3 inch screws, and there’s 4 in each corner.
That thing is solid!
I started by attaching the 2 ft cross piece on the bottoms. The first corner was screwed together manually. Even with the pilot holes, it was not easy – and with arthritis in my wrists and fingers, rather painful. Our new drill isn’t a quick release type, and I didn’t want to be switching from drill bit to screwdriver tip, over and over, so I decided to use an old drill that we “inherited” to put in the screws.
That worked much faster!
Once the cross pieces were in, I got out a tape measure and figured out how much of an overhang I wanted on the roof supports. I decided to make the roof supports 3 1/2 feet long.
Lining those up at an angle was a pain in the butt! Once again, it was more about making sure the pieces matched, because there was no way I was going to be able to take usable measurements. I managed to get them lined up and the pilot holes done. By the time I was putting in the last set of screws, though, the drill was starting to complain, so I set them as far as I could before the drill started having a hard time, planning to screw them the rest of the way by hand.
When I took the screw driver tip off the drill, I realized I was seeing smoke coming out of the drill!! I remember that happening when we used it before. This old thing overheats very quickly!
By then, it was getting too cold to keep working outside, so I will continue the rest tomorrow. Once I have the 6 foot horizontal supports in place, we can take some measurements for the floor and wall boards.
The good thing is, we’ll be using the scrap wood in the junk pile. They are a lot thinner. That means I can finally use the table saw, and do all the cutting at once. :-) Those will be nailed into place; in cleaning up the basement, we found an old ice cream bucket full of nails that are just the right size for this job.
We can also go hunting in the barn or sheds for something to use as a roof. The roof supports are 3 1/2 feet long, but I hope to be able to have a sheet that’s 4 ft. The roof will be the last thing put in place.
After that, it’ll be done for this year. It’ll need to be painted, but we’ll be using it right away, so that will wait until spring. The one exception might be the roof, depending on what we find to use for that.
I hope to get a lot more done tomorrow, but that will really depend on the weather! At least they’re no longer predicting snow flurries, but who knows what the day will actually bring!
That reminds me. We need to bring the sheets of rigid insulation stored in the garage, back to the house. We’ll have to find a better way to get the sheets for the sun room windows to stay in place, though. At least this winter, we won’t be keeping the doors to outside propped open for the cats to go in and out, now that they have their own heated house! :-)
Lots to do before winter sets in, that’s for sure! :-)
This afternoon, with the help of a daughter, we hung the replacement door back up onto the newly painted frame.
We lined the hinges up with where they were before, except further in as far as we could go. Just to be on the safe side, my daughter held the door in place while I marked the holes for the screws, then I drilled pilot holes for just the top hinge. We screwed in the top hinge, then double checked the locations for the other pilot holes and re-marked accordingly.
As you can see in one of the photos, the entire frame looks like it’s pulling away from the wall! It was like this when we moved here, and the gap doesn’t seem to be getting any bigger, so I don’t think it’ll be a problem. At least not any more than anything else is! :-D
Also, we only had the old screws available, since none of the new screws we have were the right size, and there were only 6 of the same type. So each hinge is missing 1 screw! I still drilled the pilot holes, though, for when I pick some up.
Of course, as soon as we got the top and bottom hinges secure, we tested the door, just in case.
Aaannndd…
Really???
The door was hitting the frame again! It had to be forced closed!
We decided to finish hanging the door, though. Once it was in, I tested it again, which is when I noticed this…
The door latch was now higher than it was before.
Keep in mind that we did NOT raise the door when we put it back. The hinges were lined up with where it was hung previously. The only change was mounting them further in the frame than it was before. Apparently, that was enough for the door latch to be about half an inch higher than it was before!
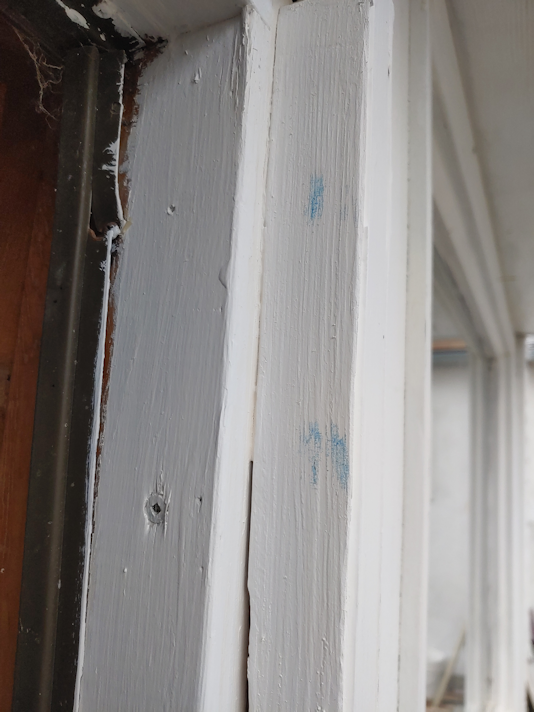
Using where the blue paint marked the frame as a guide, I went back to trying to reduce the wood in those spots. I used the shaver, a chisel, a rasp, and even some of my coarsest sandpaper. For some of the tools, it was hard to get right into the corner. Time and again, I tested the door, and it still was hitting.
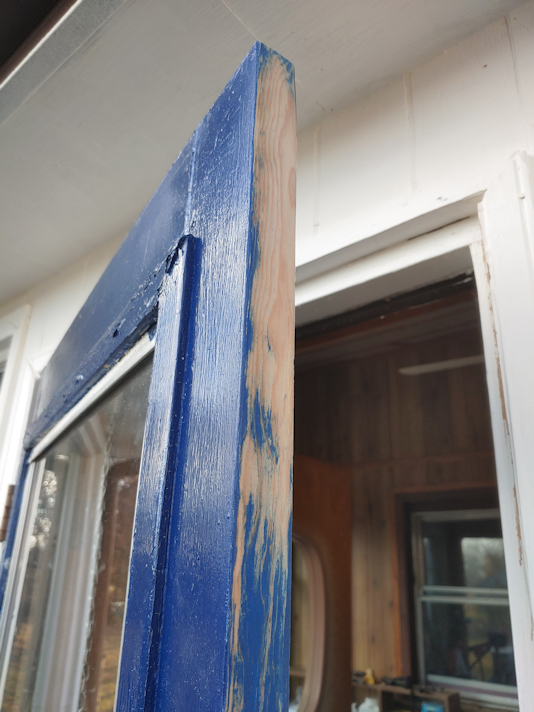
Finally, I started shaving wood off the door itself. That wood is so much softer than the frame, I could do in moments what took several minutes, and a variety of tools, to take off the same amount of material.
I took these photos when I figured I was done, but then went ahead and took off more material. Just in case!
I also gouged out more of the hole for the latch. After testing the door again and again, I finally put the latch plate back on.
That mark on the inside of the frame by the latch plate?
It turned out part of the door handle assembly – I just looked it up and now know it’s called a “rose” – hits it. So I used sandpaper to gouge out a recess there. That wood is also very soft compared to the frame pieces I’ve been fighting with!
The door now closes, easily and properly!
In fact, it’s probably the smoothest working door in the entire house right now!
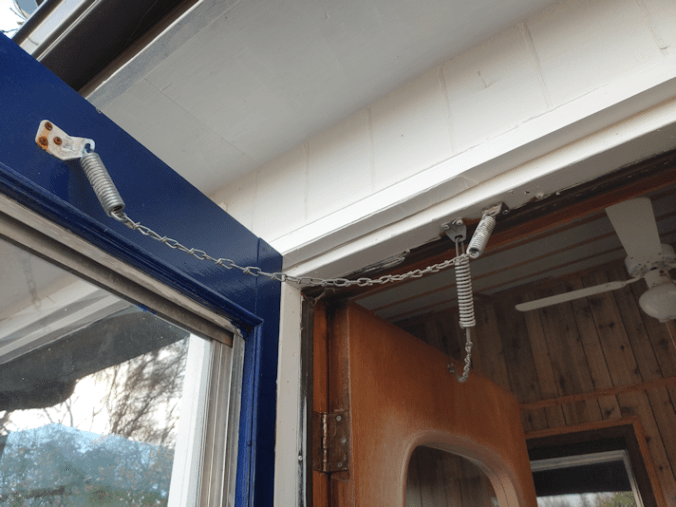
I had one last thing to attach.
The stop chain!
I started screwing it in where there were pre-existing holes, but realized the bent part of the plate was extending beyond the wood, and the door would be hitting it. While moving it over, I noticed the plate for the chain on the inner door had only one screw holding it in place, so I fixed that, too.
Now, there is no chance the door will bang open too far. It doesn’t even hit the shelf behind it anymore, which means no risk it’ll hit the window. I can now move that shelf to the other side of the door, in front of the cracked window.
Tomorrow morning, I’ll be touching up the paint that I scraped off, including the door; thankfully we still have some of that blue left.
Once I was done hanging the door, I just couldn’t help it.
I stood there, opening it and closing it again, and giggling to myself. :-D
I am easily entertained!
This door was so much more of a problem to replace than we could have imagined!
I had to make an unplanned trip today. With feeding both indoor and outdoor cats, we go through the kibble (and litter!) pretty fast, and for the amounts we buy, it’s actually worth making the trip to a Walmart of Costco.
I didn’t want to go to the city, though, so I made the trip to…
A different city. :-D
It’s barely populous enough to be called a city, but it’s a bit closer, has a Walmart, and I wouldn’t have to drive through city traffic to get to it. In fact, I didn’t even have to go into the city at all, since the Walmart is on the outskirts.
When I got home and was closing the gate, I could hear some rather excited meowing.
It’s always cheering when the outside cats are so happy to see us, they come running.
There was, however, a different meow today. A different, but familiar meow.
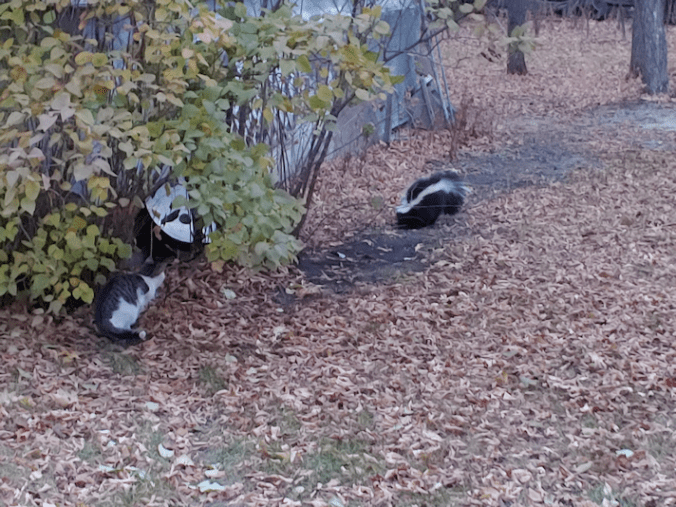
We’ve been Mooned!
Rolando Moon is back! I haven’t seen her in ages! Like Butterscotch and Beep Beep, she is one of the cats my dad used to take care of, but she doesn’t hang around like the other yard cats do.
She was definitely a hungry girl, and was constantly growling at any cat that came near her, but she just couldn’t get enough pets!
It’s been so long, I thought she was gone for good. So I was very happy to get Mooned today!
Well, most of what I intended to get done today, happened. Plus, some unplanned stuff got done. :-)
There was quite the crowd around for breakfast – and not all of them are in this photo! Most of them came out of the cat shelter, which was quite gratifying to see.
They were hungry enough that the little kittens allowed me to pet them while they were eating, including the calico. I was also able to finally confirm that both orange tabbies are male. That leaves the two bigger kittens (behind the food bowls in the photo) that we don’t know the gender of, yet. We’re really hoping they are males, because we have had zero progress in getting those ones more socialized. At least with the little calico, there is some hope we’ll be able to get her inside before she goes into heat.
The water bowls were all frozen this morning, so I brought out some warm water for them. The cats really appreciated that! I’ll have to get that heated water bowl set up soon.
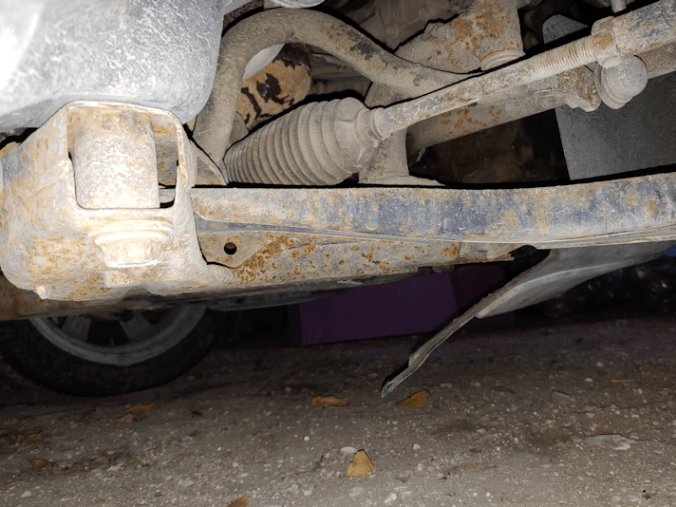
While doing my rounds, I remembered to try and get a photo under my mother’s car. It took quite a few tries!
The last time I drove it, I noticed something was loose underneath. I only saw it because of how I happened to be parked in an otherwise empty parking lot, as I walked to the car from a store. From a distance, I could see something hanging down near the front passenger tire, but once at the car, I had to look through the tire rim at just the right angle to be able to spot it.
When it was time to go to my mother’s to help her with errands, I left early so I could stop at the garage near her place. It is just a plastic shield, and it looks like a bolt probably vibrated off. Who knows when that happened, but it had to be recently, since I picked it up from the garage not that long ago. I have no way to get under there myself, but it’s such a small job, I didn’t even need to make an appointment to get it worked on. I was told to just give a call in the morning, then come on over. I will do that as soon as I can, so I don’t have to make my mother clamber up into our van anymore!
I was able to help my mother with several errands, and even get a bit of a visit. I was happy to see the mask exemption card I’d taped to her door was still there. Her municipality has a mask mandate right now, so we did get asked a couple of times if we had masks. Since I was with her, I was able to tell them we had medical exemptions, and there was no problem. Interestingly, while at the pharmacist’s counter, where they didn’t even bat and eye over our lack of masks, my mother did fish out a surgical mask from her pocket and put it on, saying she didn’t want any trouble – except no one was giving her trouble! I just cringed, because she has no ability to put one on properly. She only kept it on for maybe a minute, probably less. She didn’t even try to put it on when we got to the grocery store. I’ve helped my mother shop often enough, and the staff knows her well enough, that they talked to me about the masks, not her. It all worked out well. It was a real relief for me, given how much she struggles to breathe with a mask on. She still has a hard time understanding mask exemptions, and I could see she was concerned about being given a hard time, but the staff at all the places we went to were awesome. I did give her an exemption card to carry, but I have no idea what she did with that!
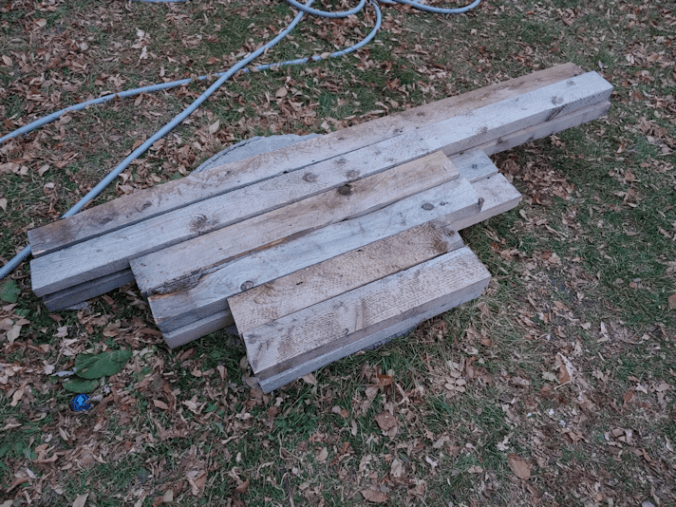
Once my mother was all set, I headed home and was expecting to hang the replacement door for the sun room back up. I wasn’t able to get another set of hands to hold it for me, so I instead worked on some cutting I needed to do. I had found a board in one of the sheds that I cut to length to make a couple of shelves in the entry. The pieces now just need some sanding and painting.
Then I started on cutting pieces that will be the frame for a cat kibble house. :-D
I’d made a rough and flexible plan for it. For the frame, I am using the pieces of wood from the frames I’ve been using to mark out garden beds. I also had a couple of extra long pieces we never used when we built the goat catcher.
I ended up changing the dimensions a bit, based on the wood I had available. All the pieces had one end slightly more damaged than the other, so I worked around that when making my measurements and cuts.
The short end pieces from the dismantled frames will be the upright pieces for the cat kibble house. The back pieces are 3 feet long, while I decided to make the front pieces 3 1/2 feet, instead of the 4 feet I was originally thinking of doing. The longer side pieces of the dismantled frames will be the length of the kibble house. I actually measured the group of kibble bowls and decided to make it 6 feet long, instead of the 5 feet I was originally thinking of. I then used the cut off pieces from those to cut cross pieces that will be the depth of the kibble house. They weren’t long enough to do the 2 1/2 feet I’d originally considered making it, so I cut them 2 feet long, instead.
I cut 4 of them, though I only need two, just in case I need extra.
The only pieces I haven’t cut yet will be the support for the roof. I will decide on the length of those later. I want a considerable overhang on the front of the roof. It can’t extend too far, though, because then it will be in the way when trying to reach the kibble bowls inside.
As for the roof itself, I’ve been finding sections of plywood in the barn and sheds that I should be able to salvage. Once I decide on how long of an overhang I want, I’ll have the dimensions I need to hunt out a piece that will fit.
The kibble house will also have a floor and three walls. For that, I plan to use wood salvaged from the junk pile. The pieces are pretty inconsistent in size, but it doesn’t have to be perfect. It just needs to be enough to keep the bulk of the wind and snow out. The roof will be the most important part.
As you can imagine, the noise of cutting the pieces spooked the cats quite a bit. Some of them, however, were spooked into the cat shelter. As I was putting things away, I looked to see that the indicator light for the timer was on. I could also see a little calico kitten, curled up under the heater! I am so glad the little kittens are using it. They are the ones I’m most concerned about for the winter!
Unfortunately, other critters have discovered the shelter.
Stinky came by as I was cleaning up! I had unhooked the hose, though it was too cold and stiff to put away, so I screwed it back on and used it to spray the skunk away. Long before the cats were willing to check out their new shelter, I could tell from the smell that Sir Stinks Alot had already visited. Nicky the Nose – the only one of the big toms that still visits regularly – has been seen coming out of it, too. We’re trying to discourage him from visiting, because he has been attacking our own male cats. Especially Creamsicle. :-( If he’s in there, chances are he will chase away some of our own cats.
He’s also the daddy of way too many kittens!
I have come to the conclusion that Nicky the Nose is deaf, or at least mostly deaf. There have been a few times I’ve come towards him, even talking as I walked, while he was facing away, with no reaction. It isn’t until he turns his head and sees me that he reacts and runs off.
Tomorrow, barring some unexpected change in plan, I will continue to work on the cat kibble house, and hopefully be able to snag a daughter to help hang the sun room’s replacement door.
It’s starting to get pretty chilly out there, and there’s still plenty we need to get done before the real cold hits!
This morning, after doing my morning rounds, I gave the sun room door frame a second coat of paint. Tomorrow, we hang the door back up.
I had an audience. :-D
Also, while I was painting, I found that Nostrildamus has figured out to jump over the threshold after it’s been painted! :-D
Meanwhile…
Today was finally racking day for our first attempt at making hard apple cider, using our own crab apples. For new visitors, you can read up about that here and here. (links will open in new tabs)
Here is how the gallon carboys looked before I started. As expected, there was a LOT of sediment at the bottom. It’s not just the lees from the yeast, but the sediment from the raw, unfiltered juice.
We had some concerns with the fermentation. Activity in the airlock stopped a while ago. I think the room temperature became a problem. While they were actively bubbling, their temperatures tended towards 18C/64F, though we did also keep them wrapped in a towel and, every now and then, I’d heat up a rice-filled warming pad in the microwave and stick it between them to help keep them warm. We had used an electric heating pad, when making mead, but where these were sitting, there is nowhere to plug it in.
Racking from a 4L to a 3L carboy meant a lot of sediment heavy liquid left behind. Though I tried to hold the racking cane well above the sediment as long as I could, I could still see wisps of it being pulled up the siphon.
As I racked each jug, I made sure to get a hydrometer reading.
I just don’t know what to make of it.
For one of them, the hydrometer pretty much sank to the bottom. I had to add cider almost to the top for it to float enough to get a reading. The other was only slightly better. When they were first tested, it floated quite handily.
Unfortunately, I just can’t get it straight on how to read the specific gravity on that thing. So I write down all three readings.
The readings still don’t make any sense to me. Why would the numbers all drop so much? From what I can figure out, this is basically telling me there’s no alcohol in one, and almost no alcohol in the other.
I did taste test it, of course, and they both have a VERY sour apple taste. It also does taste alcoholic, but that is almost overwhelmed by the sour apple taste. Which is interesting, since the apples we used are actually quite sweet, and there was quite a bit of sugar added to the juice, too.
As for the hydrometer reading this time around, the only thing I can think of that might be affecting it (besides something going weird with the cider itself) is the temperature. Both carboys had a temperature reading of 16C/60F. The ambient temperature in the room is 15C/59C. From what I’ve been reading, newer hydrometers are calibrated for about 20C/68F. I’ve found a site that will calculate the adjustment for temperature, but there is virtually no change in the reading. So what gives?
I have no idea.
Considering that the traditional way of making hard apple cider is to press whole apples into a barrel, set it aside for a few months and BOOM, you’ve got booze, I didn’t expect this to be so complicated.
Anyhow. The 3L carboys are now set up with their airlocks for a second fermentation. As for the liquid left behind with the lees, I ended up straining much of it, and we now have about half a liter of filtered baby hard apple cider.
Hmmm… I wonder how it will go with the ham I will be roasting today?
The Re-Farmer
Update: When I started the hard apple cider, I did it based on this video from CS Mead and More.
There is a reason I included them among my Recommended sites!
I went ahead and contacted them about my readings, and got a very prompt response, and I am very happy!
It turns out, everything is working fine. My problem is with reading the hydrometer, then figuring out what it’s telling me! :-D
And now I know what to do with the information I’m getting off the hydrometer. I may not be using the AVB or Brix to work it out, but I’m writing them down anyway, because I can see those readings better. I can then use the printed out chart that came with the hydrometer to see where that lines up with the Specific Gravity and actually read that number on paper, instead of trying to see it in the liquid. When I take pictures and upload them to my desktop, I can usually zoom in and read it, but sometimes I find the hydrometer moved as I was taking the picture and I still can’t read it. :-/
The formula I was given to calculate the alcohol percentage is to subtract the new reading from the first reading, then multiply the answer by 135. So for one of my ciders it’s:
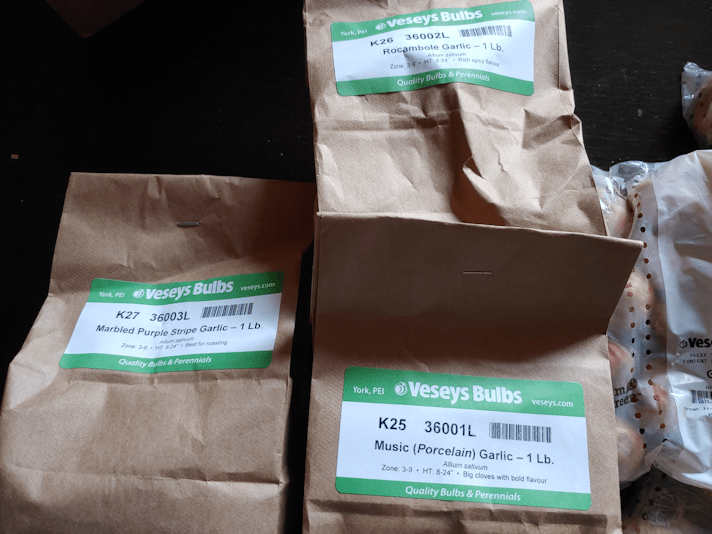
Along with the three types of garlic that came in, my daughters’ flower bulbs arrived.
The tulip collection included 10 bulbs each of Orca, Pinksize and Brownie, and 8 bulbs each of Black Hero, Pamplona and Vanilla Coup. There was also 6 bulbs of Gardenia Daffodil.
So while I was having fun working in the soft soil, planting garlic, the girls did the hard work of digging holes for bulbs in hard soil, and between roots!
They did not take pictures of the process, unfortunately.
The tulips were planted not far from where they’d planted the Bulls Eye tulips that came in earlier. This area was selected for its combination of sunlight and drainage, and because they’re not supposed to be watered, and this is not an area where they might accidentally get watered along with something else.
The tulips need to be planted up to 12 inches deep, if we want them coming back year after year, but that depth includes the depth of any mulch. So they planted the 50+ bulbs at 6 inches, adding a 6 inch leaf mulch. Leaves, however, crumble and settle quite a bit, plus the wind was threatening to blow it way, so they also wet down some peat, which we still have lots of, and added that to the top.
The Gardenia Daffodil had different requirements, so it was planted with the Eye of the Tiger irises planted along one side of the old kitchen garden.
When we are next able to, we’re thinking of picking up a couple of bags of soil to scatter on top of the mulch. The soil under the mulch in the old kitchen garden is much improved from before, but the straw itself, and even the grass clippings, aren’t breaking down very quickly, making it not at all conducive to planting in it. It’s all just too stringy! :-D And now there’s the excess flax straw from inside the cat shelter. Adding some soil and peat, as well as moisture, for the microbes and worms to do their stuff should help it break down faster.
We also got a couple other things off the to-do list today.
Now that the soil around the support post has had a few days to settle (and get stomped down some more, every now and then), our new bird feeder is now hung up. Hopefully, this less decorative design will not get flung around in the wind as much as the church and barn shaped ones were, and with the support now buried in the ground like a fence post, we don’t have to worry about it being knocked over any more!
I also had a chance to work on the grapes, while the girls were still digging holes for tulips.
The first thing that needed to be done was prune them. I hope I did it right. From what I’ve read, they should be pruned above the second bud from the ground, as grapes will be produced on first year vines. The problem was, I couldn’t see any buds at all! So I tried to err on the side of caution.
I had to move the trellis supports so I could get behind to harvest the grapes. Today, I finally set them into the ground in their new locations, so we can squeeze behind them again, if necessary. On the right is a long piece of rebar, but the white support on the left is actually two plastic tubes on a shorter piece of rebar. The bar wasn’t long enough to hold the trellis wire, but it is long enough to support the plastic tube. I had to lift off the piece that was woven into the wire mesh, then reset the position of the other two pieces.
When I set this up as a makeshift trellis, I was able to bang the rebar into the ground with a piece of broken brick I’d found while cleaning up around the storage house. I tried that again, but it broke. So I dug around in the sun room, among the things we’d found in there while cleaning it up. There was an old hammer with a ball peen on one side, and a heavy flat head on the other. Much heavier than a regular hammer. For the long piece of rebar, I had to stand on the stairs to reach the top and start hammering it in.
The head fell off the hammer.
It turned out the handle was rotted out at the head!
Thankfully, I still had the new handle I’d found while cleaning up the old basement. I’d intended it for something else, but it didn’t fit right, so I’d left it for later.
Now, I’m glad it didn’t fit the other thing I’d meant it for!
Mind you, it didn’t fit the head of this hammer, either, but I was able to shave the corners of the top, and got it on. I was able to finish the job!
After hammering the rebar supports into the ground and getting the plastic tube in the wire mesh back in place, I was able to use foam covered garden wires a darling friend found for me, to tie the pruned vines to the mesh. Then I used one of the bamboo poles that we’d used in the squash beds as a support for the top. With the grapes growing so well this past summer, I was able to see the weight of the vines were pulling the wire mesh downwards, so this should add some extra support.
Now, all they need is for some mulch to be added to protect them from the winter’s cold. From what I’ve found out about growing grapes in our zone is that they should be just fine with snow as insulation; the vine would be laid down on the ground to be covered. Planted against the storage house like this, that doesn’t really work out, so mulch it is!
We now have all the flower bulbs we ordered planted – 200 grape hyacinth, 100 snow crocuses, irises, gladiolas, and almost 70 tulips – plus the garlic.
That’s it for fall planting this year.
Now, we need to assess how our vegetable gardening went, and decide what we want to plant next year! :-)
I was so excited to finally get our bulbs this morning!
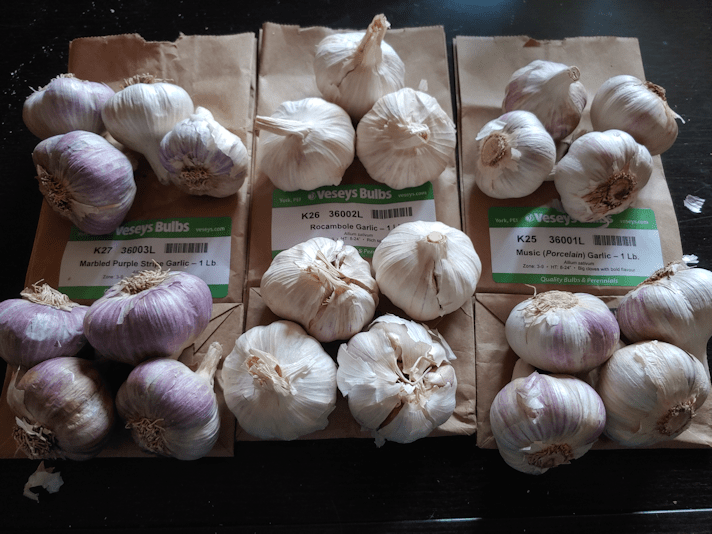
Here are the three varieties of garlic we ordered.
I appreciate how they add things to the label, like “best for roasting” , “rich, spicy flavour” and “big cloves with bold flavour”.
This is what 1 pound of each variety looks like. I wasn’t sure how many bulb heads or cloves that would translate into. That was the main reason I wasn’t sure if the two beds I’d prepared for them would be enough. At least I was reasonably sure it wasn’t going to be too much space! :-)
Today turned out to be a very windy day, so my daughter and I broke apart the cloves inside the house.
Those old take out containers were perfect for keeping the varieties organized!
Also, they made the house smell absolutely amazing!
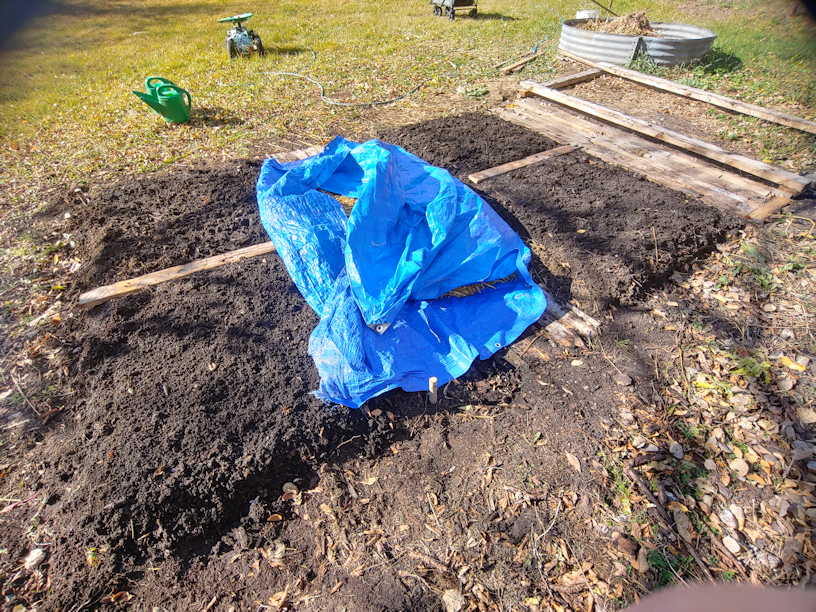
I had been watering the prepared beds, to try and get moisture down to the layer of compost and straw buried inside. Unfortunately, I wasn’t able to do that as often as I’d wanted to, so I gave them another thorough soak.
The frame used as a guide to dig 4′ x 8′ beds fit in the next space, inches to spare between it and the ring around the new compost pile. It was ready, just in case I needed a third bed.
Thankfully, I didn’t!
Porcelain Music Garlic
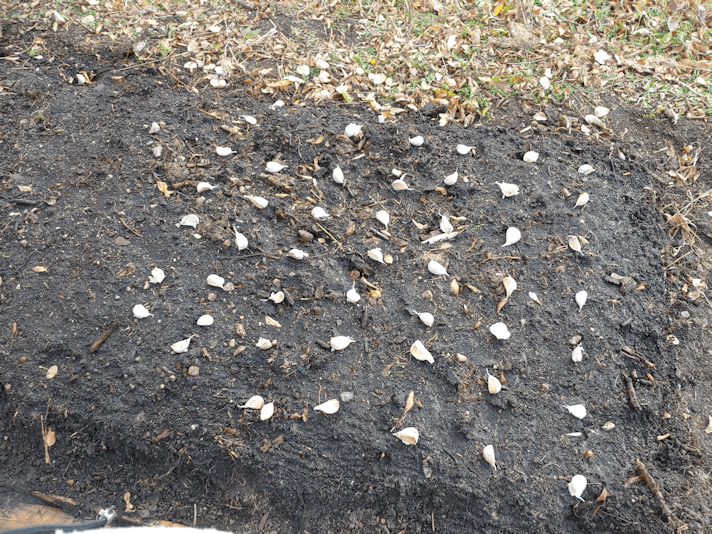
The first variety I planted was Music. Directions for planting hard neck garlic I have looked up, say to plant cloves 4 – 8 inches apart, in rows about 12 – 18 inches apart. Since we are doing beds rather than rows, I laid them out in a roughly 6 inch grid. The soil is so soft here, I was able to plant the by just pushing my gloved fingers in to the correct depth, without the need for any tools.
Purple Stripe Garlic
With the number of cloves we got from the Purple Stripe, my grid wasn’t quite as even at the end. :-D The corners on this bed seemed like they would collapse a bit, so I moved the cloves that would have been planted there to the other side.
Once the two varieties were planted, I added boards to mark where the grid ended, and the third variety, which would be in both beds, started.
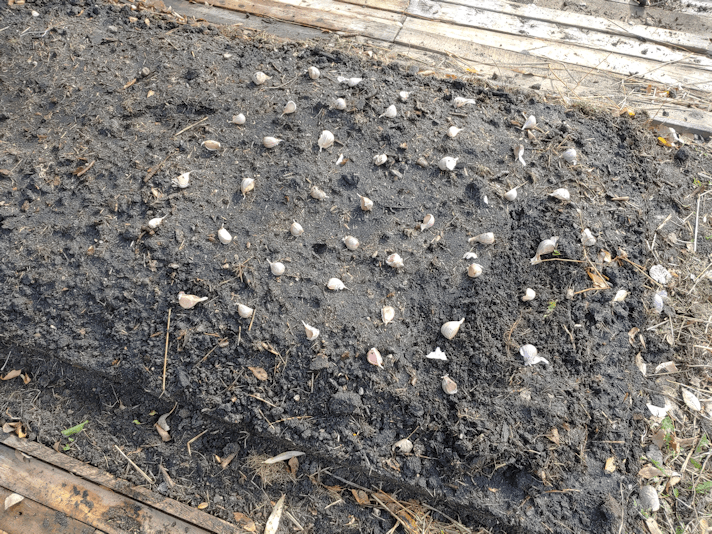
Racombole Garlic
The last ones to plant were Racombole. Which sounds like a Pokemon.
The Racombole turned out to have a lot more cloves, including more smaller ones. It was almost like soft neck garlic that way. So these were planted slightly closer together. More like 4 inches apart, rather than 6. I probably shouldn’t have bothered to plant the smallest ones, but I didn’t want to waste a single clove!
Those boards across the beds also came in very handy to put a foot on to brace myself, making it easier for my short little arms to reach the middle. ;-)
Planting in these beds really demonstrated for me that building much higher raised beds for accessibility is a very good idea!
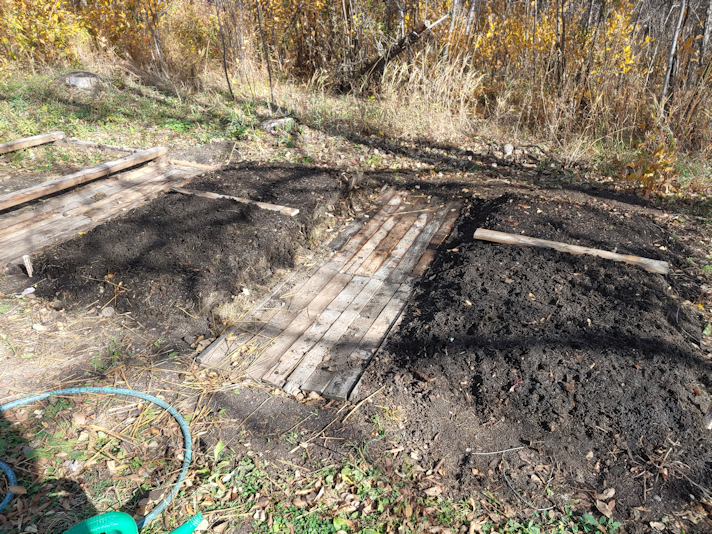
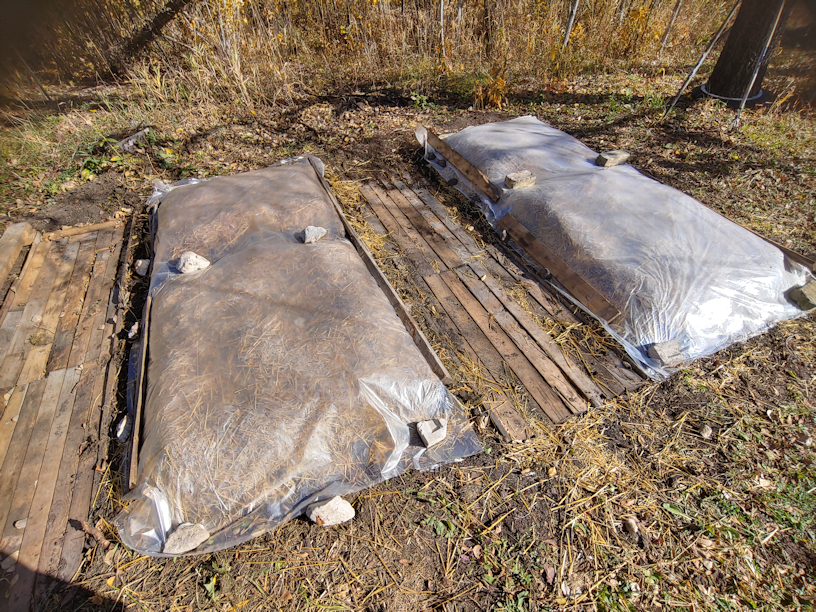
The next step was to add the mulch, and this is where the wind became a real potential problem.
Thankfully, I thought to put the chopped up straw on a tarp.
It was easy to slide the whole thing into the path between the beds. I could then grab handfuls, keeping them low and out of the wind as much as I could, to spread out.
I then had to rush to give the mulch a soak with the hose, more to weigh the mulch down than anything else! As you can see, the wind was already starting to blow the straw away!
The last step was to cover the beds with plastic – which the wind certainly made challenging! Thankfully, we’ve found a couple of rolls of plastic while cleaning up the house and basements, so we have plenty, and I could unroll it directly on the mulch, adding weights as I did.. The plastic is actually folded in half on the roll, and I didn’t bother to unfold it, so this is a double layer of plastic on the beds.
As you can see, those board across the beds came in handy for the weights, too!
The plastic isn’t something I’ve seen suggested, in general, but we are in zone three, and most of the places I’ve looked up are in at least a zone 6. While October is the month for planting hard neck garlic for them, we probably should have planted these at the end of September – and would have, if they had not been back ordered.
The issue is overnight temperatures. We’re consistently hovering just below freezing. In the long range forecasts, our highs for the day will be just barely above freezing.
There are a few things going for these beds that should help with our planting this late in our zone. Burying the organic matter at the bottom of the beds means there should be some warmth generated as they break down, just as it would have if it were in a compost pile. The mulch will also help regulate the temperatures and, finally, the plastic should help keep things a bit on the warm side. I don’t want it warm enough for the garlic to start sprouting, but they do need to start their growth below ground before winter temperatures set in.
I might remove the plastic later on. Snow also acts as an insulator, plus these beds should not need any watering throughout the growing season. Between normal precipitation and the mulch, they should have enough moisture. Letting the snow cover the beds would give them that first burst of moisture in the spring, and the beds being slightly raised means they should thaw out faster than the ground surrounding them. However, the plastic will also keep the moisture they already have from drying out before the snow falls, and will help the soil warm up even faster in the spring, giving the garlic a chance to start growing a bit earlier. I would then remove the plastic once I saw that greens were making their way through the mulch.
My mother grew garlic in the old kitchen garden, but she never used mulch or plastic or any of the other techniques I am using that irritates her so much. :-D So I can’t go by how she did things, in past years.
So if there are any experienced garlic growers here, I would love to hear how you have done it! And would you leave the plastic, or take it off before the snow falls?
I’m really looking forward to seeing how these do. When it comes time to harvest them next year, we will be looking to save the largest bulbs for planting. Hopefully, we’ll have enough large ones to have more to plant than what we started with.
With the chillier temperatures, it’s really not a good time to be painting outdoors, so I made a point of starting right after doing my morning rounds. This way, it could have the whole day to cure, and I could decide on whether I wanted to do a second coat or not.
The top is cut so terribly crooked! LOL This is the piece I cut using a hand saw, after two failed attempts with the power tools we have available.
Though the house was painted the summer before we moved in, it looks like the inside of the door frame only got one coat, so I went ahead and painted that, too.
The extension cord to the cat shelter was staying, but I managed to keep it away from the paint. This corner on the left is where we’ve had to add the most material to make up for the shifting of the frame.
It’s really amazing how much a coat of paint makes even the worst patch jobs look better! :-D
Well, that didn’t take long! :-D
I had to leave the doors into the sun room open, of course, and later in the day we found white foot prints on the concrete inside! :-D
I’m rather happy with how the paint was feeling by the end of the day. We will be able to drop the cord down and actually close the door for the night. I’ve decided to go ahead and give it a second coat tomorrow morning, which means that the day after tomorrow, we can hang the door back up again.
It will be so good to finally have this job done!!!
After painting this morning, I headed to the post office to pick up our bulbs, which are now planted – but those will get their own posts! :-)
Lats this morning I headed over to my mother’s place with a turkey dinner to have lunch with her.
On the way out, I spotted three sets of ears in the window of the cat shelter.
Tiny sets of years belonging to the little kittens! I didn’t dare go closer for a picture, though, because I didn’t want to startle them away. There may have been more cats inside with them that I couldn’t see, too. I’m so glad to see them in the shelter, rather than hiding under it!
My mother and I had a very nice lunch and visit (how visits turn out is always touch and go with my mother! LOL). I brought a mask exemption card to tape to her door, and another she can carry with her. Hopefully, that will help reduce the harassment from the caretakers. Unfortunately, I think more has happened than she is telling us, because she kept insisting she “doesn’t want a war” and even started asking me not to call the housing department responsible for her building to talk about the caretaker’s abusive behaviour. She wore a mask – under her nose! – to meet me at the side door that’s very close to her own apartment door, and even in that short distance, by the time she was back in her apartment, she was struggling to breathe. She had also mentioned to me on the phone, waking up and struggling to breathe again. So I brought a foam wedge we got for my husband that he ended up not being able to use. Depending on how it’s positioned, it can be used under the knees, to lean against while sitting up in bed, or to sleep in an inclined position. The doctor had recommended trying to sleep more upright to see if that helped. When she saw it, however, she flat out refused to even try it and told me to take it home. Eventually, she said it was because it looked ugly! Which I highly doubt is the real reason. Frustrating!
Still, it was a good visit and my mother was very happy I was able to come over. I think the pandemic social restrictions are really getting to her. There used to be many events and gatherings, either in her own building, or in nearby venues, that she attended. Now, there are none. It seems the only real “social” interactions she’s getting these days are with the nasty caretaking couple. The restrictions seem to be bringing out the worst in people. I think she is getting very lonely, and some serious cabin fever!
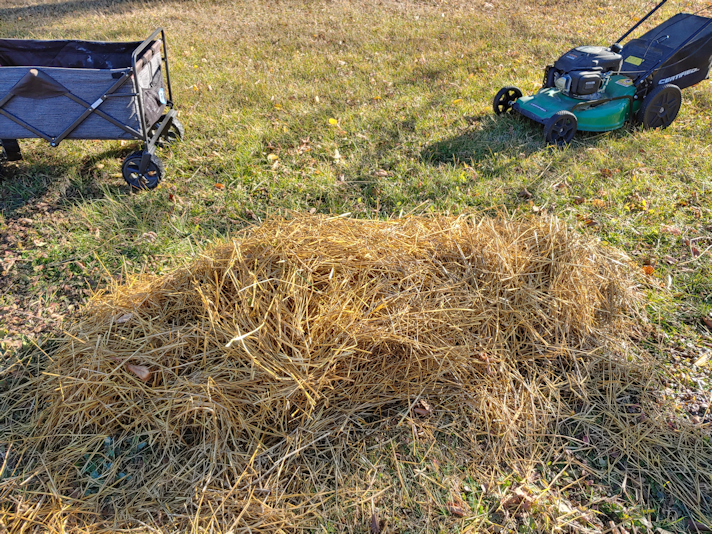
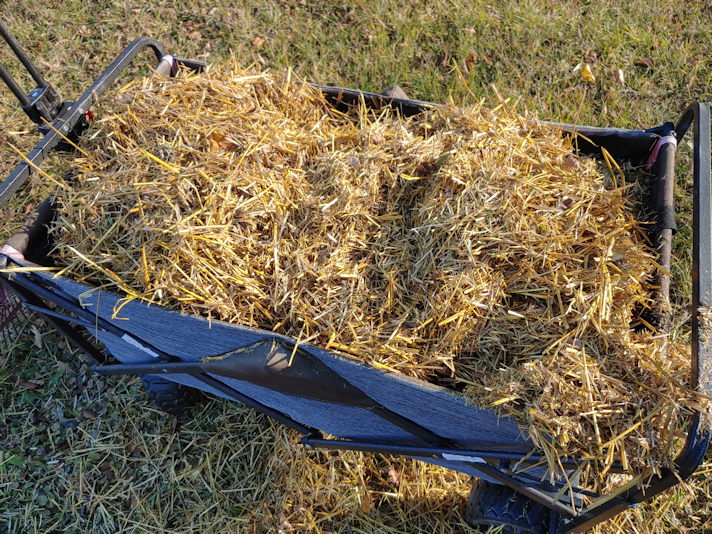
Once at home, I took advantage of the warmer weather. With the garlic ready to be picked up when the post office opens tomorrow, I was thinking of how I wanted to mulch the beds. The straw is not breaking down as I had expected, and I decided to try an experiment.
Using the new push mower to chop it into smaller pieces!
The bag filled up very quickly, but it wasn’t until I had already started that I realized I’d forgotten to check the height of the mower. It was at 7; the highest setting! So things weren’t quite as chopped up as I wanted.
I lowered it to 3 and that chopped things up much better.
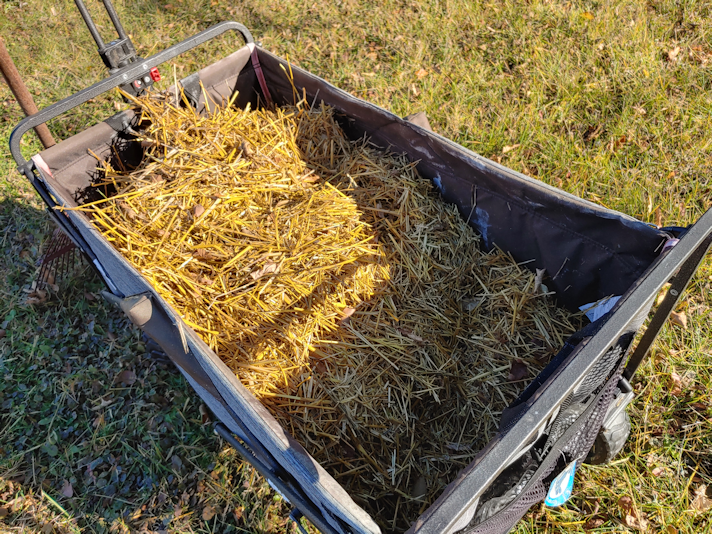
It took only 2 bags to fill the wagon, it’s so fluffy. LOL I laid out a tarp near the beds the garlic will be planted it, to make it easier to work with when it’s needed – plus I can fold half the tarp over the pile to keep the wind from blowing it away.
Unfortunately, I had an unexpected problem.
The new lawn mower stopped starting.
Right from the beginning, it was harder to start, but every time I had to turn it off to empty that bag, it kept getting harder to restart it until, finally, I just couldn’t start it at all. It had been so easy to start, before! In the spring, when we had so much rain, I was using it a lot and had no problems. Then the rain stopped, and the grass never really got long enough to make it worth cutting again. So it’s been sitting in the garage for the last couple of months. That on its own should not cause the problem. I couldn’t find any reason for it. It just won’t start. After getting only 2 1/2 wagon loads done, I finally gave up.
I will just have to take it in to the small engine shop in town to get it looked at, later in the year.
So the experiment worked, as far as chopping up the straw to make a finer mulch. It was just the lawn mower that failed!
After giving up on that task, I took the time to take the sun room replacement door off in preparation for painting the frame. I plan to get at that as soon as possible tomorrow morning, then go to the mail to pick up our bulbs. I will get the garlic in, while the girls will be doing the digging to get their flowers in.
While working at the door, I spotted this.
That is two little kittens in there! One of the orange tabbies, and Creamsicle Jr. As I walked around after taking the picture, Potato Beetle came out of the entry. I hadn’t seen him at all in there!
So I decided not to go inside after taking the door off, and stayed to see if I could get the kittens to play.
I had a target in mind.
This little lady. In the interest of trying to reduce future litters, we are hoping to get her friendly enough to bring her inside.
Yeah. I know. We have too many cats inside already!
Nostrildamus, meanwhile, couldn’t get enough attention! It was only a couple of weeks ago that we were lucky if we could pet him at all. Now, he’s all over us, asking for pets! He still doesn’t like to be picked up, but he does like chewing on fingers!
The two napping in the shelter eventually came out to see what was going on, and joined in on the play. I was able to pet the little orange one – the smallest of the 4 younger kittens – and even managed to pet Creamsicle Jr. a bit. The calico, however, would not let me touch her! However, my daughter came out to join me for a while, and she tried to play with them. Not only did she get the calico close enough to pet, she was even able to pick her up! Only briefly, and she didn’t like it, but she didn’t run away after jumping down, either.
Aside from Nostrildamus, we seem to be having a better time of socializing Butterscotch’s second litter than the older kittens. Though it didn’t help that Butterscotch was around and growling all the other cats away, including her own babies!
Still, we have made some socialization progress!
The other little orange kitten came by later. That one, the gender is still in doubt, but from what little we’ve been able to see, I suspect it is female.
I thought it was supposed to be rare for orange tabbies to be female, but here, they seem to be the majority! Of the older kittens, Nostrildamus is the only whose gender we are sure of. His one confirmed sister is now inside, but with the luck we’ve been having, his other sibling and Rosencrantz’s baby are also female! And we can’t get anywhere near any of them. :-(
Ah, well. We will just have to do what we can. Mostly, I’m just really, really glad the little kittens are going inside the shelter.