Of all the inside cats we’ve had over the years, none has taken to cuddling with me at night like Nosencrantz has! She is very particular about it, and she has actually started to “bully” me to get with the routine! She goes to her corner of the bed which, unfortunately, she starts kneading, which I don’t want because she’s going to put holes in my sheets. Then she sticks her face into my hand, demanding I pet her head. Especially around the eyes. And if I’m doing some last minute checking of my phone before putting it on the charger, she will bash at it with her face until I pet her!
Then she spins around, shoves her head into my hand again, then drops her body down on my arm, the back of her head and neck in my hand, and stretched out to my elbow, while demanding I continue to pet her face with my fingers cupped around the back of her head! Since she also starts kneading again, I usually end up having to use my other arm to grab her front paws to stop her. End result, she’s tucked into a nest between my arms, and happily goes to sleep.
Sometimes when I get up in the morning, she stays, even after I straighten the covers over her.
Of course, all my bedding is absolutely covered in fur. It doesn’t even wash out completely anymore, it’s so stuck into the fibres!
It’s a good thing she’s so darn cute, because she’s such a pain in the butt, too! 😄
Tissue is quite enjoying the warmth of the sun – and so far, none of the cats seems to have tried to destroy the smaller plants that have been temporarily moved onto the shelves that will soon be holding seedlings.
Soon, she will not be able to spend time on the window sill in this room! My daughter and I finally made it to the city to pick up what we need to make the cat barriers (which my other daughter is paying for, sweetheart that she is!).
And I’m looking forward to having a carpet that doesn’t get completely covered in cat hair and the bits of rope torn off their scratch tower, immediately after vacuuming.
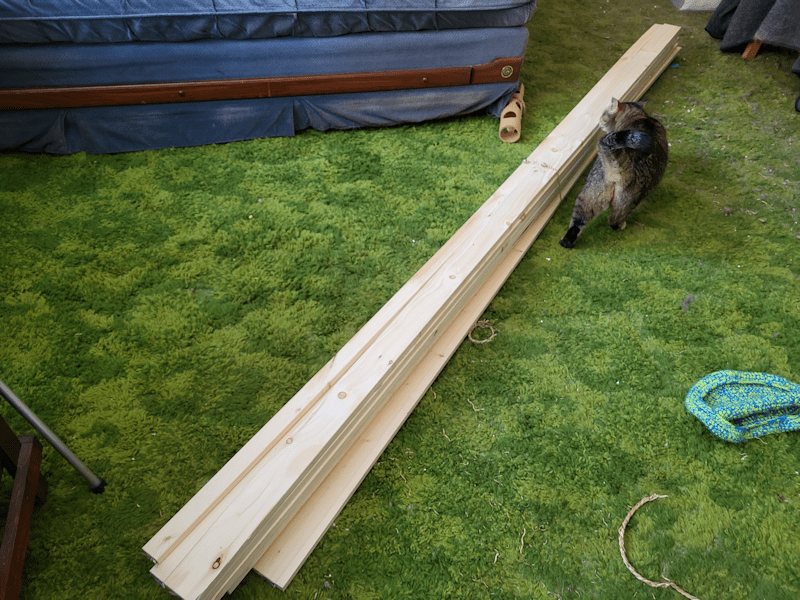
We’ve got three sizes of boards. We were going through the cheap contractor grade pieces, and it was hard to find any that weren’t damaged, or wonky.
We also got chicken wire, aka: hex wire, instead of the hardware cloth I wanted to get. It was the only thing they had that was wide enough and long enough for this.
We’re actually doing a simplified version of our original plans. Instead of a box frame for the entry, then a door frame inside, and finally the door, we’re just going to do a box frame and a wide door.
For the box frame, we’ve got 1″ x 4″ boards. The frame is meant to slide into the entry into the living room, with self adhesive foam on the sides to hold it in place, but still allow us to remove it, if necessary. The problem was, we couldn’t find the thickness we needed. There is moulding at the top and bottom of the entry, so the foam was supposed to fill that gap. After debating our options, we decided to go with the thickest they had, and we’ll remove the molding from the bottom of the entry and make the box fit top to bottom more snugly. It won’t be completely snug; when the girls measured the space, they found a half inch difference between the top and the bottom!
For the door, we’ve got 1″ x 3″ boards. We will also need to create a barrier for an opening in one of the shelf dividers, so we got 1″ x 2″ boards as well – one of which will also be used a side jamb.
We spent some time looking at our latch options and ended up going with a simple hook and eye latch. We decided against getting a handle. We had use the latches as handles, but if we really wanted a handle, I’m sure we’ve got something lying around the house somewhere.
Unfortunately, it does look like the hinges I picked up will be too wide. Possibly. If we do have to get smaller ones, I’ll be sure to pick up three hinges, not a set of two.
Securing the chicken wire was another thing we had to consider. We’d both bounced around the idea of sandwiching the wire between boards, but we’d basically double the wood need for the door, so we’re going to make it the same was as the barriers we’ve made for the basement doors; The horizontal boards will overlay the verticals, with the wire sandwiched between, and the rest of the wire will be secured with something else.
My thought had been to use small U nails (I think some places all them staples), but they didn’t have any small ones. The alternative is to use actual staples, but our staple gun isn’t very strong, and we’ve found the staples pop out way too easily. So we looked at staple guns, only to find that ours was there, and is a heavy duty gun. So we ended up getting stronger staples, instead! We’ll see if that works. If it doesn’t, I know where to go in town, where I can get what I was originally thinking of, in bulk.
I might need to go into town, anyhow. I think what we have at home is all too large for the size of wood we are using. The cats have knocked most of the boxes off the counter in the sun room, anyhow, along with all sorts of other things now scattered around the floor in there – and we won’t be able to clean it up until we can take things like the table saw and my husband’s walker, outside, so we can get at it all.
Meanwhile, construction starts tomorrow. Hopefully, we’ll be able to get both the doorway and the shelf opening done, and we can finally have cat free space for more seedling trays, and not worry about them being destroyed! And hang the shop lights we will be using as grow lights from the ceiling without worrying about cats jumping on top of them. We have seeds that need to be started indoors 12 weeks before last frost, and that’s in four days.
In other things, I got an email from my bank this morning, congratulating me on getting approved for the low limit credit card I applied for (and approved for) last week, and letting me know it just got mailed. I was also informed that I could start using it right away – if I just get the Apple Pay app and set it up through my online banking.
No, thankyou!
For the card I chose, there is no annual fee, however there is also a 21 day interest free grace period on new purchases. As long as I pay off any and all new purchases within 21 days, and never use cash back, I could theoretically never pay interest on this card. Since I plan to only use it for purchases within budget, and pay it off right away, that should actually work out.
On another unrelated note…
One of the things we got done today was set up an eye exam appointment for my younger daughter. I was going to wait until my husband and I got our tax returns, and we’d get glasses for all four of us (which we planned to do last year, but ended up with unexpected bills, instead). Unfortunately, my daughter’s glasses have gotten so scratched up, she can actually see better without them than with! I’d been told that in our current province, eye exams are covered by the provincial health care plan, once every two years. When I called and asked about it, however, it turns out that it’s only partially covered – and the remainder that we would pay is $105. !!! I hate to think how much it would cost if it wasn’t partially covered! That is massively more expensive since we last got our eye exams. At least I’m still covered 90% by my husband’s health insurance, and I confirmed that they direct bill.
We just have to get our taxes done. I picked up different software than the TurboTax we usually use and did try to get it started, but quickly gave up. I had to manually include the T4A to their list of different T4s (I had no idea there were so many), but while I could input how much he paid in taxes, there was no line for his disability income. The line number on his T4A simply doesn’t seem to exist in the software, which makes no sense at all. There was also nowhere I could input that I qualify for the caregiver’s tax benefit, nor anywhere for my husband to include that he gets the disability tax credit.
It takes a lot to be even worse than TurboTax.
Frustrating.
Ah, well. It’ll get done, and the sooner the better!
Well, today is going to be a day of rest, whether I intended it or not.
And a day of painkillers.
Last night, I finished setting up the living room so that, once we build the cat barriers, it will be a plant room.
We hardly use the living room. The aquarium greenhouses are there, so of course I’m checking on those regularly, as well as tending the few plants we’ve been able to keep in there without the cats absolutely destroying them. My husband’s leather working desk is there, but between the pain and the mind numbing meds, he doesn’t use it as often as he’d like. The TV (which was here when we moved in) is there, which we tend to forget even exists.
So it’s been cat heaven in there.
The whole room needed to be complete rearranged, which meant taking a lot of stuff out completely, then working section by section. Move stuff out of the way. Vacuum. Empty the cat hair filled cannister after a few passes. Vacuum again. Empty the canister. Clear the next section. Repeat.
The frustrating thing was discovering all the spots a couple of our boys has been spraying. Yes, all the males are fixed, but we have two that still spray, and in the most inconvenient and inaccessible spaces. Leyendecker didn’t start spraying until after he got blocked and miraculously survived. Gee, thanks, dude. 😕
It was also the time to do little things, like replace a ceiling hook with something stronger (I had to get my younger daughter to climb the little step ladder to do that for me!) for the grow lights, and set up a power bar in a better space, since where it was hanging before would be blocked by shelves. Thanks, M, for the Alien Tape! It works great!
We had the couch in the middle of the room, close to the TV, since when we do watch movies, we always use the subtitles. It’s a big TV, but it’s still hard to read the subtitles from across the room. Well, that had to change, so I took advantage of the situation to not only use the pet hair attachment on our vacuum cleaner on all sides, but to tip it over so we could find where that piece of spring I found when I first moved it came from. How that cats managed to snap that, I have no idea!
My daughters helped as much as they could, but it really was a one person job for the most part. One of the things that had to be moved out was this monster.
This is my older daughter’s jade tree that almost got killed during the move, because of how cold it got in the van when we stopped to try and sleep in the drive out. What started out as three small plants now has 7 trunks, and is thriving – in spite of many attempts by cats to destroy it! It is just massive, heavy, of course, and very awkward to carry! 😂 I can hardly imagine how big it would be, if it hadn’t had so many branches lost to the cold during the move, or broken off by cats.
We had the pair of these cheap, square Ikea tables side by side before but, with the new arrangement, they are now stacked on top of each other – and secured together. The girls found a way to secure the pot with a Bungee cord, so it couldn’t get knocked off by the cats. At some point, it needs to be transplanted into a bigger pot, which is going to make it even more difficult to move around! We do have wheeled plant platforms, but that’s not much use then the plant is several feet above the floor.
But it’s done. The mini greenhouse frame and several shelves (a couple of them are bookshelves converted from old TVs, back when the screens were in wooden cabinets) are now set up all along the window, stuff that was taken out are all back and in their new spots, and we actually have an open space in the middle of the living room, instead of it being cut in half by the couch and shelves. All we need to do now is get the cat barriers built and set up.
I look forward to the cats not having access to that room. Ever since I finished last night, they’ve been all over the place, investigating things and crawling into spaces they shouldn’t be in!
I “celebrated” by watching a movie when I was done.
From across the room.
Boy, do I need a new prescription for my glasses!
During the night is when I started paying for it all. My whole body has stiffened up, and everything is hurting – and that’s with painkillers!
Well, I did a lot more driving today than usual! Even compared to trips to the city.
With the van back, we were finally able to make a trip to the dump. From there, I headed into town to pick up some prescription refills and printouts for our tax returns. That was certainly an interesting part of the drive. It was bright and sunny, until I started getting closer to town, when I drove into a wall of fog! It got very thick for a while, with very low visibility, as we got closer to the lake. However, once we actually got into town, it started to lighten up, though I could see it was thicker all around town. Once I reached “downtown”, it was bright and sunny again – but with a wall of fog still visible in all directions!
I took advantage of being in town to make a few more stops. By the time I was done my errands, the fog was gone, except for on the lake. Sadly, I was unable to get any photos, as it would have been too dangerous to pull over while I was in the middle of it. Ah, well.
From there, I made my way to a town I haven’t been to since my dad took me to a cattle auction when I was a kid. I remember the auction, but not the town! 😄 I knew it was a fair distance from the main highway. Even after looking it up on the map, it still turned out further than I expected.
I was aiming for a feed store that was recommended to me. Thanks, Wolfsong! I looked it up on the map and had that image in my head, but I still drove right past it! I was looking at the building and vehicles as I drove by, thinking, this should be it, but didn’t see any signs. Of course, I saw them after I turned around and came back. They just weren’t where I was expecting them to be.
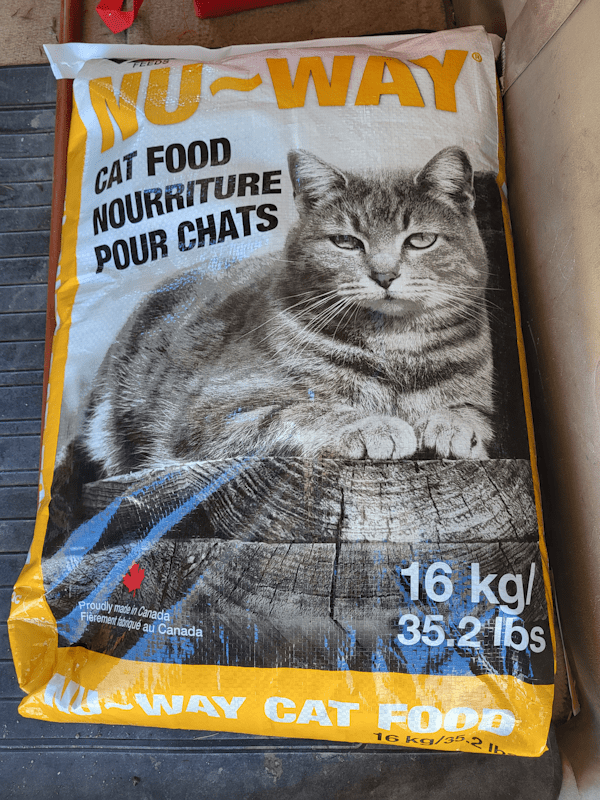
Once there, I was very happy to pick up two of these.
These were the largest bags they had, and at $36.30 a bag, they were only slightly more expensive then the 11kg bags I’ve been able to find in certain places. I probably should have got more, but two will do for now. The price is worth the drive to this town, which is nearer than the Walmart I’ve been getting 11kg bags at, and certainly closer than Costco.
I hope the cats like it, because that’s what we’ll be getting!
As a bonus, they also carry supplies we’ll need to get once we’ve got a chicken coop and can finally get chickens! Though I think we can find those closer, if I’m going there to get cat food, anyhow, it makes sense to buy the supplies at the same place.
That done, I’d made arrangements for one more trip.
Yup! I got a couple more flats of eggs. These were about as fresh as fresh can be, too!
I just love all those colours!
When I got there, I had just missed the egg lady, so her husband grabbed the trays – and a few last eggs from the coop! – for me, while I got to pet their adorable goats.
One of whom wanted to climb right into the van and go for a ride!
Goats have the softest, nibblely lips.
Her husband called her while I was there and, since she was at the feed store in the town my mother lives in, he was able to send her a picture of the cat food I’d gotten, to compare prices. It seems they don’t carry this brand, and it was even recommended as being the best price for cat kibble. That was a nice confirmation to get.
A lot of the driving I did today was along roads I’ve never seen before – unless you count the gap in my childhood memory! 😄 It was interesting to go through sections of road, patched but not yet repaired, from last year’s flooding. !! There’s a lot of marshland in this area, plus another lake. Actually, the lake is almost directly West of us, while this town is past it. One of these days, I need to go check out this lake. Somehow, I’ve just never gone that way. The closest has been to a few farms in that direction, but never as far as the lake itself. The satellite maps don’t tell me much about how accessible things are. The roads basically just end or go around it. If I trusted the van more, I’d love to explore the area, just to see what’s there.
I’m glad I was finally able to make the trip to this feed store. Definitely not a “let’s swing by on the way to the city” sort of place!
It has also been the perfect day for it. We’re at -2C/28F right now. The snow is melting off all the roofs, and the paths are all getting soft. The kitties are running around all over, and thoroughly enjoying themselves!
I am so looking forward to the snow being gone, and to be able to get to get work done outside again! We have so much to do, but much of it has to wait for the ground to thaw, at least somewhat. We’re going to have a very tight window to get some of the new, permanent, garden structures done before we need to start sowing and transplanting!
What a gorgeous day it is today! As I write this, we are at -2C/28F, with beautiful sunshine and next to no wind. Snow is melting all over the place! Including our nice new roof – with not a single leak into the sun room!
I’m not sure how many cats I saw this morning – I lost track after 20. That long haired tabby even let me pet him, as he followed me up the driveway. On the way back, I spotted The Distinguished Guest, tucked into a path in the snow, waiting his chance to come closer to the house and get some food.
I got a message from the garage, letting me know our van was ready to pick up. The final bill was $216 and change. It meant setting a little bit less aside for our “car payment”, but not by much.
We got to talk about his trip to the auction, and no, he was not able to find anything, and he was able to explain the issue.
We actually got approved for a larger amount loan than the cost of the vehicle we were interested in. The problem was that the monthly payments would have been $750 a month, because of the interest. As my credit score is so bad, the interest rate would have been 29%. Which is insane. To get a vehicle that meets our needs, with payments we could afford, that was also 2014 or newer, with a maximum 180,000 km… well, it just doesn’t really exist.
Of course, right now, we have nothing to improve our credit rating. We have no debt. No rent or mortgage. Nothing that would improve our credit rating.
His suggestion?
Get a credit card.
More specifically, get a card with a $300 or $500 credit limit. Max the card out every month, and pay it off every month. Which we could easily do with a single Costco shopping trip. In 6 months, we’d have a good credit score. Together with the money we are setting aside every month towards a down payment, he’d be able to get us a much newer and better vehicle, with payments within our budget.
While we were talking, his mechanic joined the conversation. He knew full well what we were going through. Thanks to the lockdowns, he lost his small trucking business 2 years ago. It wiped him out completely and, of course, his credit score was wrecked. He wanted to get a loan for a truck to start over, but couldn’t get one. He got himself a $500 credit card, maxed it out and paid it off every month, and it repaired his credit rating enough that he was able to get a lone for a truck – and those things go for about $200,000!
It’s basically the only way we have available to us to repair my credit score, so when I got home, I went online with my bank and started looking up what was available. Once I got to a certain point, though, I decided I needed to talk to someone, so I called it in. As I spoke to the representative, he told me the main issue was that I have no income – it will be based on household income. My chances of being approved was pretty low, but I could apply for a secured credit card. That, however, had to be done in person. He recommended I do that, rather than continue trying to apply over the phone.
Well, it was early enough in the day, so off I went to the nearest branch, in the town my mother lives in. I tried calling my mother to see if she would need groceries, but got no answer, so I took her car just in case.
I got in to see someone fairly quickly and explained our situation. We started the application for a secured credit card. The down side of this is they work it by locking the amount – in this case, $500, which is their minimum – in our account, so that if we ever reneged on a payment, they would get their money out of the locked funds. However, she suggested we go ahead and try for an unsecured account, first, and see how it that went.
Much to my shock, I got approved for a $1000, unsecured credit card!
I asked if it could be reduced to $500, which she was able to do.
I should be getting my card in 7-10 business days.
The whole thing was shockingly painless!
Once it comes in, it will be used only for gas and groceries, within our usual budget, that’s it!
With that done, I finally managed to connect with my mother and popped in for a visit. She only needed a few things, so I just ran out and picked them up for her. She commented that she wasn’t feeling that well, after the procedure – then started to tell me again that if they couldn’t do what she was there for, because she was on blood thinners, then what was the point? I told her, she was there for the scope; the taking of samples would have been only if they found something of concern, and for that, they would have had her come back. She started to get angry and insisted she never left the room and never had the procedure. She watched other people come and go, but not her. I explained the light sedation to her, and told her I don’t remember getting my bronchoscopy, either. Turns out she’s working herself up to thinking that the stuff they sprayed in her mouth, and lying about doing the scope on her, and her now not feeling as well is them trying to kill off old people to save money.
The sad thing is, I can’t fault her for thinking that. However, our “wonderful” health care system is now using MAiD – Medical Assistance in Dying – for that, so there’s no need for the elaborate scene she’s building up in her mind. So far, no one has tried to talk her into offing herself, at least. It’s a good thing we don’t live in BC. 😕
Anyhow, I temporarily mollified her, but I know it won’t last long. Aside from that, it was actually a really good visit, and I even got to talk to her about our plans for getting chickens (which she enthusiastically supports), and to make it so that if things happen, like the power going out for a long time, we’d be okay. Every time I bring that up, she starts talking about being able to use the old wood cookstove in the old kitchen, and I had to explain to her again, how badly damaged it is, and why it would be wildly unsafe to use it, even if we did manage to repair it. We may some day be able to fix it up, but until then, there are other things that we can do that we can do ourselves, at little cost, like building and outdoor kitchen under a shelter. In the past, she would have mocked me for the things I was talking about, but she doesn’t do that anymore. Since we’ve moved here, she gave us the hardest time over our plans, because they were so different from how she did things, and she didn’t believe we would actually do them. One example being the retaining wall I wanted to build at one end of the old kitchen garden. When I described to her what we had in mind, she laughed out loud. Then she told me how the family that used to live across the road from here (no one lives there now) had all sorts of grand plans for how they wanted to fix up the property, with retaining walls and garden beds and more. In all the years they lived there, they never did any of it. Therefore, neither would I.
Then I build the retaining wall, and we did several other things I’d told her about that she laughed at me over, or even became angry over, because she would not have done things that way. But they worked. So now, she no longer laughs.
Progress!
For now, anyhow.
So it’s been a pretty productive day, even if not in the ways I expected or planned on!
Of all the long haired cats, this one somehow managed to be the scraggliest. His fur doesn’t seem to be matting. I’ve often seen his fur covered in frost. It makes me think that, after being in the cuddle pile, his frost dampened fur go serious bed head. 😄
I so want to brush him, but he won’t let anyone touch him!
Also, the cats have knocked almost everything off the counter shelf, which was mostly containers of screws, quite a few things off the window shelf, and dumped numerous containers out of the cube shelf under the bathroom window. None of which we can properly cleaned up until the snow is melted and the ground dry enough to move stuff outside, and we can start closing the sun room doors again.
Yesterday, I double checked with the garage to make sure they were ready to have our van towed over. Then I pumped the flat tire enough to be able to back it out of the garage without driving on the rim. We have a compressor, but the hose couldn’t possibly reach that far (I am considering making an opening in the wall so that the hose end could be passed through, in case we find ourselves in this situation again in the future), but I have a hand pump with a built in pressure gauge. I was able to get to about 20psi when I started hearing the hissing. I ended up slapping a couple of pieces of duct tape over the hole so I could get a bit more air into the tire without it leaking faster than I could pump!
We have a compressor, but the hose couldn’t possibly reach that far (I am considering making an opening in the wall so that the hose end could be passed through, in case we find ourselves in this situation again in the future), but I have a hand pump with a built in pressure gauge. I was able to get to about 20psi when I started hearing the hissing. I ended up slapping a couple of pieces of duct tape over the hole so I could get a bit more air into the tire without it leaking faster than I could pump! All I needed to do was back it out and leave it lined up with the driveway, so the tow truck could easily access it.
Then I called CAA and arranged the tow. The dispatcher couldn’t find our address, of course, since the maps have us on an “un-named road”. She got the directions in the notes, and then I got a call from the towing company soon after. Turns out, they were the same company that towed our van that last time we had to call, more than a year ago. It was the owner that called me, and he remembered taking directions from me before!
Then it was a matter of waiting until a driver was free. I was originally given a wait time of about an hour and a half. About an hour later, I got a robo call saying it would be another 45 minutes. I just hung up from that call when the phone rang again, and it was a real human, calling to make sure I knew about the delay, and apologizing for it.
I’ve always had excellent service with CAA!
I hadn’t get much sleep while at my mother’s, so I set a timer for half an hour so I could close my eyes for a bit. Of course, the cats made sure I still didn’t get much sleep! 😄 At one point, I had Fenrir on my hip, Ginger using one hand as a pillow, Butterscotch head butting my other hand, demanding pets – and then Potato Beetle decided it was a good time to walk across me and settle on my shoulder! All four of them, purring like mad.
Eventually, I de-catted myself, got up and went into the kitchen, before going back to monitoring the live feed on the driveway security camera.
I did a double take after glancing out the kitchen window.
The van was gone! We never heard or saw a thing! I thought they’d at least need me to sign something, but nope. The keys were in the van, so the driver had all he needed.
When I checked the trail cam files this morning, I could watch as he backed up our driveway, then left with the van loaded on the flatbed. From the time stamp, he left about 5 or 10 minutes before I got up, and about half an hour earlier than expected!
Today, they were able to check it out and, unfortunately – though not surprisingly, to be honest – it can’t be repaired. I’m going to need a new tire. I ended up going for the less expensive option. If things go as hoped, we won’t be driving the van for long, anyhow. So a new tire has been ordered. When it’s time to pick up the van, I’ll have a chat with him about how things went at the car auction. The fact that he didn’t call me about it tells me he didn’t find anything to meet our needs.
While waiting for the tow truck, I called the clinic to make a follow up appointment for my mother with the specialist. While doing that, I brought up my mother’s confusion about the procedure not being finished somehow, because she was still on her blood thinners. It turns out that the letter they give out is a standard letter that needs to be updated. They don’t ask people to stop taking blood thinners for a scope anymore. Only if they see something of concern and want to take samples for a biopsy will they then book another appointment, and this time the patient would stop taking any blood thinners. If they had seen anything of concern and wanted her to come back, the letter even explained that a doctor would have discussed that with the patient while they were still in the recovery room.
The clinic already had the report, though, and she was able to read it to me. They looked at both her esophagus and her trachea, and everything was “unremarkable”. They saw nothing to warrant taking any samples.
So when I got through to my mother later on, I explained it all to her, including what was in the report.
My mother was immediately suspicous.
It took some questioning, but it turns out that, because my mother doesn’t actually remember the procedure – she doesn’t even remember being taken from and returned to the recovery room – and she has had zero discomfort from it, she doesn’t think it happened. As far as she’s concerned, they had her in the room, sprayed her throat, then came back to tell her they couldn’t finish the procedure because she was on blood thinners and sent her home.
I explained to her again what the doctor had said about light sedation, and that she might not remember anything.
It wasn’t enough. She has convinced herself that the procedure never happened, because she feels no difference after it and doesn’t remember it. She even started saying that the spray didn’t do anything, though she was still feeling the effects of it when I got her home, and had explained why they instructed not to eat or drink anything for at least 2 hours.
*sigh*
Her follow up appointment isn’t until near the end of March. Hopefully, she’ll understand that her lack of memory is due to the light sedation, and that roughly 2 hours of her morning didn’t just disappear.
Anyhow.
With the van waiting for a new tire, and not having to go anywhere until we get it back, I think today is going to be a nice quiet day, after all!
What I found when I looked out the kitchen window this morning.
The babies were running all over the branches, enjoying the sunshine and mild temperatures!
The cats are going to miss that tree when we finally have it cut down. This is a job to hire experts for, since it’s so close to the house and overhanging the roof again. We can see that it’s been cut back a few times, but still left to regrow. Unfortunately, there are now cracks in the basement wall under the kitchen from the roots, and a number of patio blocks are lifted out of place. Still, I’d like to keep enough of the trunk to turn it into a bench or a table. Preferably a table.
Anyhow.
I’m home!
Technically, I should still be at my mothers for another hour, but she was feeling so good, she basically kicked me out. 😄 She slept really well, has no residual pain or discomfort from the scope, and is just doing great overall.
The only downside is that, while she was still in the recovery room, they told her there was something they didn’t do, because she was on blood thinners. The blood thinners the doctor’s notes specifically said she could keep taking. When she first told me about it, she was still pretty confused. Recovering from being partially sedated certainly didn’t help. However, they gave her a letter with recovery instructions to take home. While she was napping, I took a look, and there was a note about it. They did not take any samples while doing the scope, because she was on the blood thinners. Which makes sense, since taking samples could have left her bleeding.
The problem is, the more she thinks about it, the more she’s convincing herself that the procedure was a waste of time. She went through all that preparation for nothing. She’s forgetting that the reason she was there was for the scope. The doctor did say that they might want to take samples, too, but not necessarily. Considering that his notes said she didn’t have to stop taking her blood thinners, clearly he did not see it as an issue. However, my mother no longer remembers much about what he said, and is busily rewriting everything in her mind, because they told her that they didn’t do something extra.
Well, I need to call the doctor and make a follow up appointment for her. Hopefully, he’ll be able to reassure her.
The main thing is that it’s over and done with, and everything went well!
As for staying with my mother, that was… mostly good. She tried to go on some racist rants a few times, but I’ve learned how best to cut that off. When I told her I’d brought my own Lent food, she started telling me that that was only Friday’s and Ash Wednesday. It took me a moment to figure out she was talking about the traditional fasting from meat on Fridays. So I told her, that’s not what I was doing, and explained about cutting sugar and starchy food. She quite enjoyed the food I brought – I made sure to bring enough to share – but kept trying to offer me bread or cookies! Which I didn’t mind to much, since I was actually expecting her to become angry and start lecturing me on how I was doing it wrong somehow. So it really did go well, overall!
Now that I’m home, it’s time to get busy. On the list is contacting the garage before arranging to get the van brought in – and find out if he had any success at the car auction!
I am now at my mother’s home. She did fabulous during her procedure. On the way out, they were going to have her in a wheelchair, but instead, we used her walker like a wheelchair. Once I got her home, she chose to walk instead of ride and dud very well.
My mother is indestructible. I even got comments from the nurse about how spry my mother is – and that’s with two bum knees!
Still, she was understandably tired. I insisted she lie down as soon as she was settled, and she fell asleep almost immediately.
The only strange thing was discovering her thermostat was maxed put at 30C for some reason. I was just melting! Last time I was here, she had all but turned it off, because it was so hot. Strange!