Dutch oven scalloped potatoes; almost a recipe!

We had a very successful cookout, with great company and lots of food!

And lots of mosquitoes.

Insane numbers of mosquitoes.

We had bug spray, citronella candles, and even the smoke from the fire, and we still got invaded.

Still, we had a great time of it.

Having company was my excuse to finally use our new Dutch oven.

I’ve been looking up recipes for quite a while, and it’s been rather frustrating. So many of the sites I’ve been finding are just the same links to the same recipes, over and over. I had better luck with YouTube and survivalist/bushcraft type channels.

In the end, I realized I really didn’t need any special recipes so much as get a handle on the technique.

With our planned cookout, we were going to have burgers on the grill, with wieners and hoagies over the fire. So for the Dutch oven, I decided to do scalloped potatoes. I just slightly modified my usual recipe for them.

The first thing I made for them was a cheesy white sauce. A basic white sauce is a table spoon of butter, melted, a tablespoon of flour added and stirred to keep smooth, then slowly add about 2 cups of milk (how much milk depends on how thick you want the sauce), stirring constantly. The sauce it cooked until the desired thickness, then seasoned to taste (I used salt, pepper, paprika and garlic powder). For today’s sauce, I also added a handful of shredded Old cheddar cheese, stirring until melted. The sauce was then set aside until it was time to do the rest.

Along with the sauce, I used bacon slices, sliced onions and peeled and sliced potatoes.

The Dutch oven we got was pre-seasoned. According to the instructions, we could use it straight out of the box. However, since it was our first time using it, I still gave it a wipe down, then gave it a light coat of oil.

My first modification to my usual scalloped potatoes recipe was with the bacon. Pre-sliced bacon would have worked, but we happen to have a slab of bacon right now, so I cut a bunch of slices from that. They were not at all even and pretty, but who cares? :-D

The bacon is there to keep the potatoes from directly touching the surface – at least not right away. As they cook, the fat from the bacon renders out, making another layer between the sides and the other ingredients, until they absorb it. At least, that was the plan.

The sliced potatoes were in a bowl of water, and I didn’t try to shake it off much. The water would add to the moisture that would cook the potatoes, without making things too runny. The potatoes were layered on top of the bacon first, then a layer of sliced onions. Because of the bacon and seasonings in the sauce, no other seasonings were added between the layers.

Because I was making enough for 8 people, I used about 7 – 8 pounds of potatoes and 2 sliced onions. The layers made for a VERY full pot! Once the layers were down, the bacon ends were folded over the top.

Then the cheesy sauce was poured over the whole thing. The sauce had thickened more as it cooled, so I smoothed it out and pushed it down the sides to get it down into the potatoes.

Because it was so very full, I thought it might end up touching the lid, so I gave the underside of the lid an extra coat of oil. Just in case.

Our Dutch oven set came with a carry bag. I put the full Dutch oven into the bag, tucking an ice pack under it, and a couple more along the sides, until it was time to get cooking. The carry bag made it much easier to move the whole thing to the fire pit later on, too.

About 2 hours before we were expecting our guests, I got the fire going.

I made sure to use all maple wood at first. That piece of tree that fell on our canopy tent and destroyed it was nice and dry, and burned really well.

Still, it took an hour to get it down to the coals I needed.

I put a bunch of coals in between the fire bricks I found. We will need to empty the fire pit of ashes, soon, so one of the benefits of using the bricks under the Dutch oven is that it keeps the legs from sinking. More ashes were added to the lid (they got spread out better, after I took the picture), and then I built the fire up again, for later roasting of wieners. :-)

By this time, I was starting to use pieces of apple wood we’d set aside was we pruned branches or cut away dead trees.

Since the fire was going, with so much more heat on the one side, I set a timer on my phone to go off every 15 minutes, at which point I rotated the pot a 1/3 turn. Getting the legs to rest on the bricks equally was more difficult than expected. I can’t see them while using the lid lifter on the handle to turn it, and I’d sometimes miss. At the very end, though, with my last rotation, I missed the bricks entirely, and the Dutch oven was resting directly on the bricks. It was more than an hour by then, and the coals were starting to die down, so I left it that way.

After about 1 1/2 hours, I decided it was time to take it off. Being cast iron, which holds heat for a very long time, if the potatoes weren’t quite done yet, they would continue to cook, even off the fire.

I ended up using a BBQ scrubbing brush to get as much of the ashes off the lid as I could, then used my fire fan to blow more ashes off the top. We brought out our pizza stone to use as a trivet on the picnic table.

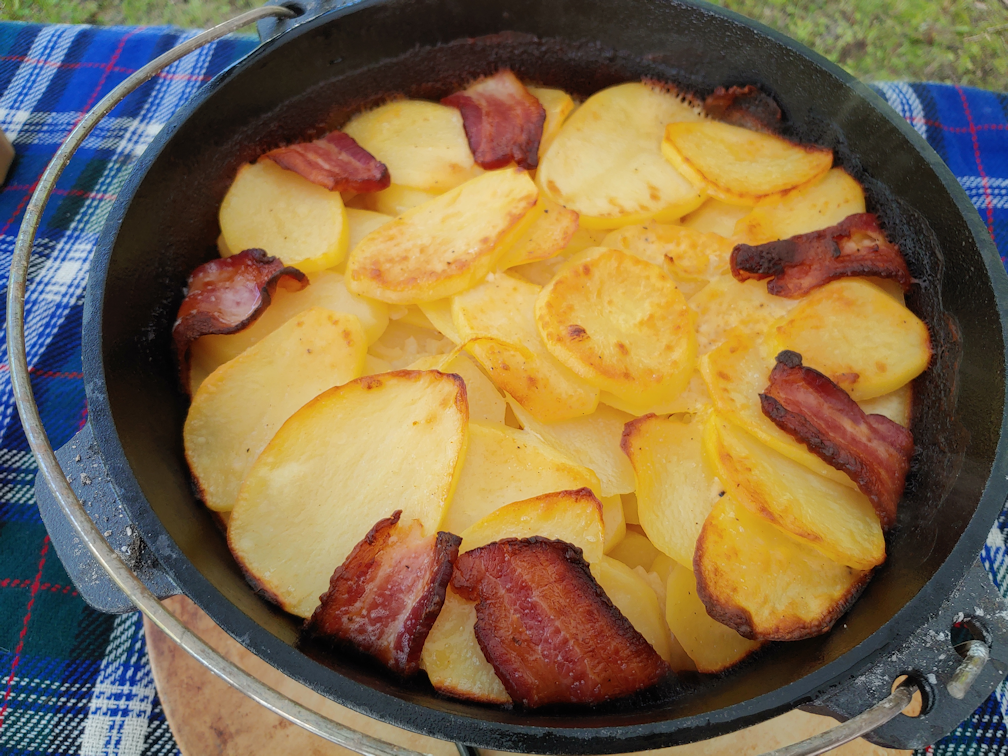
The potatoes turned out to be perfectly done. The bacon was nice and crisp, and the potatoes absorbed the sauce completely. They were perfectly soft – almost creamy in texture, but still holding their shape. While things were crispier around the bottom and edges, nothing was burnt. Just toasty.

They were an absolute hit. So incredibly tasty!!

With how well these worked, we are looking forward to trying other dishes in the Dutch oven as we do more cookouts!

When that will be is hard to say, though, with so many mosquitoes to do battle with!!!

The Re-Farmer

Making chive blossom oil

Last night, I found a large enough, liquid tight jar that would be great for making chive blossom oil.

It’s big enough that all the cleaned and dried blossoms could fit into it. The jar was saved from some Christmas nuts that were available at a local grocery store. Buying the nuts and keeping the jar was cheaper than getting the same type of jar (without the decorative glass) on its own!

After putting the blossoms in, the jar was filled with olive oil, then gently muddled with the handle of a wooden spoon to get out any air bubbles. A label on the top has the date and a reminder to turn the jar a bit, at least once a day. It should be stored in a cool dark place, but with the temperatures we’ve been having, we’d got it in a dark cupboard that is just a little bit cooler than the rest of the house. Thankfully, we aren’t expecting any unusually high temperatures for the next while.

This should be ready to use in about 5-7 days – or longer, if we want the flavour to be stronger.

Making infused oil can be quite easy!

The Re-Farmer

We forgot!

When preparing for this year’s Easter basket, we did three different types of pickled eggs.

While going through the fridge, I noticed a container that got pushed to the back and…

… discovered we completely forgot about the soya sauce pickled eggs!

So I had one with my breakfast.

We were missing the Mirin sauce, but it was still quite good. Definitely something worth making again. It’s too bad we forgot about them for our basket. They would have looked a lot like milk chocolate eggs in there! :-D

The Re-Farmer

Storm Status, and Easter baking

Well, it’s certainly snowing and blowing enthusiastically, out there!

That hasn’t stopped the birds from enjoying the suet feeder.

The driveway is so white right now, it’s messing with the camera’s ability to “see” it, making for some interesting rings of colours on there.

I took this screencap of the weather app on my desktop, just minutes ago. According to this, the worst is still yet to come. It is still conflicting with what’s showing on the weather radar.

Well, it will be what it will be. My main concern is with the high winds, of course. When this is over, we’ll have to do a walk-about to see if any more dead trees have come down, or what branches have fallen.

From the looks of the weather radar, the most severe conditions are hitting the US, as the system sweeps across the Eastern states. I hope those of you living in those states are keeping safe!

While it’s snowing and blowing, we got some bread baking done.

A two-loaf recipe was divided into four small loaves. The prettiest one will be for our Easter basket.

Since I was baking bread anyhow, I made a batch of oatmeal bread, also divided into four small loaves instead of two regular loaves. That way, we get a loaf each. :-D

I’m looking forward to having one of them with a big bowl of chili, once it cools down enough. :-)

The Re-Farmer

Change in plans

With today supposed to be a warmer day, the family decided to go have a cookout in the fire pit. May as well get some use out of it now, because we might not be able to use it in the summer again!

My original plan had been to do my usual morning routine at the computer, then decide what to test the new Dutch oven with. Making a damper had been suggested, and that seems just the quick and easy thing that would be perfect for a test recipe.

I was just settling in at my computer when the phone rang. It was my sister. Where we going to be home today? Yes… She then started telling me something about Holy days, and she wanted to bring us some chicken, when the phone started screaming and the signal was lost.

My sister had gotten rid of long distance service on their land line, and has been using her cell phone for long distance calls. The problem is, she’s in almost as bad of a cell phone dead zone as we are!

She called back a little while later. She hadn’t realized the line had gone dead at her end – the screaming noise was only at my end! – and had been talking for a while. :-D When she realized just how much I’d missed, she cut it short and just said that they were going for a drive and wanted to swing by. They could be here at around noon.

So we decided to start the cookout earlier, so they could join us. Which meant no time to experiment with the new Dutch oven this time. We’ll have to plan a day for that. One of my daughters headed out to get the fire going, since it took a long time to get and keep a fire going when the girls had a cookout before, and stayed outside to tend it.

I admit that we are not the best of housekeepers so, of course, the place was a disaster. They did say they would only swing buy, but I thought they might want to come in for tea, so I went on a whirlwind cleaning spree. :-D

The fire was down to cooking stage by the time I was bringing the tray of food when my sister and her husband arrived.

Sort of.

I saw their car pull up the driveway, very slowly, stopping a little past the garage. I figured they’d drive up to the gate, but no. They backed up, then turned to park in front of the garage.

They didn’t want to drive through the “lake” and leave muddy ruts in the soil.

They also didn’t have rubber boots, because, why would they?

Which meant they couldn’t get to the inner yard. Or the house.

So it was a short visit, outside in front of the garage, as I slogged through the mud to them with my rubber boots!

I finally got the rest of the story, too.

My sister and her husband wanted to follow scripture for Holy days. They are Christian, but of a sect that also follows Old Testament Jewish traditions. They wanted to get all leaven out of the house for the Sabbath, and realized they had some breaded chicken cutlets in their freezer.

Rather than throw out good food, they offered it to us, while also just going out for a drive together. Something they haven’t done in a very long time.

That was very kind of them. It’s a shame they couldn’t come any closer to the house, though! They would have gotten their shoes completely soaked and muddy!

After they left, the girls and I had our cookout. My other daughter made tea and coffee for us, and we cooked up some hoagies to bring in for my husband, too.

I just had to take a picture of the set up.

I found it so funny to see the fancy tea cups with coffee in them, and the giant coffee mug with my tea in it, sitting on the very convenient concrete blocks. The lids did a good job of keeping the ashes out of their coffee!

Unlike my tea…

The grill my brother and his wife gifted us with could be swung over as needed to toast the buns.

My younger daughter doesn’t like hoagies, so she’s the one with the normal sized wiener. We only had regular hot dog buns, though, which are comically too small for the hoagies.

It was far windier than I expected, but it helped keep the fire going! We ended up staying out for at least a couple of hours.

We do enjoy cookouts. We need to build a more permanent shelter from the rain and wind, though, seeing as how we’ve had two tent shelters destroyed by weather already. I wouldn’t mind making something that can still be moved, though.

When we build our outdoor kitchen, sheltering walls are definitely going to be part of the design. Wind is a major and near constant issue. We all really enjoy cooking and eating outdoors, and would love to have a nice, comfortable set up to do it.

All in good time. The area I’m thinking would be best to do this – well away from any trees – is not far from where that old shed that lost its roof is located. We have a lot to do in that area because it can be made into a useable space!

Just one more thing on the list of stuff we plan to work on over the next few years. :-)

The Re-Farmer

Hearty Winter Potato Soup (not quite a recipe)

With all the heavy stuff going on around, I wanted to bring things back to what this blog is supposed to be about for a while. So here is a food post for you to enjoy!

There’s nothing quite like a hearty bowl of thicksome soup on a cold winter’s day! Most of our cooking falls half way between “this is how you make a thing” and, “let’s use whatever’s in the fridge or cupboards at right now and wing it.” So here is the approximate recipe for this soup. Quantities are pretty flexible. This is one of those soups that taste better the next day, so I made a huge pot of it this time.

Bacon, cut into small pieces – I used half a package of sliced bacon
Onions, 2 medium, finely diced
Garlic, several cloves, chopped fine. I like to use lots of garlic, but use however much you fancy
carrots, peeled and finely diced. Three largish carrots was what was used this time. Feel free to include other vegetables, like celery, broccoli, etc. For a large quantity of soup like this one, shoot for a total of 2 – 2 1/2 cups of finely chopped or diced vegetables.
(In this soup, I also added about half a cup of our frozen tiny tomatoes. It is not something we normally use in this soup, because tomatoes and I don’t get along. :-D )
potatoes, peeled and cut into 1/4 – 1/2 inch cubes. For this soup, I like to include different sizes of potato cubes, because I want the smaller cubes to overcook and basically dissolve into the soup, to make it thicker. For this batch, I used about 6 large-ish yellow potatoes.
egg noodles, or other pasta in shapes of a similar size
cooked chicken; we used canned chicken, drained, but this would be a good way to use any leftover roasted chicken or turkey.
cream, about 2 cups. We use whipping cream, because that’s pretty much the only cream we buy, but a lighter cream would work, too
shredded cheese – sharp cheddar is always good, but any strong flavoured, shred-able cheese will be wonderful
bay leaf
dry mustard powder, about half a teaspoon, or to taste. A prepared Dijon type mustard can be used, too.
herbs of choice, to taste (we almost always use a combination of ground thyme, sage, paprika and parsley. If we aren’t using fresh garlic, we’ll use garlic granules with the herbs)
salt and pepper to taste
chicken stock, water, or water with bouillon cubes/powder. I usually use bouillon cubes, and less than recommended for the amount of water used, because herbs, salt and pepper are also used. You can always add more seasoning, but you can’t take it out!
optional garnish: sour cream and shredded cheese

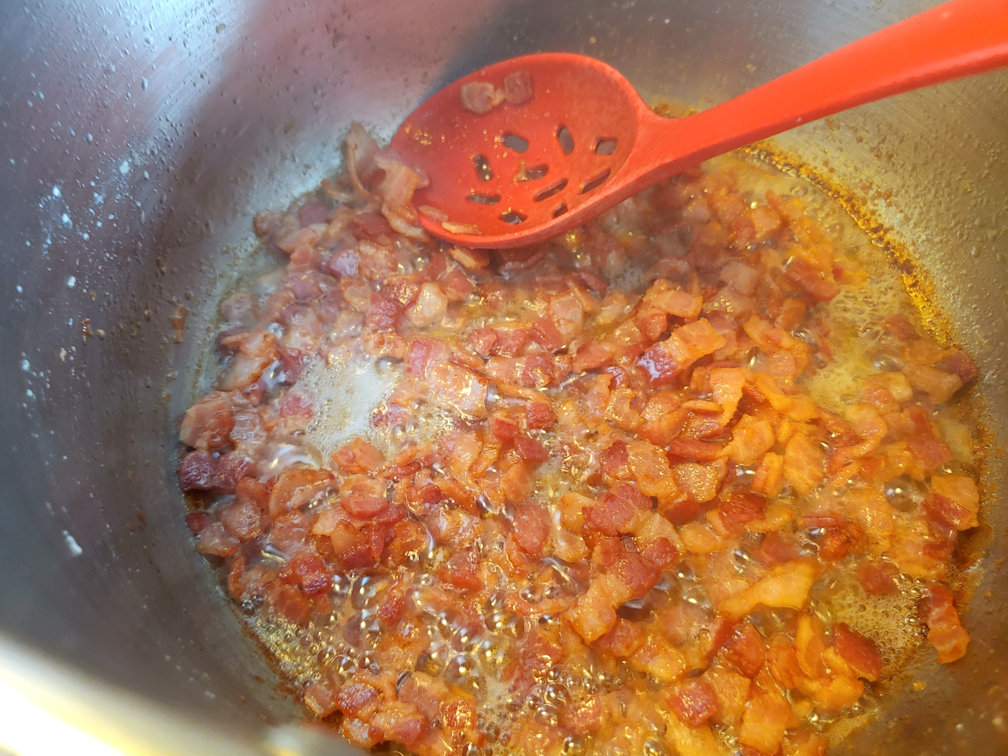
Start by cooking the bacon pieces in a large stock pot. If they seemed to be cooking unevenly, add a bit of water, which will help render out the fat more evenly, and deglaze the bottom so it doesn’t burn. Cook to desired doneness. I like it on the crispier side.

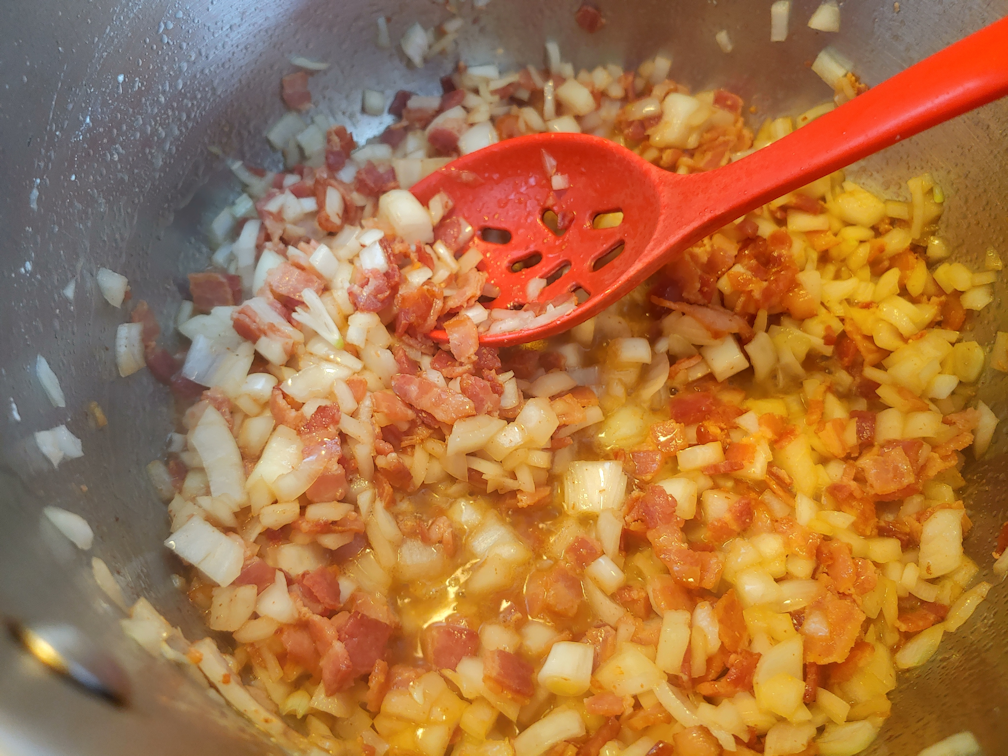
Next, add the chopped onions and cook until the onions are softening and starting to become translucent.

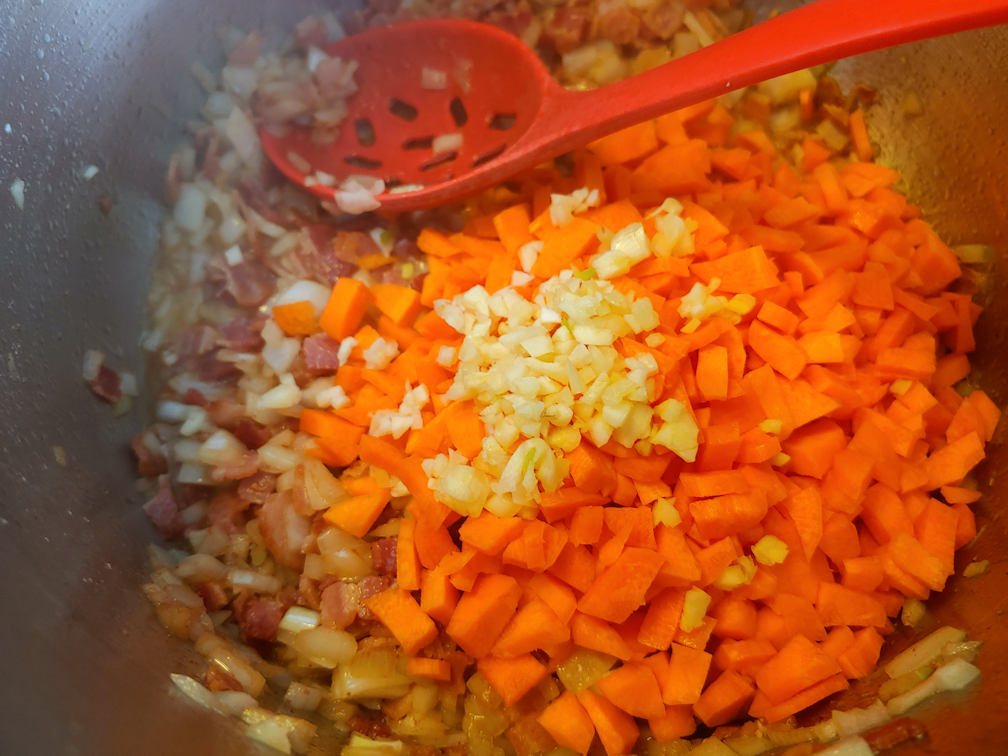
Add the carrots and garlic. Stir and cook until the carrots are about half done. If using other vegetables as well, add the longer cooking vegetables in first.

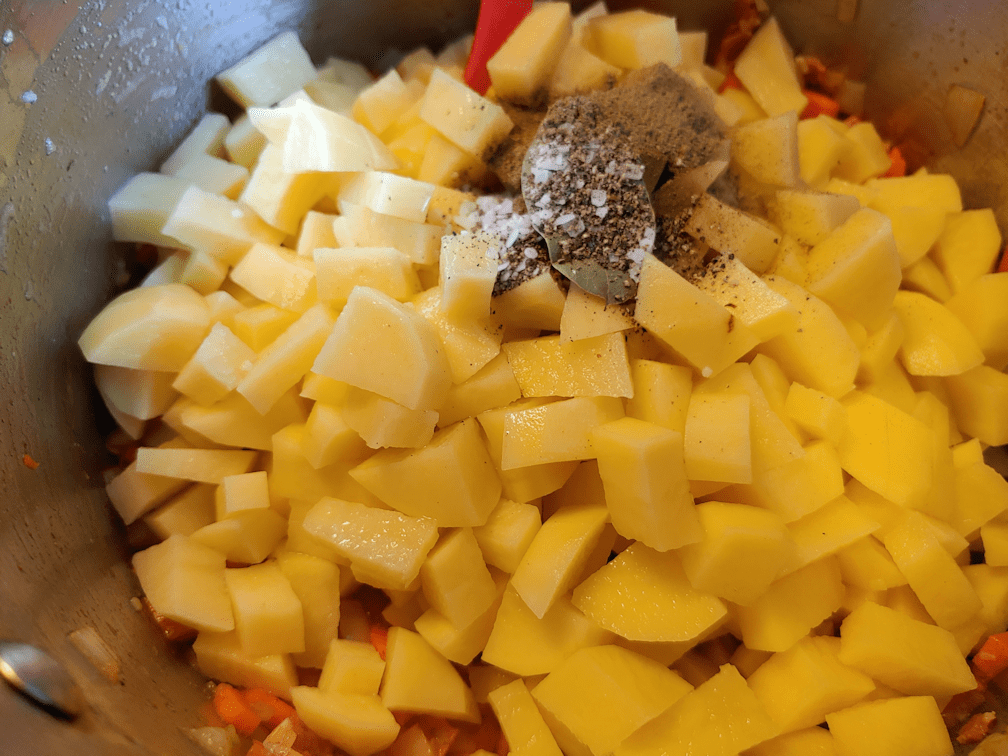
Next, add the potatoes, bay leaf, herbs, salt and pepper.

Add enough water or stock to cover everything. Since I was using bouillon cubes, I added them at this point, too. I like to chop them up a bit, so that they dissolve faster.

Stir well, then bring to a boil.

Once the liquid has been brought to a boil, reduce heat and simmer for the time needed to cook the potatoes, minus the time needed to cook the egg noodles or pasta. So if the size of potato cubes you cut need 20 minutes, and you’re using pasta that needs 8 minutes to cook, simmer for 12 minutes.

Because I wanted to deliberately overcook the potatoes, I simmered mine for 15 minutes.

Stir in the egg noodles. This was an entire small package of egg noodles. I don’t remember the weight on it.

Add more water as needed. To keep it from cooling down too much, boil some water in advance and use that while it’s still hot.

Stir in the canned or cooked chicken.

The tiny frozen tomatoes were added at this point, then the soup was brought to a boil again.

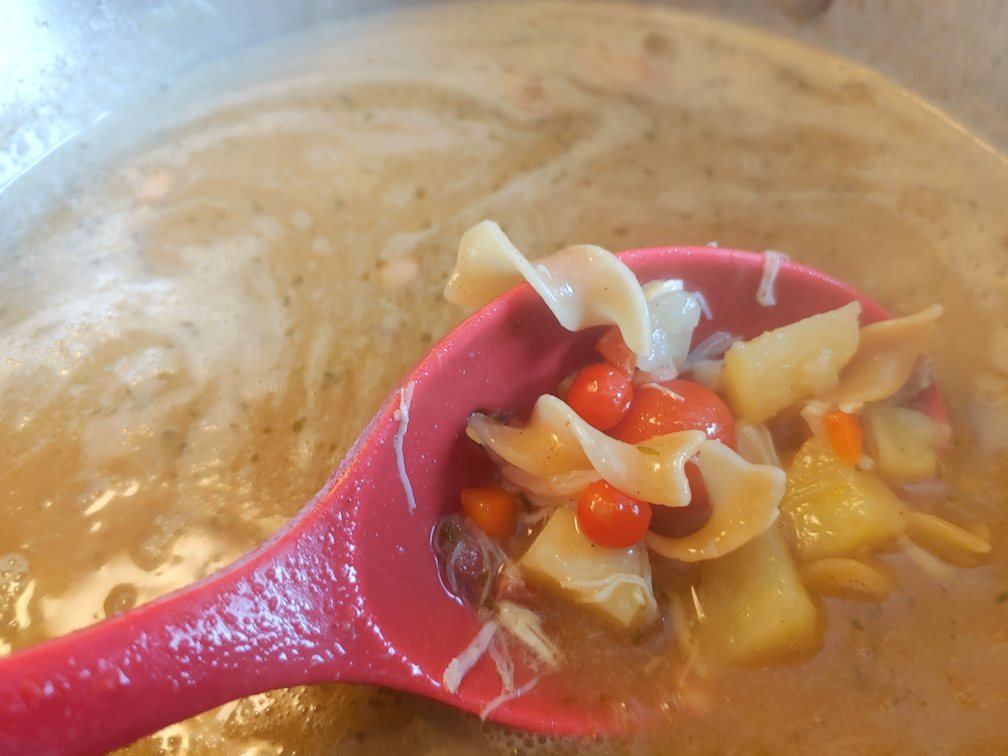
These are the super tiny Spoon tomatoes, and some cherry tomatoes, we grew last year. Their tiny size allowed them to be added at this stage, but if we were to use regular sized tomatoes, they would have been added with the carrots, much earlier on.

Bring to a boil, then simmer until the noodles are done. Remove the bay leaf.

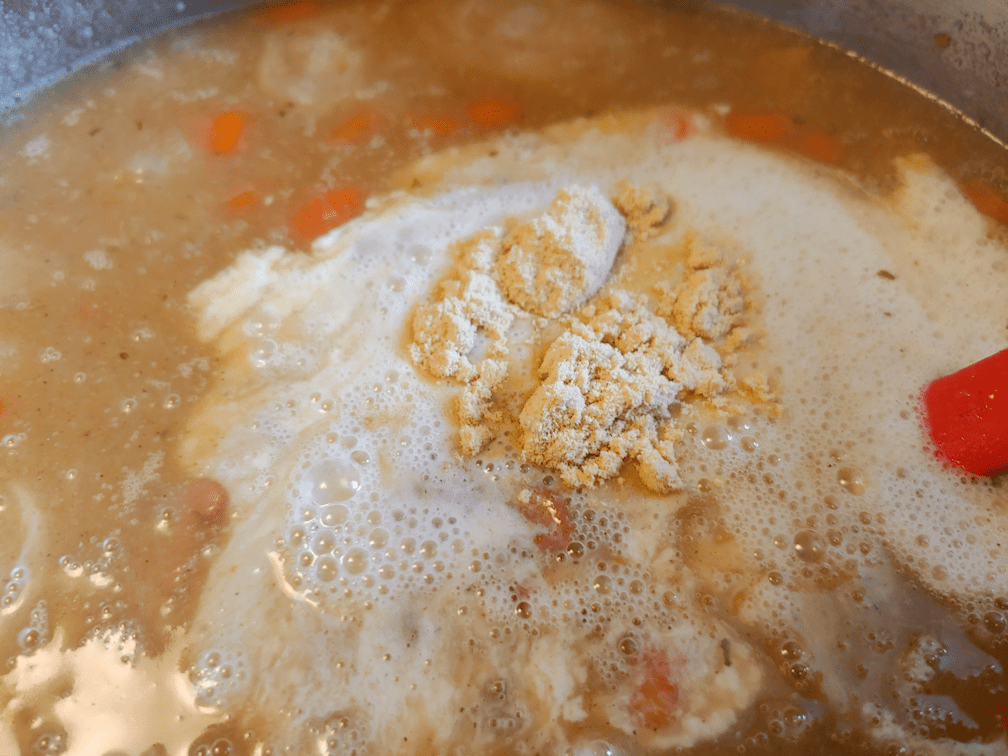
Stir in the cream and mustard powder. Bring the heat back up and simmer just long enough to heat the cream through, stirring continually. Turn off the heat.

Taste and adjust seasonings.

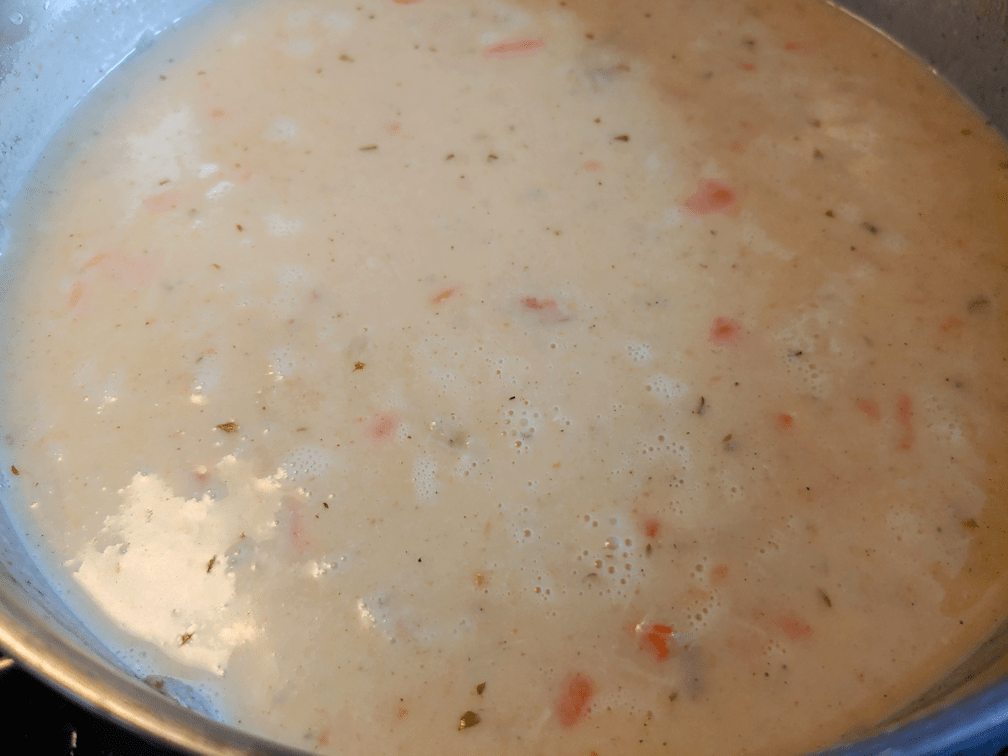
This is the soup after the cream and mustard powder has been incorporated. You could skip the next step, if you like a thinner, chunkier soup.

Or, you can partially blend it. I have an immersion blender, which makes easy work of it, but if you have a countertop blender or food processor, use it to blend about half of the soup, then return the blended soup to the rest in the pot. Stir and, if necessary, reheat until it’s hot enough to melt cheese, then remove from heat.

Add in a good handful or two of shredded cheese and stir until thoroughly melted and incorporated.

Serve topped with a dollop of sour cream and a bit of shredded cheese, if desired.

This soup always goes over really well, even with my lactose intolerant family! It’s thick and hearty enough to be the main course, with maybe some buttered bread to go with it. If you like an even thicker soup, use more potatoes, and blend it more at the end.

Good stuff!

I think I’ll go for seconds, now…

The Re-Farmer

Should have done that from the start

Y’know, sometimes I’m a doofus.

Yesterday, I decided to try making meat pies with an oil based crust again. The goal was to make mini pies, in muffin tins, perhaps, or just little turnover hand pies.

After my first attempt was a tasty fail, and my many searches for recipes did not turn up anything I found useful, I decided to try a hot water dough I’ve made many, many times before.

It’s from this cookbook.

Sort of.

I have this as a set of 11 English language books. Which is funny, because on the back there’s a sort of an index telling what categories of recipes are in which numbered book – and there are 12 of them. Some of them are split between two books. The reason is that this was originally published in French. As a set, it would have been 12 books. Which means that everything in the English language books are shifted over from how the contents are described on their back covers.

My late MIL had the original cookbook. Back in the day, in Quebec, they had a sort of recipe card subscription, where recipes were sent every month or whatever. However, this subscription sent chapters, and people could keep just the ones they wanted. The pages were sewn together. When all the chapters were sent out, the subscribers could then take all their chapters and have them professionally bound. That’s what my MIL had. It was a thick, hardcover book, with many decades of wear and tear on it. This was the book that had the base recipe for tourtierre, a traditional meat pie, that she used (except hers was modified for her own secret recipe, which was passed on to me). It was also where the base hot water dough recipe was from. Every Christmas, my MIL would special order her secret mixture of ground meat from the butcher, complete with “top secret” and “eyes only” warnings (my late MIL was a hoot!) from the local butcher. Anywhere from 20 – 30 pounds of it, depending on how many pies she planned to give away that Christmas. In the years we were living in the same province, we would spend a couple of days with them, making tourtierre, assembly line style. The first day was to make the filling, which then sat outside overnight to cool. The next day was to make triple-recipe batches of hot water dough, over and over. Each triple-recipe batch was set outside in the snow to chill, which did not take long at all, while the next batches were being made. I usually had blender duty to mix the hot water and shortening, then helped with mixer duty to combine the dough. My husband had the job of rolling the dough balls out between two sheets of heavy duty vinyl, and other family members lined the pie tins, filled and topped them. When baking started, she could only fit 3 pies into her oven at once. After coming out of the oven, they were given some time to cool, scattered around their condo, before being set outside to freeze.

So I became very, very familiar with that hot water dough recipe, even though I couldn’t read it very well in French.

I’ve been a fan of Mdm Benoit for many years, so when I found this set of cookbooks at a charity book sale, I snapped them up. I had them for a few years before I happened to look closely through the pie dough recipes and saw one that was very, very familiar. On a hunch, I found another section and, sure enough, there was the base tourtierre recipe from my MIL’s French cookbook. I had unknowingly found an English copy of it!

Now, this hot water dough recipe uses shortening, but it gets melted into the boiling water, so I figured to give it a try using oil.

So I dug out the appropriate volume, made the dough and…

Had another tasty fail.

The dough just crumbled apart.

I was able to roll the dough out inside pans, using parchment paper to be able to move the top, and still had to push it together because it was breaking apart so much.

While this second tasty failure was in the oven, I sat and flipped through the cookbook.

I found this on the very next page after the hot water dough recipe.

I should have known. I really should have. Instead of going through dozens and dozens of internet recipes, I should have just gone to Mdm Benoit in the first place.

I would never have thought to use milk instead of water. I also find it interesting that is specifies to NOT stir after combining the water and oil.

We don’t use waxed paper, but do have parchment paper, including non-disposable versions. Either would work to roll the dough out.

If I can get a working dough recipe, I plan on making a large batch of filling, then make lots of small pies that we can stick in the freezer for quick eats.

The next time we have something thawed out that will make a good filling, I will try this recipe and see how it works!

Meanwhile, the next time I want to try something to conserve ingredients, I need to remember that the internet is not my friend. I have dozens of cookbooks, even after purging so many of our books for the move *sniffle*. Many of them are very old. Those are my fravourites, because they have really basic ingredients, and don’t assume you have access to pretty much anything, at any time.

Mdm Benoit wins again!

The Re-Farmer
A rare indulgence!

Have I mentioned just how glad I am we were able to get that quarter beef this winter?

Thanks to paying the same price per pound for the whole thing, regardless of cut, last night we got to enjoy a rare indulgence.

T-bone steak!

In our younger days, when it was just my husband and I, and we had fewer expenses, we would *gasp* go to restaurants and order things like steak. My husband would order a T-bone, but he didn’t like the bone, so he’d give it to me. That’s the best part! I would happily gnaw every last bit off the bone, much to his amusement.

I’m sure the other patrons were not to impressed. ;-)

That was a long time ago. When the BSE, or “mad cow disease”, crisis hit our cattle industry, restaurants stopped selling bone-in beef. Even grocery stores stopped selling any bone-in beef, though for a while, getting any beef at all was difficult. Today, restaurants, with few exceptions, still don’t sell bone in beef, and even grocery stores never returned to pre-BSE levels of inventory, and that happened back in… 2003? Quite a long time ago. What is available in grocery stores is so insanely expensive, we could never afford it.

Which means, we haven’t had a T-bone steak in decades, and I’ve never cooked one before in my life!

So there I was, with 4 beautiful steaks and not sure what to do with them!

Ideally, I would have grilled them, but it’s freezing out, and the BBQ is buried in snow. I decided to go with pan searing them (after seasoning them with only coarse salt and freshly ground pepper), then transferring them to a baking sheet to finish them in the oven, at 450F, to finish. What that was happening, I used the pan drippings to make a gravy.

They came out looking amazing!

They tasted amazing, too. Even though I ended up over cooking them. I probably could have skipped the oven part completely and just pan seared them.

Best of all, I got to gnaw on some delicious, delicious bones!

I’m thinking we really need to find a way to fit a half beef next year, instead of a quarter beef, because having cuts like this is just amazing. :-D

The Re-Farmer
A tasty fail!

Yesterday, I tried a bit of an experiment.

I decided to make some little beef pies in muffin tins.

This is something I’ve made before – the first time, in Home Ec class! My experiment was with the dough. We’ve been trying to find ways to use less butter in our cooking. We don’t use margarine or shortening, so when it comes to cooking and baking, it’s either liquid oil or butter. With oil, it’s easy to have a variety. Not so much with solid fats.

So for the meat pie, I wanted to make a hot water dough (which is sturdier, for heavier fillings like meat), using oil instead of butter or shortening.

This is the finished result.

As you can tell, the muffin tins didn’t happen!

The dough simply would not hold together and was very difficult to roll out. I think I added too much flour, but the oil made it so slippery! In the end, I had to put half of the dough in the pie pan and roll it as thin as I could, right in the pan. After the filling was added, with about an inch and a half of space around the edges, I rolled out the other half of the dough as best I could, then brought it over, wrapped around the rolling pin, to cover the filling. Some repairs were needed, as the top was spread over and tucked around the filling. Then the edges of the bottom crust were pulled up to seal it more.

It actually turned our really delicious. I didn’t get the hand pies I was after, but that’s okay!

The filling was ground beef, browned (in butter, of course), adding onions and garlic early on, then cubed carrots half way through. The last thing added was the cubed potatoes, along with some beef stock. It was left to cook, covered, until the potatoes were just barely done, then uncovered and stirred until the liquid was all evaporated. A touch of flour was added to absorb any remaining liquid and thicken it. I ended up with more filling than fit in the pie, but it tastes good all on its own, too.

I have some hot water dough recipes that include things like egg that I might try. Maybe that will work better.

The good thing about experimenting like this is that, even when it doesn’t work, it still tastes good!

The Re-Farmer
Must… resist! (Updated)

Aw, man, it’s all I can do not to go all Cookie Monster on the muffins I just finished baking!

I ended up making a dozen each of three kinds.

The cornmeal muffins were a basic recipe, though I added a bit of sour cream to the milk, for extra flavour.

Oatmeal muffins with a streusel topping, from the simplest recipe I found online.

Spinach and cheese muffins! I spotted a recipe online, but it used frozen spinach, which we don’t have. So I just used a basic muffin recipe, adding some of our dried spinach to the liquid mixture to reconstitute for a while, and added shredded cheese to the dry ingredients. We had some small pieces of Havarti and Old cheddar left over, so I finished off both.

The girls made supper while these were cooling, so I’m being good and waiting until after I have a meal before having any muffins.

But it is soooo tempting to have “dessert” first! :-D

The Re-Farmer
Update: Taste test is done!

Spinach and cheese: I think I didn’t have enough flour or over mixed these. They were almost like a quiche in texture! Still very tasty.
Oatmeal with struedel topping: not as sweet as I expected! Nice, but of the three, these were my least favorite.

Corn meal: these were awesome. The touch of sour cream gave a surprisingly big flavour boost. Corn meal muffins are my favorite, so no surprise I liked these best!