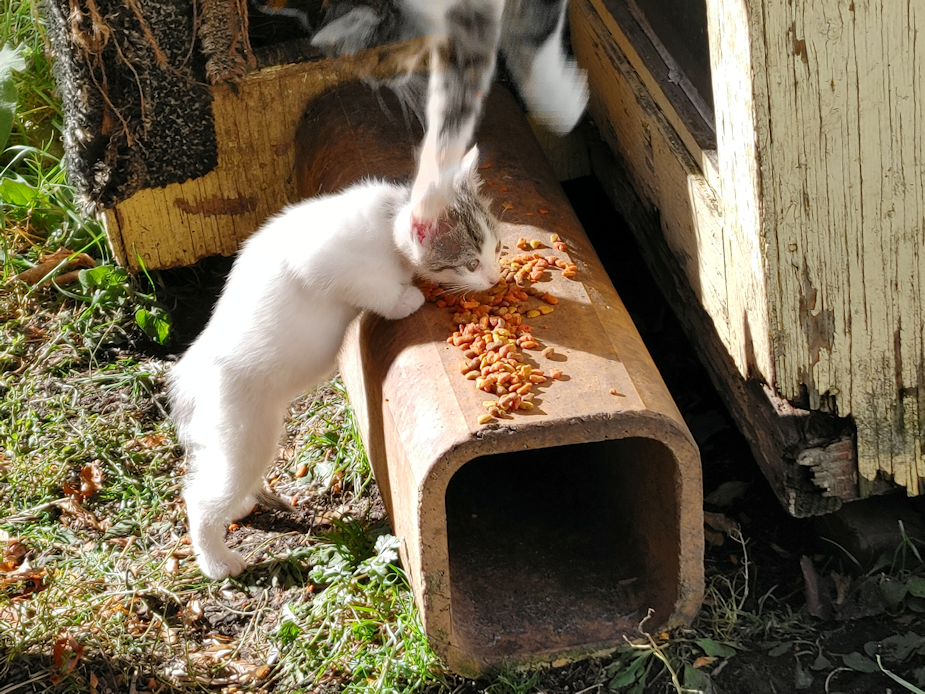
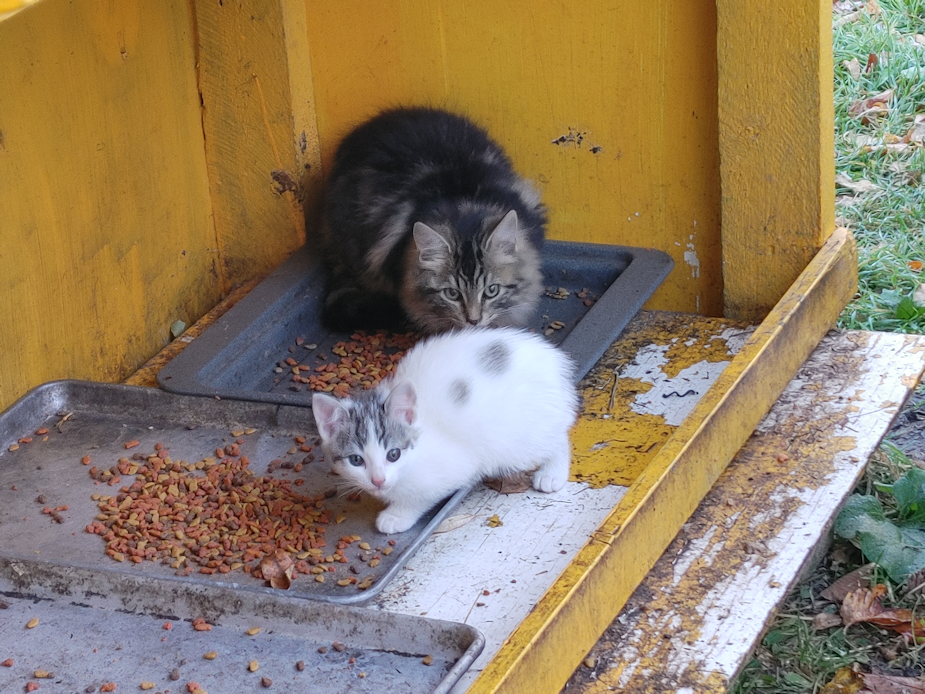
When I put kibble out for the yard cats, I make a point of putting some in a lot of different places, so that more cats have a chance to eat. It gets pretty crowded in the kibble house, and some of the smaller, shier ones end up not getting as much food. Since I want them to get used to the idea of using the cat’s house in the winter, I’ve been putting food just inside the entry, and on the block I have in front.
I spotted one of the pump shack kittens, eating from the block. It is so small, it could barely reach! Of course, I had to try for a picture.
It was just at that moment, that one of the older kittens decided to jump down from the roof and photo bombed the shot!
Today’s high was supposed to be 19C/66F. I don’t know if we reached it, but with the blustery winds, it never felt that warm. I’ve been keeping a close eye on the weather, and my app on my desktop includes historical data for each day, including 30 year record highs and lows for various data. I noticed that today had a record high for snow of 14cm/5.5in in 2019. In fact, we set record highs for snow on the 10th, 11th and 12th, all in 2019. We were just coming to the end of our second year here, so I went looking at my blog posts for those dates.
Ah, yes. I remember that blizzard!
The amazing thing is that, just days later, all that snow was gone, and while we were still cleaning up storm damage, everything was back to green and sunny!
Depending on which app I look at, however, we might be getting a mix of snow and rain starting tomorrow night, and by Friday afternoon, we’re expected to get between 3-6cm (roughly 1-2 inches) of snow.
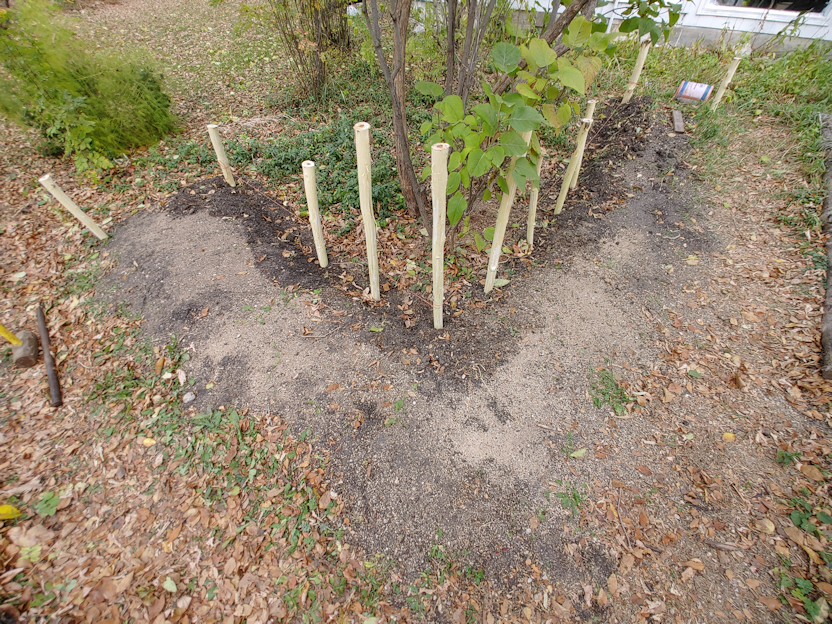
That meant my focus was preparing to build up walls around the L shaped bed in the old kitchen garden.
I went through the maple pieces I’d cut yesterday and started cutting them to size, cutting points on them, and debarking some of them.
I had lots of furry help. So much help, one of the kitties got plumb tuckered out!
From the longest, straightest pieces of maple, I cut three into 4 foot lengths. Then I went through some of the strongest pieces to cut four 3 foot lengths, then four 2 1/2 foot lengths. After that, I just cut as many 2 1/2 foot lengths from the thinner straight pieces as I could get out of them.
I used a hatchet to cut the points on all of them. That was probably the most unpleasant part of the job. Not so much for the thinner pieces, but for all the thicker ones. I’m ambidextrous for most things, left handed when it comes to fine motor control, but for some things, I am completely right handed.
Using a hatchet is one of those things, and my right hand has been in terrible shape lately. I had difficulty gripping the hatchet, and had to stop frequently to give my hand a break.
The draw knife was awesome for debarking the wood. It’s still quite green and came off easily. I don’t have a way to secure the pieces I’m working on well, so there were quite a few times when I was pushing instead of drawing the blade – and it works just as well that was, too. For some of the thinner pieces, though, it was easier to just use a knife to debark them.
Also, no, that is not rust on the blade of the draw knife. It’s stained with tree sap.
The stack of the thinnest pieces did not get debarked. It would have taken forever and, at their sizes, it would have been awkward. The pieces that will be taking the most stress, however, have been debarked.
That all took a few hours.
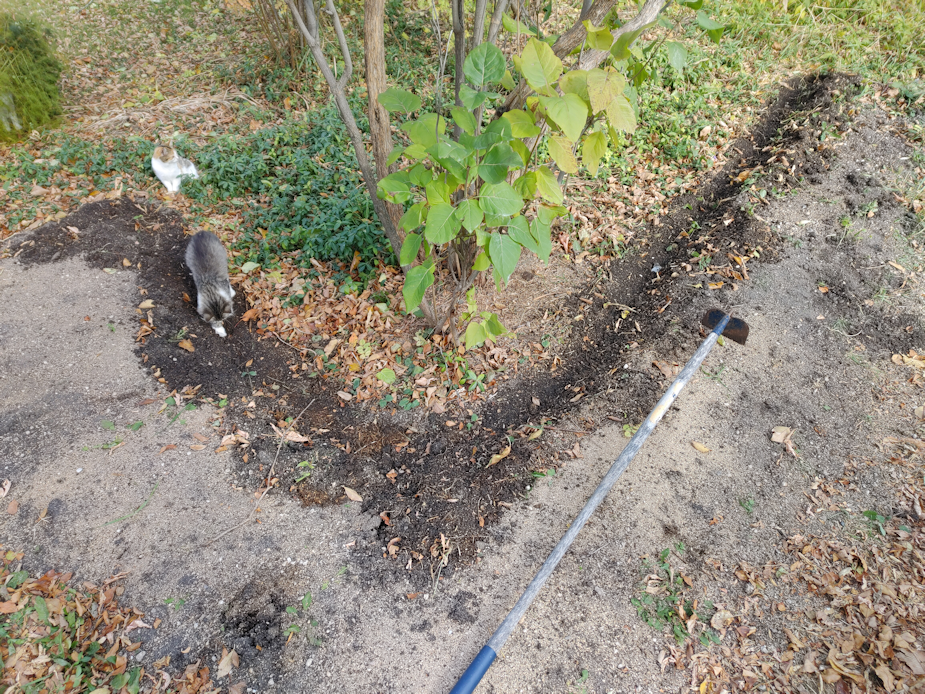
Then it was time to get to the garden bed. I pulled the lettuce I’d left to go to seed (it looks like we’ll get seed from just one of them) and got ready to prep the bed. Without walls, soil was falling into the path and the inside of the L shape, and I don’t like wasting good soil!
I used a hoe to draw some of that soil back into the bed, and level off the edge, where the uprights will be going.
The three longest pieces will form a triangle at the inside of the bend. When we start weaving branches through the posts, these will be taking the most stress. Working out from there, one 3 ft piece will go along the short end, and three down the long end. If I have enough materials to do it, I plan to build up the wall higher at these posts, as much to wall around the lilac as to create a wall for the bed.
The four 2 1/2 ft pieces are for the corners at the ends of the bed.
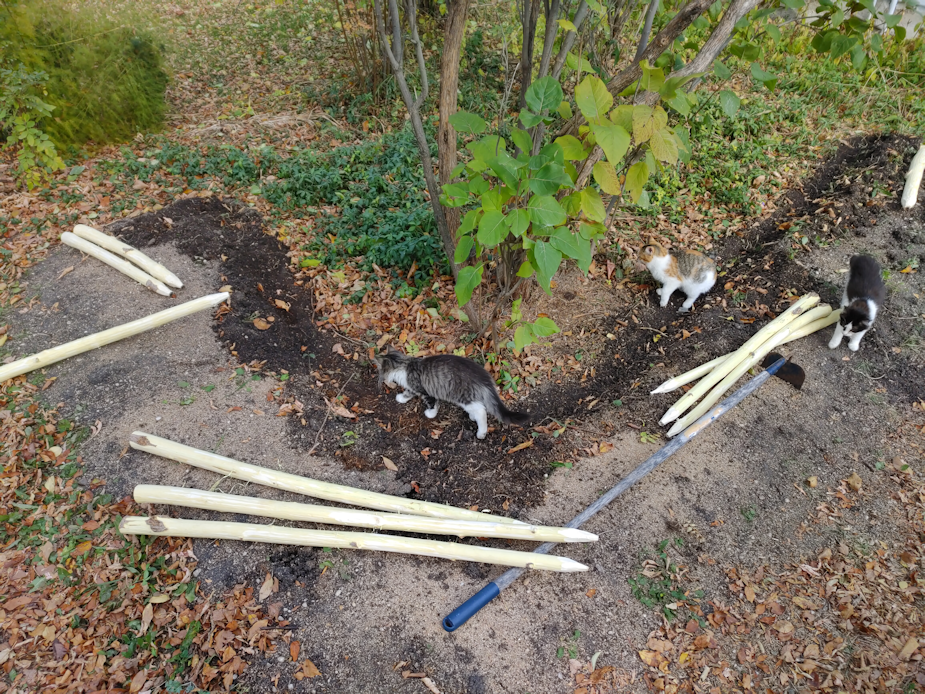
To install the posts, I used the pencil point bar and hammered it into the ground.
Unfortunately, that old hammer doesn’t have the right handle on it, and the head fell off again. I had to switch to a sledge hammer.
I really didn’t want to switch to the sledge hammer.
Ah, well. It worked better. I’m just going to be in a world of hurt, tonight!
I started by placing three posts in, then tied twine between them as guides for the rest of the posts. Then I laid out the spacing for the remaining two 4 ft posts, and the four 3 ft posts.
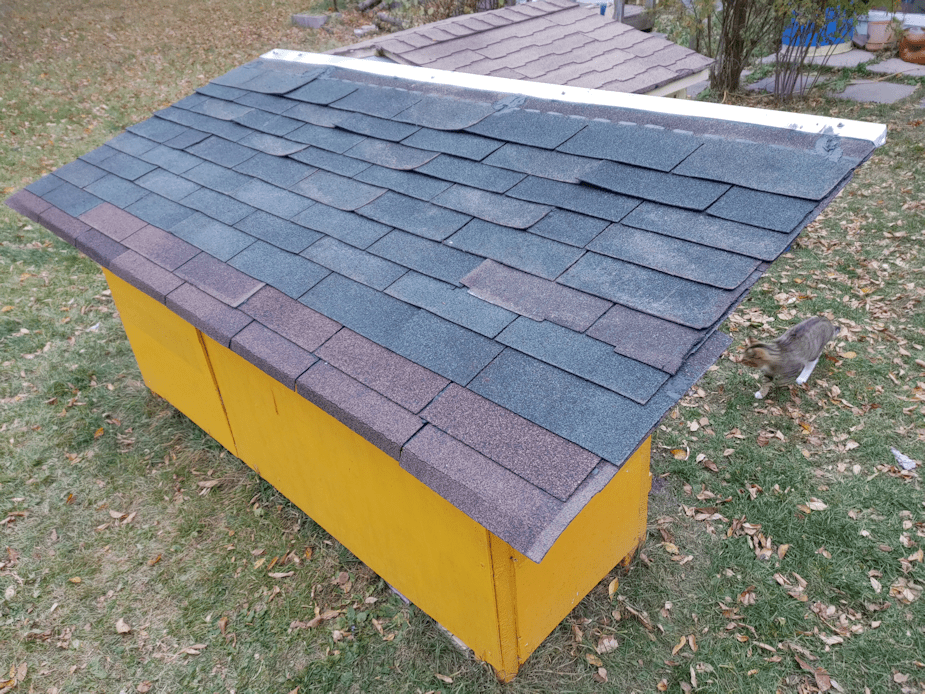
At this point my daughter, who had been working on putting salvaged shingles on the kibble house, ran out of roofing tar. I’d only picked up a small can for patch jobs, never expecting to need more.
So I left my daughter to continue pounding in the posts while I went into town to pick up more tar, and a few other things while I was there. When I came back, I found my daughter lying on a tarp on the ground surrounded by kittens. She is having much more success at socializing than I am!
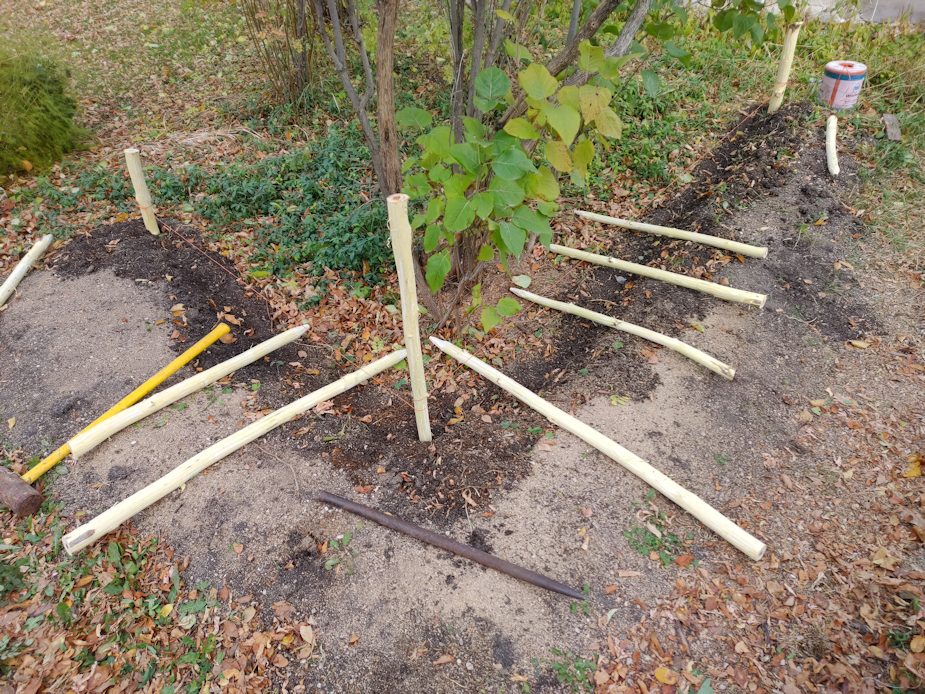
She had even pounded the other two corner posts at the ends of the L shape.
The weather was starting to get worse, so I quickly filled in the gaps with the smaller 2 1/2 ft posts.
The long end of the L shape will be only 2 feet wide, so the end posts needed just one more added in between them, plus three more along the north side. The short end of the L shape needed only 2 more to fill the gap. Since this end can be accessed from three sides, we’re okay with it being wider than 2 feet, so the end posts there got two more in between. The rest of the posts will be for the outside of the L shape.
From the looks of it, I’m going to need to find more pieces to be able to finish the outside of the bed, but I’m not concerned about that right now. It’s the inside of the L shape that I need to get done first.
By this time, however, dark clouds were rolling in and it was starting to look like rain, so I left the job at this point and focused on cleaning up and putting away anything that might blow away. My daughter, meanwhile, finished the roof of the kibble house.
The green shingles are almost 50 years old and are in pretty rough shape. The brown ones are better, but they’re almost 30 years old.
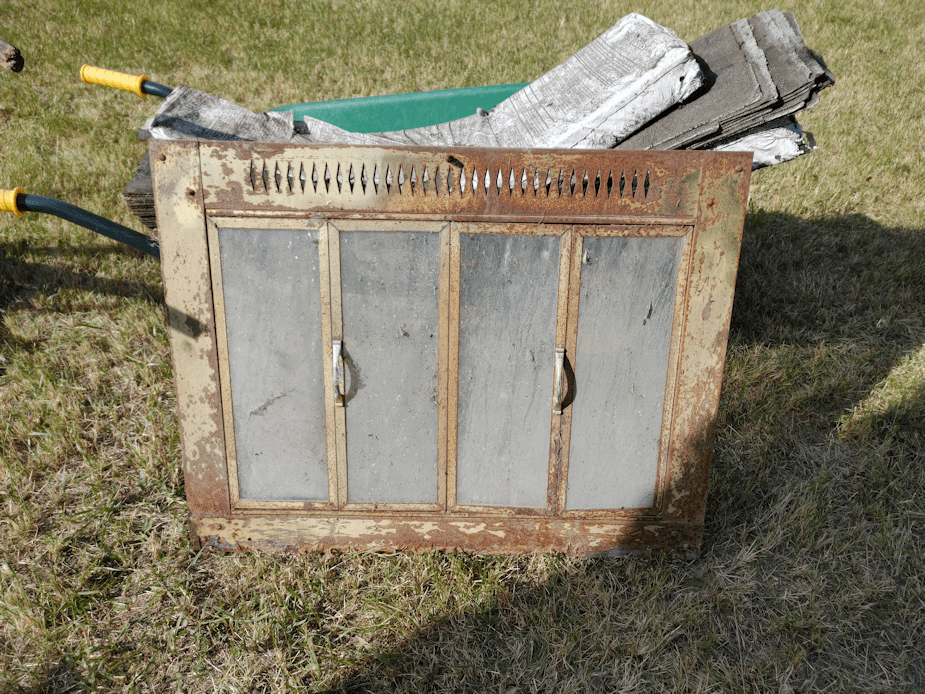
The water bowl house roof is thinner plywood, so we’ll be using pieces of metal roofing that we’ve been scavenging for various things since we’ve moved here. If we used shingles, the nails we have would go right through by nearly half an inch, and that would be a problem! I dragged a piece of metal roofing out from the barn that we can cut in half and lay side by side to cover the roof of the water bowl house, but I also spotted a stack of corner pieces. I brought one over, and helped my daughter put it on the edge of the shingles on the kibble house. I found a bin of metal roofing screws in the warehouse, so I grabbed a bunch for when the water bowl house is done, and my daughter used a few of those to install the metal cap on the edge of the roof, using the screw holes that were already in the metal – after making sure to put some tar under each hole, first.
Almost everything about the kibble and water bowl houses has been done using scavenged bits and pieces we’ve found around the property, and a lot of it is pretty old and starting to rot. We don’t expect these to last long, but using paint and even decades old shingles will help them last longer. At some point, it’ll be nice to be able to build versions using new materials, all well measured and cut and leveled, etc. But this will do for now.
Once this was done, I set up a longer extension cord I found that was in good shape, and was able to plug in the cat’s house. We lifted the roof and put in the high density rubber mats I’d dragged out of the barn, which will help insulate the floor. There’s a thick scrap yarn crocheted blanket that is laid out on top of the mats, too. We will not be using straw this year. As much care as we have taken with the terrarium heater bulb, I would much rather not have straw in there! The heat bulb is working fine, with the heat shield still in place, and the timer is set to light sensor, so it will turn on when it gets dark, then off again when it gets light. The smoke detector was tested, too, and it’s working fine.
Once the water bowl house is done and set up where it will go, we’ll be able to plug in the heated water bowl through the cat’s house entry, too.
Tonight, the cats will have a warm and cozy place to stay if they start feeling too chilly. I especially hope the tiniest kittens will start using it!
As for me, I’ve pain killered up and hope I’ll be able to continue in the old kitchen garden tomorrow. For the weaving, I plan to cut the willow branches and use them right away, while they are still very green and flexible.
I really hope this works out. Otherwise, that’s a lot of work for nothing! Well. Not for nothing. Now that those posts are in, even if wattle weaving doesn’t work, I could still use them to hold whatever we find to use instead. It’s all fly-by-the-seat-of-our-pants work, anyhow!
Today did not work out at all as planned. My daughters and I were originally going to take my mother to a marsh in the area to see the migrating birds – something my mother tries to do every fall. Unfortunately, my daughters weren’t feeling well, so we’ll be rescheduling that. We only have today and tomorrow for good weather, though, so I was going to go over to deliver some thanksgiving dinner to her and, if she felt up to it, maybe head to the marsh anyhow. Before heading over, I pulled my mother’s car out of the garage to do a bit of fall clean up – and discovered a flat tire! I pumped it up, then used our van. I couldn’t see anything that could cause a flat, and when I came home, the tire was still holding air, so I don’t know what’s going on there. I’m just glad I decided to clean out the car first, which requires moving the car out of the garage. Where her car is parked is so tight, I might not have seen it before leaving, if I hadn’t. I’ve left it out so we can check the tire any time we’re outside.
So there was no going anywhere with my mother, since it’s difficult for her to get in an out of our van. Instead, we had thanksgiving dinner together with the food that I brought. I am happy to say that she actually tried and enjoyed the peanut soup (after having an angry outburst over the fact that I brought soup at all), and even the roasted vegetables – though she did do a double take when she spotted a sunchoke, asking me what it was. When I told her, she started lecturing me about how I shouldn’t be growing “strange” things – after she had already eaten it! 😄
Overall, it was a good dinner, and I’m glad we were able to do it, in spite of some of the very strange attacks she came up with during conversation. 😄
It also meant that I was able to get home with the conditions still good enough to get some work done outside – though it did get very windy!
I need to build a wall along the “inside” of the L shaped bed in the old kitchen garden. Given what materials we have on hand, I was thinking of doing a wattle weave. I had intended to use lengths of maple suckers that I need to clear out of the maple grove, but after looking more closely at them, none of them were suitable for weaving, nor did they seem adequate for supports.
While bringing kibble to the tray in front of the pump shack, I took a closer look at some maple growing next to it. There was a maple that had been cut down, and suckers have been growing out of the stump for some years, to the point that they were getting into the power line running into the pump shack.
Lots of nice, straight and strong suckers, that would make good upright supports.
So that’s what I worked on today.
At some point, we should come back to the stump with a chain saw and try and clear it away even more. Maple stumps will send up suckers from the stump of a dead tree for ages, if something isn’t done to make sure it’s completely killed off. From what I could see, this maple has been cut down at least twice over the years, and been trimmed of suckers a number of times, too.
You can see where the power line attaches to the outside of the pump shack and runs in. That dangling board used to be attached to the side of the shack somehow. Something needs to be done about that, since it’s supposed to be supporting the line, not hanging off of it! Some of the suckers I cut away had branches tangled up in there. I’m very glad to have them clear of the shack!
I saved the straightest pieces. Hopefully, they will be easy to debark I wouldn’t want them to root themselves and start growing.
There was a lot of material that could not be used, too.
At first I put the cleaned up branches on the pyre stacked over the burnable garbage that’s too much for the burn barrel. On a calm day, we’ll have ourselves a bonfire! I ended up putting the last of the branches on the mostly composted bits that are left over from the branch pile that got chipped, just because there was getting to be too much on the bonfire pile.
I like being able to get more than one job done at once. I got to do some necessary clean up by the pump shack and it’s power line, and at the same time acquire materials to use for a garden bed or two!
As for the branches needed to weave around the uprights, I should be able to prune away suitable pieces of willow branches from the trees in the yard. Trees that have already been trimmed professionally to clear branches from the power line to the house, and that we need to keep trimmed. Willow is very enthusiastic about growing new branches after being pruned, and it’s been a couple of years. I’m just not sure we’ll have enough to do the wattle weaving I have in mind, but there are other willows in other areas in and around the yard that could probably use a good pruning, too!
I’m looking forward to trying to figure it all out, tomorrow. The temperatures are supposed to drop after tomorrow, but we’re also still expecting rain rather than snow, so it shouldn’t be too bad to get work done outside.
Now, if the wind would just die down, that would be great!
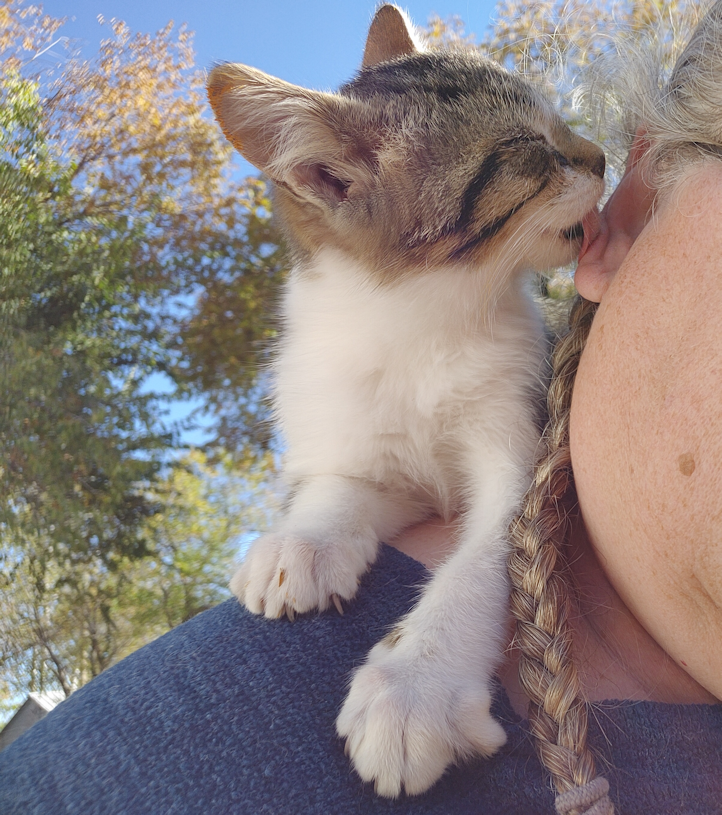
While going to the pump shack to leave some kibble at the tray by the door, I heard a plaintive little meowing. It was one of Rosencrantz’s white and grey babies, out by the junk pile.
This one.
Not only did it let me pet it, but allowed me to carry it to the kibble house!
Unlike the fuzzy beauty behind it. The girls have been able to lure it close enough to touch, but so far, I haven’t had any luck at all.
What a difference between them. The tabby is from the oldest litter of the year, and the white and grey is from one of the youngest litters. I’d estimate there’s about 4 months between them.
It’s Thanksgiving weekend, here in Canada. Thanksgiving is officially tomorrow (the second Monday of October), but we had our dinner today.
We did pretty much everything different this time! Including the turkey. I had hoped to brine the turkey overnight, but didn’t have the energy for it. Well. Mostly, my hands were hurting too much. Either way, we normally would just roast the turkey, covered in bacon. To keep the turkey from sticking to the bottom of the roaster, I would put a layer of some vegetable under it, depending on what I have at the time. An onion sliced into rings, long stripes of carrot, pieces of celery, that sort of thing.
Turkey takes a long time to roast, though, so I decided to try something different.
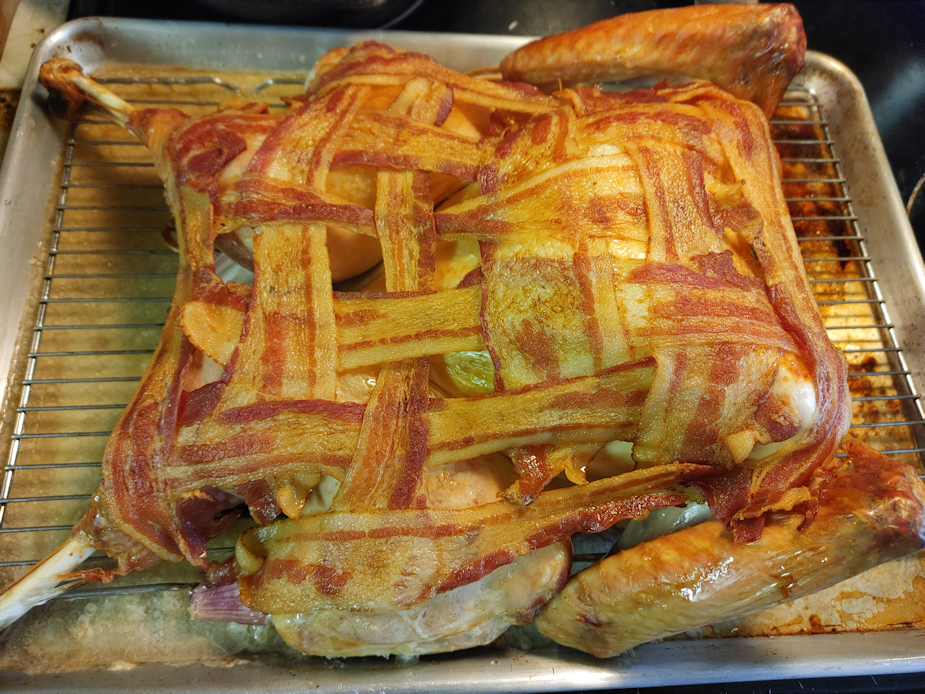
I spatchcocked it. Something I’ve done with chicken, before, but not turkey.
It’s surprisingly easy to cut that spine out, even with the pain in my hands.
Once spatchcocked, however, it no longer fit in my roaster. Using a baking sheet meant I could use a rack under the turkey. I still added some thick slices of the Tropeana Lunga onions we need to use up first, under the turkey.
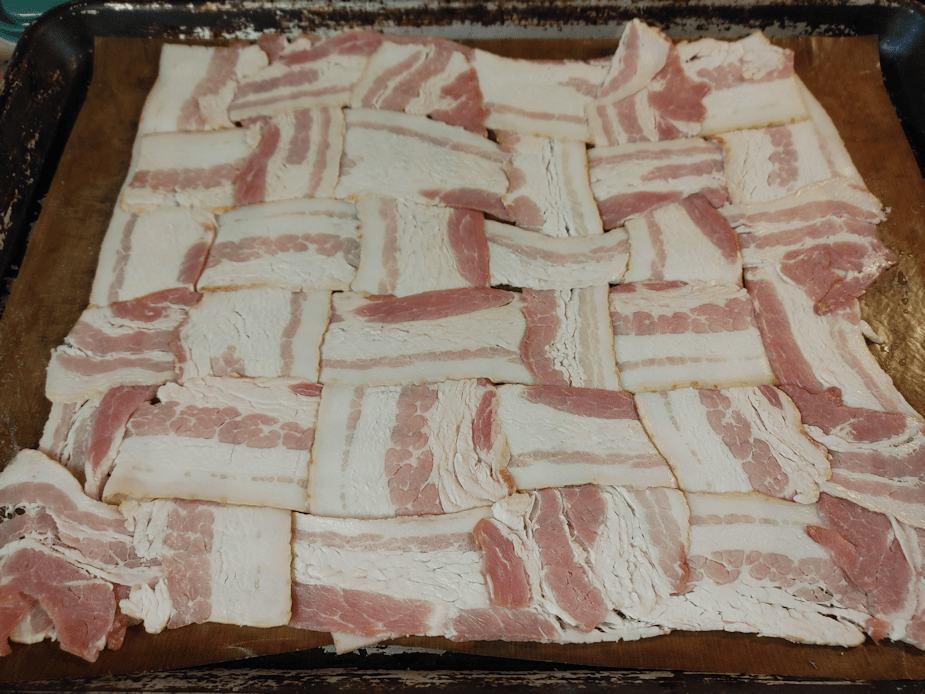
For the bacon, I would normally weave the sliced right on top of the bird, but tried something different there, too.
In another baking tray, lined with a silicone baking sheet (parchment paper would have worked, too), I wove the slices from an entire package of bacon. That got topped with another silicone baking sheet, and then I used a heavy marble rolling pin to flatten it out. After removing the top sheet, I used the bottom one to transfer the bacon mat to the top of the turkey. The final step was to add some water to the bottom of the pan.
I forgot to take a “before” picture, but this is how the turkey come out after it was done.
It took a lot less time to roast it, too.
After the turkey was in the oven, I got the mixed vegetables prepared, then spread out on another baking tray and added to the oven about 40 minutes into the turkey’s roasting time.
The mixed vegetables included some Uzbeck Golden carrots (I didn’t want to use the Black Nebula carrots, as they’d discover the entire dish!), more Tropean Lunga onions, the last of our own potatoes, plus a few store bought potatoes, some Red Kuri squash, sweet potatoes and, of course, the sunchokes. That all got tossed with some salt, pepper, garlic granules, paprika and olive oil. It turned out awesome.
When the turkey and vegetables were getting close to done, we made a soup as well. Something else I’ve never done before…
Peanut soup.
When I was able to visit my brother not long ago, we had peanut soup for lunch. I’d never tasted peanut soup before! My SIL had spent a long time trying to recreate one that she’d had at a restaurant. A recipe for West African Peanut Soup was the closest recipe she found, and she modified it to get the flavour she was after. I was able to take a picture of the recipe she used, along with her own notes for the things she changed.
What we made was a mix of the original recipe, plus some of her modifications, and it turned out really well. Among the optional ingredients was shredded chicken, which we skipped this time. The instructions also suggested one way to serve it was over rice. My younger daughter helped me make it, and we both found it funny when, after her sister had some of the soup, she commented on how it seemed a bit like a curry, and that she was tempted to put it over her turkey, adding that it would probably be great over a bed of rice!
Once the idea was brought up, both girls did use the last of it over their turkey, and decreed it delicious.
This is definitely something we will make again!
By the time we were done our dinner, none of us had room for desert, so that waited a few hours. For that, we just had a purchased pumpkin pie and some butterscotch swirl ice cream.
Meanwhile, I’ve also set aside a turkey dinner, including the soup, to bring to my mother tomorrow. She should have enough to last her a couple of days. 😊
If she’s willing to eat it, of course. No mashed potatoes and gravy, this year. 😉
Yes, here we are, Oct. 9, and there’s still things to harvest!
Well… half a harvest.
I’d been leaving the sunchokes along, and this is how they look after being hit by frost, then rain, then more frost. This being Thanksgiving weekend here in Canada, I decided to go ahead and harvest some of them to include in our meal. There were ten of them planted, and I decided to only harvest the nearer five.
I was a bit surprised by how they looked. A lot whiter than I expected, but that may be because they never got to reach their full size during this crazy growing year we had. This bed is right next to where some of the longest lasting flooded areas in the yard this spring. The bed was slightly raised, which was probably the only thing that saved them.
There wasn’t a lot to harvest, and I also made sure to rebury at least one of the largest tubers under each plant, for next year.
As for the plants, I did a chop and drop. I’ll add more mulch to this bed before things freeze over, too.
To prepare them, since they were so fresh, I basically just scrubbed them. I’ve never tasted sunchokes before. These are supposed to be edible raw, so I made sure to try a piece. I don’t know how to describe the taste, other than “mild”. There’s nothing else I can compare it to in flavour.
I added them to the other vegetables that I tossed with olive oil and seasonings. I liked them better roasted. They take on other flavours very well. Roasted, they have a very smooth texture. All four of us liked them, which seems to be a rare thing!
If all goes well, we will have a larger harvest of them next year. 😊
I laid the tarp I found in the barn out, to get a better look at it.
It turns out, it’s not a tarp. It’s the roof of the carport I found most of the frame pieces for, in the hayloft of the barn.
The kittens could not get enough of it!
You can see where there are channels that the curved roof supports would run through. All along the left, there is a series of matching, rectangular tears, one of which got duct taped.
I don’t think we can use this to cover that hole in the roof of the shed by the barn. I think we’re going to have to actually buy a large tarp.
The girls want to shingle the roof of the water bowl shelter. The paint I got was pretty cheap, and it’s so thin and watery, it doesn’t really cover well. The roof of the shelter is already mostly painted white, and the yellow just can’t go over it well.
We’ve been using some leftover shingles like what is on our roof now for replacing shingles that have blown off. We still have an unopened package of those in a tiny shed by the barn. However we also had shingled in the shed where the roof collapsed under heavy snow this past spring. I’ve been wanting to start cleaning that up so we can salvage some of the wood. Hopefully, we can salvage enough to build a chicken coop. I decided to start cleaning up in there until I could get at the shingles, and a couple other things I want to preserve.
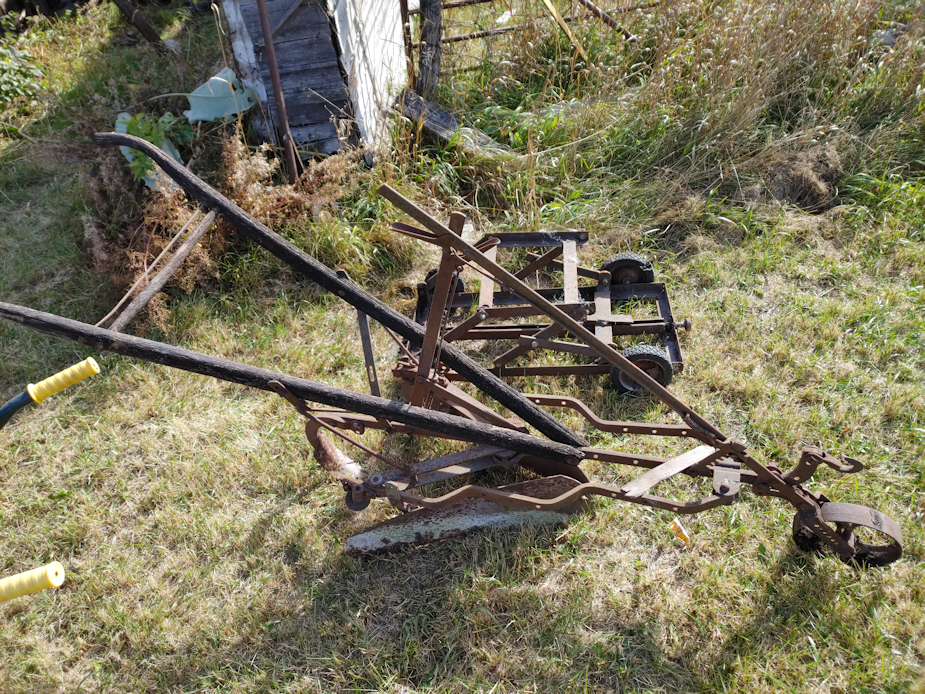
I worked my way to the corner, taking out a LOT of rotten boars, beams and shingles, and was able to get out the antique plow, and the gadget my late brother made to help him install transmissions.
That plow is remarkably heavy to carry! And awkward.
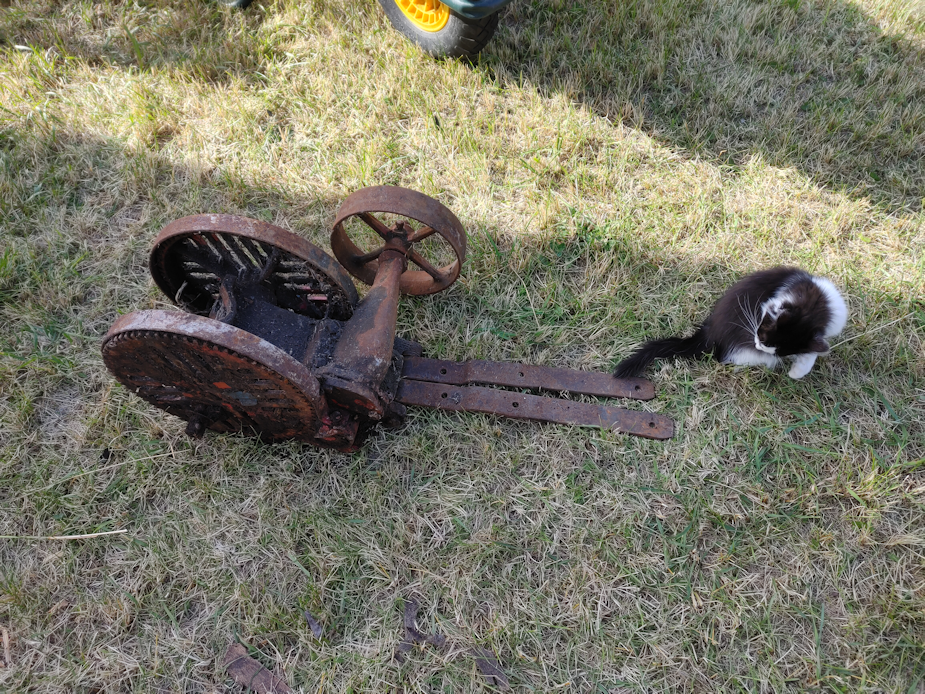
Not as awkward and heavy as this thing I found under it.
I have no clue what it is.
Then I found this surprise, under an old window and sheets of what I think is fibreglass.
What a remarkable window! And the glass is still intact!
It’s now stored in the garage with the van, where I think it will be safest. I would love to be able to clean this up and find a way to use it!
The wheelbarrow has all the shingles that were in there.
I recognise those shingles. They are the shingles from when the addition to the original log cabin part of the house. I spent many hours playing on the roof and remember the colours well.
That roof was installed in the mid 70’s.
They may not be useable. If not, I can go to the other shed, where there is an unopened package of the shingles that we have right now. That was installed in the mid to late 90’s.
Speaking of things that are older than expected…
I knew that shed was old, but I did not think it was “forged nails” old!
The wooden shingles were nailed in place with more modern nails, but the boards were nailed to the trusses with forged nails.
Hundreds of them.
They are all rusted out, with many all bent up or even broken, but I would like to save as many of these as I can.
Of the roof pieces I pulled out, there were only three lengths of wood that were potentially salvageable. The rest are incredibly rotted out. There’s still lots to clean up, but I’ve already got a substantial pile for burning – after I’ve salvaged as many of the forged nails as I can! It’s the walls that I expect to be able to salvage more, and it’s going to be a while before we can start tearing those down.
Whether or not there’s enough useable wood to build a chicken coop with it, I have no idea at this point -but I’m still hopeful!
The sun room is starting to get too cold and night to leave our harvests in it anymore. This morning, I went through them and binned them up.
All of the carrots, both types, filled one bin enough that the lid can’t quite close. Those will need to be taken care of quickly. The Black Nebula carrots are already getting wimpy!
All the gourds will go someplace warm and dry to finish curing.
The Tropeana Lunga onions are growing rather than curing, so they will go to the kitchen for fresh eating and dehydrating.
The hulless seed pumpkins that have ripened the most will be moved inside to ripen some more, while the remaining ones were shifted around on their shelf to get more sunlight. We should be able to get away with leaving those there for a while longer.
The tomatoes that are ripening were laid out in a single layer on the bottom of a bin to go inside for further ripening. The green ones that have shown no signs of turning colour by now are not going to, so they all went into one small bin. I picked through them in the process of sorting through, and the more wizened ones went into compost. The rest will go to the kitchen as we decide what to do with them. The problem is, I’m not the tomato person in this household, so I’m not exactly inspired over them!
Now that these are clear of the sun room, we’ll be able to continue cleaning out and partially reorganizing the sun room for the winter.