Aaaannnd… something else to fix

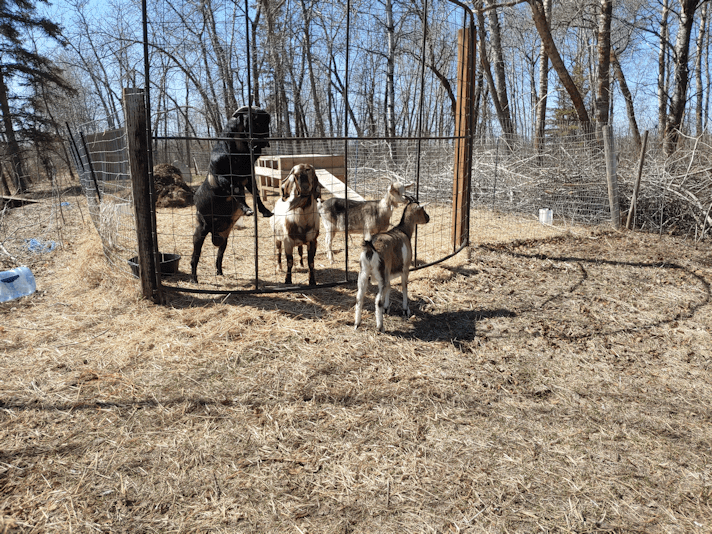
One of the odd things we have on this house is this window cover that the visiting goat discovered.

When I was a kid growing up here, this did not exist, but I think I understand why it’s here.

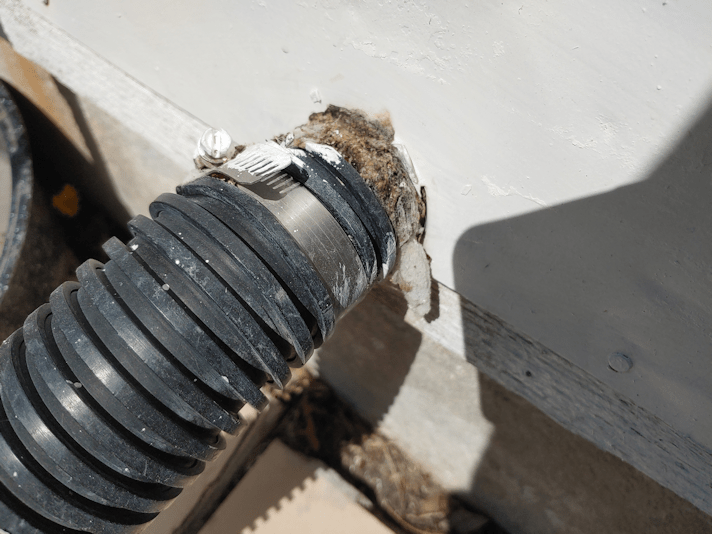
It is over the window we used to toss firewood through, when we had the wood burning furnace. The window is about 6 – 8 inches below grade. I clearly remember tossing wood through, bouncing logs off the ground in front of the window, into the basement. Sometimes, the log would hit the window frame. So the bottom of the window frame and the dirt in front of it got pretty bashed up. At some point, someone fixed the frame and added a dense, hard plastic to the ground in front of it, and made a sort of retaining wall out of bricks and paving stones on each side

Judging from the shape of this cover, it was meant to hang over the window, with the thinner portion fitting between the little retaining walls, to cover the basement window completely. It’s hinged, so it could be lift up as needed.

However, we have never seen it down, because a small fence post was put into the ground in front of it, holding it up above the window. My guess would be that this allowed access to the window, while the cover itself served as a roof to keep rain and snow out of the sunken area in front of the window. Otherwise, any moisture would leak into the basement.

We took advantage of this by putting the food containers for the outside cats under it, so rain wouldn’t turn it all into mush. It worked well, and it’s something we would continue to do, once the winter debris is cleaned up.

With that in mind, today I lifted the cover higher, so I could start cleaning stuff out from under it.

It fell off.

But only one one side!

It was an easy matter to rip it loose from the other side, too.

As you can see by the underside, it’s a fair bit of moisture damage.

The screws on the hinges pulled right out of the weathered wood.

Seeing this, I am amazed it didn’t come apart under the weight of that goat! :-D

This cover was made up of two wood panels attached to each other.

Oh, look!

The narrower piece was attached to the wider piece with screws, that were sticking through underneath.

Three of them.

I have gone under this cover, letting it rest on my back while I tended to various things at the window, so many times.

I’m now wondering how I managed to do that and never stab myself in the back, or scrape the back of my head, with those screw ends!!!

Meanwhile…

The hinge screws are still in the hinges. One of the hinges – the one that broke first – is quite loose from the wall, too.

So… this is something we’re going to need to replace. As odd as it is, it serves a purpose.

We’re going to have to figure out how to replace it, and with what.

Now that the old cover has broken off, we can think about making an improved version. Since I doubt we’ll ever have the cover hang down to cover the window, we don’t need to have the narrower end. I would also want it to be all one piece. The little fence post can stay to hold it up at the lower end, but I would like to use a material that is lighter; a hard plastic of some kind, that can handle the sun without breaking down, perhaps. I also would want to set it up so that it can be swung upwards, with something to hold it against the wall, so we can access the space under it without having to be bent over, holding it up with our own backs.

Hmmm… An idea just occurred to me. If we’re building a new cover anyhow, it could be made with legs to support it at each corner, instead of the fence post that’s there now, in the middle. The legs could be on hinges, so when it’s lifted, the legs will fold downwards rather than sticking straight out. That way, no one would be bashing their heads into a leg when it’s up. :-D

There is a piece of dense plastic near the window that may have been used as a cover there before. I could see no evidence it was ever attached to hinges, so it may simply have been placed against the wall on its own, to cover the window for the winter. I don’t actually know. I’m just guessing, based on the shape. It’s even heavier than the wood version, though, so it’s not something we can use to replace the cover, as it’s set up now.

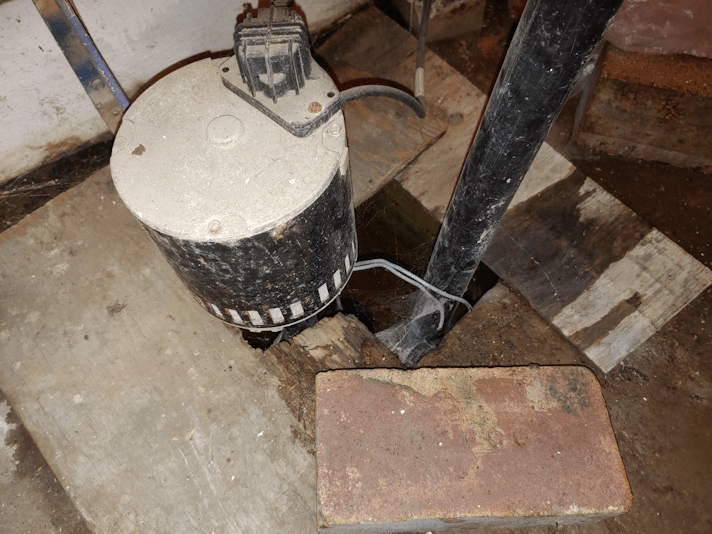
This does remind me of something else for the to-do list, though. For the summer, the basement window, plus the foam insulation cut to fit into the frame, gets removed, and a metal screen gets used, instead. This helps with air circulation in the old basement, helping to keep it dry. My older brother even had a fan set up on the inside (which disappeared before we moved in) to draw air in, along with the big blower fan that’s still down there, to help keep that basement’s floor dry.

The wood framing the metal screen was pretty old and starting to break when we first moved her, and this past winter, it finally broke apart. We will need to find some wood to make a new frame before we’ll be able to use that screen again.

Another couple of things for the to-do list! :-)

The Re-Farmer

Replacement door progress: almost there!

Today, I finally got a chance to continue working on the replacement door for the sun room.

Cutting out recesses for the hinges.

To line them up with the recesses that are already in the door frame, I dragged the broken door over and lined it up with the replacement door.

After making sure they were facing the right way, I used one of the hinges we took off to line up the recessed area, then traced around it.

And only now, as I look at this photo, I realize that for all the care I took to line it up and facing the right way, I got it backwards.

Dangit!

Ah, well. We’ll work it out.

*sigh*

I ended up carving out the recess with a combination of chiselling it, and shaving it with a utility knife.

My daughter then turned the door to access the outside of it, painted the carved out areas, and gave the outside of the door a final coat. It’s got some rough areas in the wood, so she really wanted to make sure it was well coated to protect it from the weather.

Now that I realize I goofed on the recesses, I’ll just carve out the remaining bit, so the recess runs across the door, then we’ll paint that over, too.

Ugh. I can’t believe I made such an obvious error. I even remember telling myself, when thinking about it a couple of days ago, to make sure I didn’t do that!

What a goof I am! :-D

The Re-Farmer

Some winter damage to fix

This spring, our sump pump is actually going off pretty regularly. Which is great, because it means we have moisture in the ground. The last two springs, I think it went off only once or twice, aside from when we drained the hot water tank into it.

Which brought to my attention some damage to the drainage hose outside.

I think it might have gotten stepped on, while frozen… and it was likely me who stepped on it! :-D

So I went into town to see if I could pick up some replacement hose. Something longer, so that I could direct the hose towards the garden by the old kitchen, instead of having it drain next to the well.

At the hardware store, I was very happy to find sump pump hose kits with 24 ft hoses!

Except… well… see for yourself.

They are very different diameters!

On reading the package, I realized that this hose kit is intended to attach directly to the sump pump itself.

That is not what we have.

I found a very knowledgeable employee to help me out. Unfortunately, I didn’t think to take any photos before I left, so I had to try and describe to him what we had instead.

We’ve got this semi-rigid hose cobbled together, instead. The diameter of this hose, however, should fit the hose kit. It was on the other side that the size is somehow modified so the larger diameter flexible hose could be attached. I had looked at it before and saw that it was clamped very close to the wall, but could not see what it was clamped too.

I still can’t really see.

Something has been wrapped around the end, and then the larger hose was clamped in place.

That “something” looks, for all the world, like batting. Like quilt batting, or aquarium filter batting.

Whatever it is, it’s been there long enough to be covered in crud.

In talking to the guy at the hardware store, he picked several different attachments that I might need, and a plumber’s adhesive that I would need if I had to use one of them. Once I get working on this and remove the broken hose, I should have the pieces needed to attach the hose kit, if it’s a different size. Or, if the end coming out of the wall is the size I’m seeing from the basement, and doesn’t have something weird done to it on the outside, I might be able to use what came with the kit itself.

He said I could return anything I don’t end up using, but that’s not going to happen. Even if I don’t use the pieces, they are things that will come in handy in the future and will not go to waste!

Plus, just in case, I picked up two hose kits. If things are bad enough, I can replace the cobbled together hose that’s inside the basement now and replace it with the flexible hose that should have been there in the first place. If I do end up doing that, one hose will not be long enough to run along the side of the house and reach the garden.

With that in mind, I asked the guy at the store if I could attach the hoses of two kits together, mentioning in passing that right now, the hose is draining next to our well.

That got a rather dismayed and understanding “oh, dear!” as I continued to say why I wanted to have longer hose!

He then found me the piece I would need to attach the hoses together, should I need to.

I was one very happy customer by the time I left the store!

When it comes time to actually start working on the hose, I’ll have to make sure to have the sump pump shut off in the basement. It would not be good for it to turn on while I’m working on the house outside! :-D

So this is a task prepped for, but will have to wait for another day. At least we’re all ready to get it done, though. Other things had priority for today, which will be in my next post. :-)

The Re-Farmer

Dismantling the failed goat catcher

Another thing on the to-do list accomplished!

The pen we threw together to try and catch the visiting goat was finally dismantled. Which never did work. :-D

The “door” end was already trying to make its escape. :-D

The straw I hoped the goat would use for bedding went onto the little garden near the old kitchen; another area we’re trying to build up the soil with layers of organic matter.

The chicken wire belongs to the goat’s owner, so that’s all rolled up and, along with the containers he brought to try and lure the goat with food, it is set aside and ready to be returned.

After what happened when I walked the goat over to his place, I don’t particularly want to see him, or even go to his place, so I might just drop them off at the end of his driveway when we have the chance. :-/

The frames are just set aside for now. I plan to take them apart and will likely use them to make trellises for the squash. Before I do, I will have to snag one of the girls to help me get that table saw out of the shed so we can test it out. If it works, I’ll be able to cut straight ends to the pieces, and even *gasp* have matching lengths to work with. :-D

If it doesn’t work, I’ll see what I can manage with the circular saw.

For now, though, it’s done. We no longer have a pen in the middle of our south yard! :-D

Another thing checked off the to-do list!

The Re-Farmer

A bit of prep and clean up

Yesterday, the girls were able to take our two black tarps and set them up on a future garden bed area.

We mulched this area with straw last year, as a start to try and amend the soil and add organic matter to it. The old garden area had been plowed probably the fall before we moved in. I don’t actually know. It left the entire area very rough, but the ground itself is incredibly hard and full of rocks. I remember as a child, we were constantly picking rocks out of here, though one section (now full of trees) was so bad, my parents stopped trying to plant anything in it.

We want to amend the soil by adding organic matter to it, but we have also not decided where we will be permanently adding garden beds. For much of this area, we are already planning of eventually putting fruit and nut trees, though for this year, outside of the section in the photo, we will be planting giant sunflowers.

The black tarps are there just to warm the soil faster. Along the North side, I plan to plant birdhouse gourds in a row running East to West. In front of it, we will plant pattypan squash and the zucchini mix, in rows running North to South, all with trellises.

That may change, if none of the birdhouse gourd seeds sprout! Still no sign of them right now.

After this year, I hope we will have cleaned things up and worked things out enough to decide where we want to plant raised bed gardens. And by “raised bed”, I don’t mean the ones I’ve seen videos of, where people just border an area with rocks or a layer of bricks that get referred to as raised beds. I am thinking of beds that may be as high as 3 or 4 feet. Accessibility is what I have in mind for these, as my body ages and I know my mobility in my hips and knees will continue to decrease. This means finding permanent locations, and from what I’m seeing, this may end up being on the South side of the house, rather than the North.

We shall see.

Among the other things I finally got to today was dismantling the cat condo I put together out of cardboard boxes and rigid insulation. The remains of the boxes went to the burn barrel area, but I wanted to keep the insulation for potential future uses.

I am amused by the very defined areas that cats used it for scratching! These pieces were all in the backs of each “condo”, and the scratches near the “ceiling”.

No wonder other pieces were falling inside. I cut them in sizes that would support each other. That doesn’t work if they get moved around by enthusiastic scratching! :-D

Another thing I finally set up for a bit of cleaning was the large crocheted blanket that was set up on my dad’s old swing bench, to help the cats keep warm.

The peed and crapped all over it. :-(

I’d already draped it over the sawhorses and gave one side a thorough soaking and de-pooping with the hose. Today, I did the other side on the clothes line.

The blanket, on its own, is already pretty heavy. Full of water, it probably weighs more than 20 pounds. It stretched the clothes line until the bottom was piled on the ground. The clothes line is on a pulley system, so clothes can be hung from the platform at one end, and the line moved as needed. (When I was a kid, there were three lines set up, but there’s just the one, now.) So I used some rope to tie the top and bottom parts of the line closer together, then slid that over to lift the blanket off the ground a bit.

I had actually tightened the line before putting the blanket on it, too!

We have another, smaller blanket we use for the cats. It was covering a shelf, so it didn’t get filthy like this one did. It, too, got a soak from the hose to try and clean it. Both are way to heavy to ever put into a normal washing machine, so a hose is the best we can do, right now!

I am hoping that, sometime next week, we’ll finally be able to empty the sun room to give the floor a thorough cleaning. We should be able to continue cleaning out the old kitchen, too, so we can turn it into a pantry.

Little by little, it’ll get done!

The Re-Farmer

Morning cheers

Today was a day to work on a whole bunch of little things that needed to be done or started – and a surprise breakage. Rather than do one huge post, I’ll split them up into a bunch of little posts.

But first, here’s something that cheered me up this morning.

Of course, there was checking on the babies.

It’s going to be interesting in the basement, when these guys start getting more mobile!

While doing my rounds, I had my furry escort, including Creamsicle…

He’s about 10 feet above my head in this photo! Of all the cats, he seems to be the one who loves to climb the most. :-D

What a great way to start the day!

The Re-Farmer

Morning kitties, and I think I’ll hold off on that…

When I opened the door to the basement to check on Beep Beep and the kitties, I found Beep Beep sitting in the basement window at the stairs.

She immediately bolted through the door.

She had to go through the several cats that were trying to bolt down the stairs at the same time! :-D

It’s a good think I was intending to leave the door open for a while, anyhow.

The babies are definitely getting more curious and mobile! Beep Beep is getting more comfortable with leaving them for longer periods, too.

The girls are calling Butterscotch’s baby “Nickypants” because his fur pattern makes him look like he has white pants, just like Nicky the Nose. :-D

After a while, I had to go hunting for Beep Beep to bring her back down, so I could close up the basement again. I found her on the kitchen counter! Bad Beep Beep! ;-)

We’ve been having some very chilly nights lately, so I’ve been keeping a close eye on the seed trays. I was happy to see some new growth.

More pattypans/sunbrust squash are emerging, a few more of the zucchini surprise mix are showing, too.

It’s funny how there is this one large sunburst squash that showed up next to the zucchini mix. If I hadn’t put those straws in to mark the different groups, I would have thought it was part of the mix!

Still no sign of gourds, though. There were no new seedlings emerging in the other tray.

I was supposed to presoak the carrot seeds a while ago, but things got busy and it just didn’t happen. Now I’m glad it got delayed, and I think I will delay a few more days. We’re supposed to get a couple of centimeters of snow tomorrow evening! It looks like things will warm up and stay above freezing, even overnight, by Tuesday, so I will aim to start the seeds soaking on Saturday. The video I’m using said it should take 3 or 4 days for roots to show, so we’ll see how that goes.

The Re-Farmer

Bye Goat!

When I was doing my rounds last night, including the outer yard, I got some company.

Though we made a point of closing the gates in the chain link fence, the truth is, the goat could have gotten out at any time, if she wanted. And this time, she wanted to follow a cat!

As I did my founds this morning, she followed me for the entire circuit!

We were having no luck closing her up in the pen we threw together, but maybe… just maybe…

Would she follow me if I walked over to her owner’s place?

I figured it was worth a shot. After having breakfast (and taking some pain killers!), a grabbed a bit of feed in a bucket and started walking.

She enjoyed a bit of feed while I locked the gate behind me. :-)

For the first while, we were being followed by Creamsicle and Butterscotch. The goat was happy to come along with all of us.

Also, I spotted these ahead on the road. I zoomed in, and it’s hard to see, but…

… can you see those shapes on the road?

There was about 4 or 5 of them, all in a row, when I first spotted them.

They’re cranes!

I often hear their calls from that direction, and had a good idea of where they were, and this has been confirmed.

This is where the cranes were. When I was a kid, we used to all this area the Three Ponds. In reality, it was more like one pond and a couple of marshy bits, but we didn’t care!

I spent many happy hours slogging around in the water, spotting mysterious creatures among the underwater plants and observing them.

This area is so full of water right now! The last couple of years, even the deepest part here was almost completely dry.

For a while, I thought leading the goat wouldn’t work. I almost reached about a third of a mile when the goat started going back the other way. She was following the cats. Butterscotch and Creamsicle were following, but they reached about the quarter mile mark and didn’t want to go any further. I ended up back tracking quite a bit, before the goat was willing to turn back to me. What I ended up finding was that if I walked my normal pace (which is a brisk walk), she would actually run to catch up with me, and follow along more diligently, rather than wandering off to the ditches as she did when I walked slowly. Especially after we had to pause to let a truck drive by. I think it spooked her a bit, and she kept up with me a lot more after that.

I’d posted earlier about the flowing stream I’d found that was a surprise to me. This is where that water reaches the road.

We are past the farm’s property line at this point. The photo on the left belongs to the guy who owns the goat, I think. That quarter section has been split up since we last lived in the area, and I don’t know where the new lines have been drawn, so I can’t be sure.

This is part of the municipal drainage system, and one which takes advantage of a low area that was already there, naturally. In one of the photos, you can see some piles of dirt from when it sometimes gets dredged. This is more what I was expecting, at our place. Basically, a big ditch of slowly draining water. Not a fast flowing stream.

It’s hard to see in the photo, but the markers are warnings for the dip that runs across the road. When I was a kid, this section of road would get washed out, every spring. Sometimes, so much would wash away, the school bus couldn’t get through. The driver would have to reverse the bus for about 2/3 of a mile, before he could use our driveway to turn around in. Eventually, the municipality cut down all the trees that were growing along the ditches on either side. After that, the road no longer washed away. It wasn’t until after I moved off the farm that the drainage ditch was dredged out, and a culvert placed under the road. It’s at this culvert that the road is sinking!

We turned at the 1 mile intersection, then it was another 1/4 mile or so to the driveway of the owner. It was at this point that I think the goat started to really recognize things. She perked right up and started going ahead of me, instead of following behind.

When I started going down the driveway, which is closely bordered by trees, it took a bit to get the goat to go down the driveway, too – but soon we were walking past a goat pen, and she went right over!

Just look at the size of those bucks!

The other milk goat is in there with them.

As I continued down the driveway, I was greeted by three BIG Great Pyrenees dogs, wagging their tails, furiously. I didn’t know he had dogs! I’d seem them before, but in other people’s fields, and had no idea who they belonged to. Such gorgeous animals!

As I went around, I saw the other goat pen way beyond the house. The owner, however, was not home.

I didn’t expect that. With the lock down, pretty much everyone is home. I didn’t even think that he might not be.

So I sent him a text right away, letting him know the goat had followed me over, and was at the pen near the rams (he called them rams, but male goats are called bucks).

The response was not what I expected.

I thought, at the very least, he would be happy for relieved the goat was home again.

Instead, he was all stressed out that she was there and not in a pen.

Long story short, he told me he was going to get a buddy to go over and put her down.

I tried to reassure him, saying the goat would stay near the other goats and be fine, but nope.

At that point, I was most of the way home again and just stopped responding. She’s his goat, and he can do what he wants with her, but what the heck? Why such an extreme response?

I find myself wondering. He could have been having a lot more problems with the goats than he’d hinted at before, and maybe he had been counting on us taking the two milk goats off of his hands. He had still wanted her back to breed with the bucks, though, and would have kept her until we had a pen ready. Maybe he thought that if he said this, he expected me to turn around and take her back? I don’t know. I’m only guessing.

Whatever his reasons and motives, I can’t help but feel ticked off that he was so eager to just shoot her. I didn’t want or even expect any sort of thanks for bringing the goat back, but I did expect him to at least be happy to have her again. Not immediately have her put down.

Whether or not he’ll follow through with this, I don’t know. I don’t know what circumstances he’s going through with his goats, it’s not up to us, and we are not in a position to take the goats ourselves right now. There is just no way we can set up the fencing needed right now. A few months from now, maybe, but not right now.

In hindsight, I probably should have contacted him before I headed over, but I hadn’t planned on doing it, and didn’t even know it would work. Now, I kinda wish I hadn’t.

It has, however, been a learning experience for us.

I still think we will be getting milk goats, but will go back to our original timeline. We’ll take a couple of years to get ready for them, while continuing to clean up around the property. Then, when we do get them, we will buy them from someone I know, who raises goats and works very closely with them; these will not be untamed goats!

Meanwhile, we can dismantle the pen we threw together, then put together the stuff that is his, like the chicken wire and food containers. I might end up using the wood to build squash trellises, instead. I should probably be outside already, working on that, but…

I’m just feeling quite ticked off right now.

Bye, Goat.

The Re-Farmer

Recommended: What the Fungus

Welcome to my “Recommended” series of posts. These will be weekly – for now – posts about resources and sites I have found over the past while that I found so excellent, I want to share them with you, my dear readers. 🙂 Whether or not I continue to post these, and how often they are posted, will depend on feedback. Please feel free to comment below, and if you have a favorite resource of your own, do share, and I will review them for possible future posts.

I hope you find these recommendations as useful and enjoyable as I have!

When I was a kid, I refused to eat mushrooms.

Especially morel mushrooms, which we found in various places here on the farm. I thought they looked like brains.

My parents, being Polish, loved mushrooms, but couldn’t make me eat them.

To this day, I have yet to taste a morel mushroom.

I have, however, developed a taste for other mushrooms, and even an interest in the idea of growing them at home. I had discovered a website that sold different types of mushroom spores, which I didn’t even know was a thing until then. We were still living in the city, however, so the closest we ever got to growing mushrooms was to buy an oyster mushroom kit we saw at a grocery store. Once.

It didn’t grow very well, but we did get a couple of mushrooms out of it.

Since moving back to the farm, we have talked about buying spores and inoculating areas around the farm. I have been interested in trying morel mushrooms, but have only ever seen very expensive dried ones in stores. Since I already know they can grow here in the wild, it seemed logical to inoculate an area somewhere closer to the house.

Unfortunately, the website I’d found years ago has disappeared. I found a few other sites, but they were all US based.

Then I saw a video on a YouTube channel I’ve recommended previously, The Urban Farmer talking about a company called What the Fungus.

Oh, have I been smitten!

For starters, they are Canadian. They might be in BC, but it still makes being able to find varieties that will grow here in our province much greater.

What is awesome is that this company doesn’t just grow and sell fresh mushrooms, mushroom spores and the things you need to grow them. They provide a lot of information and support to teach people how to start a viable mushroom growing business for themselves.

With the current Wuhan virus shut downs, they are now producing videos that focus on how to continue to run a business and make an income when almost all avenues for sales are no longer available.

While most of their growing videos involve greenhouses or indoor mushroom farms, they also have videos on growing mushrooms on logs, outdoors. Which is more in line with what we were originally thinking of doing here at the farm.

Their video channel is a wealth of information, from how to grow different types of mushrooms, to equipment used, to financial concerns.

On their website, you can buy mushroom kits and supplies and, if you are in their area of BC, order fresh mushrooms. They even have a mentorship program for those interested in commercial mushroom growing.

Now, we’re just interested in growing mushrooms for our own use. We have lots of mushrooms growing wild here at the farm, but I have no idea which ones are safe to eat (except morels, which I have yet to look for since we’ve moved here, because where I remember finding them is actually on the other quarter section that’s rented out), so this would be a way to have mushrooms we can be sure are edible. We would also be able to grow varieties that are either not available locally in stores, or are way out of our budget.

After discovering What the Fungus, however, I am starting to feel that growing commercially is something we could do at some point. Right now, this farm makes no money. We don’t own it, so we’re not the ones paying the taxes or the property insurance (and the income from the renter barely covers the taxes, if I remember correctly), but the maintenance of this place is almost all out of our own rather limited pockets. As it stands now, at some point, when my husband and I are no longer able, it’s already planned for the girls to take over as caretakers, and it would be good to have things set up so they can run a profitable farm, even on just the few acres that aren’t rented out. So this is one of the avenues we can consider in the longer term.

With the wealth of information and resources available in the videos and on the website, this actually seems quite feasible!