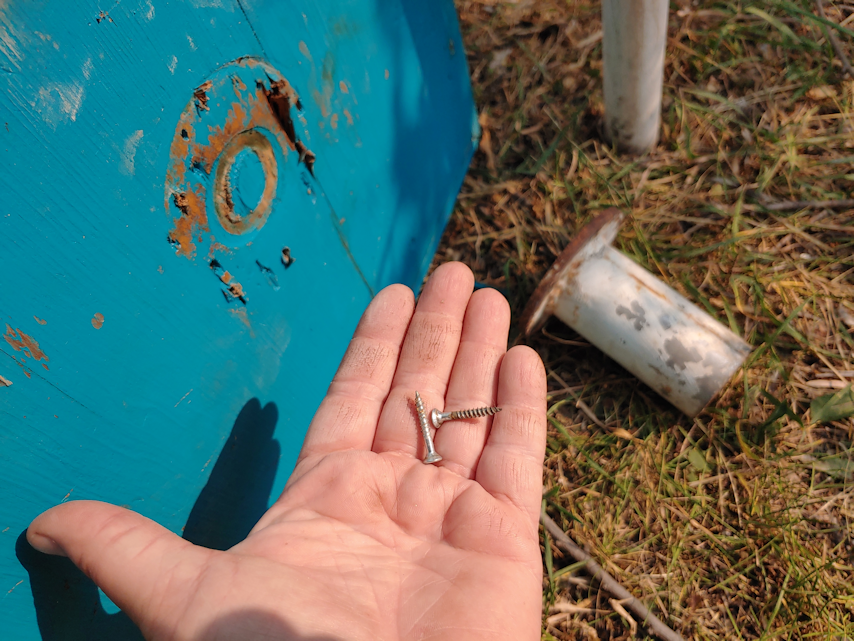
While heading over to put some kibble out for the junk pile kittens this morning, I found this.
Just last night, I was looking closely at this lilac, to see why one of the branches had died, and found it broken at the main stem. Now think I know what broke it. My guess is a racoon was using the lilac to get at the bird feeder, and it broke under the weight.
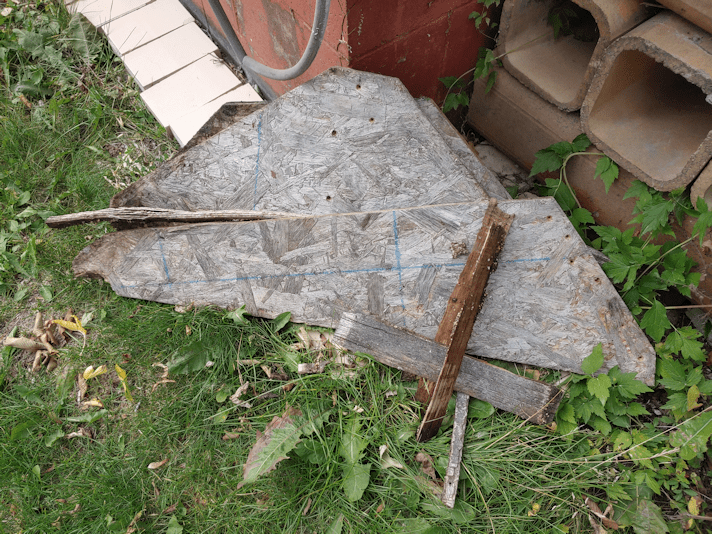
Which is what I think happened to this bird feeder.
When we cleaned up and painted this bird feeder, we found only two bent screws were holding it to the metal piece that fits over the pole. We replaced those and added more.
I could only find two.
What I’ll likely do is attach a new piece of wood to the base of the bird feeder, then attach the metal fitting to the new wood. Hopefully, that will prevent this from happening again.
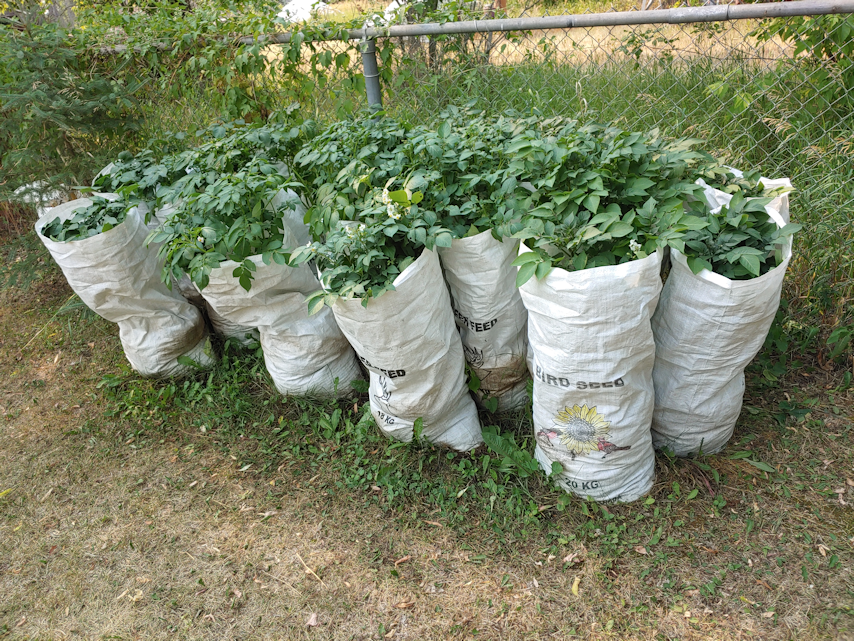
Now that I had good light, I got a picture of the unrolled potato bags. I think this will do well to protect them from further critter damage. I’m just glad that what damage there was, was minor.
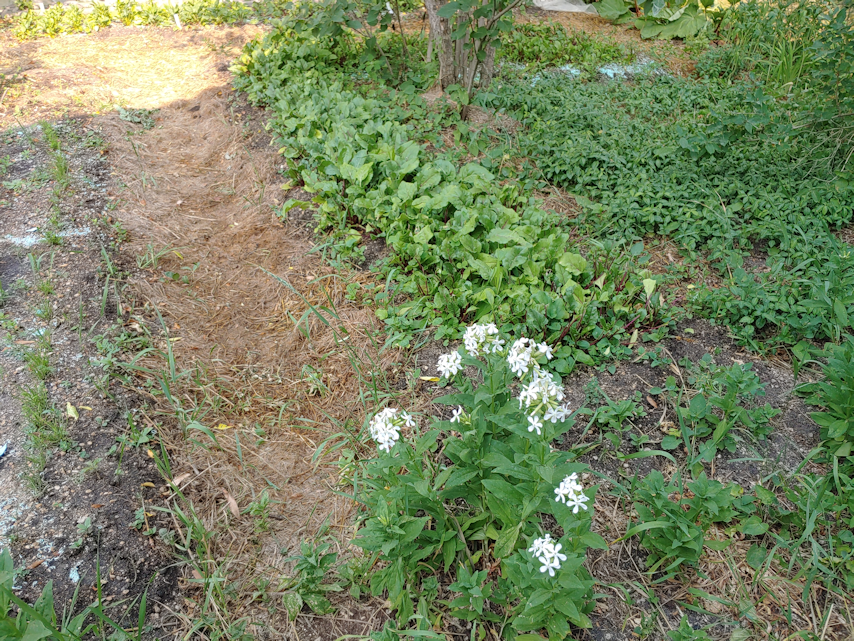
I saw no new damage in the old kitchen garden. This edge of the beet bed had been left alone until after the soap shavings were added. This end has hot pepper flakes on it.
Also, those flowers blooming in the foreground are incredibly resilient. When we ended up digging out a whole bunch of soil to make the path along the house, all the flowers and whatnot that were growing there were disturbed. I took out as many roots as I could, and the excess soil got moved over to the rose bushes and honeysuckle. The entire area was disrupted, and this far from the house, everything was buried in the dug up soil, then torn up as the soil was moved again. Yet these guys managed to push their way through the hard packed soil and mulch, and are now merrily blooming!
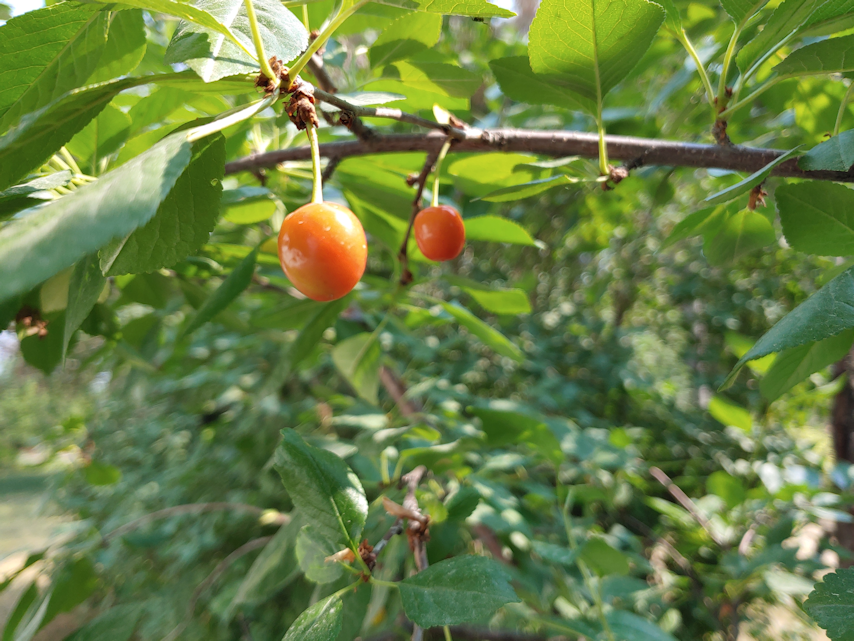
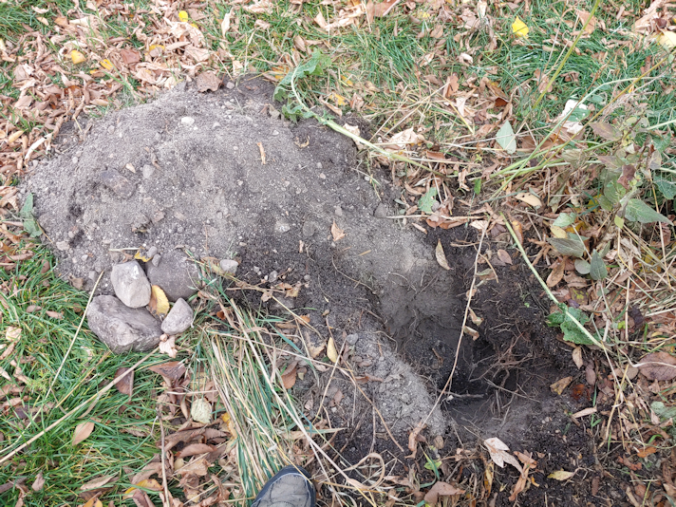
This morning, I worked on getting rid of the woodchuck den I found under the stairs at our dining room door. In the process, I noticed a splash of colour.
This one little cherry tree has developing cherries. There are two others, here, and they barely even bloomed this year.
I’m glad there will be at least a few cherries this year.
While doing my rounds this morning, I topped up the small bird feeder. As I took it down from its hanger, I heard something fly out from the plants below. It turned out to be a goldfinch. It flew onto a nearby lilac branch, and just stayed there, watching me.
As I went by again, on my way to the garden, I saw it again.
I came withing a few feet of it, and it just stayed there. Like it was trying to sleep and wondering what this idiot human was doing at 5:30 in the morning!
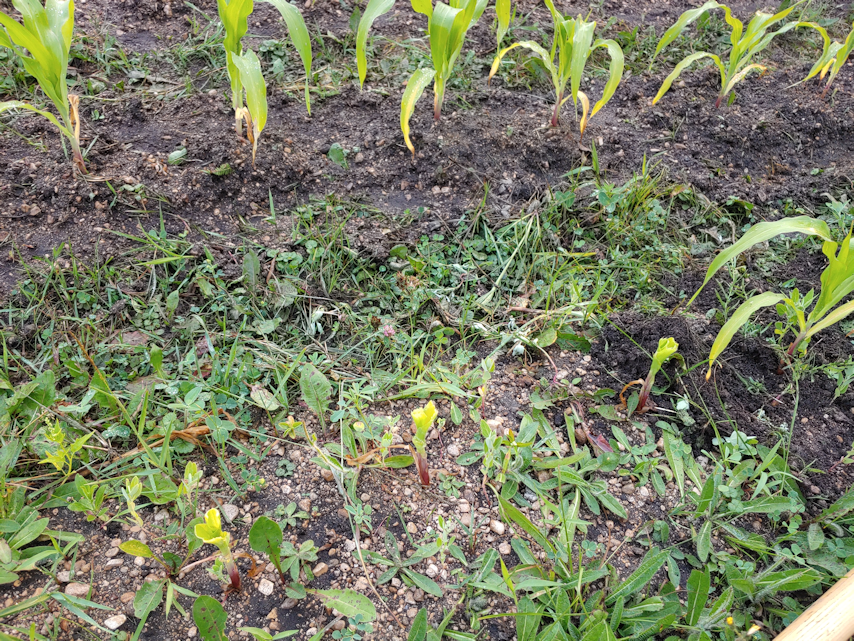
A few days ago, I noticed we’d lost a few sunflowers, among the Hopi Black Dye rows, and a couple of sweet corn. Off hand, I would have thought “deer”, but it was odd. There were just a few nipped plants, and they were in the middle of the rows, in roughly the middle of blocks, not along the edges as I would expect from a deer going around the roped off blocks.
Nothing showed up in the garden cam, which told me that whatever it was, it was too small to trigger the motion sensor where the camera was set up. So I repositioned the camera (mounting in on that flag stand was the best rig ever!) to hopefully catch something.
When checking the beds before watering them, I was disappointed to find this.
The second Crespo squash find has had its end nibbled off, too. Only as far as the hoop barrier, but then, the only vine had been nibbled about the same amount, and there was no barrier at all at the time.
Unfortunately, we don’t have another camera for this end of the garden.
As for the sweet corn…
Three corn plants were nibbled on. In the middle of a row, and in the middle block of the 3 corn blocks!
Just those three. Nothing else in the area was nibbled on.
It was a gorgeous 18C/64 when I first came out, but by the time I finished using the new action hoe to finish weeding a second row, it was already getting too hot for manual labour. So I headed indoors and checked the trail cam files, to see if whatever did this was captured.
Well, waddaya know. Do you see those two “lights” on the left?
Those are the eyes of two big, fluffy raccoons!!! And the far one could be seen coming out of the roped off area, while the nearer one was on the outside of the roped area.
*sigh*
So it is likely these guys that have been nibbling our sweet corn and sunflowers. We have not been seeing deer on the trail cams lately, but that doesn’t mean they haven’t been going elsewhere in the yard. The water level in the kiddie pool is down, but not by much, so I don’t think anything as big as a deer has been using it.
The more stuff like this I see, the more I am thinking we are going to have to invest in a guard dog. A large breed that loves our cold winters. Which is a weird thing to think of, in our current heat.
As I write this, we’re at 33C/91F with a humidex of 36C/97F, and our high is predicted to be 34C/93F… oh, wait. My weather app icon on my desktop just changed. We’ve just hit 34C. The humidex is supposed to reach 37F/99F. Which is actually a bit lower than was forecast, a few days ago. But then, the weather forecasts have been unusually off this spring and summer. It’s one thing to be off by a couple of degrees, or even the continual calling for rain and thunderstorms that never happen. It’s when they say things like “rain will stop in X minutes”, and there’s no rain at all, anywhere in the region. Or “rain will start in X minutes”, but if I look at the weather radar, there isn’t any rain showing in the entire province, nor even in provinces on either side of us, nor the states to the north of us. Frustrating!
Still, over the next two weeks, the temperatures are expected to hover just above or below 30C/86F. One of my apps has a 25 day forecast, so it’s running into August, where, we’re expected to hover around the 25C/77F range. The average temperatures for both July and August in our area is 25C/77F, so I guess that’s about right. I was planning to plant spinach and lettuce in late July. I guess we’ll find out if it’s too hot for them or not!
One thing about our expanded gardening this year. We are continually looking at things and saying, “okay, so next year we’ll do this” or “next year, we’ll not to that.” :-D It would all be a waste, if we didn’t learn anything from it! :-D
I’ve seen a racoon twice on the trail cam. Once was just a tail tip when it was set over the tulips to see what was eating them. The second time, it went by after the camera was moved to face the sunflowers to see where the deer were coming from.
To be sitting on the couch and suddenly seeing this creature climbing up the pole to the bird feeder was almost surreal!
My daughters and I watched if for a while before I finally tapped on the window to make it stop eating the bird feed. I do wish I still had my phone out, because it went down the pole, head first!
What a remarkable experience!
I wonder if he’s been stealing bird seed before, when we haven’t been around to see it?
The Re-Farmer
Edit: I was able to upload some video I took onto Rumble. WordPress doesn’t seem to handle Rumble well, so please let me know if you have any problems viewing it. :-)
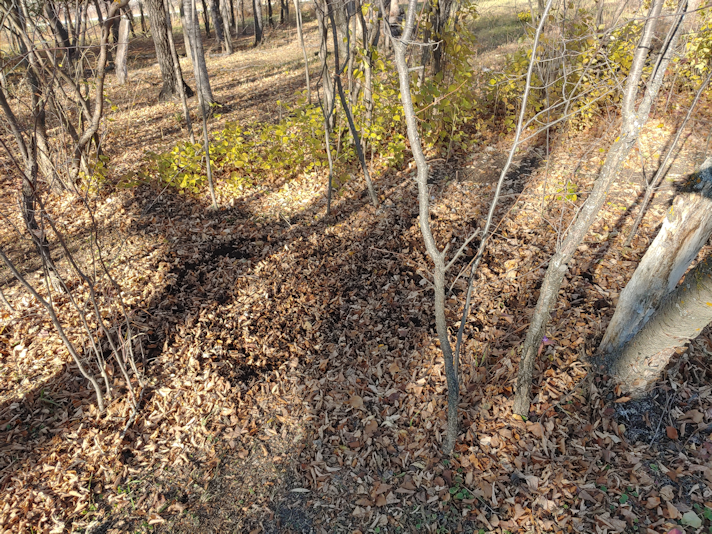
While they don’t come around when we’re around to see them, there are plenty of signs that the deer are coming to the feeding station.
The snow was absolutely trampled this morning! You can see it all the way back to the corner of the spruce grove, before the tracks start splitting up into smaller trails.
Here, you can see their trail coming from inside the spruce grove. More tracks go through the gate and towards the barn.
We may not be able to leave much feed out – and the birds eat a lot of what we do leave out – but at least they know they can come here for a winter snack!
The suet we have right now seems to be a bust, though. When I bought it, the Walmart I found them in was out of stock except for packs with 3 different “flavours”. All mixes of seeds, nuts and fruit. Usually, the only ones I can find locally are basic seed mixes, or special mixes for specific birds. The brand is the same, though.
The individual packs were not labelled, so I don’t know which is which. The first one I put up was, as far as I could tell, completely ignored. Usually, the chickadees and nuthatches are all over it! After several weeks of it looking completely un-pecked at, I decided to put a different one in. I put the first one in the snow in the bird bath (which I am not trying to keep with water this winter; it is just too damaged for that, and I’m amazed it actually lasted another summer!).
Since then, I’ve seen Blue Jays on the bird bath, pecking away at that piece of suit, but none on the hanging feeder!
I’m thinking the larger birds don’t like the little feeder basket as something to land on, and the little birds don’t like these mixes, so they’re not bothering. Not with delicious black oil seeds for them to eat, instead! :-)
With feeding the critters outside, I needed a good, sturdy scoop to hold the cat kibble, deer feed or bird seed. At first, we tried re-purposing the gallon plastic jugs from distilled water. They’re basically the same that milk comes in. We would just cut the bottom off to form a scoop and, with the cap on, the jug itself became the carrying vessel.
The plastic, however, was too flimsy and bendy. I believe it was my husband who first cut the bottom off of an empty popcorn container from Costco. The plastic is much stronger, and even the handle is a better shape. Very convenient!
There is something else that’s convenient.
When we fixed up the old platform bird feeder, I’d taken off the rotten seed platform, but left the supports. I figured I might add another platform in the future, but as soon as it was set back up, the birds started using the supports to perch on. Being so handy for the birds, they’ll be left as is.
Which is working out for me, too.
After refilling the new bird feeder, I need to hands to be able to put it back on the hook.
The supports are the perfect width and height to hold my scoop for me while I hang the feeder! LOL
Also, while doing my rounds, I couldn’t resist getting a picture of this clump of trees by the barn.
Along with the three types of garlic that came in, my daughters’ flower bulbs arrived.
The tulip collection included 10 bulbs each of Orca, Pinksize and Brownie, and 8 bulbs each of Black Hero, Pamplona and Vanilla Coup. There was also 6 bulbs of Gardenia Daffodil.
So while I was having fun working in the soft soil, planting garlic, the girls did the hard work of digging holes for bulbs in hard soil, and between roots!
They did not take pictures of the process, unfortunately.
The tulips were planted not far from where they’d planted the Bulls Eye tulips that came in earlier. This area was selected for its combination of sunlight and drainage, and because they’re not supposed to be watered, and this is not an area where they might accidentally get watered along with something else.
The tulips need to be planted up to 12 inches deep, if we want them coming back year after year, but that depth includes the depth of any mulch. So they planted the 50+ bulbs at 6 inches, adding a 6 inch leaf mulch. Leaves, however, crumble and settle quite a bit, plus the wind was threatening to blow it way, so they also wet down some peat, which we still have lots of, and added that to the top.
The Gardenia Daffodil had different requirements, so it was planted with the Eye of the Tiger irises planted along one side of the old kitchen garden.
When we are next able to, we’re thinking of picking up a couple of bags of soil to scatter on top of the mulch. The soil under the mulch in the old kitchen garden is much improved from before, but the straw itself, and even the grass clippings, aren’t breaking down very quickly, making it not at all conducive to planting in it. It’s all just too stringy! :-D And now there’s the excess flax straw from inside the cat shelter. Adding some soil and peat, as well as moisture, for the microbes and worms to do their stuff should help it break down faster.
We also got a couple other things off the to-do list today.
Now that the soil around the support post has had a few days to settle (and get stomped down some more, every now and then), our new bird feeder is now hung up. Hopefully, this less decorative design will not get flung around in the wind as much as the church and barn shaped ones were, and with the support now buried in the ground like a fence post, we don’t have to worry about it being knocked over any more!
I also had a chance to work on the grapes, while the girls were still digging holes for tulips.
The first thing that needed to be done was prune them. I hope I did it right. From what I’ve read, they should be pruned above the second bud from the ground, as grapes will be produced on first year vines. The problem was, I couldn’t see any buds at all! So I tried to err on the side of caution.
I had to move the trellis supports so I could get behind to harvest the grapes. Today, I finally set them into the ground in their new locations, so we can squeeze behind them again, if necessary. On the right is a long piece of rebar, but the white support on the left is actually two plastic tubes on a shorter piece of rebar. The bar wasn’t long enough to hold the trellis wire, but it is long enough to support the plastic tube. I had to lift off the piece that was woven into the wire mesh, then reset the position of the other two pieces.
When I set this up as a makeshift trellis, I was able to bang the rebar into the ground with a piece of broken brick I’d found while cleaning up around the storage house. I tried that again, but it broke. So I dug around in the sun room, among the things we’d found in there while cleaning it up. There was an old hammer with a ball peen on one side, and a heavy flat head on the other. Much heavier than a regular hammer. For the long piece of rebar, I had to stand on the stairs to reach the top and start hammering it in.
The head fell off the hammer.
It turned out the handle was rotted out at the head!
Thankfully, I still had the new handle I’d found while cleaning up the old basement. I’d intended it for something else, but it didn’t fit right, so I’d left it for later.
Now, I’m glad it didn’t fit the other thing I’d meant it for!
Mind you, it didn’t fit the head of this hammer, either, but I was able to shave the corners of the top, and got it on. I was able to finish the job!
After hammering the rebar supports into the ground and getting the plastic tube in the wire mesh back in place, I was able to use foam covered garden wires a darling friend found for me, to tie the pruned vines to the mesh. Then I used one of the bamboo poles that we’d used in the squash beds as a support for the top. With the grapes growing so well this past summer, I was able to see the weight of the vines were pulling the wire mesh downwards, so this should add some extra support.
Now, all they need is for some mulch to be added to protect them from the winter’s cold. From what I’ve found out about growing grapes in our zone is that they should be just fine with snow as insulation; the vine would be laid down on the ground to be covered. Planted against the storage house like this, that doesn’t really work out, so mulch it is!
We now have all the flower bulbs we ordered planted – 200 grape hyacinth, 100 snow crocuses, irises, gladiolas, and almost 70 tulips – plus the garlic.
That’s it for fall planting this year.
Now, we need to assess how our vegetable gardening went, and decide what we want to plant next year! :-)
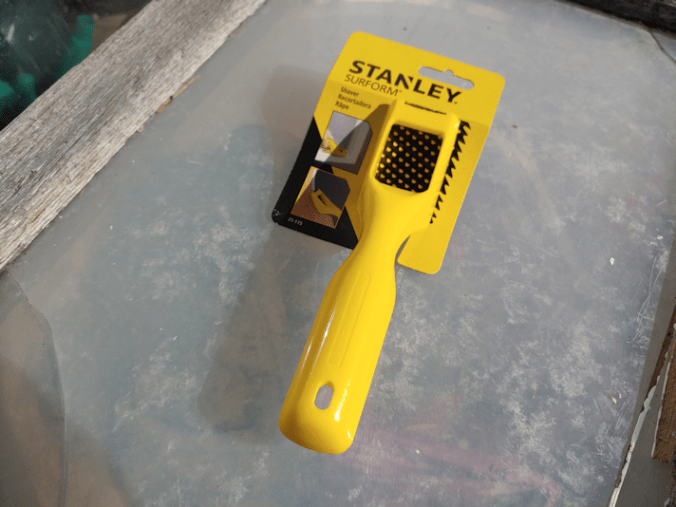
The first order of business was to test out my new tool on the sun room door frame.
I had gone into town to look at mini planers, but while perusing my options, I chose this tool, instead.
It’s a shaver. The shaving plate looks rather like a bada$$ Parmesan cheese grater. I figured the many cutting blades would make short work of the areas I needed to work on.
I was right. (For a change! LOL)
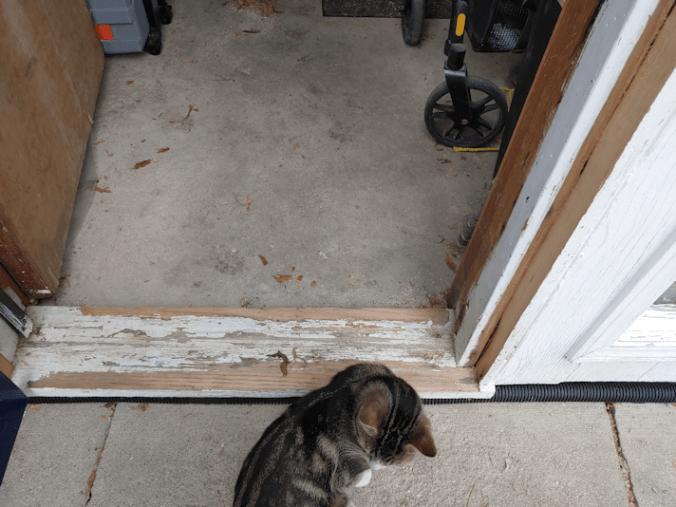
Using the blue paint marks from the door to show me exactly where I needed to shave off the wood – was well as smoothing my messy, messy cut somewhat – I did both the side of the door frame and the threshold.
What a fantastic little tool! The door can now close without catching anywhere on the frame or the threshold!
Then, because it worked so well, I did the threshold for the inner door, too. It now closes better, too.
The door is not quite done, yet. I’ve decided I need to take it off again, and move the hinges in about half an inch. Right now, when the door is closed, there is a lot of stress at the hinges, and I can actually see where parts of the door are starting to pull apart. This is a temporary fix with a salvaged door, but I’d like it to at least last the winter!
When we first set up the replacement door and attached it to the frame, we lined the hinges up on the door itself with the old door, then rehung it in the same recesses in the frame that the old door’s hinges were in.
With all the other problems that had to be dealt with, we still used the same spots, even after I filled the recesses with wood. Now that the door can actually close, I can see that the hinges are too far out, which basically forces the door to bend in order to close.
As I was thinking about this, and remembering the old door we were replacing, I am realizing what likely happened. When the sun room was built (which happened while we were living in another province), it likely had a different door. When that door was replaced with the door that was here when we moved in, the same recesses in the frame were used for the hinges. Remembering the problems we had to close that door before it finally fell apart, I am guessing that the house had already shifted and the frame was no longer straight, plus the door itself didn’t set the same way as the previous door, but whomever hung it didn’t bother doing anything to compensate for that. Over the years, my parents just put up with it. Meanwhile, the house would have continued to shift which would have made it worse, until it was in the condition it was in when we moved here.
If my guess is right, we hung this door up in the same location as the previous door, which was hung in the same location as the original door.
What I am now thinking of doing is taking the door off again, painting the frame, then hanging it back up with the hinges further in, rather than where the old door was hung.
Given the overnight temperatures, though, I will need to wait for a sunny, warmer day so the paint will have as much time to cure as possible before it starts dropping below freezing. Unfortunately, the long range forecasts are showing a steep drop in temperatures over the next few days, though it is supposed to flatten off after that.
For now, though, we have a working door!
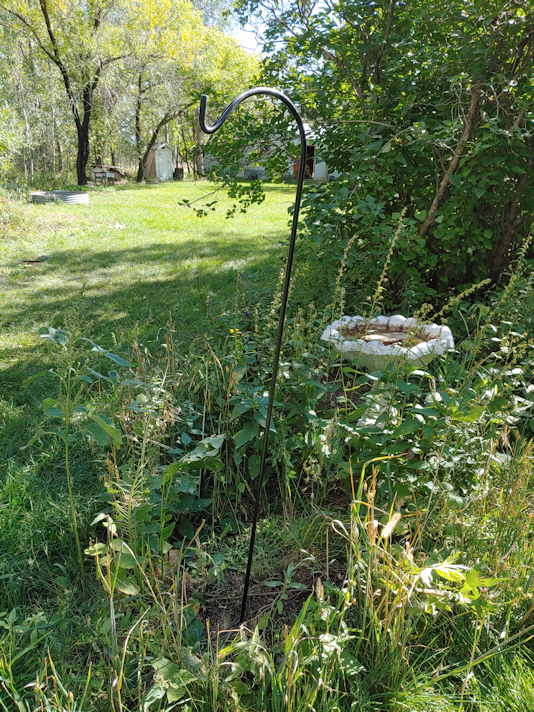
The next job on the list was setting up the newly painted bird feeder stand.
I decided to set it like a fence post, in the same spot as before. The new metal support we have the suet cage hanging from was set aside, and self-seeded flowers and bird seed plants cleared away. Much of it was already empty, though. I don’t know what cats were fighting in there, but they flattened everything around the bases of the bird bath and feeder!
I half considered trying out one of the old post hole diggers we found, but as I dug, I immediately started hitting rocks, so I’m glad I didn’t! The soil is a lot deeper here than in other areas; I just started to hit sandy soil when I stopped. Very different from the soil further away from the house.
The larger rocks I dug out went back in, to help support the post.
Finally, the soil was returned and stamped down. It will now be left for a few days to settle before I hang anything on the hook.
If you look closely at the suet feeder in the back, you can see a chickadee on it!
Chickadees were not my only audience!
The suet feeder was returned, with the hook facing the bird bath. I deliberately placed the other hook facing away from the bird bath, to reduce the number of seeds that end up in it. That’s not as much of a concern with a suet feeder, though my daughter pointed out that it’s a lot closer to something the cats use to drink out of! So it will likely be moved further away.
The chickadees were quick to return, and are already using the support bars from under the platform feeder as perches! This might actually be a better use for them than to add another platform later.
The hook is on the north side of the post, but the post itself is leaning slightly to the south. This was not intentional, but rather than straightening it, I decided to leave it. It should compensate a bit for any pull from the weight of a full bird feeder. That would be more of an issue with those surprisingly fierce winds from the south that kept blowing the whole thing over until we stopped hanging a feeder on it.
I’m rather pleased with how it looks. Plus, it’s set deep enough in the ground that I should be able to hang a feeder on it without needing to stand on something. Previously, I could tip the whole thing over to reach but, obviously, that is no longer an option!
The real test will be how it holds up the next time we have a storm, while a feeder is hanging off of it!
The kitties were happy to see me this morning! :-D
I did find the missing food container that had been in the entry to the cat house. It is, indeed, still in the cat house, but somehow got dragged well into the main space, in an area where I could only see if when the sun was shining through the window in the entry! LOL
I got one side of the bird feeder support painted.
Then it started to rain and I tucked it into the sun room. I’m not sure if I’ll be able to do the other side today.
While that was drying, I started to work on trimming the pieces from the sun room door frame so we can finally hand the replacement door straight. I measured how much space I had, taking into account space needed around the door itself. The piece across the top would be an easy one, but the side piece needs to have a half inch difference between the top and bottom.
I quickly discovered some problems.
I was looking forward to using the table saw for this, only to discover the blade isn’t large enough to cut through. It would only reach half the thickness of the wood. I went hunting in the basement and the garage and did find more blades, but none larger.
I figured I would use the circular saw, instead. I started with the short, top piece, but it’s only 2 1/2 inches wide. I had my daughter try to help by holding it steady on the saw horses, but we discovered that the circular saw couldn’t cut all the way through, either. ??? Well, there’s the reciprocating saw. The blade on that was more than long enough. Except we don’t have clamps large enough to hold the piece in place, and it vibrates so much, there was no way it could be held steady by hand.
Which left using a hand saw.
At which point I could really feel how hard the hardwood is! It took forever to saw the half-inch I needed to remove.
There is no way the side piece can be cut by hand. It’s just too awkward, it’s several times longer than the top piece, and the cut that needs to be made is a very gradual angle. I was able to use the chalk line to mark a guideline to follow, but it would be difficult enough using power tools, never mind by hand!
I might just have to go and pick up some larger clamps, so I can use the reciprocating saw. I was looking at circular saw blades while at the hardware store yesterday, and they had almost no inventory, so I can’t even just buy a larger blade for the table saw.
I’ll make that decision, tomorrow.
So we moved on to other things. Like deciding to use up all the carrots we harvested to make one giant pot of carrot soup.
With the beets, too, since there are so few of them.
As I write this, they are all being roasted in the oven, and the girls are working on the other preparations. We got about 6 pounds of carrots (and maybe half a pound of that is beets! LOL), so it’ll be a triple recipe. We’ve never made carrot soup before. It should be very interesting in appearance, with all the colours in there. The carrots includes purple, white, yellow, and orange, while the beets include red and white, deep red and gold. I figure we’ll get … purplish grey. LOL
The vegetables were all still on the metal mesh “door” in the old kitchen, which is about as cold as a refrigerator these days. Once they were trimmed and removed, I took the time to reinforce the metal mesh. Some of the staples were already popped out. :-(
I’d found some washers in the garage a while back, large enough to reinforce the mesh, but the holes in the washers were too large for wood screws. So I got some smaller washers that would hold the screws.
This is on the support bar across the middle, which had lost the most staples.
Doing the sides was a bit different. The mesh is slightly off center, so on one side, I had plenty of mesh to work with, while on the other…
… there was about half the amount to work with. It worked, though. The mesh feels very secure. Even if the staples somehow end up coming out, the mesh will stay in place. It is now strong enough to use as a soil or compost sifter, if we want.
For now, though, it’s tucked away until we need it next year. :-)
Now to go see how things are going with that carrot and beet soup…
We had a light frost last night, and have frost warnings for tonight, but today was a gorgeous day to get work done outside! We reached a high of 15C/59F, which is an ideal temperature, I find.
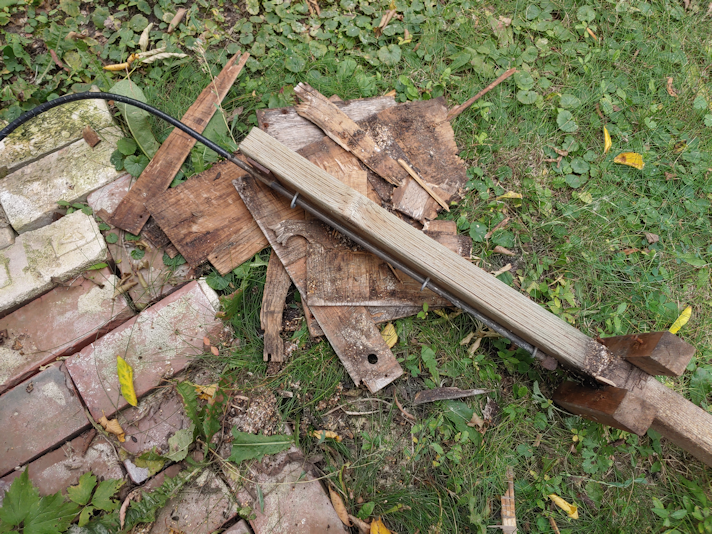
The first thing on the list was to work on the platform bird feeder. It has been just sitting off to the side for a couple of weeks now, so it’s about time!
The first thing to do was remove the “legs”. They’re not particularly stable, and showing rot where they touch the ground, so it was time for them to go.
There were a remarkable number of screws holding them in place!
There were 20 screws between 3 legs!!
You can see how they were starting to degrade.
Also, pieces of the platform feeder were just peeling right off!
That took a bit more effort to take off. I started to remove screws from the supports under it, but realized it is really solid, so I tightened them again and left it.
Then I had to find the screws holding the platform to the supports.
I found one I was able to remove. Another would not budge.
It was actually easier to just tear apart the platform with my hands.
I had to use pliers to loosen the remaining screws before I could take them out.
After that, I brushed and scraped away the old bird seed that had gotten jammed around the support post, the scrubbed again with water. Is was then set aside to dry in the sun.
Later, I will cut off the rotten end of the support post, and then I think we will paint it. This can definitely be salvaged. We just need to figure out how to securely set it in place. With a bird feeder hanging off the hook – or even just the cage of a suet feeder – the wind kept blowing it over. I also want to find a way to put on another platform. Maybe something not wood, to avoid the problem of rot that developed on the old one!
We’ll figure it out as we go. For now, we’ll see about getting it painted, first. :-)
The girls and I made our trip into the city. While I didn’t need anything myself, I did take advantage of the trip – and summer clearance prices.
While we had cleaned and painted the old wooden bird feeder and replaced it on its metal post, not a lot of birds are using it. I believe it’s just too crowded by the novelty lilac, next to it. I’ve seen some of the smaller birds around it, but the larger birds, such as the mourning doves, are still trying to find seed on the ground by the old platform feeder (where we stopped adding bird seed, since our supply filled the newly painted one).
If I could get that metal post out of the ground without having to dig, I’d transfer it to the other end, where the platform feeder and bird bath are. It seems the better location for it, plus we can see them from the living room. We can’t see the metal post set up from inside the house.
The platform on the platform feeder, however, is in really bad shape. So today, when I spotted supports for bird feeders or hanging baskets on clearance, I grabbed one.
I’ll… go back and straighten that out, later. :-D
It’s a lot shorter than the platform feeder. Perfect for short little me to reach!
The old one was constantly being blown over in the wind, until we stopped actually hanging a bird feeder on its hook. One of the hanging feeders hit the ground so often, it no longer holds together very well. The base wasn’t very stable and, as you can see, where it was touching the ground is rotting.
The platform is also a complete loss, but the hook itself, and the pressure treated 2×4, are just fine.
I am thinking of removing the rotted platform, the pieces on the bottom, and cutting off the rotten end. If I can figure out a way to make it more stable, it might be worth making a new platform and setting it up again. Having hanging feeders is good, but some types of birds prefer the platform to feed from. Plus, with two hangers, we can have the suet feeder out again, too.
We shall see.
Meanwhile I wanted to share a really terrible, zoomed in photo I took this morning, before we headed to the city… :-D
The kittens were playing on the steps at the other door! I had started to move their food bowl further from the junk pile, to encourage them to come closer to the house, but Butterscotch beat me to it. :-D
Ultimately, I’d like the kittens to start coming around to the south side of the house. I’ve started to place food bowls near the entrance to the old doghouse my brother brought for them to use in the winter. It would be great if the whole little family would just move into there. As this litter is so much younger than the other kittens, they are more at risk when the cold weather hits. There is enough room in there that all of the yard cats can fit in there and be nice and warm, just like they used to all pile up together on the swing bench in the sun room. Petty differences between the cats seemed to disappear when it came to staying warm!
It was very encouraging to see the kittens playing by the house. What an adventurous bunch they are! They were just loving those stairs. :-D