Analyzing our 2023 garden: melons, squash, gourds – plus the stuff I forgot! (updated)

Okay, I’m going to start with the eggplants, because I keep forgetting about them!

Last year, we grew the Little Finger variety of eggplants. Last year being our Terrible, No Good Growing Year, they never got to the size they would normally have been harvested at, but we did have little baby eggplants to try, and really enjoyed them. So they were worth growing again. I also picked up some Classic eggplant seeds to try.

This was not a good year for our eggplants.

I started the Little Finger seeds in the middle of March. The Classic eggplant seed packet, however, was mistakenly sorted in with the direct sowing seeds, and I didn’t find it and start them until the end of March.

We had trouble with both types, right from the start. With all the Little Finger seeds that were planted, only 3 germinated, so more were planted. It was even worse with the Classic eggplant, which also got replanted.

By the time they got transplanted, there were only 5 Little Finger eggplant.

They were transplanted in between the gourds by the chain link fence, with the tiniest two, which were really too small to be transplanted, but I did, anyhow, going into one planter block.

With the Classic eggplant, we had only one transplant, and it went into the wattle weave bed.

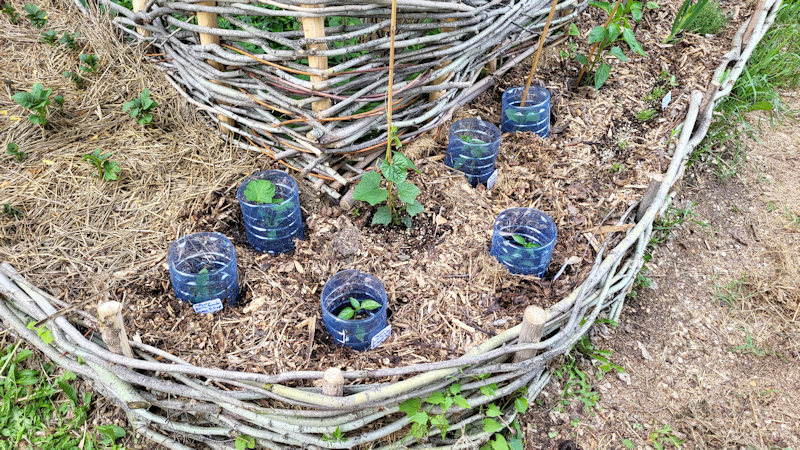
In the above photo, it’s just to the right of the luffa that doesn’t have a plastic ring around it anymore.

I really thought the Little Fingers would do well, where they were. They had plenty of space and lots of sunlight. Instead, they didn’t thrive at all. The one at the very end of the row, next to the people gate, did sort of grow, but mostly they just stagnated. They never even got large enough to start producing flower buds. In fact, nothing did well in those blocks at all.

The Classic eggplant, however, did surprisingly well. The plant grew quite large and robust and started to bloom and produce!

Everything this year seemed to be behind, though, so while these were a variety that should have been able to mature within our growing season, they never quite got there. We did have a long, mild fall, which helped, and when we did get an unexpected frost, that one plant handled it quite well, though we did cover it, along with the peppers, during other nights we thought might get frost.

This is how big they got before we finally harvested them, knowing they wouldn’t get a chance to grow any bigger before a killing frost was expected. Which means we did get a chance to taste test them, and were quite happy with them.

Final thoughts on eggplant

While the Little Finger were a completely failure this year, and we got only one Classic eggplant, we like them enough to grow both again.

Just not in the planter blocks by the chain link fence!

Eggplant is not something we buy often, mostly for budget or space reasons, but we do like them. Growing them ourselves will allow us to do more with them, too. In the future, we will probably try other varieties, but for next year, I think we’ll just stick to the two we still have seeds for.


Next up – the gourds.

We had a real problem starting gourd seeds this year. Many didn’t germinate at all, and I don’t know why. These included varieties we grew last year that had no problems germinating.

Luffa

This is the third year we tried growing luffa.

I started them much earlier this year, and at first, they seemed to do all right.

Then they started dying off, and I replanted, but the new seeds didn’t germinate. In the end, I had just one survive. The growing medium in the other pots got reused when potting up other things, but I could find no sign of seeds in them.

So that one surviving luffa got planted in the corner of wattle weave bed, where it could get good sunlight, and have the taller portion of wall, then the lilac bush, to climb.

Later on, however, some seedlings sprouted that looked an awful lot like luffa! So I planted them in the same bed.

How they did

This was the best year for growing luffa, yet!

Ideally, we’d be growing them in a polytunnel or greenhouse, because they need twice the growing season we’ve got, to reach full maturity. If we were just growing them as a summer squash for fresh eating, that would be fine, but I’m after the luffa sponges.

The two mystery plants did turn out to be luffa, but they were planted way too late to do well. That first transplant, though, grew so very well and was soon climbing high into the lilac bush where, hidden from view, we actually had several gourds start to develop!

Not all of them made it. In fact, only one did, really. We left it on the vine as long as we possibly could before harvesting it. As I write this, it’s currently curing over a heat vent in the living room. I keep forgetting it exists, so I haven’t tried to peel it and see if we got an actual mature luffa with usable sponge – and possibly seeds – inside.

Final thoughts on luffa

Luffa is one of my “just for fun” experimental plants, so I keep trying! We will eventually get some sort of polytunnel or greenhouse set up, which should make them easier to grow in our short season. I will keep trying to grow them for the challenge of it, but I think I will try seeds from other sources in the future.


Drum gourds, Caveman’s Club gourds, Zucca melon and Crespo Squash

We tried growing Zucca melon last year, but that bed was one of the ones that got flooded, so I wanted to try again. The African Drum gourds and Caveman’s club gourds were new ones to try. I want to grow gourds to use them for crafting. The first time we tried to grow Crespo squash, they did really well, even when recovering from being eaten repeatedly by groundhogs and deer. Both the Zucca melon and Crespo squash are experiments we are growing so we can at least try them and see if we enjoy eating them.

The drum gourds and Zucca melons were started indoors in early February.

The Crespo squash and Caveman’s club were started in the middle of March.

Though I made sure to scarify the seeds, when they germinated, there were problems with the seed leaves not being able to free themselves from the shells. We also had losses and germination issues, and had to replant the pretty much all of them.

The ones that did take, did well, though, and soon got quite huge!

Here you can see where I used a straw as a splint to protect a breaking stem. It started to break, just from moving the pots around to get good light, when they were still smaller and in the living room. Once we were taking them outside to harden them off, there was a much greater risk of damage. So some of them got transplanted earlier than I normally would have, given our last frost date.

One Zucca melon and one African Drum gourd went into the block planters, along with the two surviving Caveman’s Club. The Crespo squash got their own bed, well away from the other squash, in case we were able to save seeds, as they don’t seem to be available anymore.

The last of the Zucca melon and African Drum gourds went into a reworked bed near the squash patch.

At least, that’s what I thought.

As things started blooming and developing, it because clear that there were only Zucca melon. With restarting seeds and putting up, I must have mislabeled things, because the pots that were labelled African Drum gourd began producing fruit that could only be Zucca melon.

Which means the only African Drum gourd transplant we had, was the one planted along the chain link fence.

How they did

As you can see from the photos above, the drum gourd, Crespo squash and Zucca melon did start blooming.

What was grown in the blocks by the chain link fence did not do well at all.

The Crespo squash also did not like their location. I was expecting the huge, lush plants we got the first year we tried them. Instead, they were spindly vines, with many male flowers but almost no female flowers. What few did appear, I hand pollinated. We did get a few that started to grow, but by fall, there was just one to harvest, and it was much, much smaller than these are supposed to get.

With the Zucca melon, they also produced mostly male flowers, but they did start to eventually produce a good amount of female flowers. I hand pollinated those, too! While the plants themselves didn’t thrive, either, they did do better than the Crespo squash, or the ones at the chain link fence. They started to produce fuzzy fruit, which is how we could finally say that what we thought were Drum gourds were actually Zucca. Some of them even started to get pretty big, but in the end, they all ended up with blossom end rot and dying off!

Update:

I knew I was forgetting something!

The Caveman’s Club gourds did slightly better, though far from healthy plants. They bloomed and pollinated, and at the end of the season, we had two – sort of – little gourds. After picking them, one got all wizened and was tossed. The larger one is currently curing in our sun room. The cats keep trying to play with it!

Final thoughts

These were all really disappointing. Those transplants were looking so good when they went in, but none of them thrived!

With the Crespo squash, a bit of research leaves me to conclude that they actually got too much sunlight. Where they were planted gets full sun, all day – no shade at all in the summer. This will be the last year we use that patch for vegetables, though, and next year we will be planting something for the food forest there.

I still have seeds and do what to try them again, but in a different location, where they will be less likely to get sun burnt.

As for what was planted in the blocks, this was the first year those blocks were used as planted, and something is definitely going wrong. It shouldn’t be the soil. One possibility is that the regrown branches above are cutting out too much sunlight. Another is that the blocks themselves are creating a hydration problem. We will grow completely different plants in there, next year.

The Zucca melons near the squash patch, though… that’s where we grew Crespo for the first time, two years ago, and giant pumpkins last year. The soil had been reworked and had manure added to it. They should have done well, and yet they didn’t. I’m not sure why. Next year, we will use that spot to grow something different.

I do still want to try growing all of these again, plus other gourds that we have seeds for. We are working on building trellis beds, but these are all supposed to produce really massive fruit, so I will likely try them in low raised beds, instead. Whether or not we try them again next year, or pause them for a year, will depend on just how many of the various raised beds we need to build, progress.


Summer and Winter Squash

I’m putting these together, but there isn’t much to say about the summer squash!

We had seeds for the same varieties we grew last year; green zucchini, yellow zucchini, yellow patty pans and Magda squash are all seeds we got from a variety pack we accidentally bought 3 of, so we’ll have seeds for these for a long time! We like all of them, too. Then there was the G-star patty pan that we grew last year, and was one of the few things that produced, in spite of the flooding. We got those seeds sent to us by mistake. A happy mistake, as we quite like them, too.

As these are shorter season varieties that we only plan to eat when they are smaller, I was going to experiment with starting a few seeds indoors, and direct sowing others. In the end, we didn’t have the space to start more seeds indoors, so they got direct sown.

*sigh*

What a disaster.

Every red dot you see in the above photo marks a slug.

I’ve never seen so many slugs in my life – and we’ve lived in Victoria, BC, where the Banana slugs come out in herds, after a rainfall!

They absolutely devastated our sprouting summer squash. They did damage to the winter squash as well, but they seemed to leave the larger transplants alone more.

Ultimately, we did have a green zucchini, yellow zucchini and a yellow pattypan squash survive and actually produce some fruit. No Magda squash survived. The G-star, however, did surprisingly well; they didn’t seem to get hit by the slugs as badly, recovered very well, and had decent production.

There was the problem of only male flowers being produced, and when a female flower did finally show up, there were often no male flowers to pollinate them. So I ended up hand pollinating them with any male flowers I found on other summer squash plants.

We didn’t have a lot of summer squash to harvest, but there was at least some!

I think the biggest surprise was when they got hit by frost, but when we got more mild temperatures again, they started to recover and continue to produce!

Then there was the winter squash.

As with so many other things we started indoors, we had a really hard time with germination. Some squash and melons simply did not germinate at all, or when they finally did, the seedlings quickly died. In the above photo, you can see what was left to transplant. Just two Lady Godiva hulless seed pumpkins (we started 3 varieties of hulless seed pumpkins), two Winter Sweet (they were among those we tried last year that got flooded out), and two Boston Marrow (another from last year that got flooded). The Little Gem/Red Kuri are something we’ve grown for a couple of years now, and quite like, but this is the first time we’ve tried growing them without a trellis of some time.

More of the Honeyboat Delicata survived. This is a new variety for us, and is a variety of Delicata that is supposed to be good for storage. We’d tried Candy Roaster last year, too, but they, too, got flooded. The Pink Banana was a new one for this year.

The empty mounds got summer squash planted in them, plus another row was prepared for the rest of the summer squash, on the left of the photo.

The thing with winter squash, of course, is that there’s nothing to harvest until the end of the season!

What a difference between the plants, though.

How they did

The Pink Banana and the North Georgia Candy Roasters did excellent! I didn’t think they would, because their two rows were planted in an area that gets a lot more shade. The other winter squash were planted in rows that got much more sun, yet they were the ones that failed to thrive! Going back to what I learned in trying to figure out what happened to the Crespo squash, it looks like they actually got too much sun, while the rows that got shade for much of the day got just enough! Lesson learned!

We still managed to get small harvests out of some of the sun burnt squash. We did get to try both the Banana and Candy Roaster squash and found them delicious.

Final thoughts on summer and winter squash

When it comes to summer squash, these will remain a staple in our garden. We just have to find a way to deal with all the slugs!! We will try other varieties as we’re able – there are a few patty pan varieties I want to try, but what we have now are basic and we will keep growing them. Especially the G-Star. They seem to really thrive here, even under really horrible conditions!

With winter squash, we are still very much in the experimental stage in learning what what grows well here, and what we like. The Red Kuri/Little Gem squash are a winner – though they definitely need better growing conditions than what they got this year! The Pink Banana and Candy Roasters are both ones well worth growing again. I don’t know that we’ll bother with the hulless seed pumpkins again, though. I seem to be the only one that likes pumpkin seeds in the family! As for the other varieties of winter squash, we will try them again in different growing conditions. With the tiny fruit we got this year, we can’t really say if we like them or not, as they would not have developed their full flavour.

Next year, we will not be growing squash again in this location. They need to be rotated out. The trellis tunnel that will be built into the new mid-height raised beds we are working on will be strong enough to hold the weight of these climbing varieties, so hopefully, that’s where we’ll be planting them next year.

The Surprise Squash

We got some unexpected squash, too!

In our compost ring!

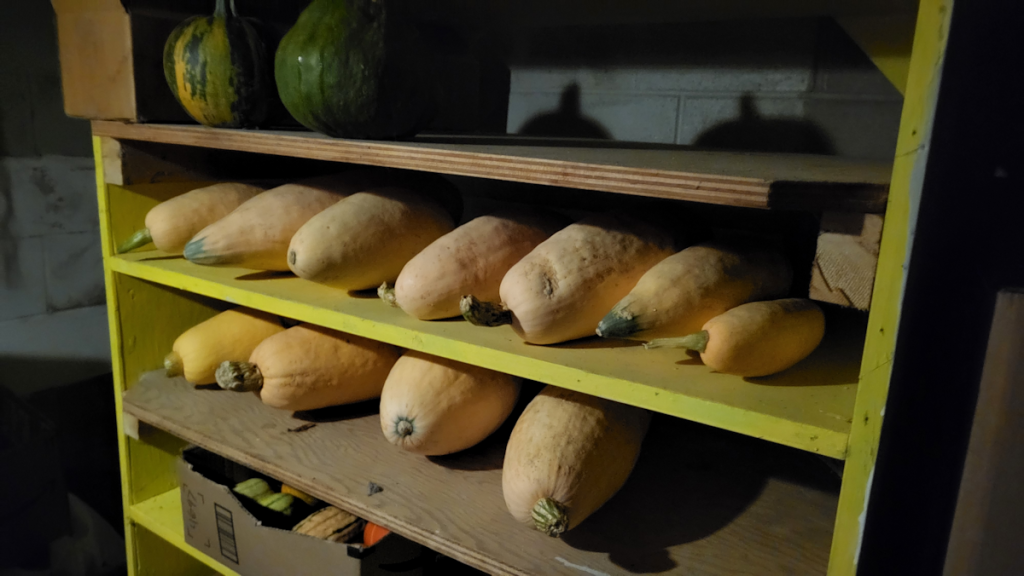
They were the biggest, healthiest squash of all! 😄 Unfortunately, we don’t really know what they are. Some looked like hulless seed pumpkins. Some looked like they might have been from some hybrid zucchini we were gifted with. We harvested them, but have yet to actually try any of them. If you look at the photo of squash in our root cellar, the two big green ones at the top are from the compost heap! Whatever they are, they are likely hybrids, or even hybrids of hybrids! 😄

We also got surprise beans in here. I left them to go to seed, and have no idea where they came from. We’ve never grown beans like those before!

It should be interesting to see what volunteers we get in our compost, next year. 😁


Melons

We were so eager to do melons again!

Two years ago, in spite of a drought, we successfully grew two types of melons, Halona and Pixie, and were looking forward to growing even more, last year.

Yeah. They were in beds that got flooded.

Total and complete loss.

This year, we hoped to be able to grow quite a bit more. We started the seeds indoors in early May.

This year, we tried the Halona and Pixie melons again, plus Sarah’s Choice, a new variety. We also tried Cream of Saskatchewan watermelon. The watermelon we tried the previous year – a short season variety, too – was among the losses.

The water melon was a loss this year, too! Zero germination. Bizarre!

The others struggled to start, too. In the end, we had only two Sarah’s Choice, and a couple of Pixia and Halona, each, none of which looked particularly strong.

These were intended to go into the new trellis bed, but that didn’t get built, so we got creative.

We have a kiddie pool we’ve been using for all sorts of things, from washing cat blankets outdoors, to harvesting potatoes out of bags into, to sifting soil into, to use elsewhere.

I made holes in the bottom and turned it into a raised bed, because the few melons we had really needed to get transplanted!

How they did

They did remarkably well! So well, we had to add more supports to the top of the makeshift trellis.

As with the winter squash, these just needed tending until the end of the season. They developed many flowers and we saw lots of little melons forming.

Unfortunately, like so many other things, they started blooming late. We did get a couple of larger melons that were fully mature, but most of them never had a chance to get to that point, even with our exceptionally long and mild fall.

This was our final harvest of all the melons, and you can see we did get some decently large ones!

The smaller ones, however, very quickly started to rot, so we didn’t get very many to eat.

Final thoughts on melons

We will continue to try and grow melons, because we really like them, but they tend to be too expensive to buy regularly. As we build more raised beds, and the trellis tunnels we are planning, we should have better growing environments for them over time.

The Halona and Pixie melons are varieties we know can grow here, so we will probably stick to those two.

We will try the watermelon again. I don’t know why they didn’t germinate; I don’t think the problem was with the seeds. It’s a short season variety developed in Saskatchewan, so it should grow here fine. I might even try direct sowing them instead of starting them indoors, to see if that makes a difference.

We will also try other varieties over time until we eventually settle on something we all really like, and can save seeds from. There are many short season varieties we can choose from!


Poppies

I almost completely forgot about these!

I really want to grow non-ornamental poppies. My mother used to grow them on the old kitchen garden, when I was a kid, and we had enough that my late brother and I would eat the seeds straight out of the dry pods, and my mother could still make filling for makowiec.

We had two varieties of bread seed poppies; one we’ve grown before, and one that is new to us. Previously, we’d grown Giant Rattle poppies, but where we grew them ended up getting highly compacted, was full of weeds, and they did not thrive, though we did get fully mature pods out of them. The other variety we got was Hungarian Blue.

As poppies reseed themselves easily, I wanted to make sure they were planted somewhere where they could be treated as a perennial, plus I also wanted to make sure the two varieties were planted well away from each other, so as not to cross pollinate.

We only got one in.

We had an area by the chain link fence where we’d first grown potatoes in bags. After the potatoes were harvested, the soil was returned to where the bags had been sitting to create a new bed. Last year, we unsuccessfully tried to grow white strawberries there. For this year, it got a thorough weeding, and then Hungarian Blue poppies were planted in it.

How they did.

At first, I thought for sure we wouldn’t get any at all. For all my efforts to remove weed roots, that’s what we got the most of. Eventually, however, poppies started to show up! Yes, some even got to fully mature, with dried pods developing.

We also had some self seeded poppies show up with the shallots. These were transplanted in a new raised bed built over where we’d grown Giant Rattle poppies before, so I thought they’d reseeded themselves and let them be. They turned out to be a variety that predates our living here! Still a bread seed poppy, so I collected seeds from those in the fall.

Final thoughts on poppies

With edible poppies available as seeds again (for a while, they were not available, because they are the source of opium), I want these to be a staple again. I don’t know what happened to the variety my mother used to grow – the ones that have come up on their own are different from the ones I remember. I’ve even found poppy seeds while cleaning up the place, but it seems my mother switched to ornamental poppies at some point. There’s no what to know what kind the seeds I’ve found are without planting them, and with how old they probably are, it’s unlikely they will germinate.

The bed where the Hungarian Blue were planted will need to be completely reworked, with the soil sifted to get out more weed roots. Then, they will be replanted there. Once the poppies themselves are established, they will choke out any weeds, themselves. Until then, we’ll have to battle the weeds for them. The soil also got quite compacted, which affected their growth as well., so we will have to amends it more.

As for the other varieties, we still need to find locations where we can plant them, and then just leave them to self seed. There are a few areas I can think of, but it will take time to take out grass and weeds and amend the soil before we can plant them.


Well, this one turned out much longer than intended! This is the last of what we grew, though.

Next time, I’ll be looking at what we intended to grow, but it just didn’t happen!

The Re-Farmer

Analyzing our 2023 garden: four kinds of tomatoes

Last year, we grew tomatoes that were processed into tomato paste, rather than sauce. Cooking them down to a paste took many hours, and we filled a case of 125ml jars that got used up nice and fast! So this was something we were quite interested in doing again.

The variety of paste tomatoes we grew – Sophie’s Choice – was chosen partly because it was a rare variety. Yes, we saved seeds. The flavour was a bit on the bland side, so we wanted to try something different this year. So for paste tomatoes, we chose Roma VF.

We also wanted to have tomatoes that were good for fresh eating. I’m the only one in the family that can’t do fresh tomatoes. For these, we went a completely different direction and chose black tomatoes. Indigo Blue Chocolates for an indeterminate variety, and Black Beauty for a determinate variety.

Then, because they did so well a couple of years ago, I went ahead and got more Spoon tomato seeds. We did have a few seeds left, but when I saw the price per packet, and the number of seeds in them, drop to reasonable levels again, I ordered some.

Since then, I’ve started to see people and seed companies talking about Spoon tomatoes, so these miniscule tomatoes seemed to have found a following! These are also the only tomatoes that I can eat fresh, without gagging.

With wanting to have plenty of tomatoes to process into pastes and sauces, the original plan was to grow quite a lot of them. The first seeds we started indoors were the Indigo Blue Chocolate and Black Beauty, in March.

The black beauty sure started sprouting fast!

Towards the end of March, we had space in a tray and planted the Spoon tomatoes.

By this time, we had built the cat barrier, which allowed us to set trays on shelves, at least temporarily, and not have to worry about them getting destroyed.

We had a very high germination rate, which meant that when it was time to pot them up, we needed a lot of space!

With the red solo cups, they were first potted up with the soil only half way up. Once they grew big enough to need “potting up” again, we simply added more toil to the top of the cups, burying the stems so they could form more roots.

With our new indoor set up, we were able to start quite a lot of things indoors, but none thrived as well as the tomatoes! Not only did we have a very high germination rate, but we had almost no losses as they were potted up!

Eventually, when things were warm enough, the seedlings were transferred to the sun room, and then hardened off outside, before transplanting into the garden.

We soon found ourselves with a problem.

We were not able to get enough garden beds ready, before all those seedlings needed to be transplanted! The tomatoes got much bigger, faster, than we were ready for.

In the end, we got them into three of our long, low raised beds in the main garden area. One bed was filled with the Roma VF, with only a border of onions around them. We wanted to make sure to have the most of those, for processing later.

With the other two, they were each planted in a single row in the beds they were in, filling the beds half way, length wise, so that the other half could be used for the root vegetables we would plant later and, of course, room for the onions planted as a border around them.

That left the Spoon tomatoes, and at that point, I really didn’t know where to put them. In the end, I stuck a few of them into the retaining wall blocks in the Old Kitchen garden.

There wasn’t a lot of free space for them, but we got a half dozen in. Later on, a last Jiffy Pellet that had Spoon tomatoes in it finally germinated, so I stuck it at the end of the retaining wall, with a tomato plant that had broken in the wind.

That still left us with large numbers of tomato seedlings of all varieties – and nowhere to plant them!

I did find someone we could give a bunch of them to, but there were far more than they needed. In the end, I got permission to leave them outside the general store and post office for our little hamlet, with signs saying what they were, and recommending that seeds be saved. We had lots of peppers to give away, too!

I’m happy to say, they were all taken. I hope they grew well for people!

With the tomato beds, we were able to wind a soaker hose and sprinkler hoses throughout the beds so that they could be watered from below, which did free up quite a bit of time! I could just hook up the hose and go do something else, for most of the beds.

As for how ours did, I’ll talk about each variety.

The first that we were able to start harvesting from were the Roma VF. While they did start out rather well, they did get hit with tomato blight, and we ended up harvesting all the tomatoes, then pulling the plants for burning, rather than composting.

If you go through the Instagram slideshow of photos, you’ll see we were also able to harvest some Indigo Blue and Black Beauty tomatoes, too.

Both varieties of black tomatoes took a long time to ripen. Because of their colour, it was really hard to tell when they were ready to pick! Both were supposed to get a red blush on their bottoms, but ultimately, we had to go by the squeeze test to see if they were ready.

Indigo Blue Chocolate tomatoes

The Indigo Blue started to ripen first. These are a smaller tomato which, unfortunately, did have a tendency to split rather quickly, once they ripened. They have a nice, smooth shape to them, and their colours are lovely.

The Black Beauties, on the other hand, took a lot longer to ripen. They got so huge, so fast, and then… nothing. We kept checking them and they were rock hard for the longest time. They also had a tendency to split, more than the Indigo Blues did. Then, when we could finally pick some, their uneven shapes made them harder to work with. As for the flavour, my family was unimpressed. They did not live up to their descriptions on the website.

Then there were the Spoon tomatoes!

Where they were planted was not an ideal spot at all. It’s shaded by one of the ornamental apple trees, on the south corner. While they did grow quite tall on their bamboo stake supports, they did not get as lush and healthy as they did the first time we grew them, against the chain link fence. They were transplanted a bit late, too, so they took longer to ripen than before. As a result, we didn’t get a lot of them, relatively speaking, but there were certainly enough to snack on while we were out and about in the yard.

At the end of the season, when we got hit by our first frost, we harvested all the tomatoes left (except the Spoon tomatoes; we left them alone), bringing in the ripest ones, then spreading the greenest ones out on screens under the market tent to ripen.

Here, you can see the last of the Black Beauty and Indigo Blue Chocolate tomatoes set out in the sun, before they got transferred to screens.

We were able to process a sink full of Roma VF tomatoes into sauce for the freezer.

Those are already gone!

We had too many other things going on, though, and ended up freezing a lot of the tomatoes whole, to either cook as they are, process into more sauce, or into tomato paste. These can wait until slower, winter days.

The frustrating thing was all the left over, slowly ripening tomatoes. We just didn’t have the space to store them and keep them handy. Last year, we had a bin full in the dining room that the family snacked out of regularly, We weren’t able to do that this year. The end result was that many tomatoes started going bad before they could be eaten. Ultimately, way too many of them ended up in the compost heap, simply because they were forgotten.

Surprise tomatoes!

The last two years, we grew tomatoes in a bed along the chain link fence. This year, we grew other tings in there, but several self seeded tomatoes showed up, too!

I decided to transplant them into the empty bed the Irish Cobbler potatoes had been in.

It was September 8 when I transplanted them, and our average first frost date is September 10, so there was no way they’d have time to mature, but I figured I’d give them a chance! They did actually start to bloom. Even when the first mild frosts did, they were protected by the plastic rings I’d put around them and survived.

Final Thoughts on Tomatoes

As far as starting the seeds goes, they did amazingly well! I’m still blown away by the almost 100% germination rate. The transplants did really well, and I’m glad we were able to give the last ones away. Once they were in the ground, they all did mostly good, but I think our growing conditions and soil issues prevented them from doing as well as they should have.

Roma VF

As these ended up being harvested early due to tomato blight, I don’t know that they reached their full flavour potential. The family enjoyed them, but didn’t find the flavour exceptional. The tomato sauce we made was good but, again, the tomato flavour was nothing to write home about. We will try a different variety of paste tomato, next year.

Black Beauty

These are a pretty tomato, for sure, but they took so much longer to ripen, and had a real problem with splitting easily. My family was unimpressed with the flavour, and didn’t like working with the lumpy, bumpy shapes. I’m glad we tried them, but we will not be growing them again.

Indigo Blue Chocolate

These went over much better. They’re a smaller tomato, but still adequate for slicing and using in sandwiches. My husband likes to just eat the tomatoes with some salt, and quite enjoyed these that way. They were nicely productive, too. We will be growing these again.

Spoon

For all the set backs these had, they did surprisingly well. They’re also just a really fun tomato. I look forward to growing them again, just for the fun of them. Plus, they are the only ones I can actually eat, and it’s fun to have these tiny little tomatoes to snack on while working in the garden. Plus, being a rarer variety, I like the idea of keeping them going.

The challenge is going to be having enough space to grow the amount of tomatoes we would need for our long term goals. At some point, we want to be able to can and freeze sauces and pastes sufficient to last a year – basically, from harvest to harvest. For that, we’ll need to grow more tomatoes, which means we need to have more space to grow them in.

Which means we need to get our butts in gear to have enough raised beds for everything we want to grow. Even the low raised beds we have now, which have been amended for several years, will need to be made at least a little higher, with more amending.

All in good time. Little by little, it’ll get done!

The Re-Farmer

Analyzing our 2023 garden: root vegetables

Our root vegetables this year were a mix of successes and failures!

First up, the successes.

Potatoes

We had three varieties of potatoes this year. We chose the varieties based on things like their storability, and their resistance to disease, as well as their flavour profiles. One time, the Purple Peruvian Fingerlings, were a potato we’d grown a couple of years ago and quite enjoyed. The other two were new to us: Irish Cobbler, a white potato, and Red Thumb Fingerling, a potato with both red skin and red flesh.

The original plan had been to plant them all in grow bags this year. We’d tried the Ruth Stout method last year, and both beds got flooded out, and there was very little left to harvest. We were going to repurpose old bird seed and deer feed bags for this. We have stopped buying both – we just can’t afford it anymore, with how much cat kibble we’re buying now – so it turned out we didn’t have enough for all three varieties.

This required a change in plans and, that early in the season, there were only a few places we could plant potatoes directly into the soil. So, the red and white potatoes went into low raised beds in the Old Kitchen garden.

The red potatoes went into the long, thin bed next to the retaining wall block, which got redone this spring, and when I ran out of room, into the short end of the L shaped wattle weave bed.

You can see how the Old Kitchen Garden beds the potatoes were planted into progressed over the years in this video.

The Purple Peruvians went into the grow bags.

So, how did the potatoes do this year?

Pretty darn good.

We harvested baby potatoes from the Old Kitchen Garden only a couple of times, since we didn’t really have a lot of any variety. The Irish Cobbler were the first to be ready to harvest, then the Red Thumb.

The Purple Peruvians, on the other hand, took an incredibly long time to mature, and did not get harvested until mid October. I’ve been going through my files to find photos of them – they were our biggest harvest – but it turns seems that by the time I was done harvesting them, it was too dark for photos!

As I write this, we have finished off our Irish Cobbler potatoes, but still have Red Thumb and Purple Peruvian Fingerling potatoes in storage.

Final thoughts on potatoes

I would consider all three varieties a success, this year. Especially the Purple Peruvians.

The smallest harvest we got was the Irish Cobblers. They were also the earliest maturing variety. They did seem to have issues with scab, however. They tasted good, however, and were a good potato for a variety of preparation methods.

The Red Thumb did quite well, and were also tasty. When cooked, they practically mashed themselves, so not a good variety if we wanted to do a hash or in a soup or stew. Having pink mashed potatoes as a side for Thanksgiving dinner was rather fun!

The Purple Peruvians seemed to take a lot longer to mature compared to the first year we grew them, with robust plants right up until the frost hit them. They are nicely prolific. The only “down” side is one of aesthetics. They do bleed their colour quite a bit, leaving fingers purple can changing the colour of any soups or stews they are cooked in!

When it comes to growing potatoes for our general needs and use, we will need to grow a lot more, but we are still figuring out what varieties we want to grow. As much as we like the Purple Peruvians and Red Thumb potatoes, I think we might want to move away from fingerling potatoes in general, other than perhaps as a side crop. Their smaller sizes and, in the case of the Purple Peruvians, uneven shapes, make them harder to handle, clean and peel. In the future, I think we will try varieties that have more even shapes and larger sizes, as well as being good for long term storage.

One last surprise

As I mentioned, we grew potatoes last year using the Ruth Stout, deep mulch method. Not only did the potato patches get flooded out, but they also got hit with slugs quite badly.

It seems, however, that we missed a few potatoes when we harvested them, and they showed up this year!

One of them, from the All Blue patch, got quite large and began producing seeds!

I didn’t try digging up the potatoes in the fall, but I did collect the seed balls. I haven’t tried opening any yet. From what I’ve read, these can be opened and the seeds inside processed much like tomato seeds. Seeds from potatoes will not be clones, as they are when the tubers are planted. I believe there are some rare exceptions, but the seeds each typically produce a new variety, like apple seeds do. I think that if we planted them, we’d still get something similar to the All Blue potato they came from, but the only way to find that out is to plant them and find out! I’ve read that, in the first year, potatoes planted from seed will only produce a single potato that can then be planted like any other potato and produce clones of itself. I don’t know if we’ll be able to experiment with this next year. It will depend on how much space we have. Still, I’d like to try it!

Carrots

We has several varieties of carrot seeds this year, and I’d intended to plant more. In the end, we only had space to plant two.

One variety was new to us; the orange Naval carrot. With those ones, we tried something else new: making seed tape.

The other variety was the Uzbek Golden carrot. We’d grown them last year and, while they did not get a chance to reach their full potential, it being such a bad growing year overall, we did enjoy them. This year, they did even better!

With these ones, we harvested them throughout the summer, as needed, then harvested the last of them after we had our first frosts.

Uzbek Golden Carrots, Gold Ball turnips, a couple of radishes and some onions that got missed.

There was some slug damage, and a few of them split, but overall they did very well.

These carrots are lightly sweet, crispy and delicious. They were a great carrot to eat raw, and also held up to cooking very well. This is definitely a variety we would enjoy growing again. I would like to find a Canadian supplier of seeds, though. It’s getting too expensive to order seeds in from the US.

As for the Naval carrots, we planted devoted an entire bed to them.

I definitely liked how the seed tape worked out. We planted an entire package of seeds, didn’t need to thin any of them, and got a very high germination rate.

We didn’t harvest many of them through the summer, though. Instead, we left them in the ground to try out a different method of storing them for the winter: in ground and under a heavy mulch. The idea is to be able to harvest fresh carrots during the winter.

This is our first “winter” harvest.

The carrots were noticeably smaller at one end of the bed, likely because that end gets less light, so that’s the end I harvested these from. Under the thick mulch, the ground was cold and did have ice shards in some places, but the ground was workable and the carrots could be dug out fairly easily. They were wonderfully crisp and fresh and very tasty! The ultimate test for this method of storage is yet to come, as winter isn’t even officially here yet, and things have still been pretty mild, compared to how our winters usually tend to be.

Final thoughts on carrots

I do wish we’d had the space to plant more varieties, but I’m happy with what we did plant. Both varieties are tasty. If I have anything to complain about, I’d say it’s that they are a bit harder to pull, as their greens come off easily. These need to be dug loose, first. I’d be doing that anyhow, so that’s not really an issue. These are definite winners.

Now for the losers. Mostly.

Turnips and Beets

This year, we planted varieties of turnips and beets we have tried before.

Last year, we got Gold Ball turnips as a freebie with a seed order. We tried growing them, but something ate the seed leaves as fast as they came up. So, we bought more seeds to try them again.

For the beets, we planted a variety called Merlin.

There were planted in the same bed, next to the Indigo Blue tomatoes, and bordered with yellow onions. I hoped that the onions would help deter any critters or insects that would want to eat the turnip and beet greens.

The turnips did seem to do rather well. They got quite leafy, enough though something was most definitely eating them. The leaves were filled with holes.

While we did harvest a few larger turnips, ultimately, they never reached their full potential. You can see in the photo with the Uzbek carrots above, how few there were, that were worth harvesting, by the end of the season. All bug eaten greens, almost no turnips. I think they tasted okay, but they probably didn’t taste the same as they would have, if they’d reached their full potential.

In the photo above, you can see where we planted the Uzbek Golden carrots, sharing a bed with the Black Beauty Tomato transplants in the foreground. The carrot seeds are covered by boards to protect them until they sprouted. In the bed on the left of the photo, the half on the lower left got the turnips, while the half on the upper left got the beets. You can see the labels marking where they are in there. (The white boards on either side of the tomatoes are there to protect the new transplants from high winds.)

The beets barely came up at all.

The first year we grew beets, they did rather well, but pretty much every time we’ve planted them since, they’ve been doing worse and worse. This year was, to be honest, pathetic.

In the case of this bed, however, I think there was something odd about the soil. Even the turnips grew stronger and healthier on the south end of the bed, but by the middle of the bed, they were smaller and sicklier. Then there were a few little beet seedlings that started to emerge, but by the north end of the bed, there was nothing. No germination at all. Even the tomato plants at that end seemed to be smaller and less healthy looking.

The entire bed got the same amount of sunlight and water. This was one of the beds that had a sprinkler hose wound throughout. The problem could be in the soil itself, but after harvesting the grow bags at the end of the season, I think the problem may actually be that row of self seeded trees my mother allowed to stay. She’d had a row of raspberries there and, after transplanting the raspberries, she left the saplings to grow to be a wind break. In trying to clean up around there, I can see that attempts have been made to remove these trees in the past, and they’ve just grown back. It’s a mix of maple and Chinese elm, which means they are not only taking up space that used to be productive garden space, but are spreading seeds. Those Chinese elm seeds are the worst, and have been causing all sorts of problems. However, when working on the soil in these beds, pulling up roots and amending it, we find a lot of roots at the north ends of them. The bottoms of many of the grow bags the peppers were in were absolutely crowded out by tree roots that had grown in from below. Because of how these trees growing, I suspect that it’s the Chinese elm roots that are depleting spreading the most and winning the competition for nutrients.

Final thoughts on turnips and beets

We’ve had such poor results growing turnips and beets, I don’t know that we will try to grow them again, until we can plant them in higher raised beds. The one area we’ve grown beets in semi successfully, was in the East yard, near the spruce grove. When we cleared out where the old wood pile used to be, we found the best and softest soil of all under there. While my daughters have enjoyed what beets we’ve managed to grow in the past, with the Merlin variety being a favourite of theirs, I honestly don’t know if we like any of the turnips. I’ve selected turnips to grow as a good storage crop for food security, but it’s not much good for that, if we don’t actually like eating them. With the small turnips we’ve managed to harvest so far, we’re not getting their full flavour.

Which means we will likely skip trying to grow turnips and beets again for at least a couple of years. Once we have more, and more established, raised beds, we can try again.

Extras: more beets, plus radishes

After we harvested the garlic, we had an empty bed suitable for a fall crop. In it, we decided to plant spinach, beet and radishes.

We planted the Cherry Belle radishes, Lakeside spinach and Bresko beets.

I’ll cover spinach in another post, but in this bed, they started to germinate, then promptly disappeared. A couple of seedlings did survive, but didn’t grow much at all. The beets barely germinated, and what did germinate, soon disappeared. Only the radishes grew, and while we got decent looking plants, and a couple that shot up and started to bloom, there were almost no radishes worth harvesting. While I think insects or slugs got the beets and spinach, I suspect it was the nearby trees that did in the radishes.

Only one of us in our household actually likes radishes, however I’ve been curious to try radish pods. So far, we’ve never had radishes get to the point of producing any! Even though these ones were planted so late (my daughter that likes them ended up house sitting for a month, so she wasn’t here to eat what few we got!), the ones that started blooming are the furthest along we’ve had them grow.

As with the beets and turnips, I think radishes are something that we won’t grow again for a while. They do produce very quickly, if eating the roots is what we’re after, so we might tuck them in between other things as a sort of ground cover, but that’s about it. I do still want to grow some for their pods to try. Perhaps we’ll have an empty corner in a higher raised bed to tuck a few seeds in, and just let them be until the end of the season. That will be a last minute decision, depending on what space we have to work with, next year.

Which means that, for root vegetables, we’re basically down to potatoes and carrots!

Well. I guess that’ll make things easier to plan out next year! 😄

The Re-Farmer

Analyzing our 2023 garden: fall garlic, perennials and food forest items

Okay, let’s get into our longer term planting!

First, the garlic, which was planted in the fall of 2022.

We planted garlic in one low raised bed, starting with cloves we’d saved from the one successful bed of garlic planted the previous year.

First, we had to reclaim and prepare the bed from the summer’s crop. Of our saved garlic, we got only 24 big cloves out of the six bulbs we kept! We then bought more garlic locally, rather than ordering it in, this time trying a soft neck garlic for the first time.

So how did they turn out in the summer?

Apparently, not good enough to warrant getting pictures of the bed as it grew. At least not any I uploaded into my dwindling WordPress media storage.

We seemed to have lost quite a few to the winter cold. I’d say we had almost a 40% loss on our saved garlic, which was hit the hardest. Interestingly, it was the soft neck garlic that did the best, as far as survival. We harvested all the scapes from both the hard neck varieties well before soft neck variety produced scapes. All produced decent, if not particularly large, bulbs at harvest time. As I write this, we still have some left to use for cooking. We did not save any for replanting. We just didn’t have enough to make it worthwhile.

Final thoughts on garlic.

We seem to have a problem with losing our garlic to the cold over the winter. For this fall’s planting, we got just one variety. They were all planted in the Old Kitchen garden, closer to the house. We made efforts to plant them more in the middle of the beds, as the outer edges of raised beds will freeze faster. That resulted in the 3 pounds of garlic we ordered being spread out over 4 raised beds. They also got a deep mulch. This winter should be a mild one, though, so the risk of loss due to cold will be reduced, too.

Also, we need to plant a lot more garlic. That one bed, even if we hadn’t lost as many as we did, was not enough to meet our usage needs. We could easily plant two or three times as many garlic. This fall, we planted 3 pounds of seed garlic, and while it’s more than what we planted last year, more would never be a bad thing!

Raspberries

This spring, we planted three Royalty Raspberry plants.

We do have raspberries here that my mother has been growing for decades, descended from plants I used to pick from as a child. They are almost a wild variety. For our food forest, we want to include different varieties that mature at different times of the year. We’d purchased a red variety of raspberries a couple of years ago, but the deer kept eating them. They are protected now, but are not recovering well. So when these purple raspberries were planted, in an area we’d planted peas and beans in previous years, we made sure they were protected from deer.

They did rather well, too. These were supposed to be first year canes, so it was a surprise when we saw them starting to bloom. Yes, they actually produced fruit!

No new canes that would produce fruit next year emerged, though. Which means that when they died back after fruiting… well, it looks like they’ve just died.

I keep forgetting to contact Veseys about them.

[Edit: I have since remembered to contact them, and have been told this is normal, and they should start growing in the spring.]

Final thoughts of raspberries

We all love raspberries. This was actually a pretty good year for them, and the old raspberry bushes produced quite well. Especially since we cut away the crab apple tree that suddenly died of a fungal disease last year. It had been shading the patch quite a lot. This year, that end of the patch got a lot more sun, and they clearly thrived.

As for the purple Royalty raspberries, we did get enough to taste, and do like them. We will look to replacing the dead ones, while also planning to get a gold variety, plus another red variety. The long term goal is to have lots of raspberries from June through to August.

Our first apple tree

We have plenty of crab apple trees, most of which are dying of a fungal disease, so we have to be really careful about getting new apples. This spring, we got our first eating apple tree; a Liberty apple. It’s actually a zone 4 variety, so we needed to also give thought on where to plant it. It needed to get the full warmth of the sun, while also being sheltered from the cold winds. In winter, it will need extra protection to keep it from freezing.

For this, we chose an area in the west yard, closer to the house. There are ornamental crab apples nearby for cross pollination. We’ve got tulips planted here, which need protecting from the deer, with dead and dying trees that needed clearing away. So that all got taken care of, and the apple tree was planted closer to a hedge of lilacs for extra protection from the elements, while still getting that full sun.

We also got a pair of mulberry trees that are rated to zone 3. When we ordered one tree from Veseys, they did not have the size available for 2023, so we got two smaller ones, instead. They were so tiny, we ended up not transplanting them. Instead, they got potted up and kept indoors. As I write this, they are much, much larger, and their leaves have turned yellow and are dropping for the winter. If all goes well, they will come out of dormancy in the spring, we’ll harden them off and plant them in our food forest area when we are past our last frost date, in June, next year.

Final thoughts on apples (and mulberries)

Finding apples that are good for fresh eating, that are also hardy to our zone, is a challenge, but they are out there. So why did we get a variety that’s zone 4?

I’m a sucker for punishment?

The variety had qualities we were looking for, from flavour to storability. Hopefully, it will work out, and acclimate to our winters over time.

When it comes to apples, one tree should produce enough for a family, but they also often need another variety for cross pollination. So we might pick up one more variety of apple in the near future. What we really need to watch out for, though, is that fungal disease that’s killing off our crab apples. I’ve been researching about it, and there’s nothing we can do about it. Once it’s in the soil, it doesn’t go away. So if an area is badly infected, like where the row of crab apples are now, we would not be able to plant apples there again and expect healthy trees. Yes, there are ways to treat the tree, but it’s not really an option for us right now.

As for the mulberry trees, I’m pretty excited about those. I’ve never had mulberry before, but my mother remembers they had a huge mulberry tree behind their barn, when she was a child in Poland. As a food tree, they are known to be productive to the point of nuisance, so they will be planted well away from the house. There’s a gap in the lilac hedge on the north side of the property that needs to be filled in. That would be a good place to transplant these. Eventually, they should grow into towering shade trees, so we need to make sure they’re not going to cause problems for other things we want to plant around there.

Last minute addition: saffron crocus!

This year, I was really excited to find out Veseys got a Canadian supplier for saffron crocuses, acclimated to zone 4! So we took a chance and ordered some.

These were planted in a trench in the fenced off area about the tulips and the Liberty apple tree this fall. For the winter, they got a deep mulch to protect them. If they survive, they can be expected to produce flowers with harvestable stamens in the fall of 2024, and each year, they can potentially triple as they expand.

If they survive!

Of course, every year, they will acclimate more to our climate zone, too.

Final thoughts on saffron crocuses

We don’t really use a lot of saffron, so if even a few survive to produce next year, that will be enough for our needs. Long term, if they do well, who knows. We might eventually have enough saffron to be worth selling at the local markets or something. If not… well, it was worth a try!

Recovering Strawberries and Asparagus

Last year, our purple asparagus bed was flooded out. It didn’t really affect the strawberries that were interplanted with them, but the asparagus crowns were buried 2 ft deep. I wasn’t sure any survived. In the end, we did get some asparagus plants growing, but they have been set back, at least a year. This should have been the first year we could harvest any, but that just wasn’t going to happen.

As for the strawberries, they recovered quite nicely after the winter and were soon producing.

We even got a few small crops.

Then the deer got to them.

We ended up rigging up protection around the bed, and the strawberries did recover. In fact, they began producing again, quite late in the season, because of the deer damage, and were still trying to produce, right up until the first frost hit them!

Final thoughts on strawberries and asparagus

We planted a purple variety of asparagus, and the plan had been to plant a green variety the next year, and to keep adding more every year until we had enough for our family to enjoy regularly. Well, that didn’t happen. The challenge is, asparagus is a 20 year commitment. We have to find places to plant them that will not be used for anything else for 20 years, because I sure don’t want to be transplanting them in the future. Since we’re still struggling to clear up certain areas, we just don’t have the space that can be used that way.

After last year’s flooding, we now have an idea of where the more susceptible areas are that we either have to avoid, or where we’d have to make a bed raised high enough that flooding won’t be an issue.

So, yes, we do still intend to increase our asparagus beds, with both green and purple varieties. It’s just been delayed. As for the asparagus we have right now, I’m hoping they recovered enough that they will do better next year. I don’t expect we’ll have enough to harvest next year, though. Maybe in 2025.

Asparagus is definitely a long term planning sort of thing!

As for the strawberries, these were purchased transplants that were interplanted with the asparagus because I’d read they do well together. Over time, however, I am now thinking to get more strawberries to interplant around the food forest area, as a sort of ground cover, rather than having dedicated beds to just strawberries.

Strawberries from seed

Now we move on to an impulse purchase that did surprisingly well. I got a kit to grow strawberries from seed. It was marketed for kids, but strawberries are strawberries, and we just can’t get enough strawberries in this household!

What started out as this…

… became this.

Yes, we actually got a few mature strawberries!

These got transplanted in the wattle weave bed along with some herbs, peppers, eggplant and luffa. Eventually, the Old Kitchen garden will be mostly an herb garden. I honestly didn’t know if they’d make it, or if they’d produce this year at all, they were so tiny.

The kit did not say what variety the strawberries were and, from the looks of the berries, they seem to be a type of wild strawberry. We only got maybe 4 or 5 ripe berries to try, and they were tasty, but not as tasty as the variety that were bought as transplants.

Final thoughts on strawberries from seed

Since this was a spur of the moment experiment, my expectations were not high, so it doesn’t mean much to say they exceeded expectations! Once transplanted, they did really well. I don’t think I’ll grow strawberries from seed again, though. The ones purchased as transplants were more productive (even after the deer got to them) and much tastier. We’ll see if these survive the winter. They are mulched, but they were planted along the edge of the bed, so are still susceptible to freezing. For all I know, they will produce larger berries once firmly established. We shall see.

Sunchokes

I kept forgetting about the Sunchokes, aka: Jerusalem Artichokes, this year! They are in a permanent bed next to the asparagus, and this is their second year. Last year, we’d planted 10 tubers in two rows. In the fall, I harvested half the bed, replanted 5 of the largest tubers, leaving the other half of the bed untouched. The sunchokes came up quite well from both halves. They grew nice and tall and…

That’s it.

Like last year, they never boomed. I never even saw any buds forming.

This was all we harvested last year.

I was going to harvest some this fall but, in the end, I just left them. We should have more to harvest, next fall. Instead, we cut the stalks and lay them down on the bed and covered them with a grass clipping mulch. As Sunchokes are native to Canada, they probably don’t need a mulch at all, but it won’t hurt.

There are people on some of the local gardening groups on Facebook I’m part of that also grow sunchokes. I saw several people talking about how they’ve been growing them for years, and they have never bloomed, wondering what they were doing wrong. Some old time gardeners have said theirs have never boomed, either, but they still get a good harvest every year. At least I know it’s not just here!

Final thought on Sunchokes

So, obviously, I don’t have much to say about the for this year, since we skipped harvesting them. When we did try them, we liked them, so I do want to let them grow and multiply, so that we can have larger harvests. After learning that other people in our zone that have grown them for years and never had them bloom, I guess that means we don’t have to transplant them somewhere else or something. We can just leave them were they are. Hopefully, next fall, we’ll be able to get a good harvest out of them.

Everything else

This is a follow up on the things we planted the year before.

We planted a bundle of 5 sea buckthorn. Two survived. They are still surviving and growing bigger. Eventually, we will get more to add to the privacy hedge. If all goes well, we’ll have at least one male sea buckthorn, and will eventually get berries.

We planted two highbush cranberry. Last year, the deer ate one of them, it recovered, and they at it again. I put an old saw horse of that one to protect it as it recovered again. This year, it was growing well, as was the other one, which is still unprotected. Amazingly, towards the end of the season, the one with the saw horse over it to protect it got eaten again! Given how late in the season this happened, I don’t know if it will recover.

Deer chewed Highbush Cranberry.

We planted 30 silver buffalo berry in two curving rows, to eventually act as a privacy screen. It looks like we’ve lost 2 of them, possibly 3. One, I expected, as I’d accidentally pulled it up last year while weeding, but one or two may have died before fall, too. Some of them are getting pretty big, while others are still quite small. With last spring’s flooding, one end of the rows was completely underwater, and they handled it just fine. It will be a few years, yet, before they get large enough to start producing berries.

We had planted 6 Korean pine in the outer yard. We have 4 survivors. This year, they were still quite tiny, and are still covered in their chicken wire cages for protection.

From what I’ve read, they grow very slowly for the first 5 years, then start to really shoot up, and eventually become very large trees. We got 3 yr old seedlings, which means this was year 5 for them. We shall see if they get their first growth spurt next year!

Final thoughts on our food forest.

Our long term goal is to have as many perennial food plants as we can manage. Fruits, nuts, berries, tubers, whatever. We’ve got a good start on it, and hope to add more to it every year. For some things, like the sea buckthorn and silver buffalo berry, these are multipurpose plantings. They should be prolific enough – eventually – to provide winter food for the birds, while the bushes themselves will be privacy screens and living fences. The far flung areas we’d planted corn, beans, squash, etc. last year were done to help prepare and amend the soil for permanent planting, and this year, only one small area was used to grow squash in. Next year, we hope to plant a fruit tree or something in that spot.

We are trying to be very selective on what we plant and where. We need to leave lanes open, wide enough to drive through, to be able to get at fences, etc. There is also the lane we will keep open because there is a telephone line buried under it. That means we need to consider root systems, as well, when locations are decided on.

The one thing we planted out there this year – the Royalty raspberries – appears to ultimately be a failure, since they produced this year, instead of next year, and died back. So very little progress was made in that area this year. We do have some black currant bushes that I am thinking of transplanting out there. They are closer to the house, but under trees. They bloom in the spring, but have almost no berries. They simply don’t get enough sunlight.

Over time, we will keep adding more to the area, as the budget allows. Pears, plums and gooseberries are on the list, and I’m seriously considering transplanting our haskap bushes. The “male” haskap, which is supposed to be the right variety to cross pollinate the two “female” varieties, is done blooming before the two other even start. I think they’re just planted in a bad spot. Too many tree roots, and too many of those perennial flowers that my mother planted there. Even though I’ve cleared them away from around the haskaps, they get so big, they still cover the bushes – and the haskaps are supposed to get big enough that it shouldn’t be an issue! We shall see.

The experiments.

Last year, there were two things we planted that, while annuals, could be treated as perennials, because they self seed so easily. Wonderberry and Aunt Molly Ground Cherries. With those, I let them drop fruit to see if they would come back this year.

They did not.

We might still get some ground cherries in the future, but they were much more fragile a plant than I expected. They broke easily, as I reached under to find and pick ripe berries, and the patch itself got flattened by wind and had to be supported. If I do plant them in the future, I’d want to have some sort of supports for them, and I don’t know if they’re worth the extra effort!

That is where we are at now, with our fall plantings and perennials. Not a lot of progress there, this year, unfortunately. When it comes to perennials – especially trees – it can take years before they start producing, so delays in progress add years, rather than months, to having food production! At least things like berries produce faster and fill the time gap a bit.

Little by little, it’ll get done!

The Re-Farmer

Analyzing our 2023 garden: the best laid plans!

Since moving out here, our gardening plans have changed a few times. Our original 5 year plan had us starting to garden around year 5, after focusing on cleaning and clearing first the inner yard in the first two years, then the outer yard over the next 2 or 3 years, before eventually moving beyond the outer yard, which is rented out.

It’s now been 6 years. The inner yard – specifically the spruce grove – is still not cleared and cleaned up. We had to start on parts of the outer yard earlier. Some things had to be dropped completely.

Gardening, however, started early, and I’m glad it did. We started off with a couple of reclaimed patches of ground. Each year, the garden beds were expanded and we grew more things.

Until this year.

All the best laid plans, indeed! We ended up with a garden perhaps half the size of the previous year.

Early in 2023, though, we still thought we’d be able to do a larger garden. Many seeds were purchased, and orders were placed for things that would be delivered in time for spring planting. Here is a video I did, going through our seeds – old and new – and starting our onions and luffa.

Even in April, I still thought we’d be able to meet most of our goals, and was able to get started preparing a couple of low raised beds.

I also did a spring garden tour in April, where I talked about our plans.

Among the things that changed was the shed we were supposed to get, that would have been fixed up to be a chicken coop. The person that had the shed to get rid of ended up throwing it away. It did not survive the winter.

Getting the dead trees to build more raised beds didn’t work out as planned. Slowly over the summer, we did get wood harvested, but felling dead spruces resulted in trees getting hung up and stuck on other trees.

That was just the beginning of plans that fell through.

All was not a loss, though. For what we did manage to get, there were some successes and failures, as there are every year, and that’s what I’ll be going through in this series of blog posts analyzing our 2023 garden. With what we’ve learned in the past few years, we should be able to make adjustments and do better next year.

The Re-Farmer

Golden morning, and our 2023 garden

Yes, I still have garden stuff to post about! On October 20!

I have no errands to run today, so doing my morning rounds was more relaxed. And gorgeous!

We had another night with thick fog that was still hanging around, while a bright, golden sunrise shone through. Truly stunning!

Not quite enough to make me a morning person, but I can still appreciate it. 😄

With how mild the temperatures have been, the frost hardy carrots, onions and radishes are still being left to be harvested as needed. Well. Not the radishes. We’ve got the two that are happily blooming, and I want to see how far along they get before winter hits. I don’t expect to have harvestable pods in time, but you never know!

The old kitchen garden has only the chamomile and thyme (the thyme is doing very well!) growing, plus the strawberries we grew from seed.

Amazingly, there are not only strawberries ripening, but they are still blooming! They’re just tiny little things. I have no idea if that’s the variety, or if it’s because it’s their first year after being started from seed. The kit they came in did not have a variety name that I can recall.

Then there’s the luffa…

The smaller one that was hanging up near the top of the lilacs was getting pretty sad looking, so I went ahead and picked it. Definitely not developed enough, but I’ve set it aside in the sun room to dry. I’ll crack it open later to see how it looks inside. The larger one is still resting on the branch I set it on, so it wouldn’t get bashed around in high winds. The vine might be long dead, but that one is still looking very green, so I’m leaving it for now.

I’m hoping to get more work done in the garden today. Things are really damp right now, and we’re looking at the possibility of rain. I’d like to finish cutting that tree to size and dragged it out of the spruce grove for the second trellis bed. If it’s too wet to use the electric chain saw, there’s plenty of other work that needs to be done to prepare the garden beds for winter.

With all the crazy distractions we’ve had for the past month or so, I’m really appreciating how mild our fall has been, and that being able to get work done in the garden is an option at all, never mind trying to catch up on all the stuff that’s been delayed, time and again. That there is still stuff growing and blooming is absolutely amazing! I really like strong El Niño years! It may mean more snow, but the temperatures tend to be milder. Both are a huge bonus for our area.

In other things, we set our battery charger up on the truck overnight, since I had no idea when we’d be doing any longer drives that would do it for us. When we moved here we found a battery charger in the garage, but our own will stop charging when it’s full, making it safer to leave overnight. So that is taken care of. As much as I’d like to be driving the truck as much as possible, now that we have it, I don’t have the time or gas budget to waste on unnecessary trips. We’ll be doing plenty of driving at the end of the month, when it’s time to do our stock up shopping.

I’m so looking forward to being able to do full trips again! Especially with the Costco shopping, and all those bags of cat food we can now fit in there. While looking over the truck when I first brought it home, my daughters suggested we keep some sort of hook to help reach things at the far end of the box, without having to crawl all the way in. My brother keeps a garden hoe for that. Something similar, but with a narrow hook that can fit into the small handles on the ends of our hard sided bags, for example, would be better. A long handled version of the metal hooks we used to drag hay bales around, back in the day, would be perfect. I should look in the barn and the sheds and see if there’s anything we could repurpose. In the van and my mother’s car, we could get away with using the spare canes with pistol grip handles we keep in there, but those are too short to use in the truck box.

What a nice problem to have. 😊

The Re-Farmer

Presto, Change-o!

A while back, I had written about my unsuccessful hunt for a pressure canner. There were none to be had; the only place I found that had one in stock, it was way beyond our budget.

Then we were generously gifted with a pressure canner! There were even spare parts, including two pressure gauges. It had been tested before being sent; all we needed to do was get the gauges tested, and we were good to go!

Easy peasy, right?

Of course not. :-D

For you folks in the US, you can take your gauges in to the extension office for their annual testing.

Canada doesn’t have extension offices. That didn’t concern me, since I figured we had some sort of equivalent. I promptly started searching for where the gauges could be taking in for testing.

The only results I got were from the US, saying to go to your extension office. Or, send them to the manufacturer for testing.

Hmmm.

After a while, I turned to a local Facebook group specifically about what to do with your garden produce. Cooking, canning, freezing, dehydrating… all of it. I saw lots of people posting about canning, so I was sure someone would have an answer for me.

Well… not quite.

When I couldn’t find a pressure canner anywhere, locally, I had figured it was for the same reason lots of people were having a hard time finding canning jars or water bath canning supplies; the supply was far less than the sudden demand and everything was selling out very quickly.

Now I think it’s for a different reason.

Apparently, pressure canning isn’t much of a thing here in Canada.

Of the hundreds of people in this very active group, I got two people who even had pressure canners respond. One of them hadn’t used her canner in years, and the other mentioned a place she used to take them to, but they don’t test gauges anymore, so they both wanted to know, too!

I did have a couple of suggestions. One person gave me the info for a company that calibrated precision tools that she thought might be willing to do it. Another suggested I try one of the university science departments.

Given the response, I began thinking that skipping the dial gauge completely might be a better idea. So I started looking and found the weighted regulators on the Presto website. There is no dial, but they never need to be tested.

The model number for this pressure canner was not on the list of those it would work with.

Hmmm.

After another post on the group was made about getting weighted regulators and where to find them (please: don’t buy them from Amazon!!!), I went back to the Presto website last night and sent an email explaining what I needed, asking about testing the gauges, or if they had a weighted regulator appropriate for our model.

This afternoon, I got a response. It turns out they have a kit available; this model needs to have the steam vent replaced in order for the weighted gauge to work, so the kit includes the vent, 3 part regulator and an instruction booklet, all for only US$15, plus shipping.

There was also a toll free number included, with the offer to help place the order.

Of course, I called them as soon as I could!

The woman I spoke to found the email response I got, which had all the information she needed. As she was going through the process of placing an order for me, she suddenly said, oh! These are free for Canadians, because no one tests gauges in Canada.

!!!

She put me on hold to confirm, then we placed the order. I’m basically just paying for the new vent; the weighted regulator on its own cost US$12. Newer pressure canners don’t need the vent replaced for the weighted regulator to work.

It might take a while to get here, but as long as it gets here before fall, I’m happy!

Of course, I went to the group and passed on the info, so others with pressure canners would know they wouldn’t be able to find a place to test their dial gauges in Canada.

Which just blows me away! I know canning, in general, was seeing an increase in popularity for at least a decade, as more and more people were turning to self sufficiency and being “green”. I’ve never known anyone who used a pressure canner, but that doesn’t mean much. If pressure canning, with precision parts that require annual testing, is so uncommon in Canada that no one does the testing, it would explain why I found so few Canadian resources in all my searches. Finding Canadian resources online tends to be rarer in general, so I didn’t think too much of it at the time.

So very strange!

No matter. The parts are on the way. Presto, Change-O, and we’ll be able to safely can our low-acid produce this fall!

The Re-Farmer