Every year, I used to make new decorations for our Christmas tree, and to share with family. We had a multi-year hiatus for a number of reasons, including moving here, but I’ve started the tradition up again.
Each year, I try to do something different, hopefully learn a new skill, and use materials at hand. This year, I started with…
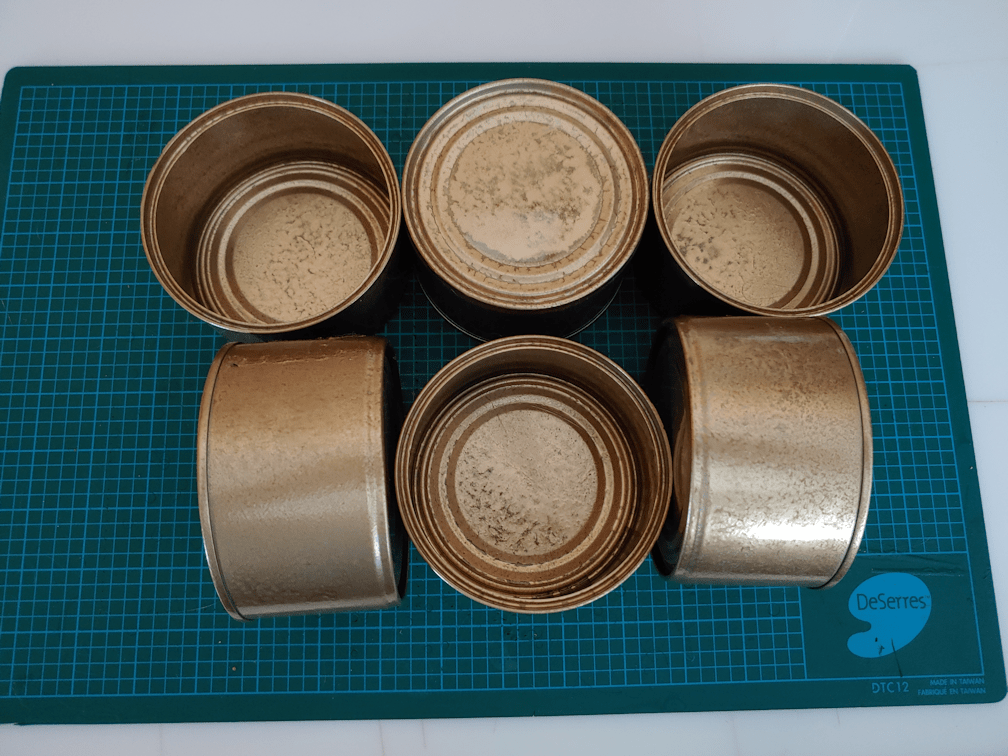
… cans.
Specifically, the cans from Costco’s canned chicken. I liked their size.
My daughter was kind enough to spray paint them gold for me, which took several days and several layers. Paint doesn’t like to cure when it’s cold, and she ended up having to do it in the old basement – forgetting that the furnace is there. :-D The paint didn’t want to adhere to the metal very well, but once it set, it was good.
Those were turned into…
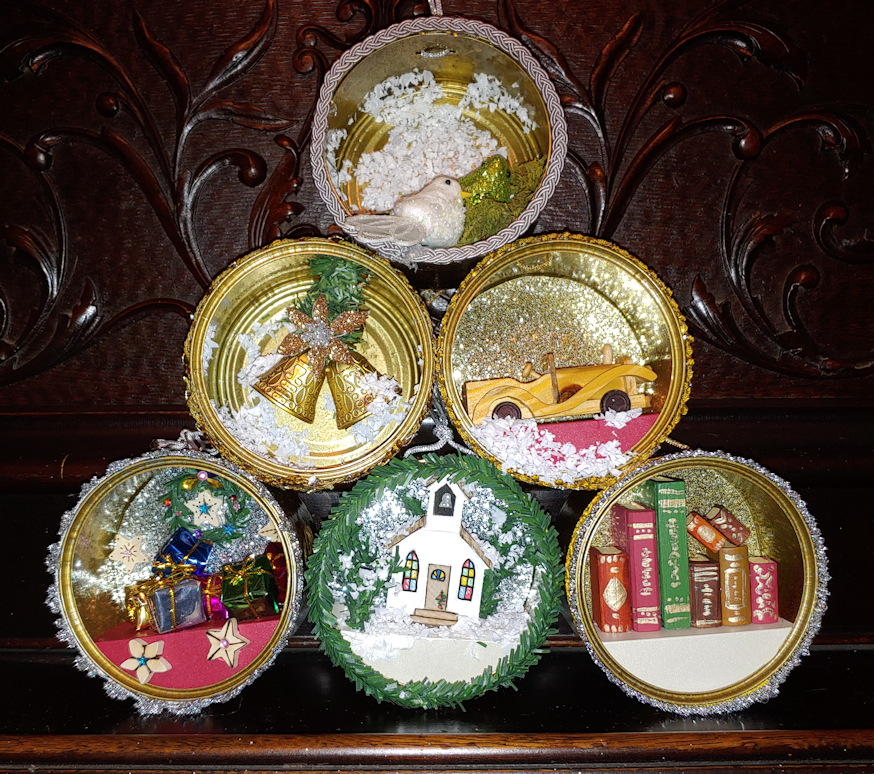
… these.
Most of the materials used were from a dollar store. I tried to find really tiny Christmas trees but ended up getting some floral wire made to look like sprigs. I cut and twisted some together to make little trees, two of which are behind the little church. The ribbon, birds, gifts, bells, glitter paper, wooden stars and fake snow were also from the dollar store. I already had metallic card stock that I used to create platforms, as well as the other wooden pieces. A family member gifted me with a storage box fill of little wooden pieces, years ago, and I finally got to use some!
I did some wood burning on the starts and the church. My daughter painted the church and the books. I just love how the books look!
You can see in the flash picture that she used metallic gold on the books. She also used some metallic paint for details on the church. When I tried to find things small enough for the wreath behind the gifts, she dug around and find some teeny, tiny “gem” shapes she had saved from somewhere. I ended up using several different types of adhesives I happened to have, to hold everything in place. As long as they did the job and dried clear, I wasn’t too fussy!
These are too large to hang on our little Christmas tree, but they will be perfect to add to the lights and garlands we have running across the dining room cabinets at the ceiling.
With having to wait for paint to cure and some adhesives to dry, this took a lot longer than I originally expected. The most difficult part was cutting holes into the metal, then threading cord through for the hangers. I couldn’t be sure where to place the holes until after the insides were done. The church steeple was particularly awkward! Craft tweezers came in very handy! The bells needed their own hole, and I had to figure out how to hang those, and ended up using a piece of the tree-sprig floral wire, then using an extra wide ribbon to edge it, to make sure the part that’s on top was well secured.
Oh, my goodness, what a difference having that new chainsaw made!
But before I could break it in, I needed to drag down the stuck tree, so I could use the wood in the high raised bed. Thanks to my husband very securely attaching the hooks I got to the rope I got – rope rated to 450 pounds – it was a simple matter to use the van to pull it out.
My goodness, where those top branches ever entangled! When I started pulling it, it didn’t fall, but stayed stuck until I got far enough that the tree was no longer dragging on the ground, but lifting up. At which point, it rolled up and got dragged over the compost ring, then finally it broke free from the branches and dropped.
Right on the cherry trees we are intending to cut away, so there’s no loss there!
After replacing a large divot of sod that got dragged out, I then used the baby chain saw to start cutting away the branches, and cutting away the top of the tree.
Then it got rolled onto the compost ring, so the rest of the branches could be trimmed off.
Finally, it was time to break out the new chainsaw!
Of course, I took the time to read the manual, first, then added chainsaw oil to the reservoir.
Then I measured out and cut a pair of nine foot lengths from the tree trunk.
The bucksaw does a great job, but the chainsaw did in mere seconds what would have taken me probably 5, maybe even 10, minutes, per cut, by hand!
Then, while I dragged the logs over to the high raised bed, I helped a daughter move the rest of the tree trunk aside, so they could set up the wood chipper. They cleaned up all the dead branches from the tree, as well as the little cherry trees we’d cut away to access the last tree we’d cut down.
They spent more time prepping the branches to fit the chipper and shredder, than actually doing the chipping and shredding! Unfortunately, the little spruce branches were so twisted, they ended up clogging the shredder chute to the point that my daughter had to take it off to unclog it. Once that was cleared up, they did a few celebratory shreds before heading inside to start on supper.
Meanwhile…
I started working on the high raised bed by first taking it apart! I cut away the notches in the base logs so that the cross pieces would sit lower, and no longer have that gap that was there before. I also was able to clean up the cuts and make adjustments, as needed.
The new nine foot lengths were thicker than I thought, so after I put the bottom cross pieces back, I used the new logs for the next level.
I ended up not needing to cut notches in them at all. Instead, I was able to just adjust and cut the notches in the next level of cross pieces to fit.
It was SO much faster and easier to cut the notches with the chain saw! Pretty much every notch we’d cut before needed modification.
I used smaller, thinner, logs at the top, which turned out to be a pain. These are from higher in the tree, which meant they were not as straight, and had more little branch stubs all over. I ended up having to trim logs along their lengths to get rid of lumpy bits, so things would sit against each other better.
Then I went and cut two more four foot lengths to do the last cross pieces.
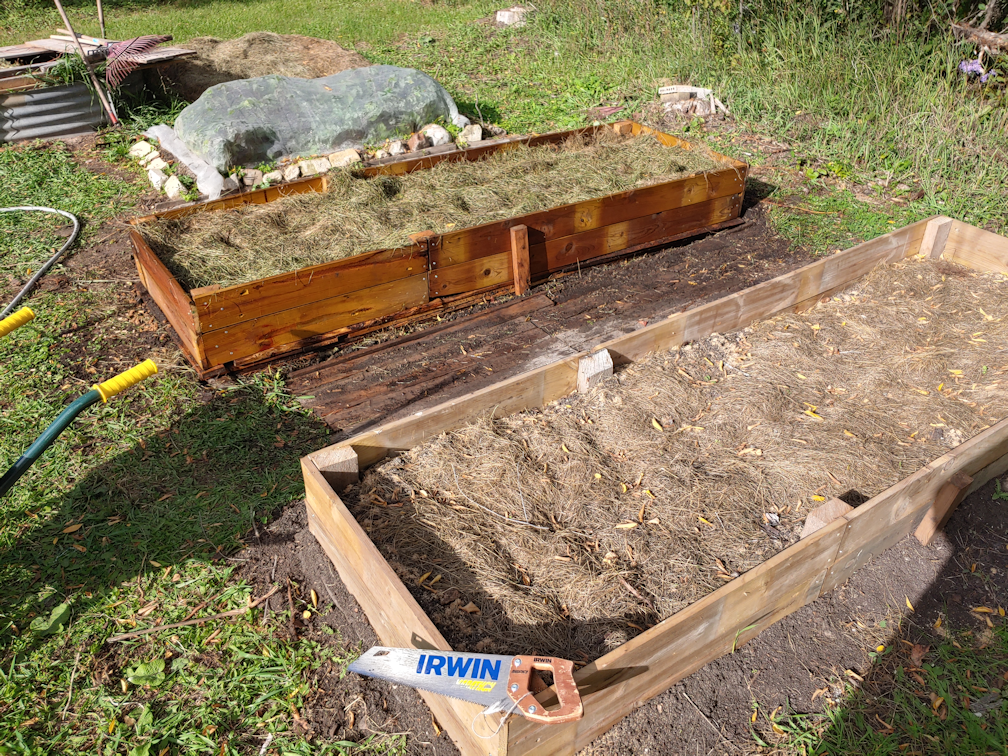
There we have it! The high raised bed is built!
Standing next to a corner, it’s just barely reaches my hip. For mobility and accessibility purposes, we could probably have gone higher than this, but I think this will be fine.
Now, we just need to fill it! We’ve got old logs for the bottom, with corn stalks, leaves, grass clippings and garden waste to layer in. I’ll add thin layers of soil in between each layer of organic matter before topping it off with soil for about the depth of the top logs.
That will be a job for tomorrow!
I may have had to juggle the budget a bit to get that chainsaw, but it was worth every penny. There is no way I could have finished this today, without it. In fact, I have my doubts I would have been able to finish it before winter, at the rate things were going!
About the only other thing we might end up doing with this is maybe get some short pieces of rebar, drill holes through the top couple of logs and set the rebar in them to really make sure the logs stay in place.
It’s really a horrible, messy, slapdash job, but it will still probably last us many years.
Now we just need to cut down more dead trees, so we’ll have the material to build more!
I remembered to go out in the dark and take a flash picture of the sign I’m working on. Looking at it on my phone, I didn’t think I got very good coverage. It wasn’t until I uploaded the photos onto my desktop that I could see how funny it was.
On the sign itself, you can see spots that are reflecting more than the rest. They were the same in each of the photos, which I took at different angles, which tells me that yes, it’s the covering, and not, say, the LED flash on my phone.
It’s what I see around the sign that is funny. All those white looking spots around the sign? Even on the grass? That’s the reflective paint! It’s everywhere! :-D It was a bit windy when I was spraying it. I expected a bit on the wall of the cat’s house, and a smattering on the posts below, but I did not expect to see that much on the grass or on the ends of the sledge the cat’s house is resting on!
So… if it’s calm enough tomorrow, I’ll give it another coat, then check it again! :-D
Yesterday, looking at the weather radar, I had expected that we would catch the edge of a weather system that was being pushed up from the southeast. Which is what usually happens.
Instead, the system ended up going right over us, and we had heavy rain all day and most of the night. We are expected to continue to get rain today and tomorrow, and remain cool until the day after.
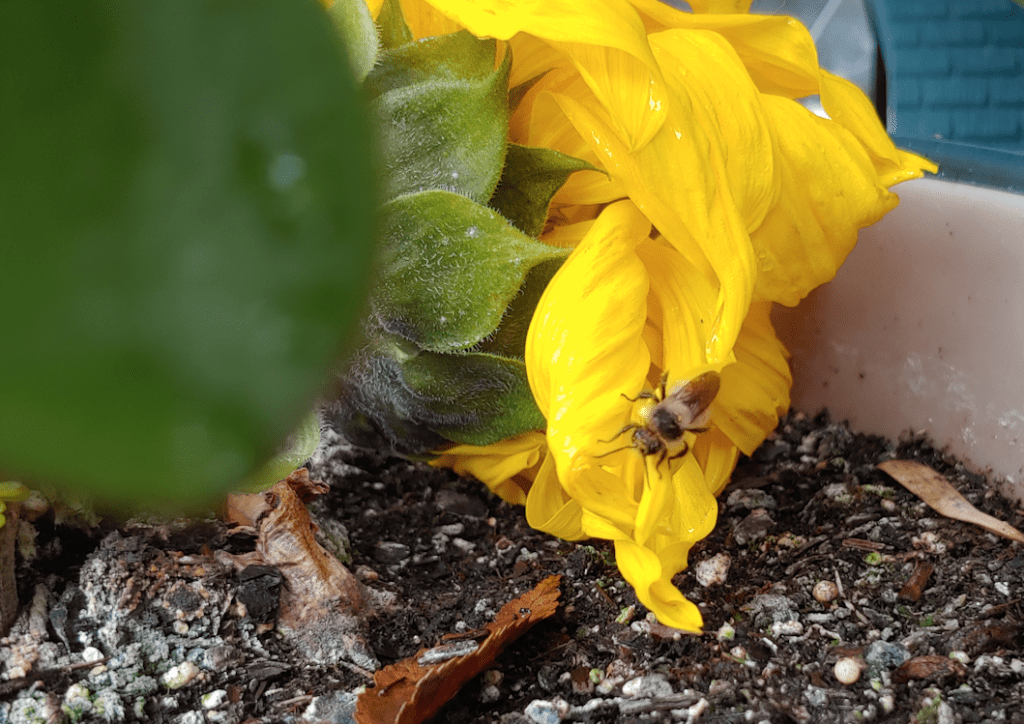
I didn’t think the bee on the sunflower would survive that long.
We have a mini greenhouse in the sun room, so I lay the cover of a seed starter kit upside down on the top shelf, and had a sieve ready to use as a cover, then went to cut the sunflower off and bring the bee over. It had actually moved a bit since I last looked at it, which was encouraging. We had set up a light fixture on the top of the mini greenhouse with a full spectrum, incandescent light bulb in it, to keep our seedlings warm. The sun room wasn’t much warmer than outside, so I turned the light on to add a bit of warmth, making sure the fixture was tilted away, so it was more indirect.
The bee is hidden by the petals on the sunflower, in the above picture.
If the bee were sluggish and staying on the sunflower only because of the temperature, I expected to see it become active fairly soon. If that wasn’t the reason it was still on the sunflower, I expected to find a dead bee.
Since it’s too wet to work on outside projects, I set up in the old kitchen to start an inside project. Since the sign with my late father’s name on it got disappeared from the corner of the property, I decided we needed a new one, as it had been a landmark we could use to give directions to our place. Yesterday, I went rifling through the barn and found a scrap of half inch plywood that was in decent shape, brought it over and gave it a cleaning. Today, it was dry and ready for painting.
We still had some white paint from when we fixed the door into the sun room and repainted the frame as well, and there is enough to do at least two coats.
It’s just a bit bigger than the top of our freezer! :-)
The first coat is done, and tomorrow I will give it a second coat. I will also look for wood that I can attach to the back to make posts that can be driven into the ground. The sign that disappeared had been attached to the corner post of the fence, but all those old fence posts along there are falling and need to be replaced, so I want to mount the sign independently from the fence.
After the paint is dry, but before the lettering is painted on, I plan to give the whole thing a spray with some reflective paint I picked up a while back. This way, the background should highlight the lettering when hit by headlights as people turn the corner towards our driveway.
We’ve been talking about coming up with a name for the farm, just for fun. It has always been really important to my parents that the farm stay in the family name, which is why it went to my older brother, who has sons and now grandsons, to carry on the name. So out of respect for my late father, I have decided to simply use our family name on the sign, however I will also include our driveway marker number, with the municipal road name, which is also our family name, and an arrow towards our driveway. The road sign with our family name on it that disappeared when the stop sign it was mounted on was broken, never got replaced, so having that road name on the sign will be helpful for our neighbours, too. Which means I will have two lines of lettering, plus an arrow, on this sign when it’s done.
I think we might also need to set up another camera on it, just in case. I have no proof that our vandal stole the old sign, but if we put up a new one, with our family name on it, I suspect it will infuriate him, and our restraining order against him is still going through the court system.
After I finished with the first coat of paint, I checked on the bee, and was happy to find it crawling actively around the sunflower. I’m very glad we had it covered!
We tucked the entire sunflower into a plant pot (our houseplants are still outside), where it would be more protected, both from the weather and from curious kitties. Happily, it immediately began crawling around even more. Hopefully, it will be able to make its way back to its hive, wherever that may be. Most local bees are more solitary, and have hives underground, so there is no way to know where it came from. At least now it has a chance, and we need all the pollinators we can get!
As much as I appreciate the rain we are having, I’m looking forward to when it clears so I can get back to work outside. I got a transaction notification from my bank, showing that Veseys has charged us for the garlic we ordered. That means they will be shipped soon. Possibly even today or tomorrow. I’ll get an email notification when they do. They will need to be planted soon after they arrive. That means we are running out of time to prepare a bed for the garlic. If the weather prevents me from finishing the high raised bed we are working on, then I will top up the low raised beds we made where the garlic was planted last year. With the new dimensions, we might even be able to plant all three varieties in one bed. It’s typically advised to rotate alliums into different beds every year, but in building the low raised beds, the soil has been amended a lot, and they will be topped up with fresh soil, so it should be just fine. We shall see what we have time for.
Meanwhile, we’ve got a couple of days to work on indoor projects, instead. Like the bread baking I can hear my daughter working on as I write this! :-)
After several days of rain, I was finally able to get a bit more work done on the high raised bed that is being built.
Such slow going!
I was able to cut the four notches to fit the end piece on, but it is not done. I made as many cuts as I could with the baby chain saw, then used the hammer and chisel to take off the excess wood while the batteries charged. Unfortunately, I finished with the chiselling faster than the batteries charged, so when it came time to use the baby chainsaw to do the finishing, I didn’t get very far.
I’ll have to get back at it, later. It’s the notches on the side logs that need to be deepened more.
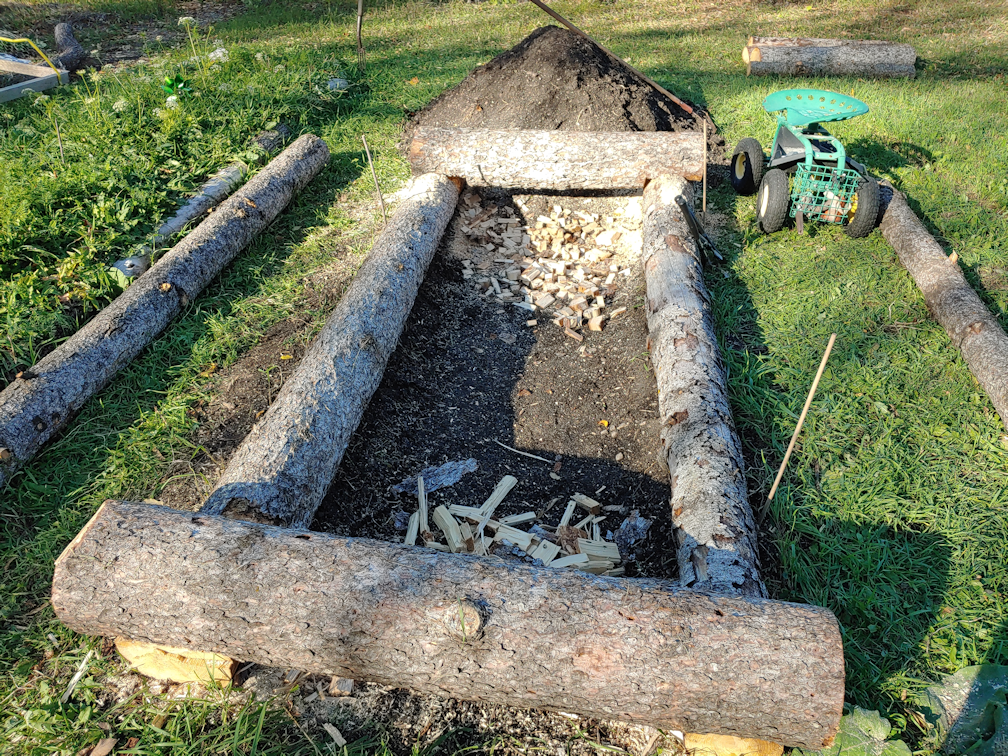
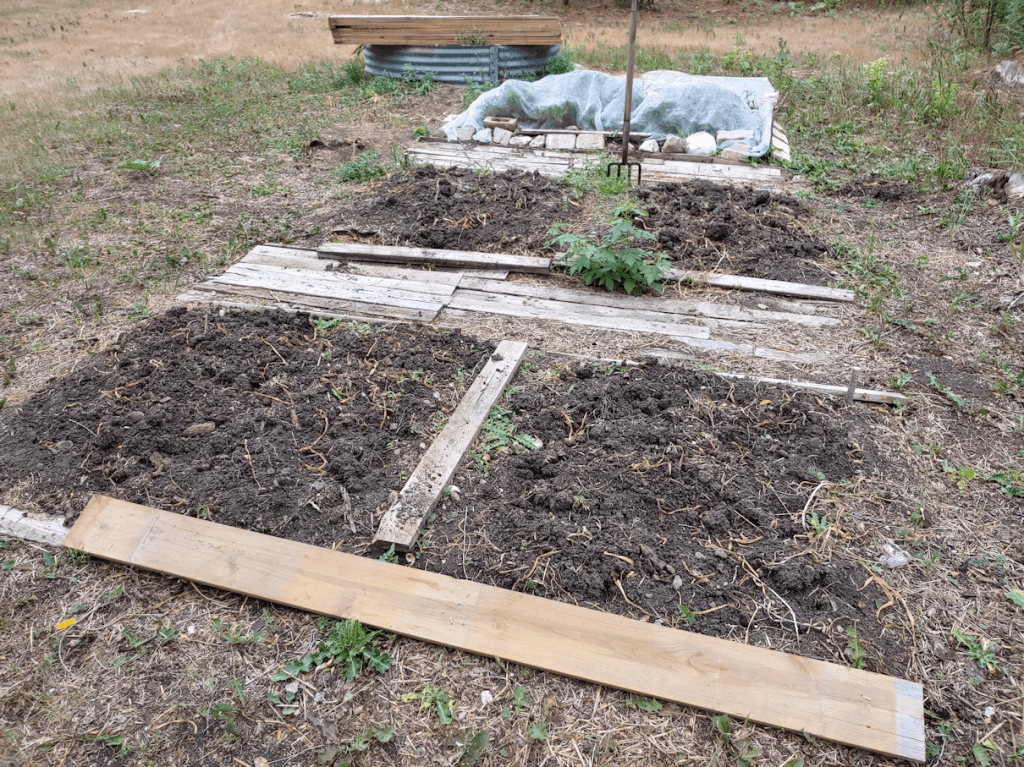
You can read about the first raised bed I did, here and here. Things were done a bit different this time, so here is another step-by-step post with lots of photos! :-) I actually started this bed over a week ago. This is how it looked then.
This bed has been almost completely untouched since the garlic was harvested, letting the weeds get fairly large. This made them easier to pull.
Along with pulling the weeds, with as much of the roots as I could, I lengthened the bed to match the size of the box. Right away, I could tell this one was going to need a “foundation” under the box, too. I was definitely hitting rocks, and a whole lot of roots, while trying to loosen more soil and remove grass and weeds.
Once the weeding and loosening of soil was done, it was left to sit so that any weeds I missed would have a chance to start growing again.
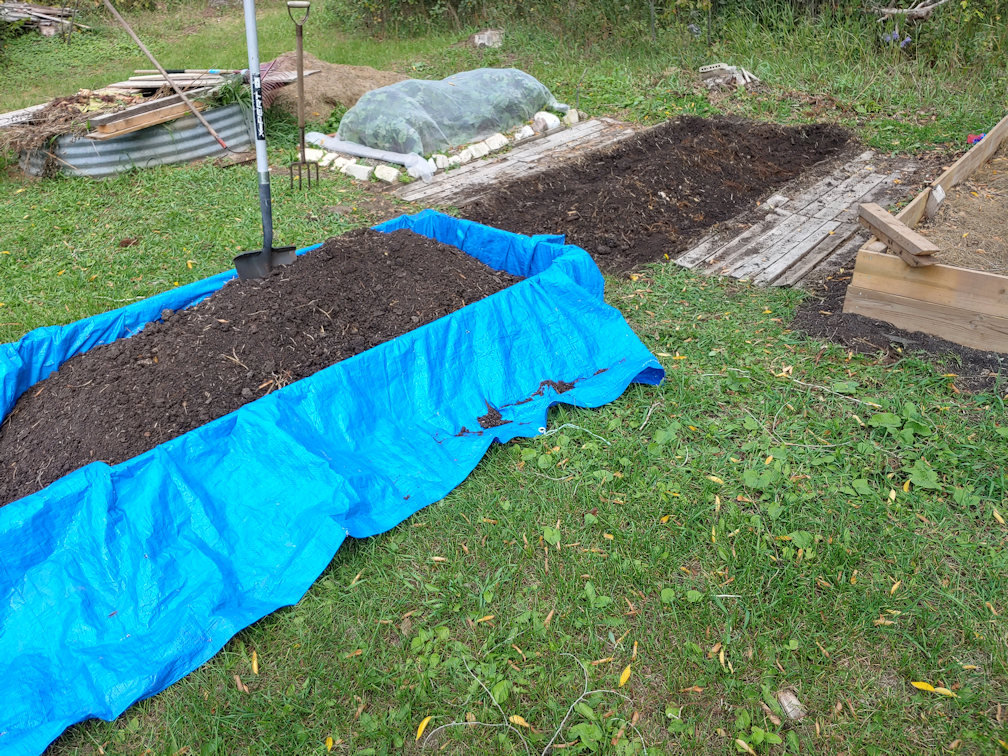
When I started working on it today, the first thing I did was go over the area again, pulling out any new growth by the roots. Then it was time to start shoveling!
Like the previous bed, this one had been originally amended by burying the contents of our compose pile and straw. So I only wanted to remove up to the straw, basically.
In the process, I was finding a LOT more roots! It looks like the cherry trees are encroaching again.
Once I was satisfied with how much of the topsoil I had removed, I raked around the edges to try and level the soil where the box would be resting, as much as possible, while heaping it all in the middle.
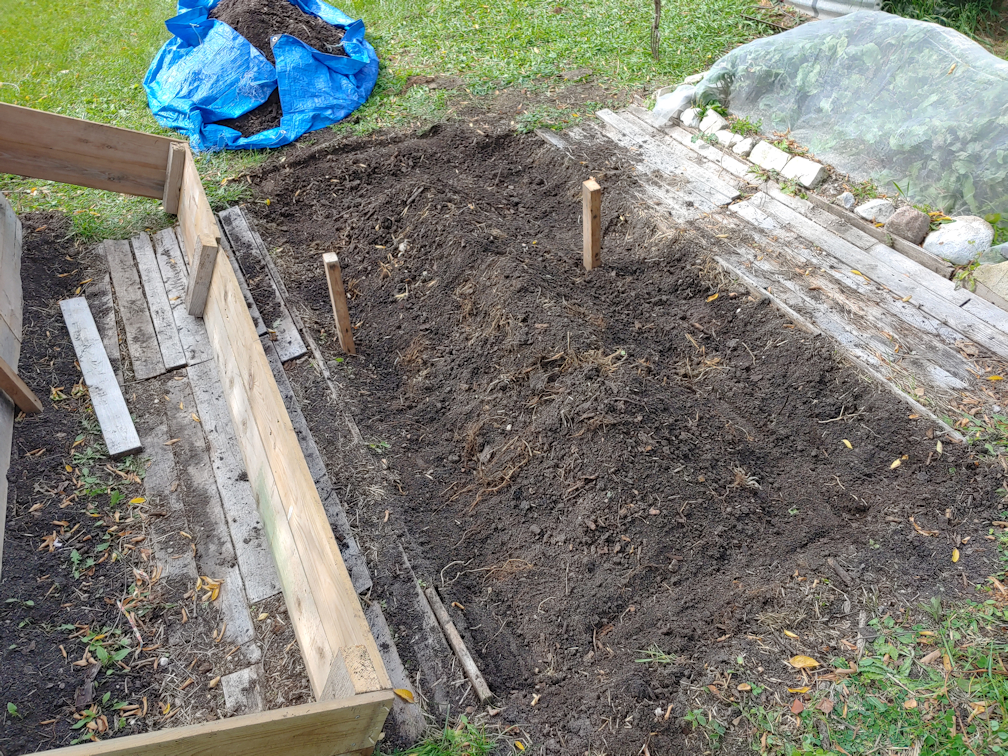
Then the box was laid down and, once I had it where I wanted it, I used a sledge hammer to hammer in the supports on either side, at the middle, to prevent the long sides from bowing out when filled with soil. I also hammered down the corners and such, to leave marks in the soil that I could use as guide lines.
The ground wasn’t anywhere near as level as I probably should have made it, but that’s okay. Things will settle and adjust over time, and these boxes can be easily replaced in the future, if need be.
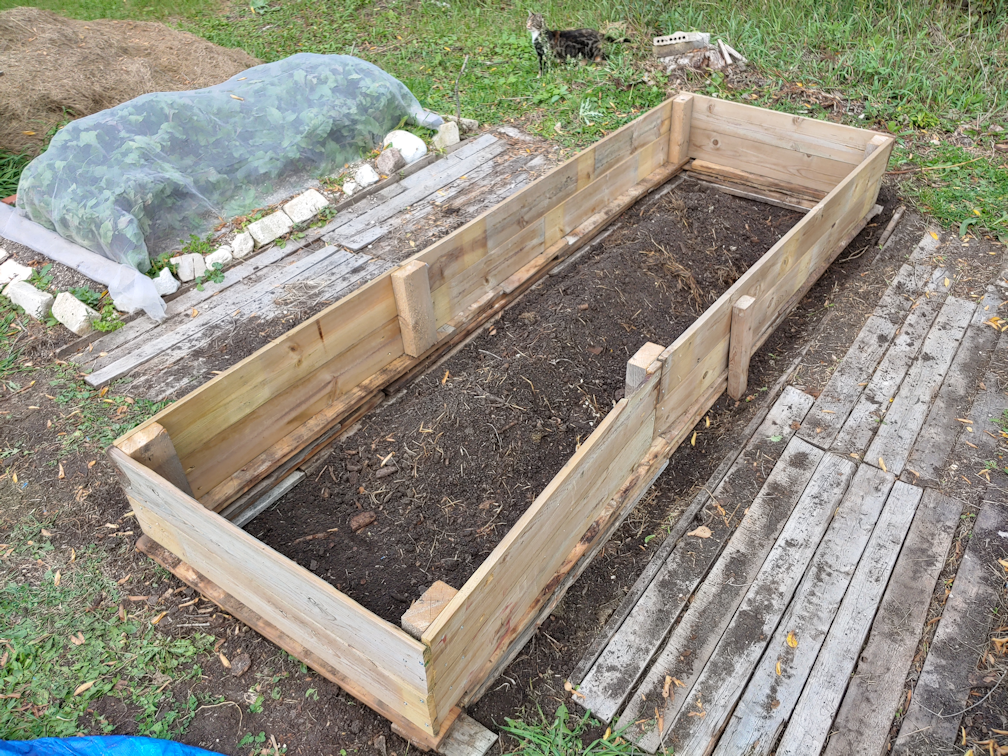
The next step was to raid the pile of old, salvaged boards that the groundhogs have made their den under, and build up a foundation to support the box. Once that was in place, a daughter came out to help me carefully place the box on top of the foundation, and in between the support posts.
Then it was just a matter of shifting the foundation boards a bit, to make sure the box was fully supported. Again, not quite level, but that’s okay.
The soil heaped in the middle was then raked out to the sides, covering the foundation boards and creating more of a recess in the centre.
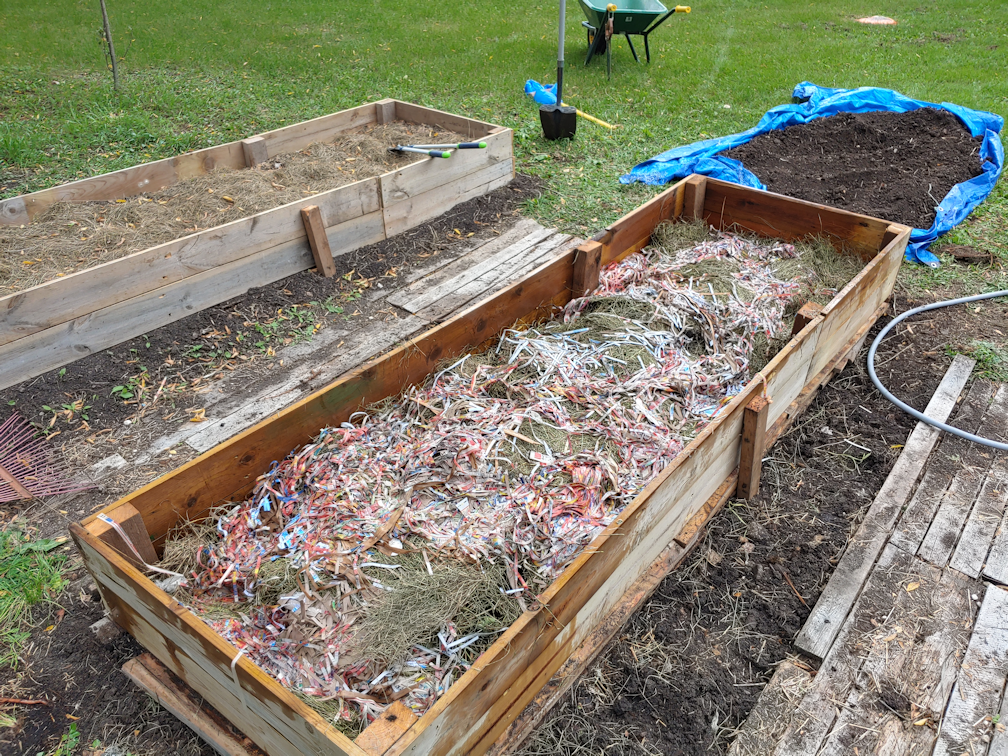
Then it was time to add the first layer of fill, and raid the branch pile. This time, I added more and larger branches than with the first bed I did.
This, unfortunately, left a lot of gaps and air pockets. They will fill in as the wood decomposes and everything settles and sinks, but that will take time. To help fill in spaces and speed up the decomposition process, I started adding back some of the soil. After returning about a quarter of the soil, I hosed it down thoroughly, so wash it further down into the gaps, then added about another quarter of the soil and soaking it down again.
The next layer was contents from the compost heap, most of which was greenery I’d cleared from around the dead spruce trees that were cut down. This got another soak, another scattering of soil, and yet another soak.
The next layers were grass clippings and shredded paper. This time, after soaking it all down, I walked back and forth over the whole thing, to try and compact and break the buried branches more.
It as at times like this that being a woman of generous proportions comes in handy. ;-)
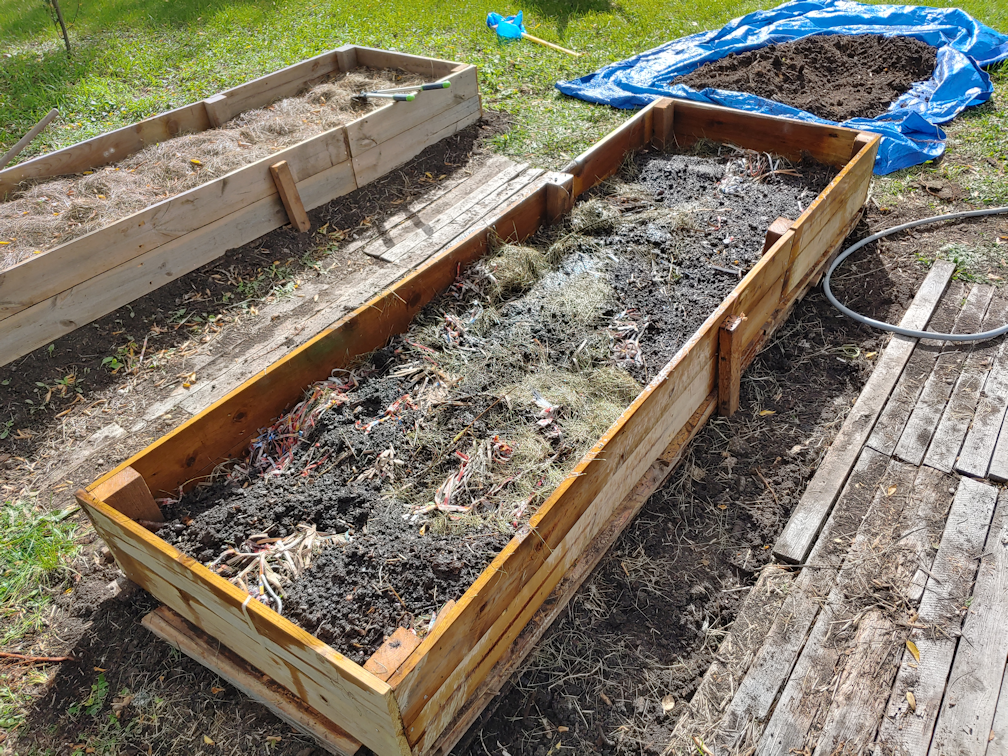
Yet another thin layer of soil was added and soaked down.
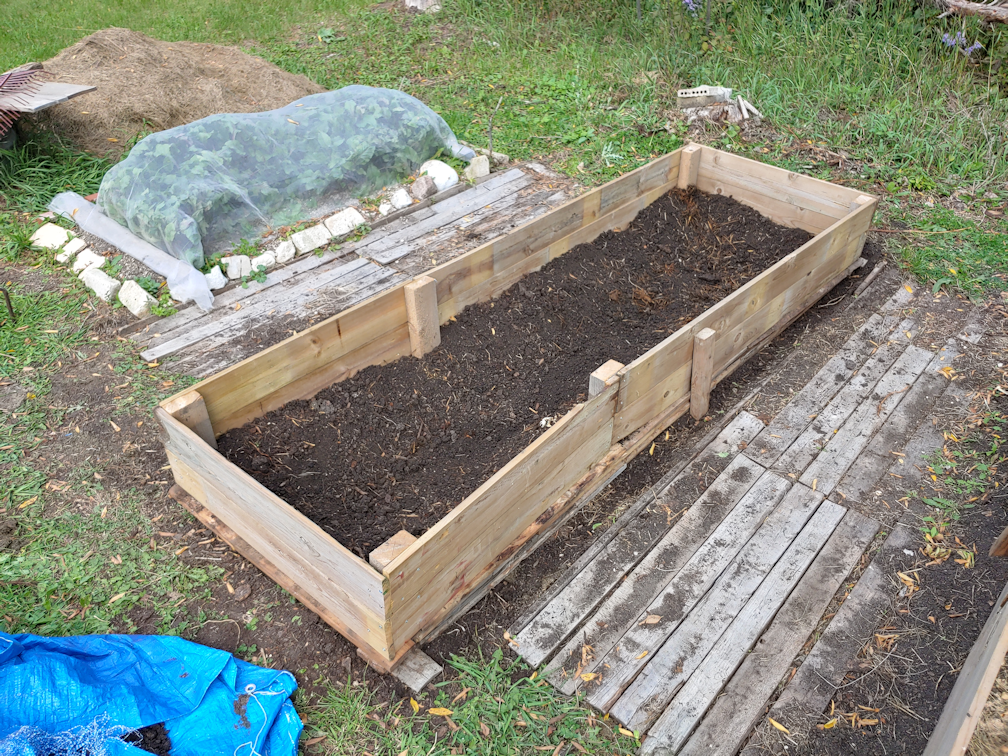
Note the gap between the box and the board path. By this point, it had become a bit of a safety hazard! Without the soil to hold them in place, the boards at the edge kept moving and catching on my feet, and I was constantly catching myself to avoid twisting my ankle in the loose and lumpy soil in the gap.
Another thin layer of grass clippings was added and hosed down. At this point, the fill in the new raised bed is about the same level as in the first one. Adding the extra and larger branches made a noticeable difference, even after being tromped down.
Once this was done, it was time to amend the remaining soil on the tarp. I added about half a 40 pound bag of wood pellets, as was done in the first raised bed, and then a couple of wheel barrow loads of new garden soil was brought over; one added to the soil and wood pellets on the tarp, and the other added directly on top of the grass clippings, then raked out as evenly as I could.
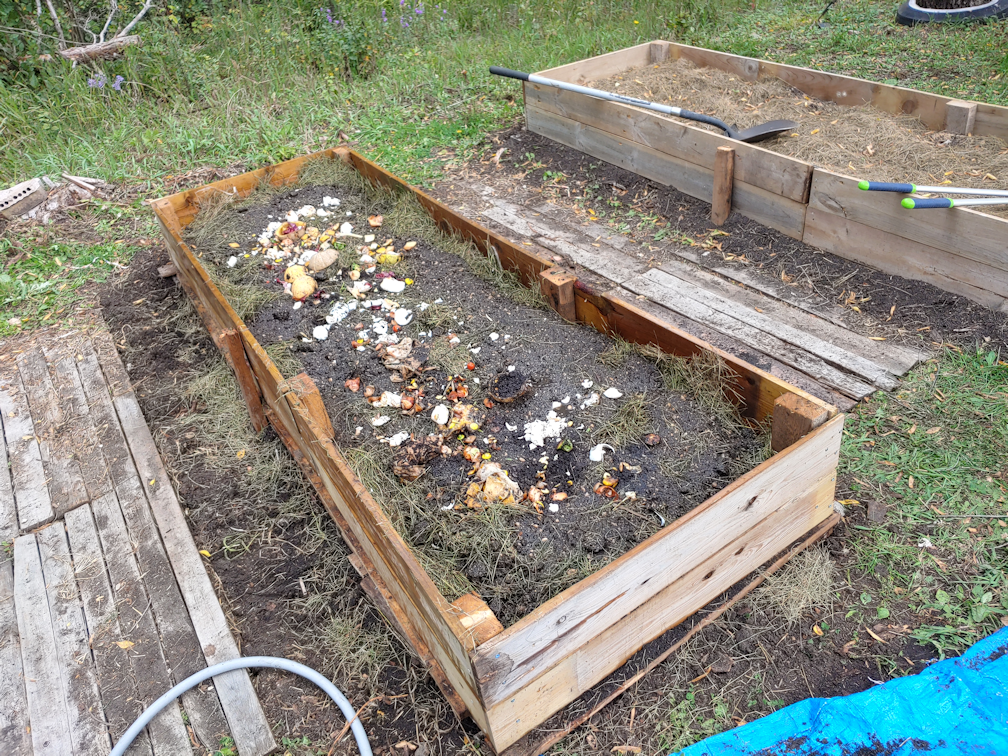
It was about this time that a daughter came out with the kitchen compost buckets, so that got added straight into the raised bed and spread out, then hosed down again.
The next while was spent mixing the soil and wood pellets together, as much as I could, before adding it to the bed.
Once the soil was added, it was raked out evenly. This layer was NOT hosed down, though.
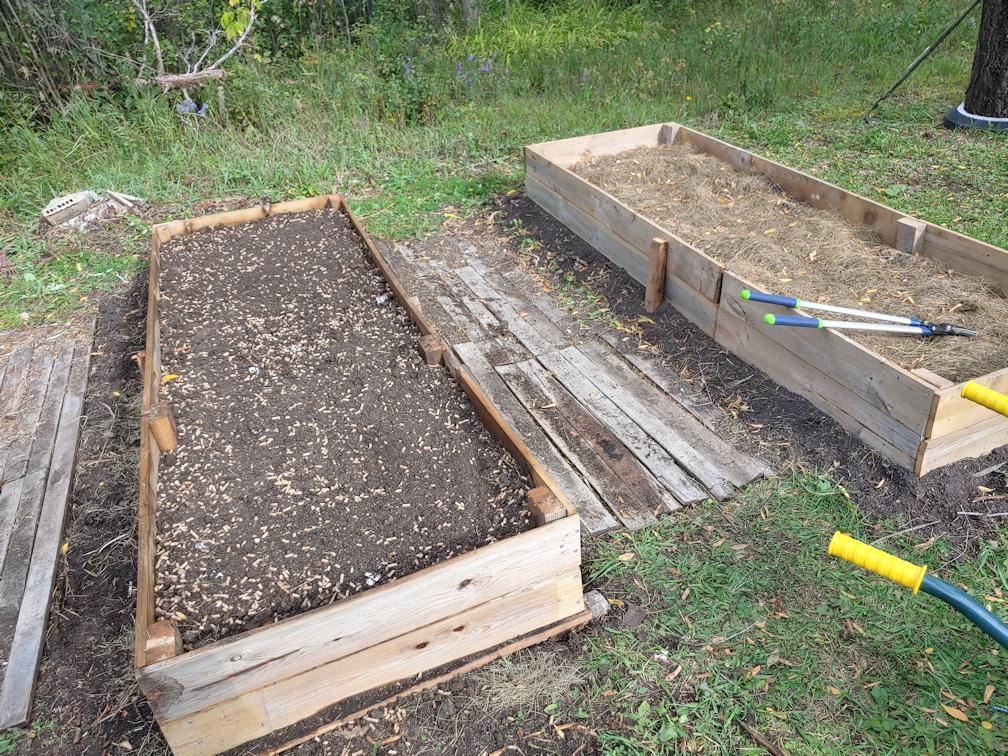
One more layer of grass clippings was added as mulch, then it got one last, very thorough, soak with the hose. This was the time to clean up the sides and edges, too.
This is as much as will be done in the bed, this year. Both beds will get more amendments added to them in the spring, after they’ve had a winter to settle and sink.
Also, remember the gap in the path on the other side of the bed?
I was going to work on filling that to make it safe, but I had reached my limit. A daughter will be working on that for me later. As these beds have been worked on, and rocks were found, I had been tossing them next to a nearby stump; you can see it in the background, with some bricks on it. Those can be gathered to use as fill in the large gap on the far side of the bed, and more boards will be added, and whatever else my daughter can thing of to make it safe to walk on. The eventual plan is to cover the board paths with sand and gravel.
After this, there is still the third bed in this location to be made, but with the beets still growing, there is no hurry. The last bed will be just one board high, as that is all the wood of this type we have left, but these boards are slightly wider, plus we still have plenty of the scrap wood bits to use as a foundation, so it shouldn’t be too much of a difference.
With the help of my younger daughter, we got the shut off valve installed on the hot water pipe.
Ha!
Just kidding.
My daughter did all the work. I took pictures and passed her things.
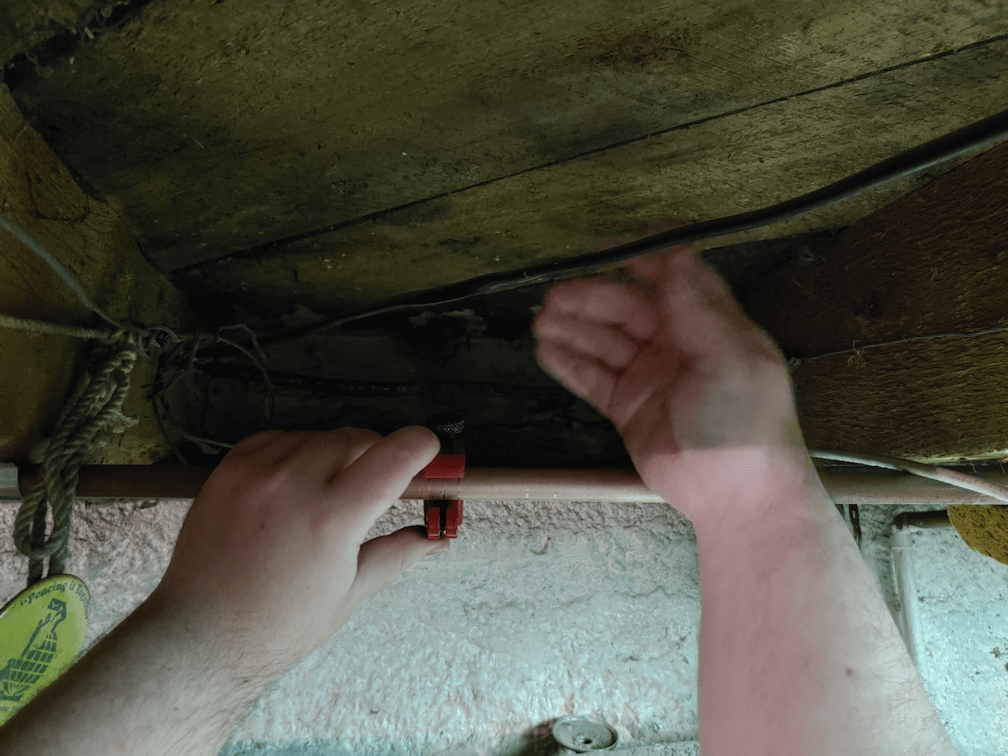
The first thing we needed to do was take off the “clamps” holding the pipe to the exposed floor joists above, on either side of where the pipes were in contact with each other and, I believe, the source of the vibrating noise that is so alarming. The “clamps”, however, were small strips of aluminum, hammered into place with finishing nails. We never did get the nails out. My daughter ended up ripping the aluminum off, instead. !!! While my daughter worked on that, I shut the water off to the hot water tank, then opened the tap to drain the pipe.
One of the things she noticed while trying to remove the aluminum strips is that the hot water pipe was actually bent upwards at this point. No wonder the crossed pipes were so jammed together.
Once there was a bit of flexibility in the pipe, it was easier to access and work on, too.
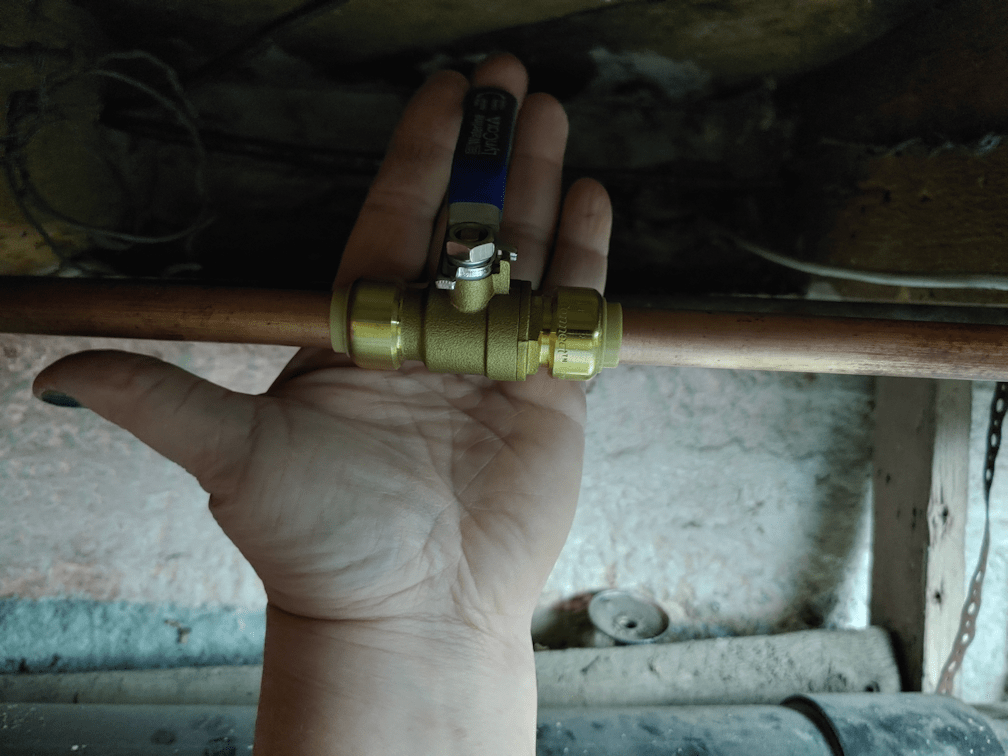
After deciding where to put the valve, the pipe got scrubbed clean, then the shut off valve was used to place marks on the pipe, so we could see where to cut it, and later see that the pipe ends were far enough inside the valve once installed. Thanks to needing to fix the kitchen sink a while back, we did have a nice little pipe cutter for the job. :-)
About two inches of pipe was removed, to make room for the valve.
The cut ends then got scrubbed and sanded, inside and out.
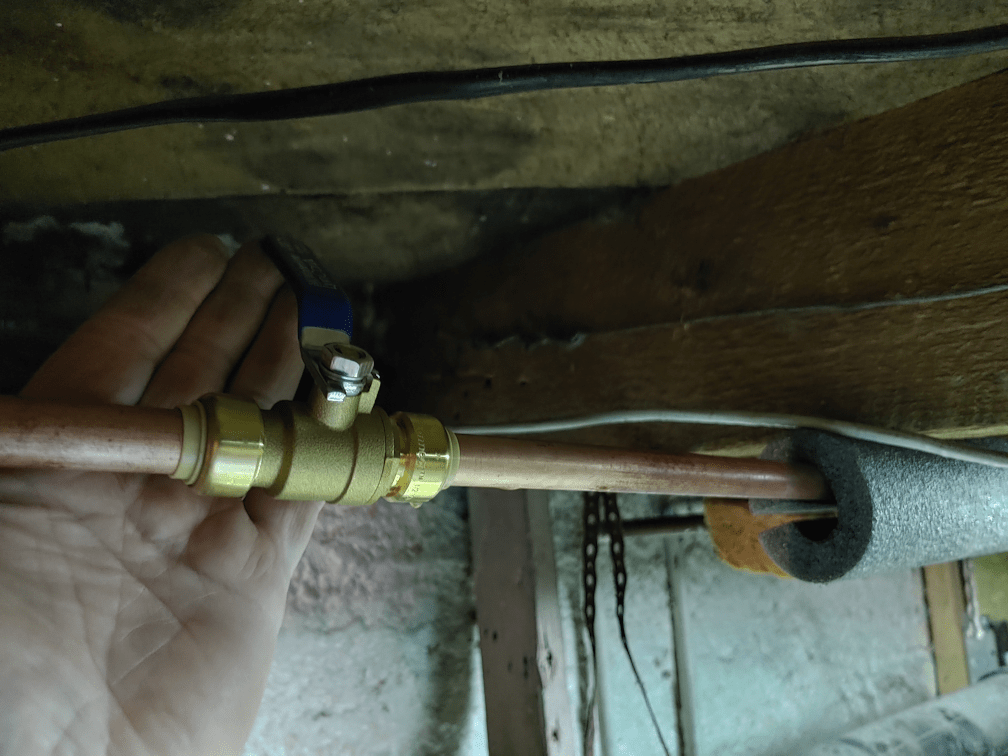
Then is was just a matter of sliding it in, and making sure the pipe was as far as it needed to go. The water to the tank was turned back on so we could test it for leaks, then the valve was shut off.
The whole thing took about 10 minutes.
With the valve in place, there is no water to leak at the tap, but if we need to use it for some reason before the tap can be replaced, we can just turn it on, use the tap, then shut it off again. Very handy.
Meanwhile, there is still the issue of the pipes.
For some reason, we have short lengths of pipe foam in the basement. It’s meant for a width of pipe I don’t see around. I put a section on the pipe, under the floor joists the pipe had been clamped to. It was just long enough to go under both.
I didn’t have any foam that was thin enough, so I jammed an old sponge I’d been using before, in between the two pipes that had been in contact, to absorb vibrations. I’d tried to squeeze it in before, but there was no give at all. I could only get it part way under, so it didn’t really stop the noise, though it seemed to make it better.
Now I am just waiting for someone to use the enough water to trigger the well pump, and see if the noise is still there.
We didn’t add a shut off valve to the cold water pipe, yet. For that, we’d need to shut water off to the entire house, and the pipe is behind the hot water pipe, so it will be harder to reach. That can wait until we are putting on the new taps.
I am quite pleased with how this worked out. I keep expecting things to go horribly wrong. :-D
Sadly, we didn’t get any more rain today, but it has been very windy. Enough that we lowered the canopy tent as far as it can go, so reduce the chances of wind damage. It still has our camp chairs and makeshift table that we were using to cure onions on a screen, under it, and we can still duck under to sit in it.
I feel like a little kid in a fort. It’s awesome!
But I digress!
There was a break in the wind, and I took advantage of it to build the second low raised bed box to go where the garlic had been.
The build went much faster than the first one, now that we’ve got it figured out.
With stuff we’ve got going on over the next few days, we won’t be able to work on the third one, nor prep the empty beds for next year, until after the weekend. Which rather sucks, because the next couple of days are going to be really nice, then by Sunday, we’re expected to hit 33C/91F, and stay above 30C/86F for at least a few days. At least there is the possibility of more rain as well.
The third box will be a very quick build, since it will be only 1 board high. The bed it’s going to go on still has beets growing in it, so there is no hurry on that one. :-)
With the garlic all harvested, we’ve got two empty beds that need to be readied for next year’s garden.
With these beds, we had dug into the soft soil we found under the wood pile, mounding soil into beds and making paths in between. This worked out quite well, but there were a couple of issues. One was, for such low raised beds, I found them too wide. They were about 4 feet wide, which would be fine for a high raised bed, but awkward to reach the middles on a low bed. That was partly solved by putting a board across the middle, which served to both mark where the different varieties of garlic were, and to give something to step on while trying to reach into the middle.
What can I say. I’m short.
The other issue was that the soil along the edges would end up in the paths, either from watering or from when the birds were digging around the garlic, early in the season.
The solution to both issues was to build a narrower box frame.
After scavenging in one of the sheds, I found some boards that would serve the purpose.
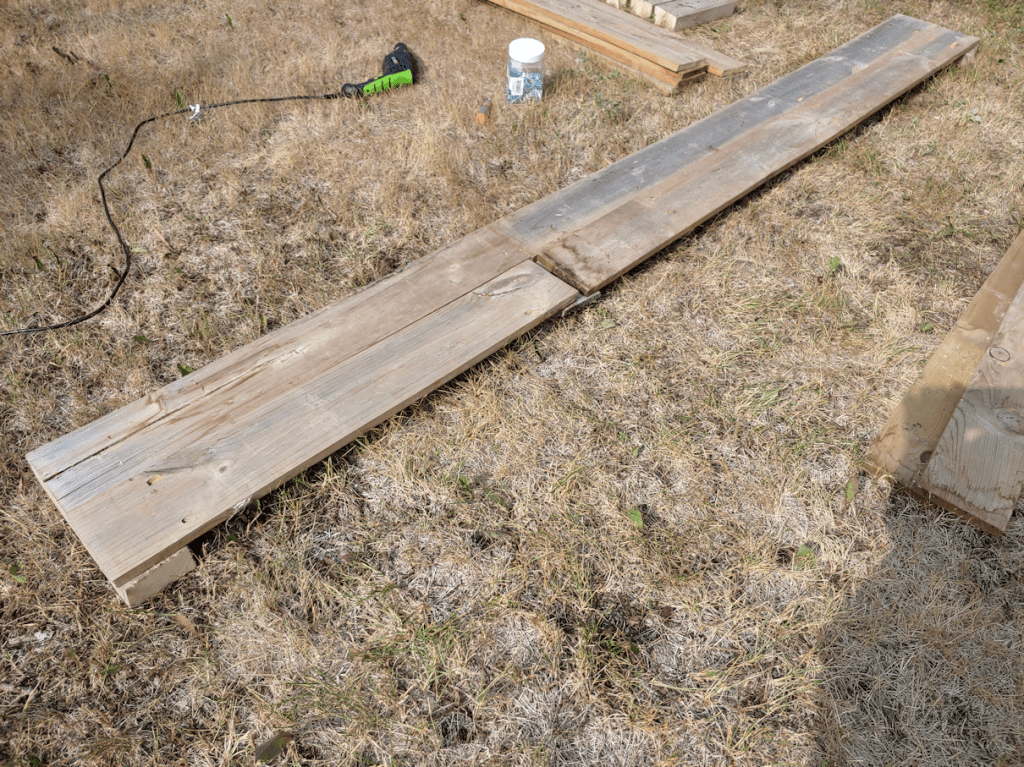
I dragged them all over to the beds. Here you can see one of them laid at the first bed I want to frame.
In total, I had 17 boards like the one in the foreground, plus 4 more that were the same length and thickness, about about an inch wider.
I decided to keep things simple.
I left four boards as is, then cut another four in half. The boards were all 6′ 1/2″ long and 5 1/4″ wide. Some of the half pieces would be used to increase the length, while the rest would be for the ends of the bed. I cut support pieces for the corners and to join the lengths together from some wood leftover from another project. Those were cut to match the width of two boards together.
The long sides were made by screwing the boards to the support pieces. The boards all have damage to them, ranging from old water damage and some rot, to splitting and cracking from being so very dry. Which is fine. They will do the job, and will last a few years, at least.
What wasn’t fine was flipping a board and almost catching my hand on these!!! They look like the screws were broken off on the other side, so there is no way to unscrew them from the wood. I have to think about the best way to get rid of these, using what tools we have, but for now, we’ll just have to watch out for them!
Once the side pieces were screwed together, making sure they matched in length, I brought over a couple of the wider boards to give a flatter, more even, surface to work on while putting on the end pieces.
Then I quickly tacked it together with just a single screw at each corner, to hold everything together while I worked.
Oddly, one piece was almost an inch longer than the others! Which is okay; the excess can be sawed off, later.
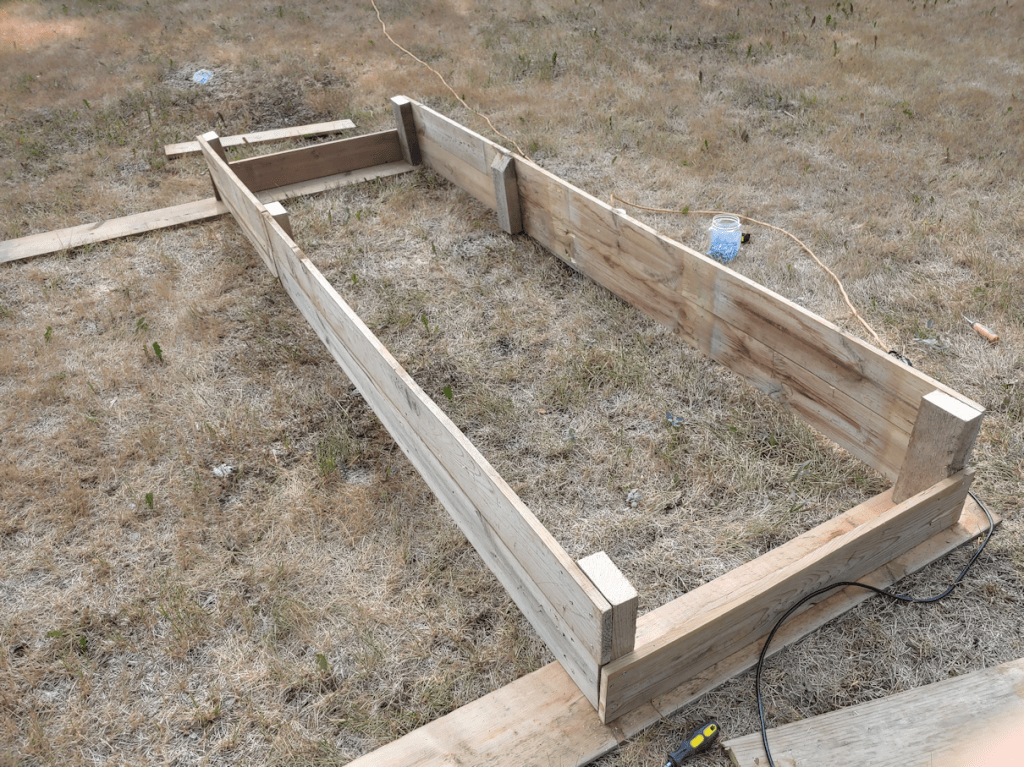
Here we have it! The finished box, next to the bed it will be placed at.
Here, you can see the difference in the dimensions quite clearly.
The box is about 9 feet long by 3 feet wide, and about 11 inches high.
In preparing these beds before planting the garlic, we dug out the soil and buried layers of straw and compost material at the bottom. Since the dimensions are being changed so much, I plan to dig out the beds again, then once the box frame is in position, will start filling it, hugelkulture style, by burying some of the branches we’ve been pruning for the past few years at the bottom, then layering the contents of our compost pile on top of that. Straw decomposes slowly, so I expect to find it when digging the bed out. If I do, I’ll be keeping it separate from the soil, so it can be layered back on again. As for the top layer of soil, I’ll take advantage of the situation to get rid of the weeds by their roots, then mix in some of the garden soil we purchased this year, before returning it to the bed. This soil tested healthier than anywhere else we took samples from, but it was still low in nitrogen, so adding the fresh soil will be a benefit. Once we have the materials again, the top will get layers of mulch to protect the soil.
I have enough wood to make a second box frame just like this one. I plan to build the second box before I start digging out soil. With the wider boards, there is enough to make a third frame for the bed that still has the beets in it, though it will be only one board high.
When this area is done, there will be three longer, narrower, framed beds with wider paths in between. This will make them much more accessible, even at their relatively low height.
Hopefully, I will be able to continue working on this tomorrow, but we’ll see how the day goes. I’ve got our rescheduled court date for the restraining order against our vandal in the morning. Hopefully, it’ll actually happen this time – and if the security guards try to tell me to leave and come back later, I will stay close this time.
I had cleaned up the dead spruce tree I’d cut down, a few days go, but only now got to continue working in the area.
Because of how the tree had landed, I used the baby chainsaw to clear away all the non-weight bearing branches first, and was left with this giant insectoid shape! :-D After clearing away the last of the branches, I was going to break the trunk down further with the electric chain saw, but when that turned out to not be working properly, I just left the trunk to the side. We’ll have to take care of it later.
Today, I broke out the reciprocating saw and used it to finish trimming the top of the stump.
Happily, the wood in this stump is nice and solid.
The other trunk, from the tree we took down 3 summers ago? Not only did it have ant damage, but as I was trimming it with the reciprocating saw, it was vibrating at root level!
Well. That changed my plans.
At first, I figured I would just make a seat instead of a bench, but I really wanted a bench.
I used one of the boards that would be a horizontal support to mark off and cut the stump, using the reciprocating saw. At this point, I was still thinking of making a seat, but figured this stump was solid enough to support a bench. I cut the support pieces to a couple of inches shorter than the board that would be the seat, found the middles, then drilled pilot holes.
Despite using a level when positioning the support pieces, they still ended up uneven!
Though at least part of that is because one of the boards was warped.
Ah, well. I wasn’t going to start over! The only thing I did have to do was trim the top of the stump with a hand saw a bit, to make it even with the support pieces.
Then it was time to screw on the board for the seat.
You can see on the far right, that there was a substantial gap! I ended up making a wedge from a scrap piece of wood and jamming it in, then screwing the board in place, though the wedge and into the horizontal support.
As I was doing that, I could feel the bench wobbling a bit and decided the ends needed extra support. I didn’t want to put too much stress on the screws holding it to the stump, even though there are quite a few of them, and they are longer than needed. I had the pieces of wood I’d cut off the horizontal supports, so I trimmed those to size and added them at the ends to make legs. The main support is still the stump. The legs are just enough to give a little extra support, if there is too much weight at an end. The ground under them is soft, so if they were to be weight bearing, I would have wanted to add something solid under them, like a brick or some flat rocks
And there we have it! Our very first tree stump bench. :-D And I must say, it felt SO good to have someplace to sit down when I was done! It was the perfect height for me and my messed up knees, too. In fact, I used my knees to judge what height to trim the stump down to, and with the height added by the thickness of the seat board, it worked out just right.
Now it just needs a good scrubbing and a paint job to protect it from the elements. The board I found for the seat still has some paint on it, so it’s not too urgent.
I am quite pleased with how this turned out. We have so many dead trees in the spruce grove that need to be cut down, with some of them fairly close to each other. My thought was to cut them to leave stumps that could be used to make seats and tables, making sure that some of the seats are a bit higher, for my husband to be able to use comfortably. This bench is the first experiment to see if the idea is viable, and I’m happy to say that it is. Most of the greenery you can see behind the bench are a flower patch that we uncovered when cleaning up in this area, and have been leaving alone, as we mow or trim around it. Which means that, over time, we’ll be able to sit here in the shade, surrounded by lovely yellow flowers. :-)
Over time, we will have many seats like this, scattered all around the the inner yard, as we continue to clean up among the trees, and turn the inner yard into a lovely haven.