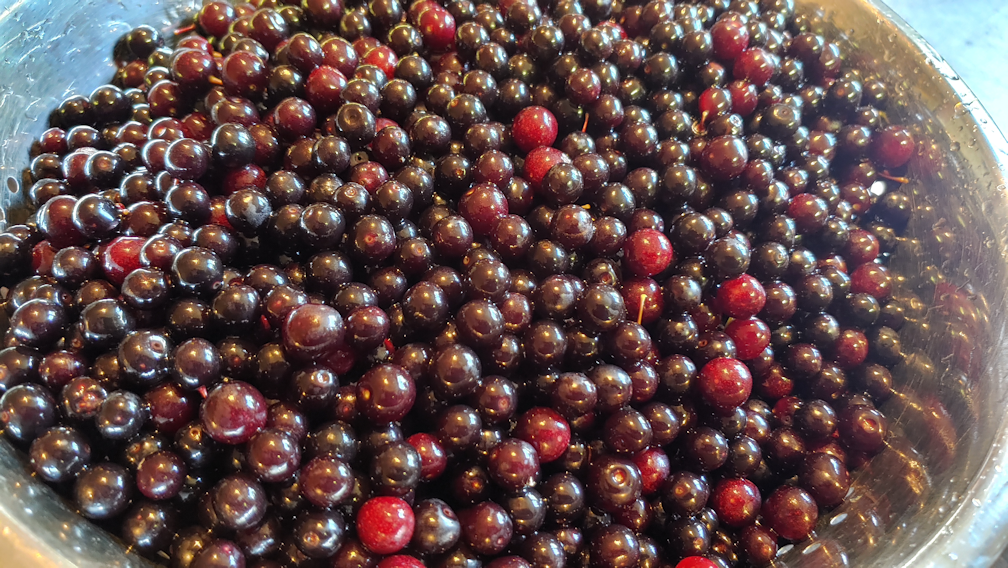
Nice to see my colander so full of berries! All clean and ready to pick over.
I got all the stems (of course, I found one I missed after I took this photo!) and the ones that were damages or whatever. I filled two 9×13 jelly roll pans with berries when I was done.
They are now in the deep freeze, to be transferred to freezer bags when they are frozen solid. After that, they can wait until we decide how we want to use them this year. :-) The freezing will help them release their juices later, too.
So… what shall we make? More chokecherry vinegar? Or try a jam or jelly this year?
While picking chokecherries, I also checked out one of the gooseberry bushes.
This is the biggest of the gooseberry bushes, and the one that got the most water over the summer, since I had the sprinkler going on the raspberry transplants. It has a fair few berries on it, while the others have either no berries at all, or almost none. The really dark berries I am holding are “ripe”, but so small, they’re practically inedible.
Note for future: transplant the gooseberries out from under other trees, and put them somewhere where they will get both sun and rain!
This morning, I grabbed a bucket and checked out the chokecherry trees.
After my last visit with them, I thought I might be too late for the one tree; either they would be over ripe, or the birds would have got them by now.
Happily, there were plenty of perfectly ripe (very dusty!) berries!
I was even able to pull branches down and get lots from the top.
This is how much I got, from just the one tree – minus the many that went flying or rolling out of my hands onto the ground! :-D
That was all what I was able to pick from both trees near the road, last year.
This year, that second tree is not doing as well.
There were very few berries, they were really small, and not consistently ripening.
I left this tree alone.
Then I went for the tree closer to the house. The berries there were much plumper, but the berries were also mostly out of reach. The lower branches don’t get anywhere near as much light, so there were fewer berries and they were redder. My daughter was able to come out and help by pulling the upper branches down so I could reach to pick them.
Check them out!
While there were a fewer berries, they had almost as much volume as the berries from the other tree.
Yes, they are also a lot more red and not as ripe. This is okay, as the less ripe berries have more natural pectin.
As I write this, the chokecherries are sitting in cold water to get rid of any critters that might have come along for the ride, and get the bulk of the dust from the gravel road off. Later, I will give them a thorough wash in cold water, then pick them over to get rid of stems and any messed up berries.
Last year, we made chokecherry vinegar, to use mostly as a drink mix, with our berries. I have not yet decided if we will do the same thing this year. I’ll go through some ideas with my daughters later. I rather like the idea of making a jelly, but that vinegar was really good!
At the very least, we’ll set some aside to freeze and use to make chokecherry mead at some point. :-)
I had a birthday recently, and my awesome daughters treated me to Chinese food. We ordered a bunch of mostly protein dishes to pick up in town, while my older daughter cooked scallop noodles, coconut sticky rice and plain white rice at home to go with it.
On unpacking the order, we discovered they had thrown in a couple of free orders of white rice and chicken fried rice.
Which left us with a pot of plain white rice that ended up in the fridge, untouched.
Not a problem at all! I used it to make these crispy, pan fried patties. It’s a great way to use up leftover rice, though tasty enough to be worth making a bunch of rice, just for this!
Rice Patty Ingredients:
4 cups cooked, cold white rice
4 eggs
1 – 2 cups shredded cheese (I used medium cheddar and a fine grater)
seasonings to taste (I used bacon salt, freshly ground pepper, paprika and garlic granules)
oil and butter for frying
Tip: when your cooked rice is ready to go into the fridge for the night, put it into a large slide-lock freezer bag. You can then more easily break any lumps of chilled rice apart in the bag, before putting it into the mixing bowl.
Note: I used a fine hand grater, normally used to grate Parmesan, for the cheese, as a regular sized grate could make the patties fall apart more. If using a regular size grate, reduce the amount of cheese used. The cheese can be skipped, too, if you wish.
Sauce ingredients:
mayonnaise
sour cream
white wine vinegar
dried herbs and seasonings to taste (I used a Mrs. Dash mix, plus a bit of rosemary lemon salt and fresh ground pepper, but feel free to combine whatever herbs you like or have on hand!)
To make the rice patties
add your chilled rice into a medium bowl. Add seasonings to taste.
add eggs and mix well with your hands, breaking up any remaining clumps of rice.
add shredded cheese and mix in. Let rest for a minute or so (this is a good time to make the sauce). Note: if the rice mixture seems too loose to form patties, mix in a small amount of flour, then let rest again to allow the flour to absorb moisture.
prepare a deep frying pan by adding about half an inch of oil (any oil with a higher smoke point, such as canola, sunflower or peanut oil, will work) along with about a tablespoon of butter, at high heat. The butter adds flavour, but it also lowers the smoke point of the oil. It can be skipped, if you wish. Note: it is important that the oil is very hot before adding the patties, so that they will crisp up rather than absorbing the oil.
begin to form patties by taking about 1/4 cup of rice and pressing it into your hands to form a sticky ball. Flatten slightly, then set aside on a plate.
when the oil is very hot, gently add several patties into the pan (I could fit only 3 in my pan). Use a spatula to gently flatten the patties.
cook until the bottoms are crispy and golden. Gently turn the patties to cook the other side until also crisp and golden.
remove patties and drain on a paper towel. Keep warm as you continue cooking patties in batches. If it become necessary to add more oil and butter to the pan, make sure to give it time to get very hot before continuing cooking.
serve with sauce while hot. Garnish, if desired.
To make the sauce:
place equal parts mayonnaise and sour cream into a small bowl or measuring cup. I used about 2 – 3 Tbsp each.
add a splash of white wine vinegar and any dried herbs you wish.
mix well and set aside to let the flavours meld.
drizzle over crispy rice patties just before serving.
Making these is rather messy, and the rice mixture tends to want to fall apart until it starts to get crispy, but it is so worth it!
Here is a really easy recipe for a healthy snack to satisfy those cravings for something crunchy!
Roasted, Seasoned Chickpeas
Ingredients:
canned chick peas
olive oil
seasonings to taste
I have found that a 9×13 baking tray fits 2 cans of chickpeas in a single layer very well.
Instructions:
Turn oven to 400F.
Drain the chickpeas into a colander and rinse well. Spread the wet chickpeas onto a baking tray and let the water dry off for a while.
Put the dried chickpeas into a bowl large enough to toss them. Add olive oil and seasonings. (In our last batch, we used Scarborough Fair Garlic Salt and freshly ground pepper. You can use ordinary course salt and pepper, if you wish. It would be great with Rosemary Lemon Salt as well, or if you want to stay away from salt, use your favourite Mrs. Dash mix. )
Toss the chick peas until well coated with olive oil and seasonings.
Return the chick peas to the baking tray and spread into a single layer. Place on centre rack in pre-heated oven.
Roast for about 20 minutes. Take the pan out and give it a shake to turn the chick peas. Return to oven and continue roasting to desired crunchiness, giving the pan another shake every now and then. (We like them extra crisp. With our oven, that takes more than an hour of roasting time. Our oven also has some cold spots, so when we give the chick peas a shake, we also turn the pan, to ensure even roasting. )
When done, remove the pan and allow the chick peas to cool.
Once cool, store in an air tight container.
These make a really excellent and healthy snack, and are downright addictive!
While we are ready and waiting for my husband to come home from the hospital, we are also getting ready for Easter.
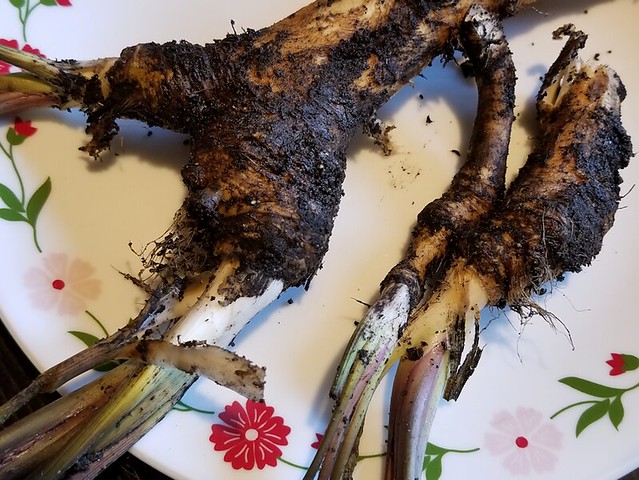
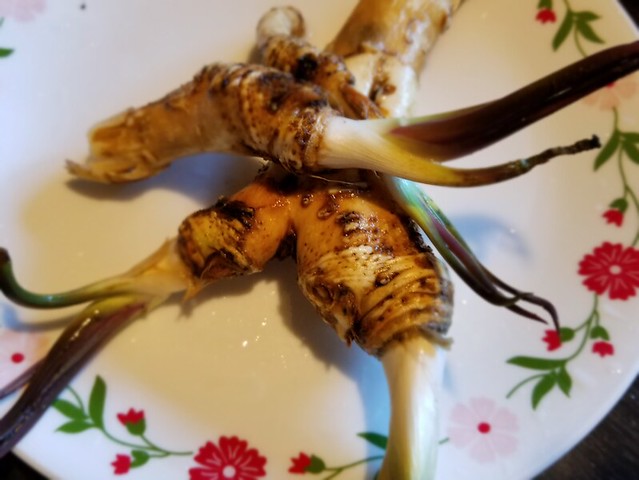
This evening, I went hunting for horseradish.
After scraping away some fallen leaves, I found some new grow peaking through the ground. I used a potato fork (the only fork that didn’t grow legs and walk away over the years) to dig up a few pieces.
This bunch is growing under the power pole in the garden. I knew the area was very rocky, but wow. I had a really hard time getting that fork deep enough to get some roots out. No matter where I moved it, I was hitting rocks, just a couple of inches below the surface.
I didn’t take out much. A larger piece for our own basket, and a couple of small pieces for my mother. If she wants, she can use one and plant the other, since she has garden space where she lives.
For now, I’ve scrubbed the dirt off, and they are wrapped in damp paper towels. For our basket, I will peel some of the outer skin off the lower part, and save the top. The tradition is to use horseradish paste, mixed with beetroot, in the basket; the bitter taste of the horseradish symbolizes the pain of crucifixion Christ endured for us, while the sweetness of the beetroot symbolizes the joy of the resurrection. Growing up, though, we always used fresh horseradish root. My mother would sometimes give away pieces with sprouting tops, after the baskets were blessed, to friends to plant if they wanted.
My mother planted the horseradish in strange places. One batch is under a spruce tree, which would be just as difficult to harvest as the ones growing among rocks. I found more growing among some of her flowers outside the living room window, which has better soil conditions, but harvesting it would mean damaging the bulbs of the flowers it’s growing with.
I’m thinking of maybe using some of the raised planters that are still in decent shape, so the horseradish itself will also be contained better, and not spread too much.
Something to figure out over the next few days!
Meanwhile, I will now go and boil some eggs to make pink pickled eggs. :-)
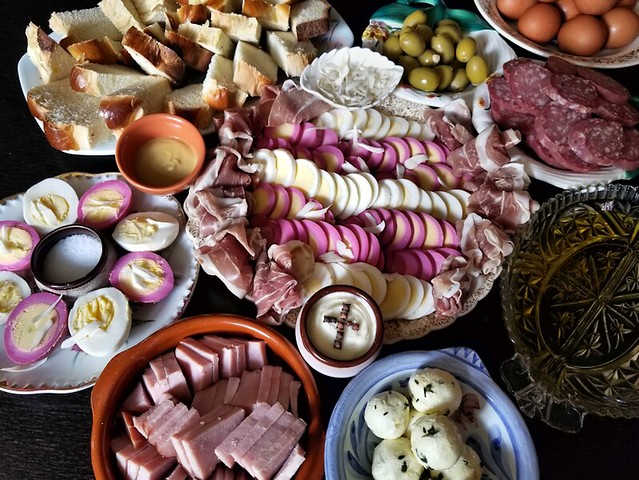
Though it is still weeks away, we are already planning our semi-traditional Polish Easter basket.
I say “semi” traditional, because we’ve modified some of the contents over the years.
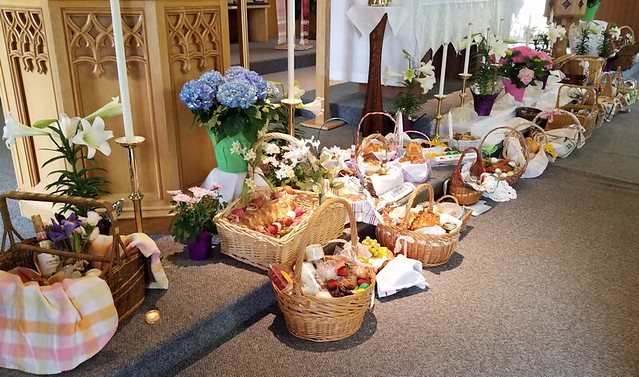
If you’re unfamiliar with a Polish Easter basket, these are filled with symbolic foods to be blessed on Holy Saturday, and eaten on Easter Sunday. The foods include ham, sausage, bacon, bread, cheese, salt, butter, horseradish and eggs. We also include things like olives, vinegar, and olive oil. It may also contain a bottle of wine and a candle. Oh, and sometimes chocolate or candy. The baskets are decorated and covered with lace or embroidered clothes. As a child, Easter was my favourite holiday, and our traditional basket was a big reason for that!
Some of the contents require more advance preparation, and I was able to start on one of those, yesterday. This is a non-traditional way to include the traditional cheese in the basket.
This year, I found some absolutely delightful mini-jars, and decided to make several small jars of marinated goat cheese, but we’ve also done it by layering medallions of goat cheese in a larger jar. Both ways work fine.
It had been my intention to make two baskets this year, with a large family basket for ourselves, and a smaller one for my mother. She declined my offer, and will be making her own basket.
We’re going to have lots extra out of this batch!
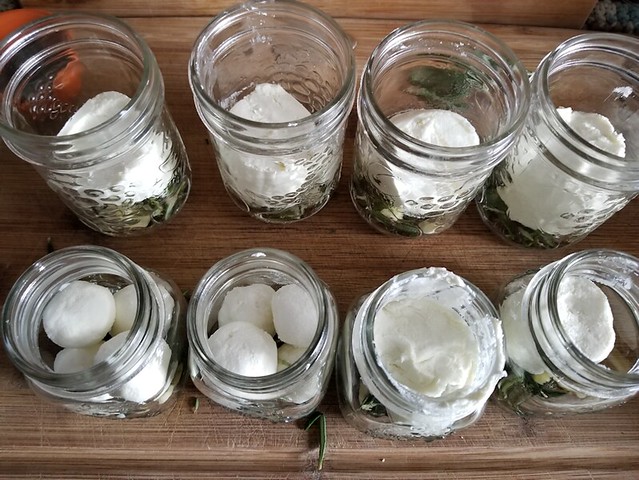
To start with, I scalded the tiny jars I bought special for the basket, plus extra pint size jars. Then I prepared the ingredients. The mini-jars have smaller openings, though, so that changed things a bit.
Here we have fresh rosemary leaves and fresh thyme leaves – they came in 28gram packages, and I stripped the leaves from the stems. There are peppercorns and about 8 cloves of garlic, sliced. Not pictured is Extra Virgin Olive Oil.
I completely forgot about the bay leaves. There should have been a bay leaf per jar.
As you can see, this is a forgiving recipe.
The goat cheese came in 300 gram logs; I had 2 of them and cut them each into 4 equal pieces. For the ones to go into the mini-jars, I cut pieces off to try and make them into smaller columns, then gently rolled them between my hands to make them smooth and round.
The first one I tried, promptly crumbed apart. Which is why I have rolled balls of cheese. I broke up each trimmed quarter piece into 4 and formed the smaller pieces into smooth balls.
For the pint sized jars, I didn’t have to be pretty, since they’re not intended for the basket
Each jar got some peppercorns, thyme leaves, garlic and rosemary leaves placed on the bottom. If I’d remembered the bay leaves, they would have gone into the bottom, too. Then the goat cheese gets put into the jars.
This is why I make extras…
I didn’t make one of the small columns of cheese small enough. It got messy. :-D
No worries. It’ll still taste good!
Once the cheese is in, more peppercorns were added, as well as the rest of the thyme, rosemary and garlic slices. Then the olive oil was added.
After the oil was added, the rims were cleaned, the jars sealed, and into the fridge they went.
Next is the hard part; waiting a week before using them!
From the looks of them, I think the balled cheese will be kept for the basket. I do have one non-messy mini-jar with a bigger piece, so I might use one of each. We shall see. The pint jars don’t have to wait for then, though, and I will post pictures, when they are ready. :-)
After marinating for a week, the oil can be drained through a sieve and reserved (the herbs are discarded). It makes for incredibly flavourful oil to use when cooking. The cheese can be served as a spread on bread or crackers, or used any other way you would use goat cheese.
Alternatively, little jars like this can be served as individual appetizers. The jars can be warmed by placing them in a flat bottomed pan with hot water, and placed in a hot oven until heated through. They can then be used as individual servings, eaten straight from the jar.
I intend to put these in our basket, just as they are, without straining them first since the jars are so small. When we made them before, with layers of cheese in a larger jar, we removed the cheese, then put a few pieces into a smaller container with a liquid tight seal. I then covered the cheese with strained oil and closed it up. It made for a nice presentation in the basket. :-)