Maple spoon; an unexpected experiment

Today was another hot one, which made it a good day to finally go into the basement and see what I could do with the various pieces of wood I’ve brought down there.

Since getting my wood carving kit, I haven’t had much chance to make things with it. I used the spoon blank it came with for my first attempt. Then I used some of the lilac wood pieces to make a hair pin for my daughter. I have since made a longer, plainer lilac hair stick for my daughter, and tried to make one out of cherry for myself.

I say “tried” because when I got a bit decorative at the thick end, it ended up breaking, twice. The inner core of the piece of cherry I was using was rotted just enough that when I tried shaping the wood, it was just too weak. This was true of the lilac wood, too, but I hadn’t tried to carve anything that would affect the integrity as much, so they were fine.

Today, I wanted to make something with some of the maple pieces from the tree I had to cut part off, earlier this year, so it would be safer for my brother to move around on the shed roof he was patching.

I had a branch of it set aside, waiting for a day like today, and I cut a short piece to work on.

I was thinking of going very simple, and making a spreader or something like that.

Thinking of the lilac and cherry wood, though, I decided to split the piece and see what it was like on the inside.
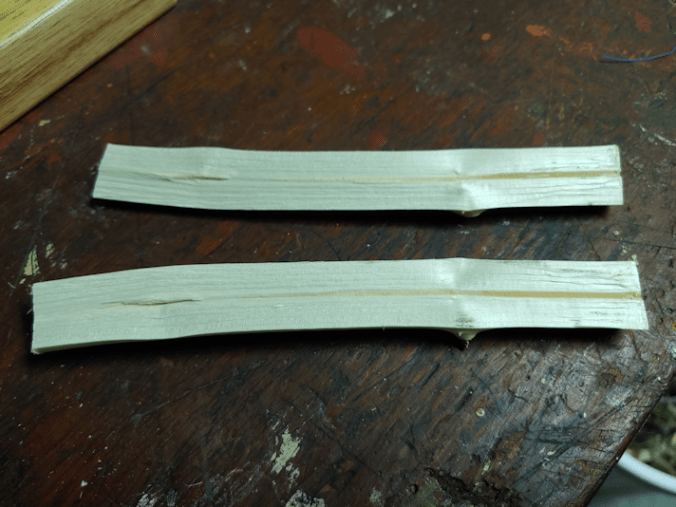
Well, crud.

I’m not going to be able to make a spreader out of that.

So I cut a piece from a larger branch I had set aside.

Dangit!

I really hope it isn’t all like this. The stuff I want to make uses the heartwood. For the larger pieces, I’m thinking of cups or bowls. Stuff I plan to actually use.

In fact, there was a particular piece of dead maple I’d found while cleaning up the maple grove, I think in our first summer here, that I was looking forward to using.

It doesn’t look like much on the outside, but when I cut it, this particular maple had red rings inside it.

I cut a piece off the end and took a look.

That does not bode well.

So I split it.

*sigh*

Yup. The middle is rotted.

However…

What about the edges? The parts with the red it in still looked solid.

So I split it again.

It did not split well, but the wood did seem pretty solid. Could I do something with this?

I wasn’t sure.

Over the next hour and a half or so, I hacked at it with a giant knife (which I’ve been using in lieu of a hatchet), decided to try the sloyd knife to carve out a spoon bowl, gave up on that and tried the Dremel (the two different tips I tried did the job, but the friction actually charred the wood!), finally broke open my new set of rasps and used a bar rasp with 4 different surfaces, and yes, even the carving knives.

Part way through, I dragged one of the chimney blocks from the old basement to use as a lower, solid surface. Especially for when I was hacking away with the big K-bar.

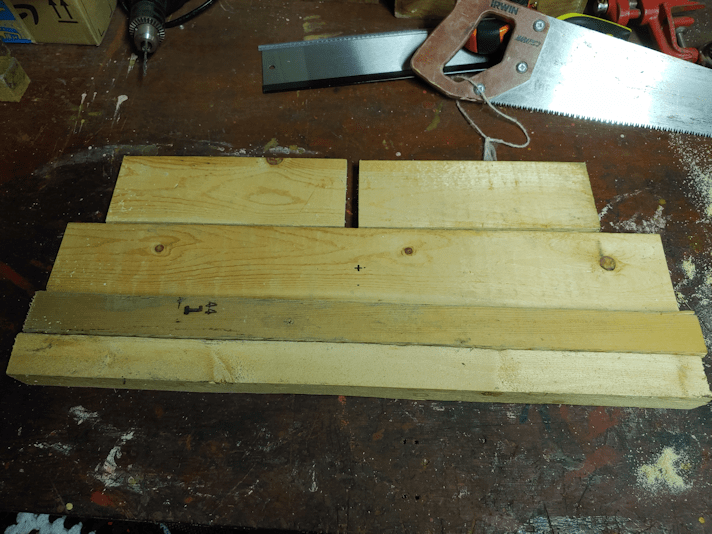
So that hunk of wood up there?

This is what I got out of it.

I didn’t stop to take any photos while I was working on it because, to be honest, I didn’t think it would work!

So here, I am at the stage of using my coarsest grit sand paper.

As I moved up to finer sandpaper, I would sometimes use my little vice.

You can really see the gouges left by the rasp. The vice made it much easier to just use a narrow strip of sandpaper around the handle and pulling back and forth.

Working my way through ever finer grits of sandpaper took probably another hour and a half.

Sanding the inside of the bowl was the most difficult. While I could use the curved sloyd knife a bit, the wood was really too small for the blade. What I really needed was a wood gouge, but I don’t have one. So that’s where the Dremel came in handy, to get the bulk of the wood out of the bowl, but I still had to cut out the bits that charred from the friction and shape it. I ended up using the other carving knives more than the sloyd knife, because of that.

Here it is, after final sanding.

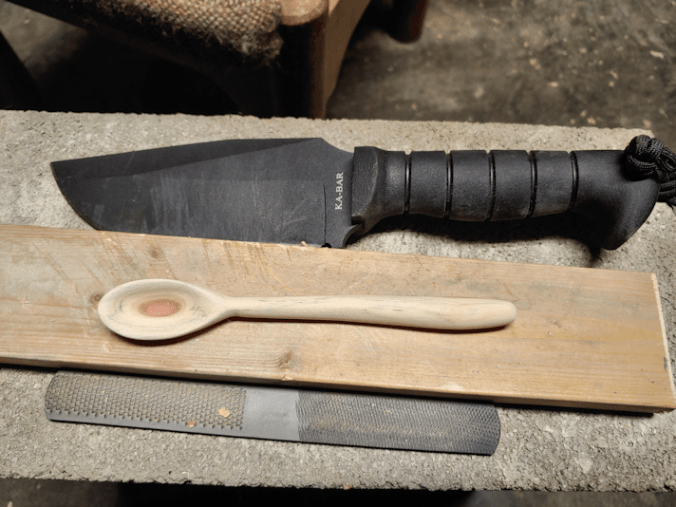
You can see on the scrap wood, where the knife was hitting while I was chopping away the excess wood on the spoon. :-D

I also included the bar rasp, to show the different surfaces.

Of course, I just had to get a picture of it next to a piece of the wood it came from.

I still can’t believe I was able to get this out of that chunk of wood!

As I was sanding it, I noticed black showing up in the non-red parts of the wood.

Having done my research before I started with my first attempt at carving, I recognized it as spalting. There are people who go out of their way to use spalted wood. It’s basically a sign of the wood’s decomposition.

It was very faint as I sanded, but how would it look after being oiled?

And how would that red show up after being oiled?

Let’s find out!

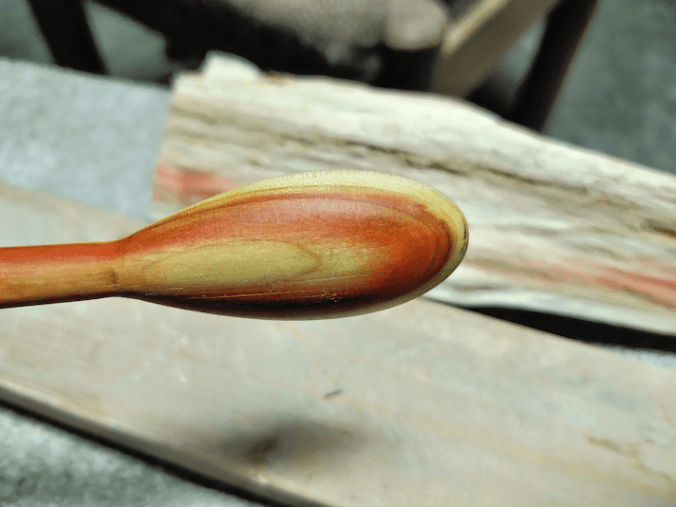
Wow!! What a difference!

I could have cut this part out, but I kind of like it.

Unfortunately, I find the spalting makes it look like it’s dirty. :-(

On the back, you can still see some of the roughness of the would that I didn’t quite get rid of completely. They look a bit like scratches on the lower part of the spoon. The part that became the outside of the spoon bowl had some chunks missing from how the wood split. It meant less excess wood to remove in that area, at least.

So this experiment was a lot more successful than I had dared hope! Not only was I able to get something out of a partially rotted piece of wood, but I was able to start and finish a spoon in one sitting!

One of these days, I want to try making a fork. :-)

The Re-Farmer

Not quite a recipe: three cheese scalloped potatoes with kielbasa and carrots

While making scalloped potatoes yesterday, I wanted to find a way to use the carrots from our garden I had picked that morning.

If they had been larger, I would have just sliced them thin and layered them with the potatoes, but these were on the small side.

So I got creative.

Here is how I ended up making the the scalloped potatoes.

For the cheese sauce, I used 1 medium onion, sliced thin, butter, flour, seasonings, whipping cream and cheese.

We already had old cheddar and grated Parmesan in the fridge. I also picked up a cheese that has recently showed up in local stores that is just awesome. BellaVitano Reserve. We’ve tried the three different varieties we have available, and I picked up Tennessee Whiskey this time. They have an Espresso one that it really good, too. I shredded this, plus the cheddar, and mixed it all together with some grated Parmesan. I used most of it in the sauce, saving some for later.

For the seasonings, I used mushroom salt, freshly ground pepper, garlic powder and paprika. For the liquid, I like to use whipping cream, but it can be made with milk or a lighter cream, though why anyone would want to, I don’t know. ;-)

To make the sauce, the onion first gets slowly cooked in about a tablespoon of butter until soft. Then, a couple more tablespoons of butter is added. When that’s melted and bubbling, the flour (about 2 tablespoons) is added and cooked, stirring constantly with a whisk, for maybe a minute. Then 2 cups of room temperature cream is added, little by little, with pauses to whisk it smooth. For the first while, the flour thickens the cream very quickly. After all the cream is added, the sauce is simmered, while constantly stirred with a whisk, until it is slightly thickened. Then the seasonings are mixed in. Finally, the heat is turned off, then the shredded cheese mixture is stirred in until melted. After tasting to see if the seasonings need adjusting, it is set aside.

For the rest of it, I had potatoes peeled and sliced thin and the carrots were peeled and shredded. I didn’t count how many potatoes I used. They were on the small side, so it was probably around a dozen. The shredded carrots made about 3 cups, loosely packed.

In a buttered baking dish, I put a layer of potato slices, topped it with 1/3rd of the shredded carrots, then added 1/4th of the onion and cheese sauce. This was repeated two more times, then the top layer was just potatoes and the last of the sauce.

It then went into a 350F oven for about 40 minutes.

Shortly before the time was up, I took a ring of Polish sausage and cut it into slices. The slices were then laid on the top of the potatoes.

I hadn’t originally planned to use the sausage, but I happened to have it, so why not? :-)

I did have some concerns at this point. We’re still getting used to the new stove, and haven’t used the oven much at all in this heat. When stabbing the potatoes with a fork before adding the sausage, they were still surprisingly hard. I had forgotten to cover it with foil at first, so that might be why.

I covered with foil at this point, but it really should have been added right from the start.

With the sausage on the top, I put them in for another 10 minutes. Most recipes for scalloped potatoes that I’ve seen say to bake for 40-50 minutes, and I was shooting for 50 minutes in total. After that, I added the rest of the cheese mixture on top.

Back in the oven it went, though without the foil. I didn’t want the cheese to stick to it. I then baked it until fork tender.

It ended up taking a lot longer to cook than I expected.

Also, handy hint. Put the pan on top of a baking sheet, in case the sauce bubbles over.

We’ll be testing out the oven’s self cleaning function, next…

:-D

When it was fork tender, I took it out and topped it with chopped parsley I’d picked from our garden that morning.

This was quite an experiment from how I usually make scalloped potatoes. They are usually just the potatoes and onion-cheese sauce, these days. I was very curious as to how the carrots worked.

They pretty much disappeared!

I used some of each type of carrot we have; white satin, rainbow (orange, pale yellow, and white), and deep purple. The purple carrots left colour on the potatoes, but with them being shredded, and such a long cooking time, they all pretty much disintegrated and disappeared into the sauce. I could taste a hint of their sweetness, but that was it.

I would definitely be up to including them again.

The addition of sausage… well, you can’t go wrong with adding kielbasa!

The cheese mixture worked really well, too. That Tennessee Whiskey cheese added to the flavour, but did not overpower.

All in all, this was quite a success!

The Re-Farmer

Making lemon cheese and a hanging rig

I’ve been planning to do this for a while, and finally had the chance today: making lemon cheese. I’m using a recipe I found here. Do check this site out. Especially if you’re interested in different ways of preserving food, though there is lots more there, too.

After sanitizing my equipment, I started heating the gallon of milk.

Well… not quite.

This is Canada, and our “gallon” of milk is actually 4L, as you can see on the very handy measurement inside the stock pot I am using. A litre is just a bit more than a quart. At 4L, the difference is enough to warrant adjusting the quantities of the other ingredients.

Which are lemon juice and salt (I used Kosher salt).

For a gallon, the recipe called for 8 Tbsp of lemon juice and 1 Tsp of salt and I adjusted those quantities up slightly when I measured them out.

After heating the milk to between 185F – 190F (I got to break in my new candy thermometer. :-D ), the milk is taken off the heat and the lemon juice is added. (I used 3% homogenized milk.)

It curdles immediately.

It then gets covered and left to sit for 15 minutes.

Which is when I dashed downstairs to do a quick build. The cheese would need to be hung to drain later, and we don’t have a good set up for that. We’ve made do with whatever we could come up with when making jelly or yogurt cheese, but we plan to be doing more of this sort of thing in the future, so having a rig to hang things to drain would be very useful.

Since we have also finished the basement and have some pieces of wood handy, I can actually do something about it!

When my timer went off, I’d reached this point.

There was just enough of the wood we used to build a frame to block the entry into the old basement, to cut 2 ft long side pieces. One of them is missing a chunk at one end, but it’ll do. I then cut a matching 2 ft long cross piece for the top, and a pair of base pieces.

Then my timer went off and I headed upstairs. Thankfully, my daughter was handy, and she took over with putting the curds into a cheesecloth lined colander over a bowl, to drain for 10 minutes. That was just enough time for me to finish my rig.

I used what screws I had that were long enough, which were really way too long for the job, but whatever. I also added a cup hook to the centre of the cross piece to hang things from.

It is a pretty ugly rig right now. Normally, I would have sanded the pieces and used more appropriate screws. It’s kinda wobbly, but steady enough for the job.

By the time I took it upstairs to give it a good cleaning, it was time to add salt to the cheese curds.

Here they are, after salting.

This is basically cottage cheese, really. My daughter had given it a quick taste after salting it and says it tastes quite different from cottage cheese, but we’re not washing the curds or anything like that, either.

The recipe then says to hang it for 30 minutes for a spreadable cheese, or up to 2 hours for a dry and crumbly cheese.

We were using a fresh cheese cloth, without cutting it down to size, so I ended up tying the cheesecloth around the cross bar instead of using the hook.

We checked it after half an hour and decided to let it hand for the 2 hours. We’ll see how it looks, then!

When we’re done with all this, I will probably take the rig apart and finish it properly. Give the pieces a good sanding, then screw it back together, with some wood glue to make it more stable.

I am so loving having that space in the basement to be able to do projects like this!!!

The Re-Farmer

Brownies, with recipe

Along with the sourdough batter bread my daughters made today, they also made brownies!

I wasn’t there to take pictures as they made it, but here is their recipe.

I didn’t realize until I uploaded the picture that there’s flour covering some of it. That reads “1 1/4” for the white sugar. :-)

For the chocolate chips, this time they used mini Reese’s Pieces.

These are such decadent brownies!

I think I’m going to go have a piece…

The Re-Farmer

Sourdough “Batter” Bread, with recipe

Today my daughters did the baking, starting with a sourdough “batter” bread.

There’s a reason the word batter is in quotations…

The girls have been finding recipes they like and, after trying them out, adding them to a notebook with any modifications or adjustments they’ve come up with.

Like this…

Continue reading

Bread Baking Day – all done!

Sometimes, I think we really need to do bread baking more often.

Then I remember how much clean up is involved. :-D

No matter! We now have two kinds of freshly baked bread done.

Here’s how the seedy bread turned out.

This is how it looked after only 1 hour of rising time. The bowl it’s in is pretty huge – too big to fit in our kitchen sink (which makes washing it a bit of a challenge! :-D ) – with plenty of room for this 4 loaf recipe.

The timing of things works out really well. I use half the dough to make buns first, leaving them to rise while I shape a couple of loaves. Once those are done, I star to preheat the oven. By the time it’s heated up, the buns have risen enough to go straight in. Once they’re out, the loaves have had enough time for their second rising. When those are done, the overnight sourdough loaves are ready to go into the oven. No wasted time in between, making for more efficient use of a hot oven.

They came out quite beautifully, too! Such a tasty bread, with a really nice texture. I love the bit of crunch the seeds add to it.

The second rising for the sourdough loaves was probably about 4 – 4 1/2 hours. The first rising was probably about 11 or 12 hours.

This is how they looked, just before I put them in the oven. They definitely rose more than the first time I tried this recipe, so the modifications made quite a difference, but still not rising as high as variations that use added yeast.

Is it worth it?

I think so.

The actual working time to make this bread is low. It’s mixed at night, then kneaded for 10 minutes the next day. It really doesn’t need a lot of attention.

The loaves came out so smooth and gorgeous. None of the cracking you can get when using an added yeast bread, since there’s no sudden rise in height in the oven.

The bread itself has a slightly thicker, sturdier crust, while the crumb is incredibly soft, tender and fine in texture.

Reducing the amount of sugar was definitely a good move. The sourdough flavour was more dominant this time, whereas the last time I tried this recipe, the sweetness was more dominant. I think adding that little bit of baking soda helped with the rising, too.

I’d still prefer a more “sour” sourdough flavour, but that has more to do with our starter than with the recipe. We’ll be making more of this one, that’s for sure. I think I’m satisfied with it enough that, next time I bake it, I’ll post with the tweaked recipe.

Tomorrow is going to be another baking day, though this time for my daughters. I look forward to seeing what they’re planning to make. :-)

The Re-Farmer

Mead Baby 2.0: bottling day!

Today, we finally bottled our second attempt at making mead!

I last wrote about it here, and you can follow links to the whole process we went through, here. (Links will open in new tabs.)

Here is how it looked, after unwrapping the carboy from its towel (which served to insulate, as well as keep light out).

Continue reading

Historical recipe: one recipe, two products

One of my long time interests is experimenting with historical cooking.

I say experimenting, because it’s not unusual for these recipes to include ingredients that are no longer available, hard to find, unknown or even extinct. Plus, they often don’t include a lot of information, either because it was assumed the reader already understood what was needed, or it was simply technologically impossible for the time period.

Thankfully, that’s not as much of a difficulty for recipes from more recent time periods.

Not too long ago, I discovered a YouTube channel called Townsends, featuring all things 18th century. I highly recommend it! I was intrigued by this video on how to make Mushroom Ketchup.

Yes, you read that correctly! Mushroom. Ketchup.

It sounded both weird and delicious at the same time! :-D

I found the recipe here, and decided to give it a go.

Continue reading

Fermented vegetable sauerkraut, take two: four week taste test

Well, today is the day!

It’s now been 4 weeks since I put up my second attempt at these. If you missed the earlier posts, you can click here, or read about our 2 week taste test here (likes will open new tabs).

Since the recipe I got from my friend said 2 – 4 weeks fermentation, I wanted to see what difference the extra time made.

I continued to monitor the jar over time, and did end up adding some water once, as the brine evaporated enough that the top was no longer covered. Both jars had been topped up in the previous two weeks. In keeping with the changed made after our first, failed, attempt I only used either water that had been previously boiled, or bottled water, just to be on the safe side in regards to our well water.

As you can see in this picture, the brine was no longer quite covering the cabbage leaf, even after being topped up. The leaf itself had floated out of position, though, so I wasn’t too concerned. The main thing is that there is NO sign of mold!

Here, with the cabbage leaf removed, you can see that the vegetables were still covered with brine.

Once again, no sign of mold! Yay!

Then came time for the taste test! After digging some out (and I do mean dig! The contents were very tightly packed. :-D ), I put a regular lid on the jar and refrigerated the rest, which will stop the fermentation.

So… how did it taste?

To be honest, I’m not sure I can tell what difference the extra two weeks made! It still had a nice crunchy texture, and didn’t seem to be any more sour. If I really had to come up with something different, I would say that perhaps the flavours were a little more blended, but even that would be a stretch.

I am also still getting that hint of after taste from one of the ingredients that I don’t really like. I wonder if it’s the ginger? Or maybe the parsley? Definitely not the garlic. Hmm.

I definitely will be doing this again, though I think I will modify the recipe and simplify it. Maybe keep the carrot and garlic, but drop the ginger and parsley, and see what difference that makes.

Altogether, this batch was definitely a success.

The Re-Farmer

Mead Baby, redux

Today, we started up a second – smaller – batch of mead.

I hope.

I documented our first attempt, throughout the process, which you can revisit at the following links (they will open new tabs, so you won’t lose your place. :-) )

Part 1 getting started
Part 2 early stage maintenance
Part 3 early stage maintenance, completion
Part 4 transferring for second fermentation
Part 5 bottling and initial results

The Failure. :-(

Continue reading