This is how the crab apple juice looked, right after we got finished setting up the fermentation.
This is how they looked this morning.
The photo does not do justice to how bright the colour is!
When I was checking these last night, the tops were full of dense foam, which has mostly collapsed, but you can certainly see how high it got.
Their temperatures seem to be holding at between 18 and 19C, and – most importantly! – we are seeing activity in the airlocks. Not a lot, but it’s definitely started to bubble!
Today was our first attempt at making hard apple cider. We are using the remaining apples from the one crab apple tree we have that produces the most amazing, sweet, delicious little apples, after using some of them to start an apple cider vinegar.
When we first moved here and saw how many crab apple trees we had around the property, we looked into what was needed to make hard apple cider. At first, we didn’t think it would be anything we could do, or at least not anytime soon. Making hard apple cider, we found, required using a large press to crush whole apples, then sealing up the resulting juice to ferment a few months.
We didn’t have a press, and with so many other things on the go, we were not about to build or buy one, either.
They started making hard apple cider, using store bought juice. Sometimes, right in the container it was packaged in!
We could make hard apple cider without having a press, after all!
One of the things we found when cleaning up this place after moving in, was a juicer exactly like the one we had to leave behind when we moved. I think one of my siblings bought it for my mother, but she hardly used it. Everything was still in its original packaging, even!
We decided to try making hard cider using our own juice.
Now, making it using store bought juice in the bottle they were sold in works, because everything comes pasteurized and sanitized off the shelf. Basically, enough juice needs to be poured off to make room for the sugar and yeast, an airlock gets put on, and you can leave it to ferment to get a very basic hard apple cider.
Of course, doing it the traditional way, with a press, the juice didn’t get pasteurized or filtered or anything.
We decided to try making our own hard crab apple cider with raw, unpasteurized, unfiltered juice. The juice would be going straight from the juicer to the sanitized gallon jugs, so the chance for contamination would be very lower.
Lower than trying to do it the old fashioned way, that’s for sure!
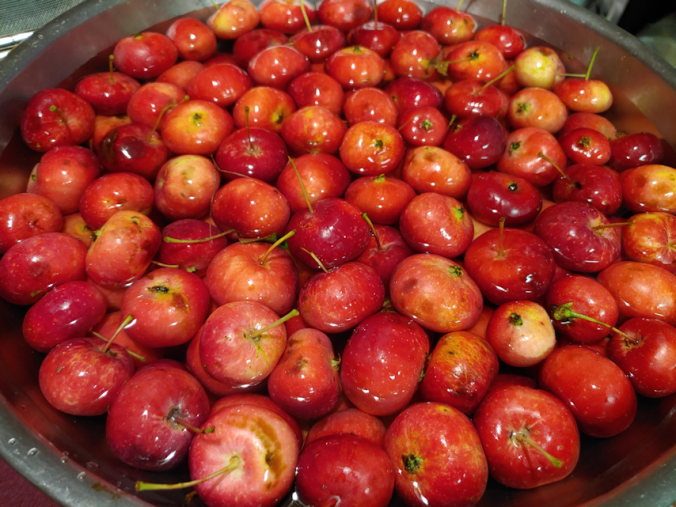
The first step was to clean the apples and de-stem them. They didn’t have to be cored, but the stems would cause problems with the juicer.
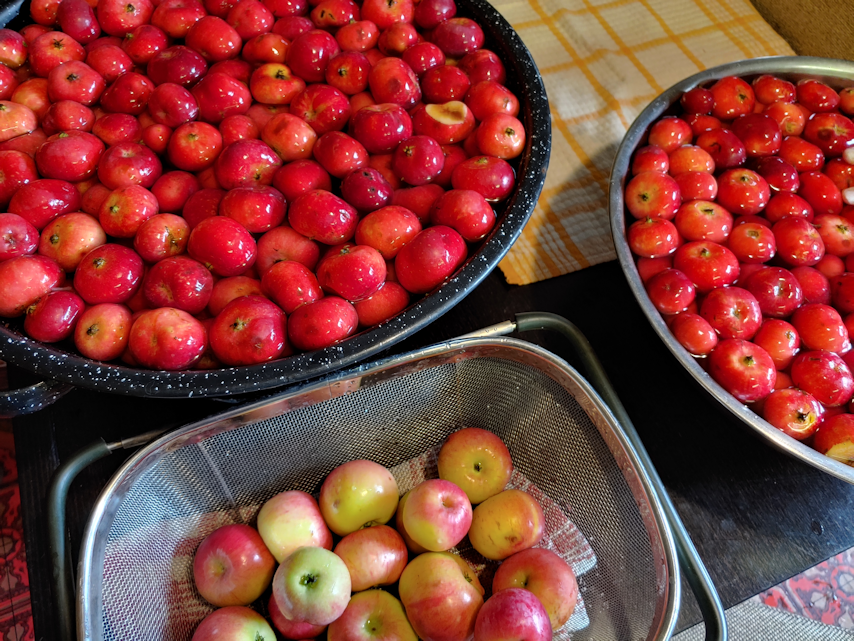
The crab apples from the one tree completely filled my two largest bowls. Though I cut away some obvious nasty bit, I wasn’t worried about light bruising. I also have the not-quite ripe apples from the tree that broke in the wind storm.
It’s a good thing we had so many of these apples this year, since I had to toss the cider vinegar, and start over again.
Juicing the apples turned out to be more difficult than expected. It was made slightly easier when we found a way to raise the juicer high enough that a 1L pitcher could fit under the spout. We had 2 one gallon jugs, and a gallon is about 4L, so I could use the pitcher to loosely measure how much juice I was putting in. However, these little apples don’t have a lot of juice in them, and their pulp kept jamming the machine. My daughter kept having to stop the juicer, open it up and peel away the pulp that accumulated on the perforated metal cone inside, instead of going out the back. The pulp was so dry, it could be taken off in ribbons!
Using information I got from one of the hard cider making videos, I used 2 cups of sugar per gallon. Each got 2L of juice before I put in a bung and shook the heck out of them to dissolve the sugar.
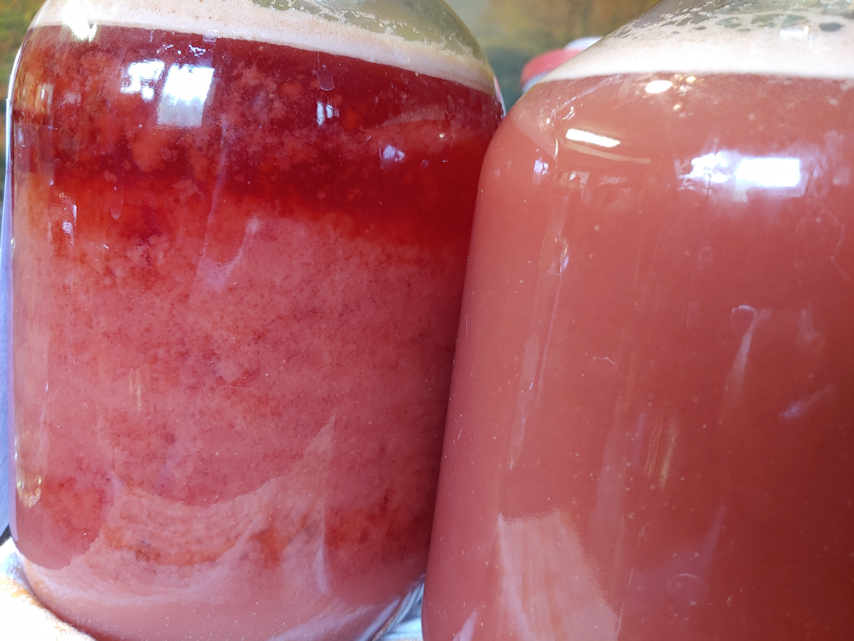
Look how pink that is!!
Also, you might notice the liquid is not at the same level. Though these are both 1 gallon jugs, one is actually bigger than the other. They are 1 gallon at about the “shoulder”, which leaves space for the fermenting liquid to bubble up a bit.
I also used the same wine yeast we’ve been using for everything else; I don’t know the specific strain of yeast, but it’s basically what is available for a non-sparkling wine from the local brewing supply store. Again, following what I saw in the video, I dissolved about a tsp of yeast in a bit of juice, then added it to the full jugs, after getting a hydrometer reading.
After the yeast was added, they got another thorough shaking, then the airlocks were put in place.
I’m also trying to be more diligent about recording everything. I have to admit, I still don’t understand the hydrometer information, so I wrote down all three readings. It has a “potential alcohol by volume” measure right on there, but I keep reading that it isn’t any good, and that it’s better to use the specific gravity reading. It doesn’t help that I can barely see the tiny numbers and lines in the first place!
I found it interesting that the readings for the 2 jugs that were made up identically, are slightly different. It’s possible that the different sized jugs means that one does have slightly more juice in it than the other, and that could explain the difference.
The juice is not only incredibly pink, but incredibly cloudy! They were, of course, just shaken when this photo was taken. You can tell which one got finished first, as the cloudiness is already starting to settle.
We have set the jugs up on a side table in the dining room for now. It’s not a particularly bright room, it’s warmer than the old kitchen, and we can keep an eye on them. I just took a look at them, after they’ve had several hours to settle. I will have to take a photo of them during the day. They look very different right now! The sediment has settled to the bottom, and the clear juice in the middle is looking a deep, deep pink – but there is a significant layer of lighter pink foam at the top! I used the temperature gun on them, and got different readings, depending on where I aimed it. The top, where the foam is, was fluctuating between 19C and 20C (66-68F). The middle was around 17-18C (62-64F), while the bottom, where the sediment has settled, is 17C (62F). Which I think is good.
Also, I’ve turned the thermostat up for the house. It was set just below 15C/59F when the furnace turned on earlier today, so I’ve upped it a few degrees! So the ambient temperature will not be too cold, either.
I have no idea how this will turn out. Will the fact that we used raw, unfiltered juice be a benefit, or a disaster? Will we get something that tastes horrific, or wonderful? Considering how great the apples themselves taste, I would hope the resulting hard cider would be its match. I have no idea. This is a total experiment for us!
As for the remaining apples, it took so long to juice enough to fill the jugs that we didn’t juice the rest of them. I had started cutting them up to cook them into a dessert, but realized I didn’t have the energy for that left, so they ended up in the freezer! Meanwhile, my poor daughter had been standing at the juicer for so long, her back was starting to give out on her! We couldn’t even plug it in somewhere where she could sit down, since there are so few outlets in this house.
Last night, I procrastinated cleaning the dining room by starting the apple cider vinegar! :-D
I slightly modified the recipe I used last year, which you can find here. (Link will open in a new tab.)
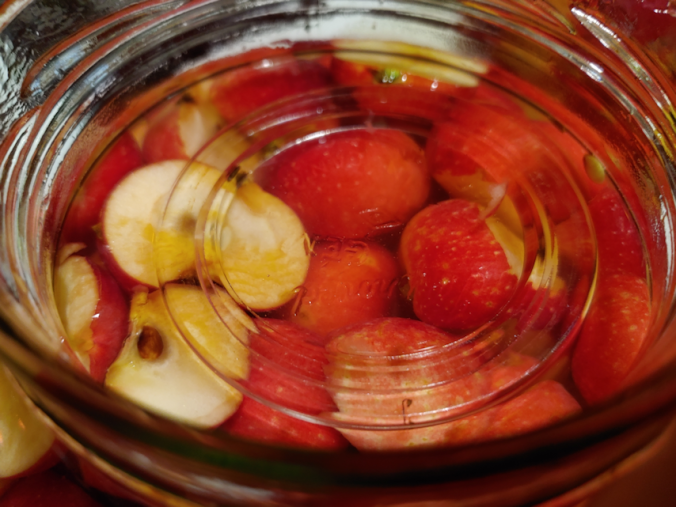
I started off by using one of my gallon jars to measure out apples from one of the 5 gallon buckets. As the apples would be cut into pieces that would fit more tightly, plus I would expect to cut away nasty bits, or even toss entire apples, I filled the jar to the top twice, then added a few extra. I have a large enough bowl to be able to give them a bit of a wash, then leave them to soak while I prepped other things.
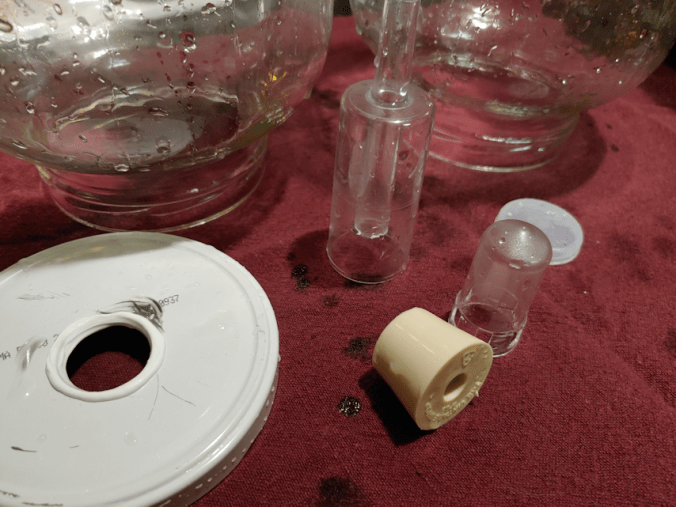
Last year, I sterilized things with boiling hot water. Since then, we have started brewing, so along with extra airlocks, we also have sanitizing solution. So one of the changes this year is to use that to sanitize everything, instead of scalding them.
Since I was doing a lot more crab apples this year, I put the cut pieces into water with a bit of lemon juice as I worked. Last time, for the amount of apples I can, there was no need for anything to keep them from browning until I was done. I cut them all into halves or quarters, depending on the size of the apple – or used what was left after cutting off any nasty bits! As expected, there were some losses, but not all that much. In fact, I could have done with fewer apples for the jars!
The recipe said to fill the jar 3/4s full, and I ended up with almost full jars! Even after shaking down, they were still full to the shoulder.
The recipe called for 2 Tbsp of sugar for a 1 quart jar, so for these, I used 8 Tbsp of sugar per jar. The recipe calls for filtered water. Last year, I happened to have some water bottles I could use, instead of our very hard, iron rich, well water. We currently buy refills of water for drinking that is first filtered, then treated with UV light and reverse osmosis. That is what I used to dissolve the sugar in, first.
The next change from last year was the use of a “starter.”
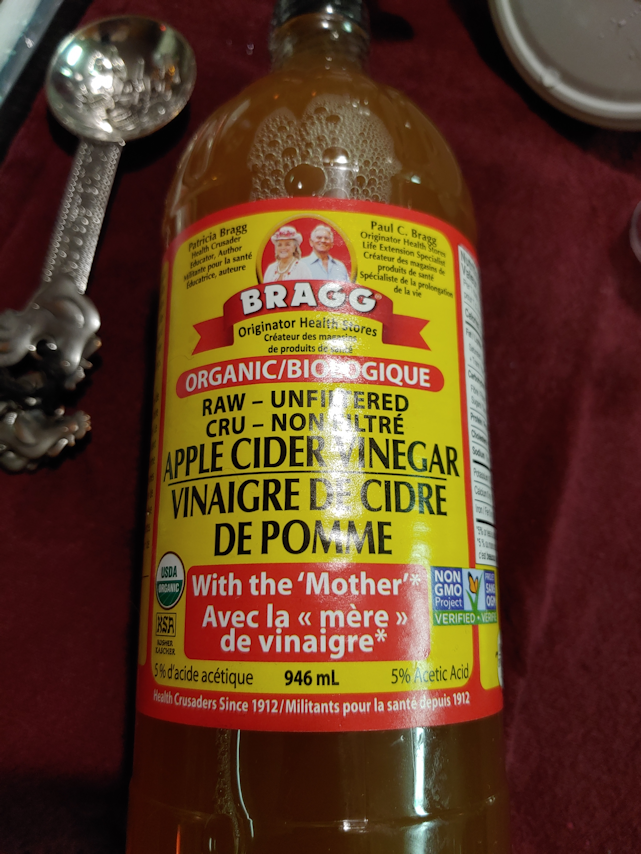
I’ll admit that when I normally buy apple cider vinegar, I buy whatever is cheapest. It gets used as an ingredient in cooking, so I don’t feel the need to anything fancy or expensive. When making the cider vinegar last year, it relied on the water, sugar, apples and whatever natural bacteria in the air “contaminated” it. Since I plan to use an airlock this year, and everything has been well sanitized, it’s not going to get that exposure. So I picked up a bottle of Bragg raw, organic, unpasteurized ACV, with the “mother”, to use as a starter and introduce the little critters needed for fermentation.
In doing my research, I found one person who used this same brand as a starter in his own ACV. He was using a large crock and just sloshed a bunch in, with no measuring, so I was left with no real idea of how much to use. I decided that 2 Tbsp per gallon out be enough. To make sure I got some of the “mother” that had settled on the bottom, I gently turned the bottle back and forth and upside down a few times first.
Once the starter was added, I filled the jars the rest of the way, with about an inch of headspace, with the filtered water.
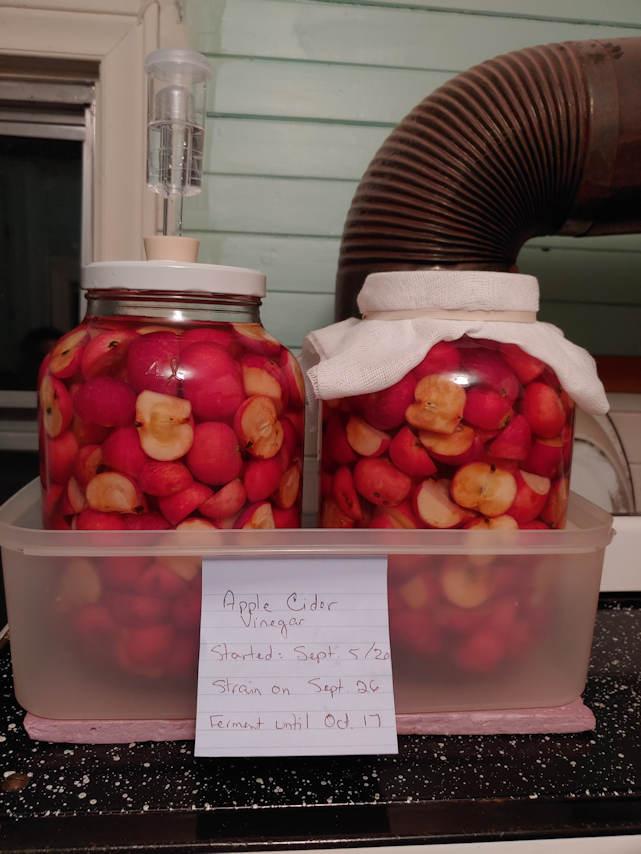
When doing this last year, I didn’t have any fermentation weights and made do with some small jars. I still don’t have fermentation weights, but with the nice, wide openings in these jars, I had something else I could use.
When I was a kid helping my mother with canning, snap lids wasn’t a thing, yet. She used either wax or glass lids with rubber rings to seal. In cleaning up the basements and the old kitchen, I’ve been finding lots of these glass lids. I cleaned and sanitized a couple of them, and they look like they’re just the right size to keep the apple pieces submerged! :-)
Now comes the experimental part.
The two jars were made in exactly the same way. One of them now has the airlock cap, while the other is covered with layers of cheesecloth, held in place with an elastic band. They are not sitting on top of the warming shelf of the old wood cookstove in the old kitchen. I placed a small piece of foam insulation down, first. The old kitchen stays quite cool throughout the summer, and is even cooler now, so the metal would be quite cold. During fermentation, there will be bubbling and foaming, and a possibility that the liquid might reach the cheesecloth, or even overflow, so they are in the plastic container to protect the top of the stove from any drips.
Now, it sits for three weeks. During this time, we’ll be checking them daily. I look forward to seeing what differences there might be, between the two methods, as well as comparing to how it turned out last year.
Hopefully, no fruit flies will be attracted to the one with the cheesecloth! We have a fruit fly problem in the kitchen right now, but so far, they haven’t been found in the old kitchen.
I still have about 7 or 8 gallons of apples left, even after my mother took some home. Tomorrow, I plan to juice them and start making some hard crab apple cider! The traditional way to do it is to use a press to smush the whole apples, then leave the juice to ferment on its own. We don’t have a press, but we do have a juicer, so I’ll be using that, plus some of the yeast we picked up to use for mead making. We have four 1 gallon jugs, plus a half gallon jug, to use for fermentation, so there’s plenty to be able to do both. :-)
This should be fun!! :-)
The Re-Farmer
Update: Sept 7, 2020 – I goofed! But you won’t spot my mistake here. Visit this follow up post to see what I did wrong, and how I fixed it.
Today I found myself heading into town for a trip that included a stop at the hardware store. I took advantage of being there to look for some Dremel tips.
The didn’t have the individual tip I was looking for.
I ended up getting this, instead.
I think I’ve got enough tips for quite a few projects, now! :-)
So, of course, I had to find a reason to use it. :-)
A while back, I posted about making a maple spoon.
You see that chunk of wood beside it?
That’s what I worked with, today.
This is that same piece of wood, roughed out.
Not for a spoon, though. Today, I was determined to make a fork!
For this project, I used everything I had around to remove the excess wood. The 4 way rasp got a lot of use, but I also used several of my new Dremel tips, the big K-bar knife, and a couple of my fine saws.
Basically, I see no point in dulling the blades on my carving knives any more than I have to! :-D
I saved cutting the tines for when I was ready to start using sandpaper on the rest of it.
I used a carving knife, as well as a fine tip on the Dremel to shape the tines.
Unfortunately, while sanding them, the wood broke off the tip of one of the inside tines.
Which meant I had to shorten all the others to match.
Here it is, after sanding.
Front
Back
The end result is the wonkiest of forks!
But it’s still a fork. :-D
Here is it, after oiling.
Front
Back
Oh, gosh, it’s the funniest looking fork, ever! :-D
Here it is, next to the spoon made with the same wood.
The spoon could use another coat of oil!
Well, I at least accomplished what I set out to do. Even if it does look totally wonky!! :-D
I still have wood left from the piece I used for these. I suppose my next project should be a knife. :-)
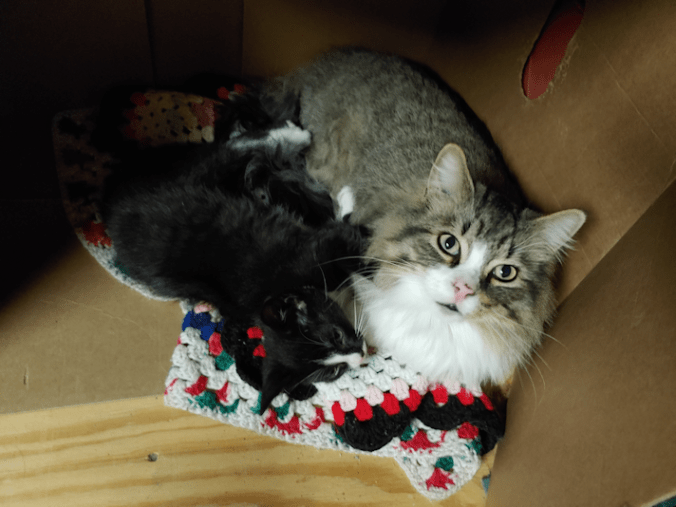
I am happy to say that I got the window for the old basement built – with considerably kitten interruptions!
While I did that, the girls installed the new kitchen faucet set. It turns out there are no shut off valves on the water. They had to shut off the main valve for the entire house.
On the list of things to do: add shut off valves all over. I’m pretty sure the bathroom sink doesn’t have any, and I know the toilet doesn’t. In following the pipes through the basements, the only valves we found where the ones for the outside taps, that just shut off every winter.
Also, the cold water pipes and well pump are all just dripping with condensation!
So we now have a nice, tall faucet on the sink that we can actually fit my big stock pots under. :-)
As for the window, this was my template.
As you can see, I have an enthusiastic helper!
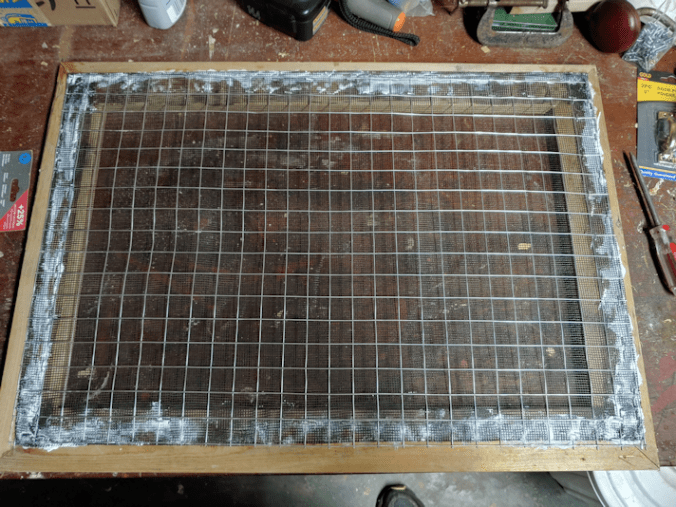
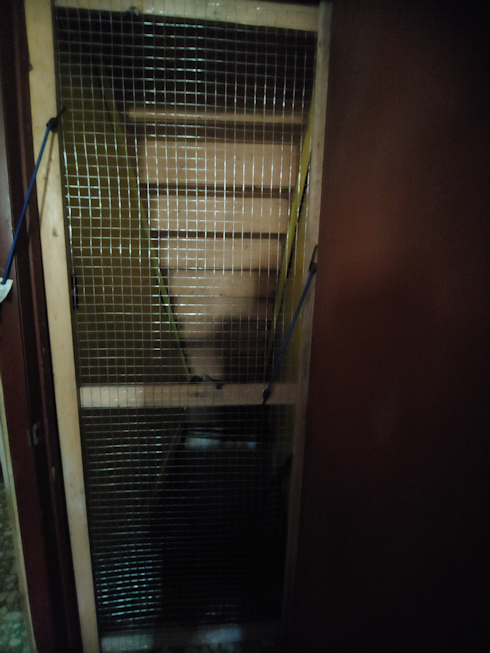
This is the window we leave on throughout the winter, with 3 inch thick foam insulation on the inside. When it warms up, we would take it out and place a wire mesh “window” over the opening to allow air circulation to help keep the basement dry. It is much bigger than the window opening, and the wood framing the metal mesh is old and rotting. It finally broke apart last winter. Right now, we still have it leaning on the wall, but with the broken frame, critters could easily squeeze through, to the insulation is still in the window opening.
I used a piece of some of the wood I’d brought from a shed and used to make the screen door so we can leave the old basement door open. One piece was enough, even after cutting away the water damaged end.
I used the window to size the pieces, then double checked the sizing after cutting. The back of this window has self-adhesive foam weather stripping around the edges, but half of it is missing, so the pieces can’t lay flat, but it’s close enough.
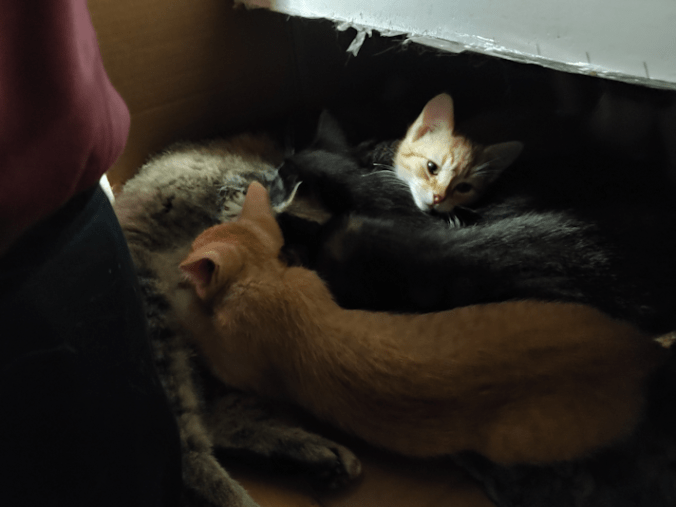
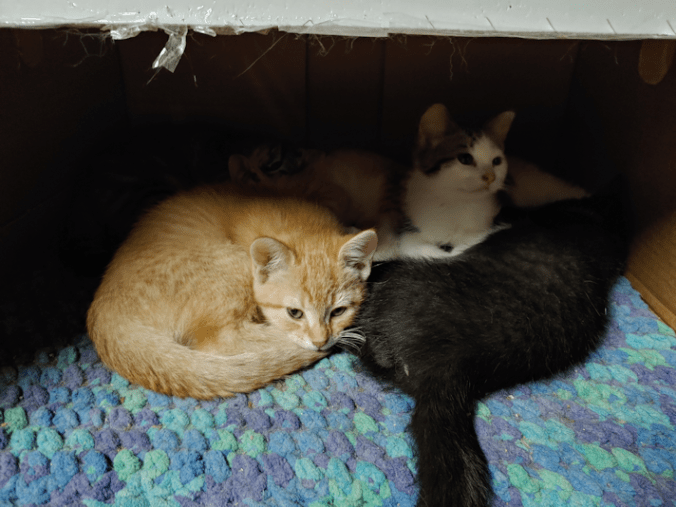
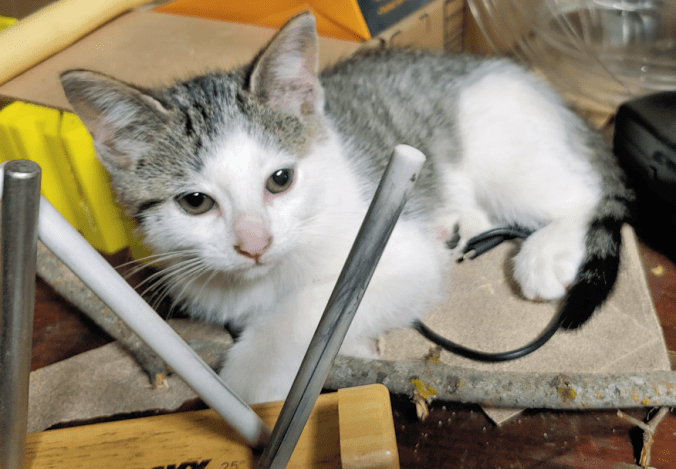
Also, it’s very interesting to use a miter box with kittens trying to climb all over me and my work table! I had some trying to chew on the miter box, while others would take flying leaps at my legs, then climb up onto my shoulders.
The little beasts! :-D
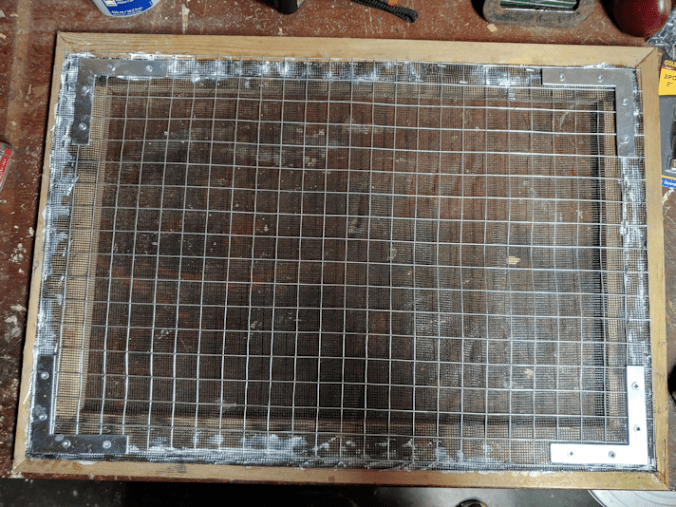
The next step was to ready the right angle plates I got for this.
This was my original plan; I’d use a combination of wood glue and these plates to secure the corners. I thought to put them on the inner edges of the corners, first, but changed my mind and decided to put them on the outer edges. I marked out the screw holes so that I could drill pilot holes, later.
It…
Didn’t work.
I started by using wood glue on a corner, then putting on the plate, only to discover the screws I had were a fraction of an inch longer than the wood was thick! It was juuuuuusssssttt enough that I screwed the corner to the table a bit.
The other problem, however, was my pilot holes. They were shallow holes; I just wanted enough to make getting started, easier. A few of them ended up being ever so slightly off centre, then some of the screws started going off on angles.
The end result was that the angle plate ended up making the corners less squared!
So I took off the couple I’d put on and left it for later. I had already glued the pair of corners, which were supposed to be clamped for 10 minutes. I don’t have right angle clamps. One didn’t really need it, but I did end up using a C clamp on the other.
It was a good thing I had to wait for the glue to set for a while, because at that point, I was being thoroughly loved on and cuddled by Big Rig. Then Leyendecker joined us. Then they fell asleep on me! After a while, Big Rig took off, but Leyendecker stayed. I finally had to move, and discovered David settled in one of their box caves, so I put them together – and Leyendecker stayed!
Until my husband came down, and he ended up with kittens nursing behind his butt. :-D Finally, Beep Beep got tired of that – and she joined David!
David is such a sweetie will all the cats and kittens!
I was, eventually, able to continue with the window. :-D
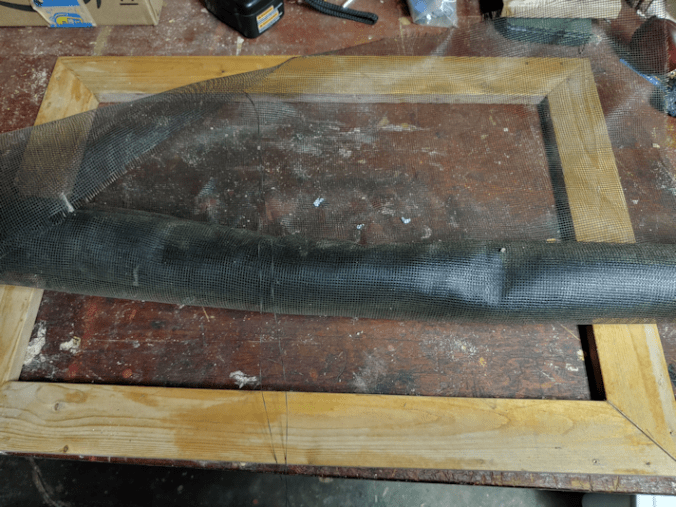
One of the things I found among the many, many things shoved onto the support beam, between the floor joists above, was a roll of window screen. I dug it out and, after gluing the remaining two corners of the frame, used it to measure off a piece of screen.
I actually ended up throwing away the first piece I’d cut, as it turned out to be damaged.
I don’t know how long that roll had been sitting there, but it was just caked with dust!!! Enough to make unrolling it very… sticky. :-/ I cut the mesh larger than the frame, so that I could fold the edges in, for extra strength.
I also cut some of the wire mesh to size.
After fighting with the window screen for a while, trying to get the edges folded under, it occurred to me that I was working on the “pretty” side of the window frame, and that the screen and wire mesh needed to be on the “ugly” side, that would be facing inside the basement.
No, the wood glue wasn’t dry enough to hold, yet. Which was fine. After I flipped it, I just stuck it back together and kept going.
It took away longer to get those edges to fold under than I expected! Here, I’ve tacked the screen to the frame at the corners with a staple gun.
Once it was tacked in place, I got out some Weldbond adhesive and applied it to the edges, then used a cast off piece of wood to spread the adhesive and push it through the screen.
Then I added the wire mesh.
I was going to say I went overboard with the staple gun, but to be honest, I seriously considered adding even more. Every wire around the edge has a staple, alternating between the outside edge, and the next wire in.
The corners each got at least 4 staples. :-D
I’m hoping that, between the Weldbond and the staples, no critter is going to be able to force their way through.
I wasn’t gone yet, though!
Remember those plates?
It took some hunting, but I did find some shorter wood screws to use. The plates were positioned based on the wood based on where the wire was. As long as the point lined up with the corner joins, I just needed to not have a wire in the way of the screws.
Between the plates and the wire screen, this frame is not moving!
Next, I needed to add handles. I used cast off pieces of wood under the metal plates, to keep the adhesive off the worktable. I’d already accidentally screwed it to the table. I didn’t want to glue it, too! :-D
The weather stripping on the back of the window wouldn’t let it lie flat, but I could at least line up the edges. I then marked the sides of the new window frame at the latches, and at the knobs.
I then added the handles with the bottoms lined up with where I’d marked the placement of the knobs.
The latches on the window fit into holes in the window opening outside. Once in place, the window is flush with the wall around the window opening. The wood is much thicker than the plastic, so I know at the very least, it will stick out from the wall. What we might end up doing is adding another pair of latches, so the outside of that window opening will have the fittings for both windows on them.
We’ll make that decision later, though. It will all depend on how it fits.
For now, the window is finished. I’ll leave the adhesive to dry overnight, and tomorrow, I’ll see if I got it right and it fits – or if I screwed up! :-D
Once I know how it fits, we will be able to see what would work best for fastening it in place.
After that, the only thing left will be to paint it. We have several things that will need painting, so we’ll wait until later in the season and do all of them at the same time.
Happily, we are now able to cross a couple more things off the to-do list. The list isn’t going down as fast as I’d like, but it is going down! :-)
At 5pm, we reached 28C/82F with a humidex of 34C/93F, and we continue to get warnings for heat, flash floods and high water. Looking at the weather radar, however, it doesn’t look like the storms will hit us. We’ll be lucky to get rain. Usually, these systems come in from the North West, dip to the South of us, then get pushed back north to the East of us. Sometimes, they pass to the West of us. This time, there seems to be strong enough winds coming from the Southeast to actually push the system back to the Northwest of us!
The long range forecasts are not showing much relief, either. We’re looking to stay in the mid to high 20’s for the next two weeks. The only relief is that the lows are finally dropping to the mid to high teens, instead of staying in the 20’s, as they have been lately.
With this house, typically the basements stay cool, the main floor gets warm, while the second floor gets insanely hot. With the temperatures being so consistently hot, even the basements are starting to get warmer, though they are still significantly better than the rest of the house. The upstairs is getting unbearable. My daughter just had to stop working and shut down her computer, because it was over heating.
Normally, to help keep the house cool, the basement doors would be left open. With needing to keep the cats out of the old part basement completely, and keep the kittens in the new part basement, we have not been able to do this.
Last year, we used my daughter’s grid wall to act as a barrier in front of the old part basement door. The doorway is wider than a panel of grid wall, so we had two of them hooked together, at an angle. It did the job, but was very much in the way.
Today, I decided to do something about that.
After finishing my rounds this morning, I went into a shed not far from the barn, where I’d found some wood that was still in good shape. Some of them had 3″ deck screws in them, so I left those behind (though I did end up with a couple that had a screw at one end that I’d missed). The little wagon was great for bringing the pile over. :-)
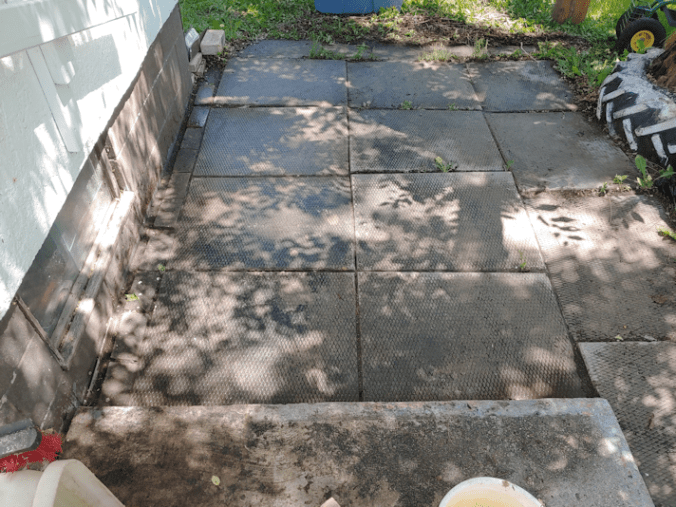
Earlier, I’d also cleared away and hosed down the patio blocks in front of our kitchen window.
One of the things we need to do is build some sort of bin for our garbage bags, because the skunks are tearing them apart when we put them outside. Normally, there is a bench against the wall, and some other stuff, but when I cleaned up the mess and saw the gunk from however many times this has happened, left behind, I just had to hose it all down.
This meant we had access to the basement window.
It was much easier to pass the wood through the window, rather than trying to get it in through the main doors, then the basement door, then down the stairs.
All while dodging cats and kittens.
So this worked out very well.
I had enough of the wire mesh we’d used to make a divider between the basements, to make wire mesh door.
The kittens were very … helpful. Yeah. That’s it. :-D
I measured the basement door and sized it to match that. We were considering taking the door off its hinges and putting in the screen instead.
Of course, it didn’t quite work out that way.
I had also considered putting it on hinges on the inside of the door frame, but it turns out the frame is narrower on the basement side of the door jam than on the door side.
Which makes no sense, but at this point, we’re pretty used to things not making sense in this house! :-D
For now, we’ve got it rigged up with hooks and Bungee cords. I will be going into town tomorrow, and am thinking of stopping at a hardware store and seeing what they’ve got that would work.
Personally, standing in front of it, I felt nothing. We have the big blower fan going constantly in this basement, trying to keep the floor relatively dry, but I felt no air movement at all. Later, my husband went by and said he could feel a cool breeze, so I’m hoping it was just me.
If we can work out how to secure this, so that cats can’t push their way through, I have enough of the wire mesh left to make another one for the other basement door. We could even hinge it to open into the entryway, instead of over the basement stairs. Which would be so much better!
It isn’t much, but every little bit helps to cope with this heat!
One of these years, I hope to get an actual air conditioner installed.
I am actually not sure I would even call making this hair pin “carving”! I used the natural shape of the piece of wood, and just sort of whittled away a bit. The wood was already very close to the size needed.
I didn’t take a “before” picture, but you can see what the branch I’d cut the piece from in this photo.
It’s being grasped by Nicco. :-)
Though the wood is from a branch that broke off in a storm more than 6 months ago, the bark was surprisingly green as I whittled it off. I think the humidity in the basement might actually have something to do with that.
Here is the finished hair pin, before oiling.
I cut the piece above where it branched off, to take advantage of the angled shape. You can see near the point, where there had been another bit of twig growing out.
I used the Dremel and the engraving tip to create the holes, so my daughter can use them to hang dangle-y bits. The natural hole at the end was where another twig had been growing out, and I included it, without trying to sand out the roughness, just for interest.
The tiny knots from the twigs where the only thing that made it more difficult to work on.
After general shaping with a carving knife, I used the tiny engraving tip on the Dremel to make the holes, and a small drum sander tip to get into the bends, where it was more difficult to safely get into with a knife. After that, it was must a matter of sanding it smooth.
Here is how it looked after oiling.
I love how the oil brings out the details in the rings.
The whole thing, including time spent playing with kittens instead, took about 2 hours.
My daughter loves it!
I’m really happy with how this turned out, and how quick it was to make! I hadn’t thought of making hair pins (which can also be used as shawl pins), but they are prefect for some of the smaller pieces of branches. I think I’ll be making more of these!
I am happy to say that I have finally finished my first attempt at carving!
Yay!
My trip into town was successful, in that I found a teeny tiny tip for my Dremel.
Saffron made sure to check it out, too!
I discovered something when I went to put it on my Dremel, though.
It didn’t fit.
The shaft is too small. By maybe a millimeter!
Well, it’s an engraving tip, and I have an engraving tool, so I got that out.
That one was even worse!
What to do? I wasn’t going to take it back. Not only did I have to destroy the packaging just to open it, it was the ONLY tip they had that was small enough for what I needed.
Painters tape to the rescue!
I got it on, and it was secure. Perfect!
After making a few practice passes on the piece of lilac I’d practiced the carving knives on, I started using it on the morel.
This is how it looked, immediately after I finished (and you can see the tape that allowed the tip to fit). I was really happy with this tip. It was exactly what I needed for the job. If anything, I would have gone even smaller, if I could!
While certainly better than the carving knives, it was still rather messy. Sanding it did take care of some of that.
I have sandpaper only up to 220 grit, which is adequate for the job. No way to get into the holes, though, which is okay. I wasn’t done with it.
The next step was to break out the wood burning kit. The kit has a very fine pointed tip that I used to burn inside each hole in the morel. This allowed me to also burn away any ragged bits.
Once the insides of the holes were done, I could use the side of the tool to burn the flat surfaces.
Here is how it looked, once done.
The only thing to do after this is to oil it!
Two Face decided to “help”. :-D
Here is the completed spoon.
For the mushroom, I basically poured the mineral oil over it, to get into all the crevices, then used a paper towel to apply oil to the rest. At this point, I will let it sit for a day or two, then see if it needs more oil. I’ve seen sites that recommend putting small things like spoons into a slide-lock bag with oil, making sure the air is all squeezed out, and the item is in contact with oil all over, then leaving it for several days. I might try that with future projects, but I think just a light coating of oil is adequate for this one.
I am really happy with how this turned out!
I feel much more encouraged about tackling some of the wood I’ve salvaged lately. :-) I think my next projects, though, will be spreaders.
Today, I got some really good progress on my practice carving, using the spoon blank that came with my carving kit.
Also, the basement is nice and cool. :-)
I was down to cutting the last few divots out of the morel mushroom on the end of the spoon, so that didn’t take long. I also tried to deepen the bowl of the spoon itself.
Working on the inside of the spoon is a challenge. The tip of the sloyd knife kept gouging areas I wasn’t working on. The direction the wood grain is also means that, in two spots opposite each other, the wood did not cut as well or as smoothly, leaving more gouges, no matter how carefully I tried to follow the instructions from the various videos I’d looked up for beginner carvers.
The rough shaping of the outside of the bowl and handle are… well… rough. LOL
Here is how it looked, after I finished with the carving tools. The next step, was to “cheat” and use my Dremel.
I have a Dremel engraver, which I tested out on the divots of the morel. That did not work at all, which is really what I expected. I figured it was worth a try, though.
Also, that thing is incredibly loud, and scare the crap out of the kittens and Beep Beep!!
The other Dremel I have is a basic low end rotating tool. (The engraver doesn’t rotate, so there is nothing interchangeable about them.) I used a drum sander to smooth out and shape the bowl and handle.
This also took off more of the excess wood to add more shaping.
For the details in the morel, I’m going to have to pick up a fine, abrasive tip. None of the tips that came with my kit are remotely close to being usable for this.
I decided on a swoopy handle, just for effect, but it has turned out to be a great thumb rest. It fits remarkably comfortably in the hand.
This is after sanding the spoon with three grades of sandpaper. Unfortunately, even the edges of the sandpaper tends to leave little gouges inside the spoon’s bowl.
I also had an unexpected issue to deal with, though not a surprising one. The humidity is so high in the basement, both the sandpaper and the wood itself was affected. The wood dust had a tendency to clump up. It wasn’t too much of a problem, but I think it affected how well the sandpaper was able to do the job. Some things actually work better with wet sandpaper. This is not one of them! :-D
This is now it looks after I stopped for the day. After I get a new Dremel tip to finish detailing the morel, I’ll continue to sand with finer grades of sandpaper, singe the morel to add colour, then finish with mineral oil. I did some searches on food grade oils for wood, and it basically came down to mineral oil. Other oils recommended are derived from nuts or seeds, and they go rancid over time. Beeswax is something else that can be used, but it can start cracking and flaking and, of course, you couldn’t use it with anything hot (among the things I hope to carve are cups and small bowls).
Once finished, I plan to offer it to my mother, since she requested I carve her a mushroom. Talking to her since then, it turns out she wants a Portebello (she didn’t know the English name for it), but I hope she’ll be happy with a morel for now. I know she likes morels, too. Most likely, she’ll reject it, but you never know. I might get her on one of her good days.
The Re-Farmer
ps: after finishing this, I checked the weather before heading outside. Turns out the temperatures are still going up, and we’re even hotter now, in the early evening, than before!
Welcome to my “Recommended” series of posts. These will be weekly – for now – posts about resources I have found over the past while that I found so excellent, I want to share them with you, my dear readers. 🙂 Whether or not I continue to post these, and how often they are posted, will depend on feedback. Please feel free to comment below, and if you have a favorite resource of your own, do share, and I will review them for possible future posts.
I hope you find these recommendations as useful and enjoyable as I have!
When I was a kid, I was pretty indifferent to cheese. For commercial cheese, we got your basic cheddar, processed cheese slices, and I even remember the odd block of Velveeta (yeah, I know…). I honestly don’t think there was much else available. Some Mozzarella, cream cheese, marble cheese and grated Parmesan in a shaker. The odd triangle of expensive blue cheese. Our choices were limited.
Even as an adult, there really wasn’t a lot of variety available. I liked cheese, certainly, but it wasn’t really a thing for me. The one major discovery for me was commercial cottage cheese. My mother made cottage cheese, and I really didn’t like it. I recently asked her how she made it, since I only remembered bits and pieces, and it was far more convoluted than I expected. It took two days, and included the addition of baking soda, but no cream.
The end product was very, very dry.
It was, of course, used as a filling in pierogi. I loved my mother’s potato pierogi, but never liked the ones with cottage cheese or sauerkraut stuffings. So very un-Polish of me. :-D
Then one day, I tried commercial cottage cheese and realized that yeah, that stuff is actually good!
Over the years, I regularly bought cheddar, but every now and then I’d get adventurous and try some Havarty or Montery Jack. Discovering Brie was an eye opening experience for me. I’d never had anything like it before, and it’s still one of my favourite cheeses.
Then, a few years back, one of our local grocery stores added a new cheese section.
You know you’re getting old when something like that is exciting. :-D
Suddenly, there was the wild and crazy selection of cheeses available, at pretty much every major grocery store. Then we found a local chain that specialized in European imports, baked their own bread in wood fired ovens, and had a deli consistently rated as the best in the city, year after year. It was thanks to this store that I discovered charcuterie platters, which became a much enjoyed treat, any time we could. We began to try new cheeses every time we could squeeze it into the budget.
I’ve long been interested in making as many things myself as I could, including making yogurt and yogurtcheese.
I definitely was interested in making other cheeses, and never really thought I could do more than make something like mozzarella or ricotta – cheeses that don’t require any aging. Then we moved provinces, and I discovered that apparently, cheeses just aren’t as popular out here. The specialty cheese sections in grocery stores don’t have anywhere near the variety, even in the city, that we’d become used to. But, what are we to do? It’s not like we could make any of these, ourselves, right? I mean, it’s not like we had access to raw milk in the first place, never mind the equipment, space, access to cultures and so on. I knew people who did make cheeses like Gouda at home, but they were farmers with cows or goats they were milking.
Then I stumbled upon The Curd Nerd, Gavin Webber, and his YouTube channel.
Talk about inspiring!!
Gavin Webber is an Australian who has been doing cheese making tutorials and “Ask the Cheesemaker” live streams and podcasts since late 2009. You’ll find videos on the making of MANY different types of cheese, followed up later with taste tests. He talks about what equipment is needed (much less than I expected), how to sanitize them, how to age cheese in a fridge, how to wax cheeses, and more. All done in his own home.
He even talks about the failures.
There are even videos on how to clean your cheese cloth, and other topics, like making mead, and the construction of his cob oven.
It was these next two videos – especially the taste testing one – that won me over.
We need to start making our own cheese.
I just love how enthusiastic and excited he gets about cheese!!! Oh, how I want to be tasting those cheeses with him!
Inspiring indeed!
I now feel we actually can start making a wide variety of cheeses at home. We are looking to convert the old root cellar into a cheese cave, but even if it turns out to not have the conditions needed, I now know we can work around that and still be able to make our own ages cheeses – in varieties that are not available locally, or well beyond our budget to indulge in.