Today, I finally started working on the Christmas decorations I was planning to make with the dehydrated orange slices I’d prepared earlier.
Of course, things didn’t work out to plan! :-D
Do they ever? ;-)
I was going to use cinnamon sticks, plus some little decorations I’d saved from Christmas crackers over the years – they would have been the perfect size – to decorate the orange slices.
I couldn’t find them.
Many of these were collected before we moved, and now I’m second guessing myself. Did I bring them along with my other craft stuff, or did I give them away before the move? I had to pare things down quite a lot for the move.
And yet… I’m sure I saw them since the move, as I’ve had to reorganize my crafting materials a couple of times, since unpacking them.
No worries, though, I decided to use some pine cones I’d gathered from our spruces a while back.
I didn’t have enough to put two on each slice, though. We kept finding them with our feet, around the house, before I discovered one of our cats digging in the container they were in, stealing a pine cone, and running off!
I had enough left for this project, though. I just made sure the biggest cones went on the smaller slices, and paired up the smallest cones on the bigger slices.
Now, I just need to see if the adhesive will work. If not, I’ll break out the hot glue gun, but it’s not like anything is going to stick to dried orange slices very well! :-D
I haven’t decided if I will do more to these or now. I might use a spray adhesive on them, and dust them with ground cloves. It’s more about making them smell unappetizing to cats than anything else! :-D
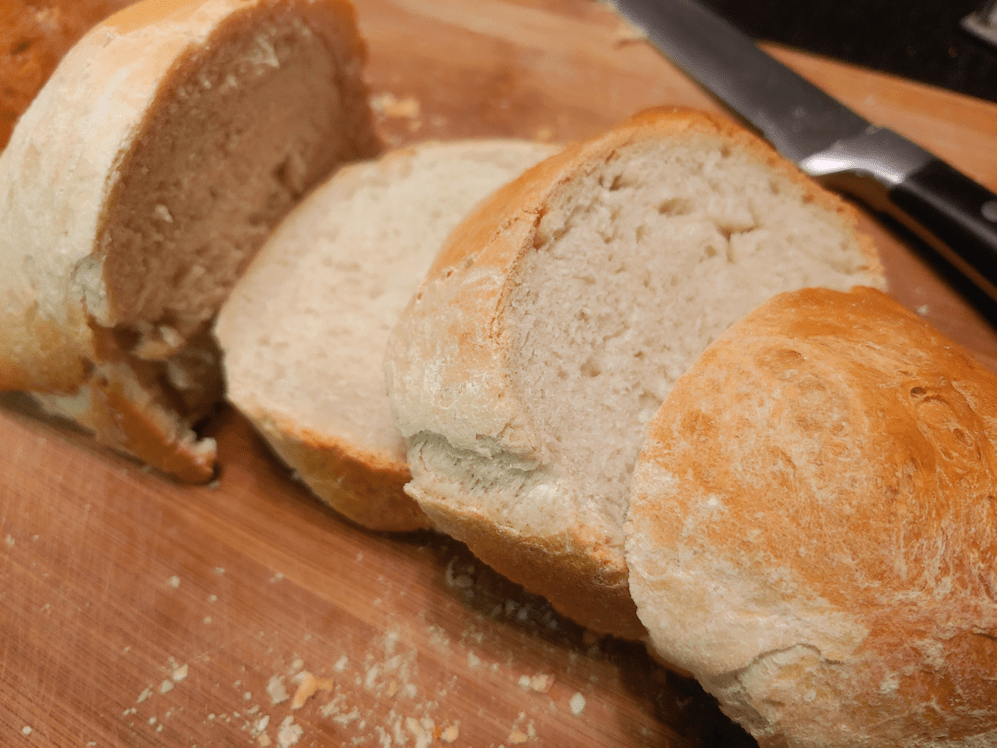
Our first batch of bread using old dough, in the manner my Babcia used to do, is now done. I did mess up a bit, which I will talk about below.
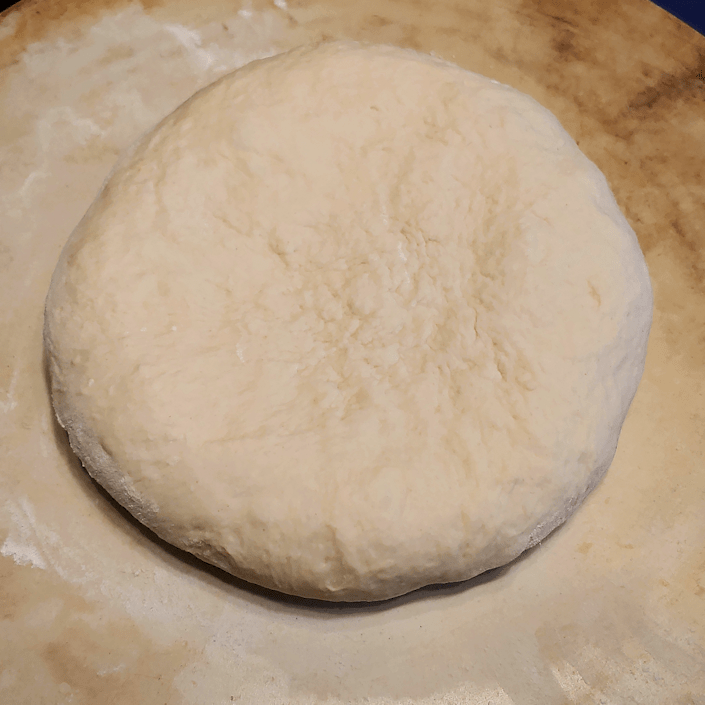
Here is how the dough looked after the first rise. I had left it for about 1 1/2 – 2 hours, give or take.
That is just beautiful.
My mother described my Babcia as “punching down” the dough. I know exactly what she was talking about, since this is what she did with her bread baking. My mother used a huge, enameled bowl with a lid, which we still have, for one big batch of bread. She would get it ready for its first rise before going out to milk the cows in the morning. By the time those chores were done, the dough was overflowing the giant bowl, knocking the lid askew. She would put the dough back in, scraping dough off the lid and adding it in, too, then literally punch it down with her fist. She would then put the lid back and leave it for a second rising, which would also overflow. She would gather it up again and punch it down before continuing on to form loaves and buns.
For such a small batch, I just took it out and gave it a light kneading.
The dough felt beautiful! Soft, light, fluffy and elastic. I probably could have skipped a rising, but I really want to recreate what my Babcia did as much as possible, so back into the bowl it went.
Both times, I set the bowl into a warm oven with the heat off and the light on.
This is possibly where I made my first mistake. The dough did not rise as much the second time. Usually, dough rises faster during a second rising, but after an hour, it really hadn’t risen as much as I would have expected. I probably should have left it for another half hour, at least.
I didn’t do that.
With this batch being rather small, I formed just one loaf out of it (after removing a portion for the next batch), then giving it another light knead.
In my starter batch, the two round loaves I shaped had puffed upwards quite a lot, so this time I pressed the loaf flat, then set it aside, covered with a tea towel, to rise while the oven preheated to 425F.
Which may have been my second mistake. I probably should have let it rise for a while, before preheating the oven. Not only am I too used to how quickly yeast bread rises, but our new oven preheats faster than the old one!
Meanwhile, I used the piece of dough I’d set aside to pick up the bits of dough stuck to the bowl and table top, as my mother described my grandmother doing, kneaded it enough to incorporate it all, then buried it in our canister of flour. I took out slightly more dough this time, as in the next batch, I intend to increase the quantities of flour and water.
When the oven was ready, I scored the loaf and put it in, checking it after half an hour, then adding more time.
I’m certainly glad I flattened the loaf as much as I did! It still became very much a ball!
This was taken out at about 40 minutes.
Which was most definitely a mistake.
Though I made sure to do the “thump” test to check if it was done, when I finally cut it open, the centre seemed slightly underdone. I probably should have left it in the oven for at least 5 or 10 more minutes. I am really bad for taking bread out too early, as I am constantly thinking they are going to burn! :-(
What to do?
Toast it!
Sort of.
I cut it into pieces, laid it back on the baking stone, and put it back in a 350F oven. After about 15 minutes, I flipped them and put them back for another 10 minutes.
Here is the end result!
It looks really great, at least! It still felt a bit heavy and dense, though.
The first taste test was with a plain piece.
The flavour is a bit milder than the starter batch. This makes sense, since that one used a commercial sourdough yeast. The sourdough yeast included rye, which I could taste in that starter batch, but I am not getting any rye flavour with this batch. There is, however, a very slight sourdough flavour. I expect this flavour to develop with every batch we bake. Overall, though, the flavour was very neutral.
The texture was slightly dense and chewy, but not under-cooked and doughy, as I feared it would be.
The one thing I had an issue with, was the crust. It had a thick, crunchy crust that crossed over to that “watch you don’t cut your mouth up” level. This may have been exacerbated by “toasting” the bread pieces again, but from what I saw when I was cutting it, I could see it was already going to be an issue.
The second taste test was with butter and, of course, that one tasted better. Fat is flavour, after all!
I found myself thinking this would be a very good bread to dip in an herb infused olive oil! The neutral base flavour would make a great carrier for other, more strongly flavored things. That neutrality will likely disappear over time, as each batch should develop a more distinct “sourdough” flavour.
So this first batch of bread using old dough was both a success and a not-quite-success.
The use of the old dough in place of yeast or sourdough started worked very well. There was plenty of yeast activity in there. Even without the use of sugar in the bread, the yeast did its job – when I gave it the time to do so!
The other success was reducing the amount of flour. It did mean making one loaf instead of two, but the dough itself turned out much better for it.
The not-quite-success part of it had more to do with my not giving it the time it needed, I think. I’ve made sourdough bread were I’ve left the dough to proof for an entire day, so it’s not like I don’t have the patience for that sort of thing. But I did see the signs and simply chose to go ahead, anyway. The end result was probably not as could as it could have been, because of it.
Plus, of course, I need to be concerned less about over-baked bread, and more about underdone bread, and leave it in the oven for longer! I should probably increase the oven temperature to 450F. That’s the temperature my daughter bakes her French bread in, and her much larger loaves bake up wonderfully.
I will leave the “bread egg” in the flour for a couple of days, then make another batch, tweaking things with what I’ve learned with this attempt.
Okay, here it is! My very first attempt at slowly recreating my grandmother’s bread, with her use of “old dough” yeast that she kept stored in flour in between baking day. (Part 1: the story)
The first goal is to create the bread dough yeast starter, and for that, I need to make a yeast bread.
Here are the ingredients.
Water, yeast, salt and flour.
That’s it!
I used Kosher salt, as I figured that was more like what my grandmother had available to her.
For a 2 loaf recipe, I used 2 cups water, 2 tsp salt, about 2 tsp yeast, and between 5 and 6 cups of flour.
The yeast is my “cheat”. Back in the spring, when everyone started panic buying, yeast was among those things that became hard to find. One of our local grocery stores now not only stocks lots of the usual big name brand or two, but a wide variety of brands and types of yeast. When I spotted a “sourdough” yeast, I grabbed a packet, just to try it.
Since some of the dough from this batch will become the “mother” of future batched, I thought it was appropriate to use it.
The ingredients list is interesting. Both wheat and rye is used.
“Sorbitan monostearate (abbreviation SMS), or Span 60, is an emulsifier esterified from sorbitol and stearic acid with the European food additive number E491. This ingredient is mostly used in baking yeast by improving the activity of instant dry yeast when the yeast is rehydrated before use. “
Speaking of rehydrating…
For the 2 cups of water, I boiled it first, because I have doubts about our well water. We really need to get the water tested, but a full test is really expensive, so… boiling it is.
I measured out half a cup of water into another measuring cup to rehydrate the yeast. I could have done it in the full 2 cups, but the half cup cooled down to a safer temperature for the yeast faster.
The inclusion of rye in this really changes the colour!
I let it proof for 5 minutes. I don’t know if I should have proofed it longer – I have recipes that call for anything from 5 to 15 minutes. It’s bubbled up, though, so I decided to go ahead.
While it was proofing, I mixed the salt into about 2-3 cups of flour. Without a wood bread bowl, I decided not to use a plastic one, and tried “dump your liquids into a well in the flour” method.
That looks…
Unpleasant.
The next while was spent with very messy, sticky hands, incorporating the rest of the flour and water in.
Thankfully, my daughter came down to give me a hand, adding the flour and water as I kneaded it in.
Once it was all mixed in, I kneaded the dough for about 15 minutes.
I may have used too much flour. I’ll have to keep that in mind for next time.
I did notice a difference in texture from my usual bread. Although I kneaded the dough until it felt smooth and satiny, it never looked smooth.
In fact, the longer I kneaded, the rougher it began to appear!
So I went by feel rather than appearances when it came time to set it aside for a first rising.
It went into an oiled plastic bowl, turning to coat all sides with oil. After covering the bowl with a tea towel, it went into a warm oven to rise.
Earlier in the day, I had prepped a baking stone and was curing it with oil in the oven. The oven was off but still warm; prefect for proofing the dough.
Once it was in the oven and rising, I set a timer to check it in an hour while my daughter started a batch of French bread. Checking it at an hour, I decided it needed more time, by my daughter’s bread was rising by the, too. So I took the bowl out and put my daughter’s dough in the warm warm oven, and set my timer for another hour.
This is the dough, after 2 hours.
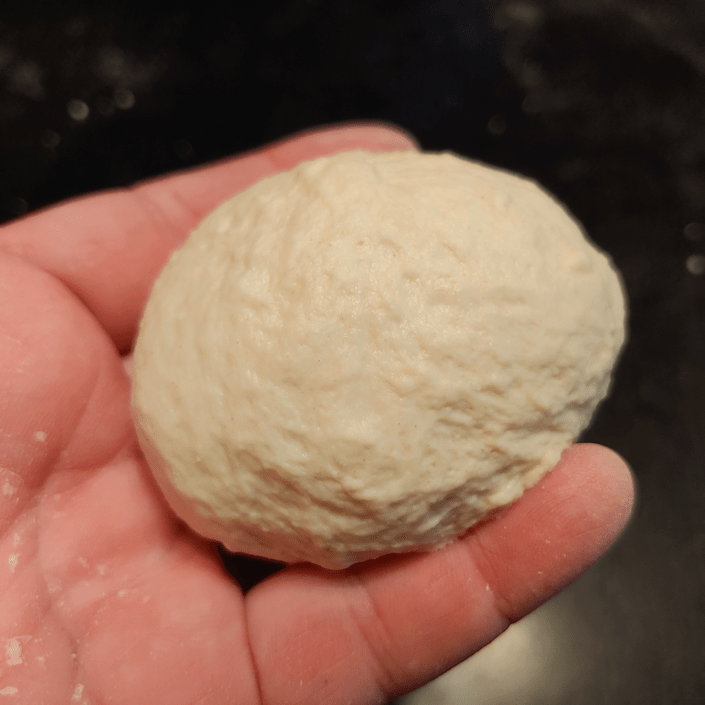
After turning the dough out to prepare the loaves, I had to make sure to do that most important part.
Collect a dough egg! :-D
This humble little lump of dough is what it’s all about.
Into our flour canister it went!
I almost forget to get a picture before burying it!
My other daughter labeled the container for me.
She is a hoot! :-D
The ball of dough will now dry out until the next time we bake this bread.
After dividing the dough, I decided to form it into round loaves.
By this time, my daughter’s loaves were in the oven.
Where she forgot to take out my curing baking stone.
So they got to have their second rise on a normal baking pa, instead.
In kneading and shaping the dough, once again, the dough got rougher rather than smoother! You can really tell in the one of the left.
I then left them to rise, checking them after about half an hour.
My daughter’s French bread was done well before my second rising was done!
The ended up needing another hour of rising time.
The baking stone had cooled down quite a bit by then, but was warm enough that I transferred the loaves over, and I think that residual warmth helped them rise even more. The above photo was taken just before they went into a 400F oven.
All done!
I am not sure how long they took to back. I set my timer for half and hour, then kept peaking and resetting the time for another 5 minutes, over and over. I think it took about an hour to bake.
I was quite impressed with how much the loaves rose in the process!
The next part was the hardest.
Waiting for the loaves to cool down!
For all that the loaves rose so much in the oven, they still felt surprisingly dense. I was also a bit surprised by how fine a crumb there was.
I taste tested one piece plain, one with ordinary butter, and one with a garlic herb butter.
I’m having a hard time describing the flavour. It was certainly tastey, but I think I was picking up the rye flavour in the “sourdough” yeast. It did have a “sourdough” tang, but one that is quite different from any sourdough we’ve made ourselves.
The sponge was soft, yet toothsome. The crust was crusty enough to be a good chew, but not so crusty as to cut up the mouth (something I have issues with, when it comes to most “crusty” breads).
The plain slice was tasty, but the buttered slices definitely were better. With no fat in the bread itself, the butter really brought out the flavours that were more muted in the unbuttered slice.
All in all, this very plain, very basic bread was a success.
It is, however, just the first step in the process. It’s purpose was to provide us with some dough to reserve for the next batch. Every batch of bread we make using the bread egg now sitting in the flour canister will be another step closer to recreating my Babcia’s bread.
While my grandmother did her bread baking once a week, we will probably make our first batch using the bread egg in 3 or 4 days.
I am really curious to see how it will look when we fish it out of the flour, and how the overnight soak will turn out! For a first time use, I don’t expect the flavour will be much different, but who knows? I’ve never done this before! :-D
I may have mentioned in past posts, about my mother’s memories of bread baking in pre-WWII Poland. I was fascinated by what she could tell me. With no commercial yeast available, I had thought my Babcia (grandmother) had used a sort of sourdough. I know my father remembers this; a portion of the bread dough would be set aside to continue to ferment, and be used in the next batch of bread.
My grandmother did something different. She allowed her old dough to dry.
We lost our own sourdough starter, the Sourceror this past summer. It almost made it to 2 years, but we had a real problem with fruit flies this year. Somehow, they managed to get into the container and contaminated it.
Having a big bubbling bowl on the counter has been a bit of a problem for other reasons, so the more I heard about how my Babcia saved her dough, the more I wanted to try it.
My mother’s memories go back to the late 1930’s, early 1940’s. Then WWII happened and they eventually ended up in Canada, where commercial yeast was available. After questioning her about it, this is what I’ve been able to piece together.
Babcia would bake bread once a week. She would set aside some of the dough, adding in the scrapings from the wooden dough bowl, form it into a ball, then burying the ball in the flour. The night before she would be baking bread again, she would take out the dried ball of dough, break it up into pieces, and soak it in water overnight. In would get all bubbly, and that would be her yeast for her bread baking, with the cycle continuing each time.
My basic bread recipe includes things like oil, sugar, eggs, milk… all things that I just couldn’t see handling sitting in a bag of flour for a week without going off. On questioning my mother, I learned Babcia used none of these things. It simply wasn’t available. Her bread was flour, water, a bit of salt, and the reconstituted old dough. That’s it.
The flour would have been flour they milled themselves (at least they did until the Nazi’s caught them using an illicit hand mill and destroyed it), using grain they grew themselves. My mother says corn flour was also sometimes used, which they also would have grown themselves. The ingredients may have been few, but my mother remembers it as being the best bread; especially when corn flour was added. She remembers it was light and fluffy, too.
My mother was too young at the time to remember a lot of details, though, so I did some research. I know that bread can be as basic as flour and water, but if salt is used, would that be a problem? I know that sugar feeds yeast, while salt retards it. How would having salt in the dough affect the old dough yeast cake? Also, how much dough was set aside? My mother remembers a “ball”, but as young as she was, her sense of how large that was would be distorted.
In my research, I found quite a bit about “old dough” bread baking. This gave me a lot of the information I was looking for. For some types of old dough baking, dough is set aside before the salt was added, while others were taken out after. Both work. As for how much was taken out, I eventually found a general “about the size of an egg” description.
What I didn’t find was anyone who used old dough that was stored in flour. Nor did I find any that stored the dough for weekly baking. Most described setting the old dough aside in the fridge for 2 or 3 days, at most. In some forums I found, people described using it in their daily baking. Not a single person described using their old dough the way my mother remembers her mother did it. They all used wet dough. None used reconstituted dry dough.
I have decided, instead of getting a sourdough going again (for now), I will try and recreate my Babcia’s bread.
Of course, some things I will simply not be able to recreate; at least not now. We’ll be using plain old AP flour. I won’t be adding corn flour right away. I don’t have a big wooden dough bowl like my Babcia would have had (with a wooden dough bowl, yeast would have gotten into the wood itself, adding its own layer of flavours). I also don’t have a wood burning masonry stove (something similar to this, with a sleeping area on top) like my grandmother would have been baking in.
I found some proportions for ingredients for 2 loaves that I will start with, and I will probably experiment with making some a couple of times a week before I start adjusting quantities for larger batches.
One of the main differences in this experimental process is that I don’t have a yeast “mother.” My mother has no memory of where her mother got hers from. It was always just there. She may well have gotten her first old dough from the family members she was living with (my great grandparents having already gone to Canada to start a homestead, only to not be able to send for their children as they had planned, because of WWI). However, as they saw the warning signs leading to WWII, they abandoned their farm in Eastern Poland, taking nothing but the clothes on their backs and a goat they could milk for food, to settle in Western Poland. At that point, my grandmother likely got another old dough ball from one of their new neighbours.
It’s amazing how much history is intertwined in something so ordinary as how my grandmother leavened her bread!
So this is what I will be doing in my experiment that will possibly span years.
Today, I have started a first batch of plain bread; it’s rising as I write this, and I will post about it separately when it’s done.
I will be using a commercial “sourdough” yeast I happened to find, in this first batch.
After the dough is risen and before I shape it into loaves, I will break off some of the dough and store it in a container of flour, then bake the rest of the dough as usual.
In a few days, I’ll reconstitute what should be a mostly dried ball of dough overnight, make another 2 loaf batch, then continue repeating the process.
What should happen: the flavour of the bread should change and develop over time, just as with a sourdough.
What might happen: I’ll have sucky bread that doesn’t rise properly? The dough ball will start molding? The yeast will die off and I’ll have to start over? I have no idea.
For the first few months, at least, I will stick to the same basic mix of flour, water, salt and the old dough for yeast. Eventually, I will try adding corn flour. If I do decide to modify the recipe in other ways, it will be by doing things like kneading in herbs or shredded cheese or whatever, after the dough ball has been removed. I won’t be adding things to the base recipe, like sugar, milk, oil or eggs.
After I’ve done a few batches, and assuming this works, I plan to give some to my mother to taste. Hopefully, she will remember enough to be able to tell me if I’ve succeeded or not! :-D
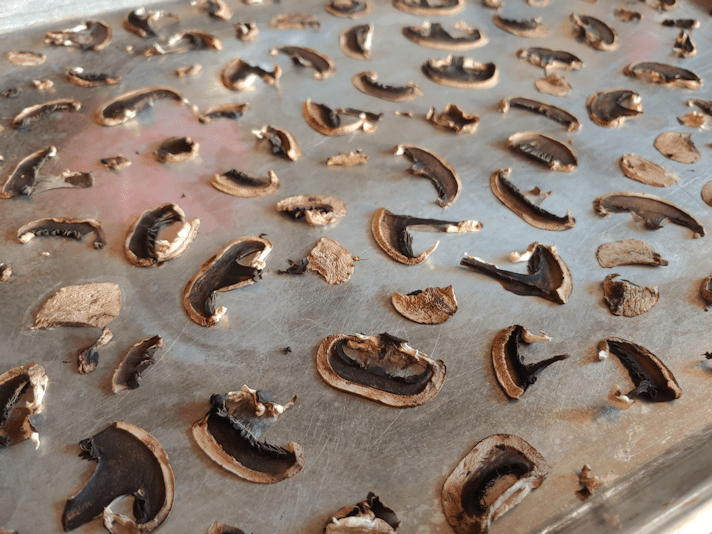
At our last Costco trip, we picked up large packages of three different types of mushrooms. After using as much fresh mushrooms as we wanted, I planned to dehydrate the rest. I really like the mushroom salt we’d made, but wanted to have mushroom powder, without the salt, to use. The powder is an excellent flavour enhancer.
We had used a dry “gourmet mushroom blend” we’d picked up at Costco to make the salt, but it looks like they don’t carry it anymore. So I decided to just dry our own mushrooms.
I had used a coffee grinder to made the mushroom powder for the salt. The mushroom blend had some very large pieces – large enough that I cut them with scissors before I could put them in the coffee grinder. Even so, some of the thicker, more leathery pieces would jam the blade.
With that in mind, I very deliberately sliced the mushroom pieces quite thin, before laying them out on baking sheets to dry. I had enough button mushrooms to fill one sheet, while the other was filled with shitake and crimini mushrooms. The “warm” setting on our new oven is 175F, but I put it at the lowest temperature it would go: 145F. Then I left the trays in the oven overnight.
This morning…
Well… they did dry very thoroughly!
This is the sheet of white button mushrooms. They had been quite crowded together, and I could barely fit all the pieces in. They are now about 1/3 – 1/2 the size before drying.
They are also thoroughly stuck to the pan.
The shitake mushrooms didn’t shrink anywhere near as much, and were easy to loosen.
These are the crimini mushrooms, which are also very stuck to the pan! I have been using a spatula to try and scrape them off. We’ll keep working at it, little by little, as we are able, throughout the day.
Well, I wanted powdered mushroom, and I’m getting powdered mushroom!
Normally when I dehydrate in the oven on pans, I like to use a cake rack to allow air circulation under whatever I’m drying. Some things are just too small for that, which is why I didn’t use any this time. I was thinking that it might have been better if I’d had a drying screen, but looking at how the pieces have adhered to the pans, I’m thinking they would have done the same to a screen. At least with a pan, I can scrape them off and still use them. If they had stuck to a screen, there probably would have been no way to get them unstuck without damaging the screen.
So in the future, I’ll know to cut crimini and white button mushrooms thicker! I know we should be able to leave them whole, or just cut them in half, but I don’t want big pieces. I’ll have to find that balance.
We’ll just have to get more mushrooms and try again.
Not that we need an excuse to get more mushrooms! :-)
This morning, after doing my morning rounds, I gave the sun room door frame a second coat of paint. Tomorrow, we hang the door back up.
I had an audience. :-D
Also, while I was painting, I found that Nostrildamus has figured out to jump over the threshold after it’s been painted! :-D
Meanwhile…
Today was finally racking day for our first attempt at making hard apple cider, using our own crab apples. For new visitors, you can read up about that here and here. (links will open in new tabs)
Here is how the gallon carboys looked before I started. As expected, there was a LOT of sediment at the bottom. It’s not just the lees from the yeast, but the sediment from the raw, unfiltered juice.
We had some concerns with the fermentation. Activity in the airlock stopped a while ago. I think the room temperature became a problem. While they were actively bubbling, their temperatures tended towards 18C/64F, though we did also keep them wrapped in a towel and, every now and then, I’d heat up a rice-filled warming pad in the microwave and stick it between them to help keep them warm. We had used an electric heating pad, when making mead, but where these were sitting, there is nowhere to plug it in.
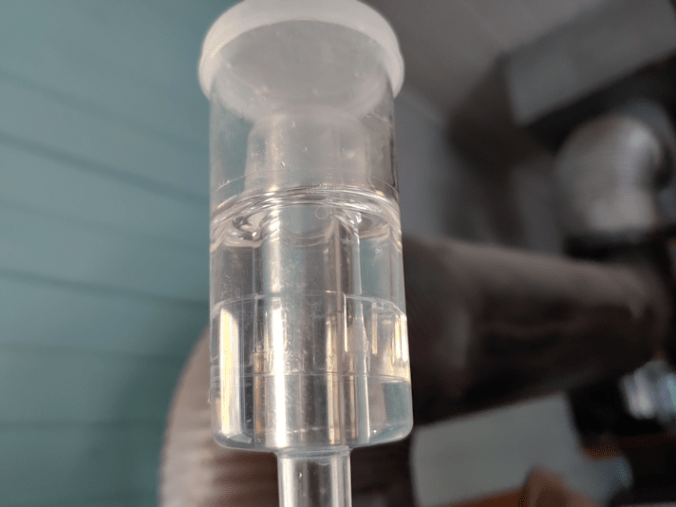
Racking from a 4L to a 3L carboy meant a lot of sediment heavy liquid left behind. Though I tried to hold the racking cane well above the sediment as long as I could, I could still see wisps of it being pulled up the siphon.
As I racked each jug, I made sure to get a hydrometer reading.
I just don’t know what to make of it.
For one of them, the hydrometer pretty much sank to the bottom. I had to add cider almost to the top for it to float enough to get a reading. The other was only slightly better. When they were first tested, it floated quite handily.
Unfortunately, I just can’t get it straight on how to read the specific gravity on that thing. So I write down all three readings.
The readings still don’t make any sense to me. Why would the numbers all drop so much? From what I can figure out, this is basically telling me there’s no alcohol in one, and almost no alcohol in the other.
I did taste test it, of course, and they both have a VERY sour apple taste. It also does taste alcoholic, but that is almost overwhelmed by the sour apple taste. Which is interesting, since the apples we used are actually quite sweet, and there was quite a bit of sugar added to the juice, too.
As for the hydrometer reading this time around, the only thing I can think of that might be affecting it (besides something going weird with the cider itself) is the temperature. Both carboys had a temperature reading of 16C/60F. The ambient temperature in the room is 15C/59C. From what I’ve been reading, newer hydrometers are calibrated for about 20C/68F. I’ve found a site that will calculate the adjustment for temperature, but there is virtually no change in the reading. So what gives?
I have no idea.
Considering that the traditional way of making hard apple cider is to press whole apples into a barrel, set it aside for a few months and BOOM, you’ve got booze, I didn’t expect this to be so complicated.
Anyhow. The 3L carboys are now set up with their airlocks for a second fermentation. As for the liquid left behind with the lees, I ended up straining much of it, and we now have about half a liter of filtered baby hard apple cider.
Hmmm… I wonder how it will go with the ham I will be roasting today?
The Re-Farmer
Update: When I started the hard apple cider, I did it based on this video from CS Mead and More.
There is a reason I included them among my Recommended sites!
I went ahead and contacted them about my readings, and got a very prompt response, and I am very happy!
It turns out, everything is working fine. My problem is with reading the hydrometer, then figuring out what it’s telling me! :-D
And now I know what to do with the information I’m getting off the hydrometer. I may not be using the AVB or Brix to work it out, but I’m writing them down anyway, because I can see those readings better. I can then use the printed out chart that came with the hydrometer to see where that lines up with the Specific Gravity and actually read that number on paper, instead of trying to see it in the liquid. When I take pictures and upload them to my desktop, I can usually zoom in and read it, but sometimes I find the hydrometer moved as I was taking the picture and I still can’t read it. :-/
The formula I was given to calculate the alcohol percentage is to subtract the new reading from the first reading, then multiply the answer by 135. So for one of my ciders it’s:
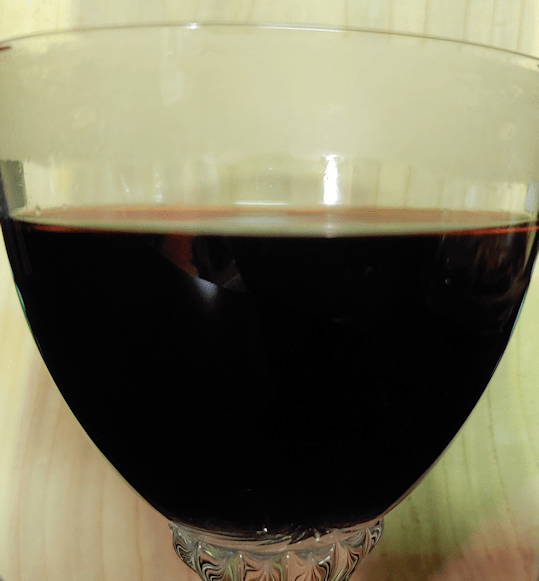
The girls and I had a lovely evening, sharing a charcuterie board to go with our version of hippocras.
We strained the spiced out using a jelly bag, and kept it warm until we were ready. Here is how it turned out.
The first thing to notice was how deep the colour had become. You can see in the photo that the glass even steamed up from the warmth. It had been kept on low heat, too!
So how did it turn out?
For my initial taste test, I could make out the predominant flavours of the cinnamon and cloves. The whole flavour profile could be described simply as “stronger”. Compared to making mulled wine in the past, I would prefer the mulled wine of this, even though there were many shared ingredients.
We did end up adding a bit of honey to the mix, which did improve the flavour. Though the hippocras was strained, some of the finer particles still got through, sinking towards the bottom of the pot but still fine enough to be floating. Which meant that when I tasted it again, after the honey was mixed in, more of these spices showed up in the glass. At that point, I was really tasting the pepper a lot more, and the spice flavour in general was stronger.
I was not able to finish the glass.
When we were done for the evening, we poured the remains into a 1L pitcher to go into the fridge. There was more than a litre left, but the last little bit was so full of spice “dust” that we didn’t keep it.
It should be interesting to see what a difference in flavour there is when drinking it chilled.
One of my daughters didn’t like it at all, but that was more about drinking wine that was warmed. She had unadulterated wine from the second jug, instead.
I think I will find ways to include the wine in our cooking, to help go through it faster, so we can use the 3L jug we bought it for! :-D
Would I make this recipe again? Probably not, however we weren’t actually true to the original recipe, not having access to the more expensive, rarer spices. If we were able to get those spices, then yes, I’d definitely want to try it again.
Until then, I think we’d just stick with our usual mulled wine combination – without pepper!
The problem is, we now have to do something with the wine. We’re not really wine drinkers in general and, ironic as is seems for someone who is getting into making alcohol, I don’t really like alcohol in general. I had a couple of glasses of the wine last night and… well… it’s wine. I can’t even say if it’s particularly good wine. Just that it’s not bad wine. Going through 6L of wine between three of us, though, was probably going to take a while, and I really want those jugs to rack that hard cider.
We have, however, made spiced wine for special occasions in the past, and I did enjoy that. Since I’m also into modern recreations of historical recipes, my mind when to this video I’d found some time ago.
It turned out my daughters were thinking in the same direction, and were quite on board with trying a historical recipe. Of course, we’d want to be having something with the spiced wine, and we started talking charcuterie. So when I headed into town this morning to go to the hardware store, I also popped by the grocery store next door to pick up what we needed.
Now, the recipe for hippocras used in the video above includes ingredients that we just can’t get. I suppose I could order them online if I really wanted to, and try recreating it more exactly in the future, but frankly I can’t justify the cost. So spikenard, galangal, long pepper and grains of paradise are out!
After going through our spice cupboard, I only needed to pick up some marjoram, fresh ginger and cardamom.
Ah, the joys of small town inventories.
It took some searching before I found their last jar of marjoram. I did not expect that to be hard to find! However…
No cardamom.
At least not the whole seeds. I did finally find a single jar of ground cardamom, but it cost almost triple what the marjoram cost!
I didn’t buy it.
We did have some ground cardamom at home, but just a tiny bit. Better than none, I guess!
So this is our poor man’s version of hippocras.
Cinnamon sticks fresh ginger whole cloves black peppercorns (substituting for long pepper) nutmeg (ground) marjoram cardamom ground cinnamon
Plus, to make up for the lack of sweet spices we’re skipping completely, some granulated sugar.
We eyeballed the quantities from the video for what was probably just over the equivalent of 2 bottles of wine. Except the cardamom. I just emptied what was left in the jar, which was probably less than a quarter teaspoon.
The cinnamon sticks were duly cracked, the ginger sliced, the remaining spices ground in a mortar and pestle (I love my mortar and pestle!), then everything mixed together in a pot with the wine.
The mixture is supposed to sit for a day or two before straining, then served warm.
We plan to drink it tonight, so to speed the process, we got it all set up and on the stove on low heat, where it will stay for the day.
It should be interesting to see how it turns out after we strain it this evening!
Of course, that still leaves us with another jug of wine. If this turns out okay, maybe we’ll make it again for Thanksgiving dinner, which we’ll be doing on Sunday.
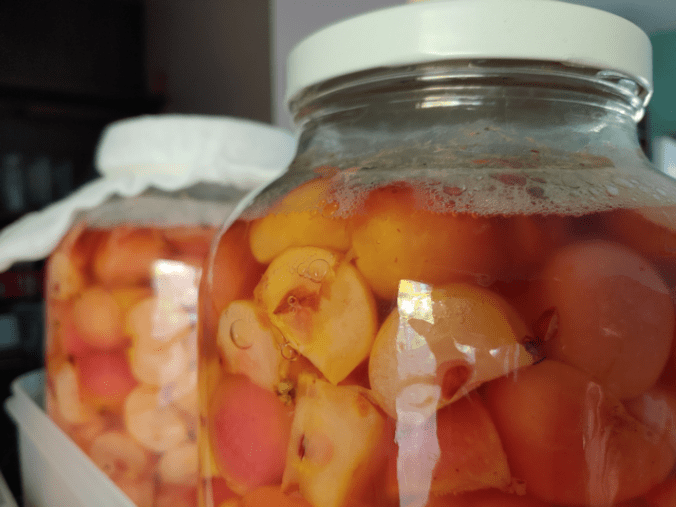
After three weeks (and a day) the crab apple cider vinegar has been strained.
For those new to this blog, you can catch up on the process by clicking on the following links. Each should open in a new tab, so you won’t lose your place.
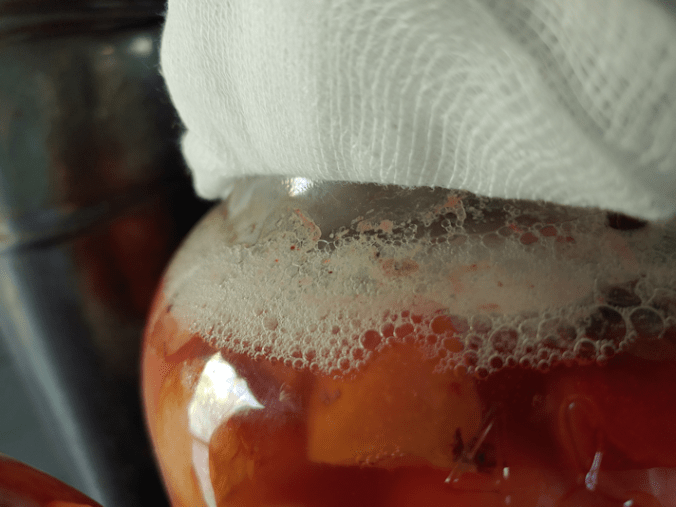
While I have not been checking on them every day, I have been checking regularly, and the last I did, it they still looked like this.
So it was a bit of a surprise when I brought the jars over to strain them, and saw this.
Oh, dear.
Both jars appeared to have mold at the top.
Now, part of what we’re doing this year is seeing if there’s a difference using cheesecloth to cover the top, or an airlock. Theoretically, because the cheesecloth allows oxygen in and an airlock doesn’t, the one with the cheesecloth should have been worse.
When I opened them up, though, there really wasn’t much difference. They both looked like this.
Yeah. Gross.
It seems the glass weight I used was not large enough to keep all the apple pieces below the level of liquid. Why it was enough to do so for almost 3 weeks, I don’t know.
On taking out the glass weight, I found that the pieces still immersed looked fine.
After scooping out the pieces at the top, the ones below all looked fine. The photo on the left is the jar that had the airlock, the one on the right had the cheesecloth.
I see no difference at this point.
After straining the pieces out, I checked them, and everything still looked fine. It was only the very top pieces that showed mold.
Took keep the experiment going, I made sure to do each jar from start to finish separately, cleaning and sanitizing the jars (and the airlock with its lid) before pouring the baby vinegar back.
The vinegar on the left is from the airlock jar. The one on the right is the cheesecloth jar.
Again, I see no difference between them.
Both of them also resulted in 2L (about half a gallon) of baby vinegar. If I weren’t testing the two different tops, I would have poured it all back into just one jar.
One thing I noticed very quickly when straining them, is that they both have a surprisingly strong alcohol smell. A rather pleasant one! I might have a bit of hard cider going at the moment!
No, I didn’t taste them.
The question is, will the mold that was at the top be a concern? Will the continued fermentation – which is really just controlled decomposition – eliminate any potential problems?
There’s only one way to find out.
Back they go to the old kitchen, for another three weeks. Then it’s tasting time before deciding to let it ferment for longer or not.
These are supposed to stay out at room temperature. Room temperature in the old kitchen is a fair bit lower than the rest of the house – which isn’t particularly warm, either! When I brought the jars over to strain them, I used the temperature gun and they were both at 12C. If we were wanting to make an alcohol, that would be too cold, but is it too cold for a vinegar?
Yesterday, we hit 27C/80F. An unexpected result of that is, all number of house flies and other flying insects emerged from wherever they were slumbering in the previous cool, and got into the house.
Which meant a night of cats making a ruckus while chasing bugs all over the house.
I got very little sleep.
Today was much cooler, but rather than being outside, taking advantage of it, I ended up passed out for a couple of hours.
Cuddled by a couple of cats, of course. The buggers! It’s a good thing they’re so cute.
Anyhow.
While puttering about the house, trying to get at least some productivity in, I was in the old kitchen and checked on the apple cider vinegar. It’s been a couple of weeks since I started – or should I say, restarted – them, so I figured it was time for a progress report.
For my new followers (welcome! Happy to see you here. :-) ), you can visit our first making of apple cider vinegar with our crab apples here. This year, we decided to make a larger quantity, with some experimentation. You can read about our first attempt here, and after discovering I made a really silly mistake, the reboot is written about here. (All links will open new tabs, so you won’t miss your place. :-) )
Here is how the jars look now.
The old kitchen is a very dark room. The south facing window has the sun room in front of it, so it doesn’t get any direct sunlight. The west window, which would normally provide a lot of light at the end of the day, is covered with aluminum foil (which predates our moving here), so there is zero light coming through there. The north facing window is what’s providing what light you can see in the above photo. Without turning the light on in the room, it was too dark to get a photo without moving to the window side of the jars.
This is a good thing. The instructions said to put the jars in a cupboard, and we just don’t have any with the space for these jars, so a room that never gets bright works just fine. The concern I had was how cold this room is. Fermentation requires warmth.
As you can see, there is no activity in the airlock at all. If there had been, the plastic cap on the inside would have been pushed to the top as it filled with CO2.
However, this is not the same as fermenting alcohol, so not seeing activity in the airlock does not necessarily mean nothing is happening.
And things are most definitely happening in there!
Both jars look the same. At this point, I see no difference between the one with the airlock and the one with the cheese cloth. Both have this layer of bubbles at the top, and when turning the jars to check them, more bubbles enthusiastically make their way up the jar. There most definitely is active fermentation going on.
One good thing about doing this in the larger jars like this: it’s nowhere near as messy as our first attempt! The fermenting vinegar had bubbled up enough to reach the coffee filter covering it and leaked a bit, inviting all sorts of fruit flies to check things out. This year, had I not had to throw away the first batch, with the its very full jars, it may well have bubbled up, and the one with the cheese cloth, at least, would likely have had a mess. There may be more headspace than needed in these jars now, but it seems to be better that way.
There also doesn’t seem to be any sign of mold or rot or anything of concern. The glass canning jar lids being used as fermentation weights are doing the job of keeping the floating apple pieces submerged.
So far, everything is looking good!
Next week we’ll hit the 3 week mark and, according to the instructions I’m following, that’s the time to strain out the apple pieces, return the vinegar to the jars, and let them sit for at least another 3 weeks.
I’m very curious to see if there will be a noticeable difference between the two jars.