When I got back from the city with our new washing machine, I just had to go around back to see how the painting went for the girls.
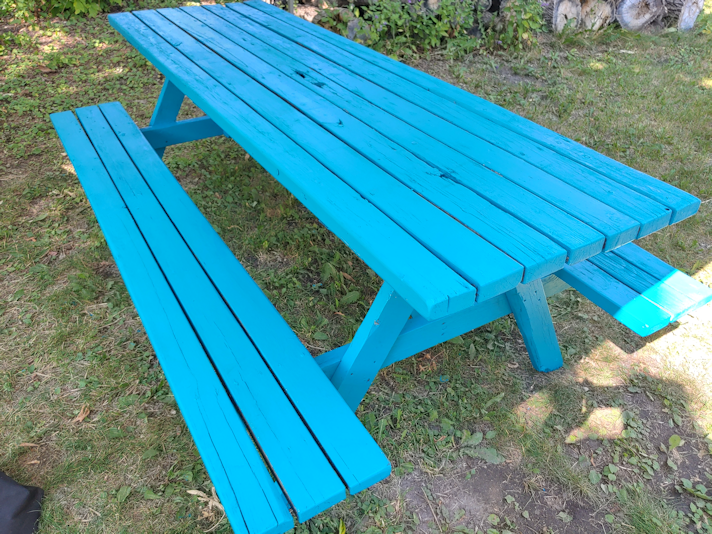
The first coat of paint is done!
You know, when I first picked up this shade, I was afraid that once it was on large surfaces like this, it would be too much. I’m happy to say that, now that I see it, I’m loving it even more!
The bird feeder had also been started.
Since these photos were taken, the girls were able to go back and do another coat on the picnic table, then flip the bird feeder to finish the rest of the top side and give the roof a second coat.
I might have to get another can of this paint! The window frame for the basement screened window didn’t get done, but that’s okay. There is no rush on that. We’re also going to wait for the paint to fully cure before we add the spray on rubber stuff for the bottoms of the picnic table legs. Since they’ve already been painted, there’s no rush on that, either.
These are going to look great, once they’re done and set up in the yard!
When we first moved here, three winters ago, there was a bird feeder mounted on a metal post at the opposite end of the flower garden where we currently have the platform feeder.
One of the first things I noticed about it was that there was a rock sitting on one corner of the base. I quickly discovered why it was there, when I lifted the top to add birdseed.
The whole thing tipped over to one side.
The rock was a counterweight, so it wouldn’t tip when birds landed on it, or in the wind.
Eventually, I took a look and discovered that the feeder had a metal mounting that fit over the post, so it could easily be lifted off.
Also, there were only 2 screws on one side, holding it in place, and that’s why the feeder kept tipping. Rather than add more screws. someone just put on the rock.
I’d set it aside for cleaning and painting, and for the past two years, it’s been sitting upside down on the bench near the main entry. I just kept forgetting about it.
This evening, my daughter wanted to add a second coat of paint to the bottoms of the picnic table legs, so I went out with her. We’d made a dump run, and I needed to hose out the plastic bin we put the cat litter bags into until we do. As I was putting the cleaned bin back next to the bench, I saw the feeder and realized this was the perfect time to prep it for painting. I just needed to take the two screws out and remove the post mount, first.
Of course, they were two completely different types of screws, that needed different screwdrivers.
One of them was actually bent.
That would be from the bird feeder tipping! I’m surprised they weren’t both bent.
Here is the feeder, after hosing it down to get rid of debris.
And spider webs.
I don’t know how much the birds would have used it, considering it was basically surrounded by the lilac, plus the maple tree that was growing through the middle of the lilac at the time. I’ve since removed the maple and pruned the lilac, so the post is now clear enough that I think the birds will use it, once we put it back again.
I suspect being engulfed in greenery had a lot to do with the feeder being so covered in lichen.
I scrubbed it as best I could, though there are still some crevices the brush I was using couldn’t fit into.
Which is fine. We’ll just paint over it.
I noticed there were holes drilled into the base to allow water to drain off. Considering much much water collected from the hose while I scrubbed, I don’t think they’re enough. I might drill a few more before we paint it.
If I remember… ;-)
I then flipped it upside down to scrub the bottom, then let it dry.
I see absolutely no sign that this was ever painted.
Yeah, the wood is definitely showing signs of rot.
It’s still pretty solid, though. Once it’s painted and the mount is properly secured, it will probably last for many more years.
The plan for tomorrow will be to head into the city for the rest of our monthly shop. Only one of my daughters will be coming along. I believe my other daughter is planning to do the first coat on the top of the picnic table while we are gone, when she takes a break from work. There should be plenty of paint to do the bird feeder, too.
I am also planning on painting the frame of the screened window I made for the old basement.
While the tech was here to try and figure out why our secondary internet account wasn’t working (more about that on another post), my daughter and I got started on the scrubbed and fully dry picnic table.
First, we set up her tent!
Once we moved it over the table, she got the paint ready while I pegged down the legs.
Well.
Tried do.
I was able to get only 1 leg properly pegged down. With the others, it didn’t matter what angles I tried, I kept hitting rocks!
Hopefully, it’ll be enough to keep it down if we get any winds.
Even if we don’t end up getting rain, it provided much appreciated shade!
Since it’s the underside, we weren’t too worried about complete coverage, except for the ends of the legs. Those might even get a second coat before we flip it.
I’m really glad we had those chimney liners to use to raise it off the ground. They really made the job easier! Amazing what a difference just those few inches makes, on preventing back strain.
The colour darkens a bit as it dries, but it’s still really, really bright!
Of all the things we need to work on, this small project is something that will be done fairly quickly. It’s a psychological thing. Once it’s done and set up, we’ll be able to see this one bright object in the yard that is a thing that we actually finished. So many other things have been delayed, or are things that will be worked on over years, not days, or even months.
I really look forward to using it when it’s done! :-)
If all goes to plan, by the time this post is published, I should be in the city with one of my daughters, doing half of our monthly shop. While going over our list, we realized we will have to split it into two trips.
Of the various outdoor projects we need to work on, I decided to start on the picnic table. It meant working in the shade, and with water, so being out shortly after the hottest part of the day would be less of an issue.
I had company.
Creamsicle tired himself out, rolling in the dirt where the picnic table has been for the past couple of summers. :-)
We will be painting the picnic table a ridiculously bright blue that I found, but first, it needed to be scrubbed.
I started with the underside, since that required the most time. Here is how it looked before I started.
I had kinda hoped those white patches were old paint but, alas, they were not.
They were old, dry mold.
I spent the next while methodically scrubbing away everything but the underside of the table top.
Which revealed a fair bit, such as the state of these two legs.
There were rotten pieces that just sloughed off as I scrubbed.
I intend to paint the underside of the table, and especially the bottoms of the legs.
This old picnic table has a lot of rot on it, but it is still strong enough to sit at. The goal is to make it more pleasant to sit at, until such time as we can replace it. The paint may even add some years to it, but I don’t expect it to.
You can actually see the colour of the wood, now! :-D
At this point, I’ve scrubbed everything except the underside of the tabletop and only managed a cursory scrub of the few inches above it. Here, it became an issue of mobility. I don’t bend and reach very well anymore, which meant I needed to find a way to raise the whole thing higher.
The area I was working in is near the old garden shed, which is an area I was able to clean up of a lot of stuff, our first summer here. Among those things was a stack of what I eventually learned are chimney liners. They and the chimney blocks we are now using as a retaining wall/planters (with more in the basement) were intended to replace the crumbling chimney for the wood burning furnace.
They were acquired shortly after my parents bought the property. The chimney had needed replacing even then (about 50 years or so ago), but it just never happened!
So now I have the inserts stacked by the back of the house, waiting until I can figure out what to do with them.
So I grabbed three of them and set them up.
… after hosing off all the spiderwebs, first…
They were perfect. I wish I’d thought of using them earlier. It made things SO much easier on my back!
Here is the underside of the table top, with years of dirt and mold scrubbed away.
I can also see where some attempts had been made to strengthen and stabilize it. We had lived in a building my parents bought as an investment property in the “downtown” of our little hamlet, years ago. After many years of problem tenants costing them thousands in damages, they didn’t want to rent the house out anymore, so we lived there for a couple of years before moving out of province. While there, we got this picnic table for a whole $5. The municipality was replacing the picnic tables in public parks and selling off the old ones for next to nothing. So it was already old when we got it, but still in great shape. It just needed a paint job. Which we never got to do, before we left the province. So my late brother brought it to the farm. He is likely the one to add the angled braces supporting the middle board. That bar across the middle was an addition, too. It looks like a hole had been drilled though to support a shade umbrella, which is probably why the braces and support bar were added. Then there’s the other piece, with a lager hole drilled through it, to support an umbrella with a larger post. I’m pretty sure we have the umbrella that was used in there, stored in the sun room now. When we’re done painting, I plan to see if it fits.
Then it was time to flip it over.
I know my mother did make efforts to protect this from the elements. She’s the last person so have painted it, and she told me how she would cover it with a plastic table cloth over the winter, to protect the wood (she used thumbtacks to secure it, and some of them are still stuck in the wood!).
It has been a long time since anyone has done anything to protect it, since. She has been living where she is now for about six years, so it’s definitely been longer than that.
Long enough for lichen to start growing on it!
The top was a lot easier to scrub. :-)
There was red paint at one corner of the table top, as well as the seat below. I suspect someone used the table to do something else, and made a mess on the table. Whatever kind of paint it was, parts of it actually dissolved and washed away with the water!
I had to use the hose almost constantly as I scrubbed. Otherwise, it all just sort of smeared. !! There was also debris packed into the spaces between some of the boards that not even the jet on the hose nozzle could blast out. Among the nearby junk around the old garden shed, I found some wire sturdy enough that I was able to get the debris loose and clear.
When we first got this table, it was a sort of reddish brown colour. I think the provincial parks department got some sort of deal on the paint because, for a while, all park benches and picnic tables were painted that same colour! There’s no sign of it now, though I can see that someone did paint it a different grey some time before my mother’s final coat of blue-grey.
So the table is now prepped for painting!
When they had a chance, the girls came out to see how it looked, then we flipped it upside down over the chimney inserts again. Since we’ve got at least 1 city shopping day to do first, it won’t be right away but, hopefully, it can be done before we go back to get the rest of what we need for the month.
Hhmm. I should probably pick up another paint brush or two. You never know. We might have more than one person available to work on it at the same time! :-D
Once it’s painted and ready, we’re thinking of setting it up near the fire pit. We will be making sure to pick up things we can cook over the fire, and I’m hoping we’ll be able to use the fire pit quite a few times this year. The picnic table will get some good use, once it’s no longer nasty to sit at! :-D
Today, I finally got a chance to continue working on the replacement door for the sun room.
Cutting out recesses for the hinges.
To line them up with the recesses that are already in the door frame, I dragged the broken door over and lined it up with the replacement door.
After making sure they were facing the right way, I used one of the hinges we took off to line up the recessed area, then traced around it.
And only now, as I look at this photo, I realize that for all the care I took to line it up and facing the right way, I got it backwards.
Dangit!
Ah, well. We’ll work it out.
*sigh*
I ended up carving out the recess with a combination of chiselling it, and shaving it with a utility knife.
My daughter then turned the door to access the outside of it, painted the carved out areas, and gave the outside of the door a final coat. It’s got some rough areas in the wood, so she really wanted to make sure it was well coated to protect it from the weather.
Now that I realize I goofed on the recesses, I’ll just carve out the remaining bit, so the recess runs across the door, then we’ll paint that over, too.
Ugh. I can’t believe I made such an obvious error. I even remember telling myself, when thinking about it a couple of days ago, to make sure I didn’t do that!
I got a little reminder today, of why I need to start using the sun room as a greenhouse.
The cats have already knocked the mini-greenhouse over once, and despite our best efforts at making sure the bottom of the plastic is pushed under the frame, the cats are determined to get in. Especially Susan! They’ve even clawed a hole in the plastic at one corner. As adorable as she was, taking a nap half in and half out, this is just not a good thing. :-(
The first order of business was to measure and cut the door down to size. We did remember to remove the hinges first, though. ;-)
I’m so excited. I got to use the chalk line we found in the basement to mark where I needed to cut! :-)
I also got to use the circular saw that was gifted to use last year. I’ve never actually used one before. With so many older brothers, I didn’t get to use a lot of the tools we had. Still, it’s pretty self explanatory.
I am, however, a lefty.
It wasn’t the straightest of cuts, but that’s okay!
When we put the hinges back on, we’ll make sure to line them up with the existing spaces on the door frame.
Speaking of which…
The door knobs on the replacement door turned out to be about half an inch off from the old door. So, while the girls scrubbed and cleaned the door, I removed the plate from the door frame, then measured off where it needed to be moved to. After a bit of hunting, I found a chisel and prepped the new location for the plate.
I won’t put the plate back on until the door is installed, in case I have to make any adjustments.
I also moved my seedling trays into the sun room.
The sun room has been reaching more than 20C (68F) during the day. It’s the night time temperature that concerns me a bit, which is why I also moved the mini-greenhouse in. The plastic cover will help keep heat in a bit, so the trays can be moved into there before it gets too chilly.
All clean! This is the outside of the door. It’s not in the best of shape, but it’s better than the old one, and will do just fine.
While it was drying, I decided to check out the future garden space where the old wood pile used to be. I figured I would use the potato fork and see how the soil is, where we covered it with black plastic.
The soil is amazing! The tines of the fork sank all the way into the soil. No ice in there at all, and it is so soft. It will be perfect for the beets and carrots we plan to plant there.
Except…
It’s also full of roots. You can see the dark pile to the side in the above photo; those are the cherry roots I’ve pulled up so far.
The area is just cris-crossed with cherry roots that we will need to dig out. I was also finding pieces of rotten pallet wood I’d missed last year, and some huge roots from the old spruce stumps nearby. We’ll need axes or saws to get those out.
Hopefully, the girls will be able to give me a hand and we’ll get this entire area free of roots tomorrow. Beets are supposed to be planted as soon as the soil can be worked, so as soon as we get it cleared, we can get those started. The ground is so soft that, when it comes time to plant, I’ll have to make sure to put boards between the rows to walk on, so I don’t sink. !!
That reminds me. I got a notice today that my soil tester and garden auger have been shipped and should arrive on Friday. The soil tester measures temperature, moisture and PH levels. The auger is a drill attachment, and we won’t need that until we’re ready to plant in the old garden area, probably in late May.
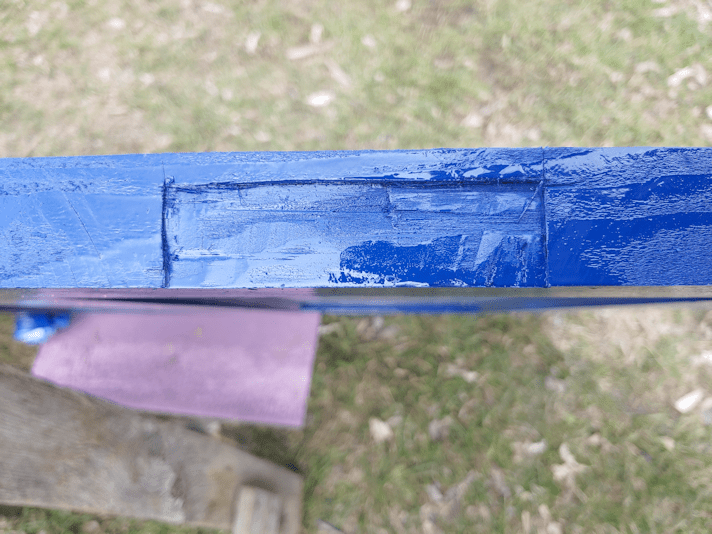
While I was working on this, my daughter came out with a respirator and a can of spray paint.
This is the same blue we used on the driveway gate. :-) It took an entire can to do two coats on this side.
Then, because it looked like it was going to rain, we made space in the sun room and brought the saw horses and door in to finish curing.
Tomorrow, we would normally head into the city for a big shop. Talking to the girls about it, we decided to wait a couple of days. Instead, I’ll go into town and pick up some more paint, so we can do the other side of the door.
Plus, takeout food. I am just dying for some takeout. :-D I have no idea where; the Chinese restaurant we normally go to is closed on Tuesdays, and the pizza place we order from doesn’t open until 4 pm.
There is, however, that fish and chips place that opened their summer time take-out window early, so they could stay open during the shut down. They’ve got the best pollock and fries I’ve ever tasted – and I don’t particularly like fish and chips in the first place! :-D
Oh, wow. I’m feeling hungry just thinking about it…
So tomorrow, we should be able to go the other side of the door, and get that garden area de-rooted.
After giving the second coat of paint 8 hours to cure – and making sure they weren’t tacky, like we were having problems with before – I put the hinge pins back up.
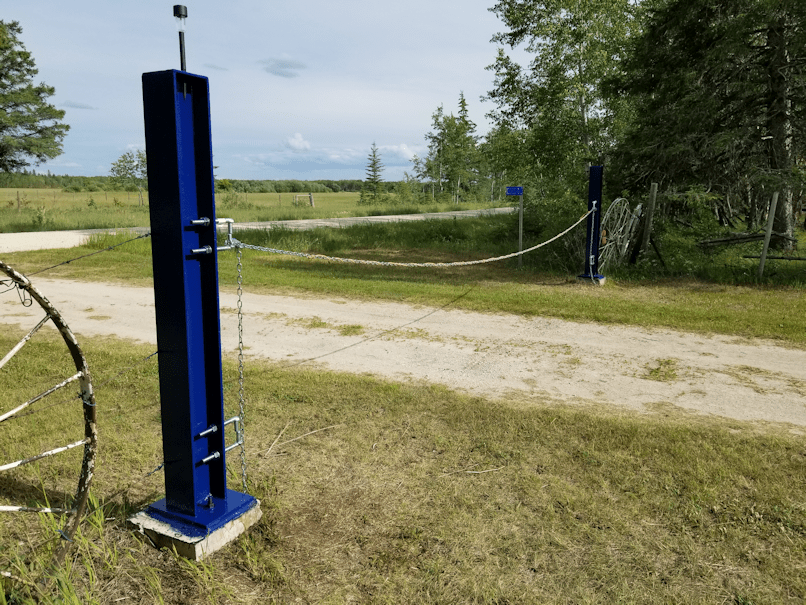
All of the painting is now complete!
The chain will be held just by the hinge pins for now; I don’t want to start scratching the new paint by wrapping the chain around the posts.
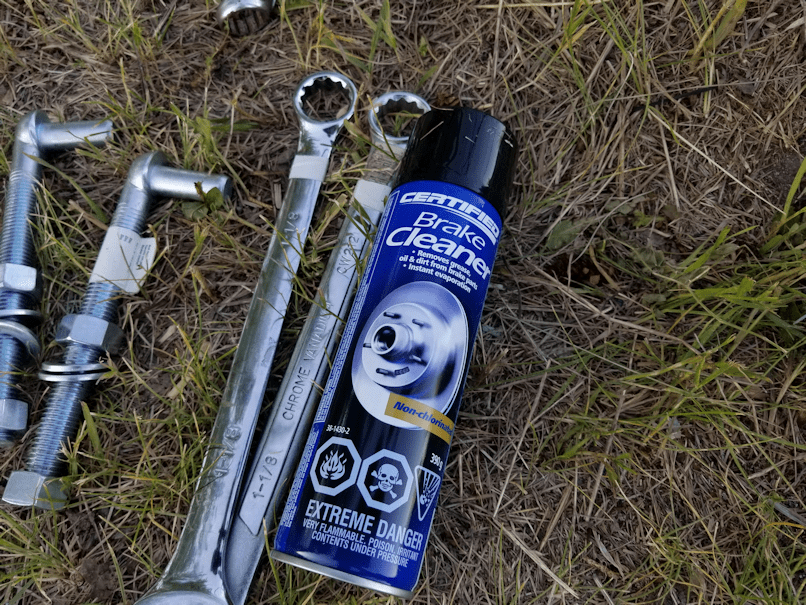
Though the paint was not tacky to the touched, I didn’t want to take a chance of the pins and their washers getting stuck once the nuts were tightened, so I applied spray lubricant, first.
As a bonus, while I was working on it, I met our neighbour, who was out jogging. As she was walking back, we introduced ourselves and had a nice chat. They live a mile away from us which is a pretty typical distance for neighbours around here. :-D I’ve seen them (well; their vehicle) pretty regularly, but we hadn’t had the chance to meet until today. :-)
The posts are now ready to have the gates mounted on the hinges, whenever my brother is ready to come by with the last pieces he has for them.
I’m really looking forward to seeing our freshly painted gate up again! :-)
Yesterday, we went into the city for the last of our Costco shopping. In the process, I swung by a Canadian Tire and picked up the cleaner my brother recommended to get rid of all the lubricant used to get the old hing pins off.
Yesterday evening, my older daughter told me I needed to go check out my rocks.
After some initial confusion, having already completely forgotten that I’d spray painted some rocks in the yard bright orange, I went and took a look.
Then squealed with glee.
Somewhere in between cleaning the eaves and working on various other things, she took the time to grab some stencils and a can of spray paint from her supplies, and made my day!