This evening, I remembered to grab a box of screws so I could get the newly painted bird feeder back up.
I did have an unexpected problem, though!
The feeder had been moved to the top of the picnic table, so that wire frame it was on could be used to hold the screen window from the basement for painting.
Either the feeder or the picnic table were not quite cured yet. The feeder was stuck!
In the photo below, you can actually see where some of the paint came off.
It’s the underside, though, so it doesn’t matter.
Meanwhile, the post mount now has 6 of the same type of screw holding it in place, instead of the two very different screws next to each other, like it was before! :-D
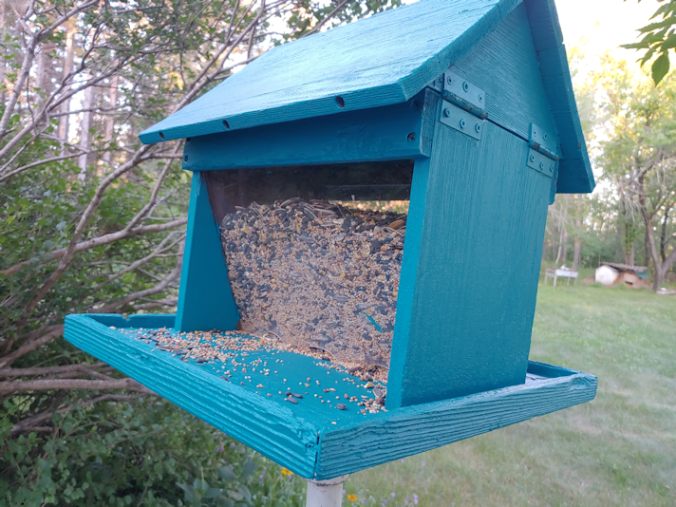
It’s up!
The post is actually narrower than the opening in the mount by a fair bit. Plus, I noticed the post, which is basically a steel pipe, is slightly squished. Which means the feeder wobbles. I’ll have to find something I can put around the top of the post to make up for that.
I did have to move one of the lilac branches and tuck it behind another one, to get it out of the feeder, as well as angle it to keep the one side clear. It holds a surprising amount of seed; I’m going to have to pick up more, if I want to keep adding bird seed to the other end of this flower bed, where the platform feeder and bird bath are.
I look forward to seeing how quickly the birds find it. :-)
As we work on clearing, cleaning and reclaiming the yard and planting our first garden beds, I’ve been keeping a close eye on details to keep in mind for the future. Things that will help us decide what needs to be done next, what to change or what to keep the same.
This morning, I found myself making a lot of comparisons.
The cutest one is the cucamelons.
This is the largest one that is developing, with my fingers giving an idea of just show small these are!
Isn’t that just the cutest thing? :-D This is the first one big enough to start seeing the patterns developing.
The trellis I made for these is just cotton yarn. It is working very well, except for on thing.
The cats.
When I am out there and the boys come over for some attention, they will plow their way through the trellis, pulling tendrils off in the process, then look at me all confused over why I’m flipping out at them. :-D They also try to lean and rub against the strands of yarn, only to flop over onto the plants. !!!
We already know that this location doesn’t have enough sun for cucamelons. If we grow them in the future, they will be planted somewhere with full sun. Our original intention was to plant them against the chain link fence for them to climb, and the cats are showing us exactly why that’s a very good idea! If not there, then we will have to make sure to have trellises that are sturdier, with strands much closer together. Not because the cucamelons themselves need it, but because of the cats!
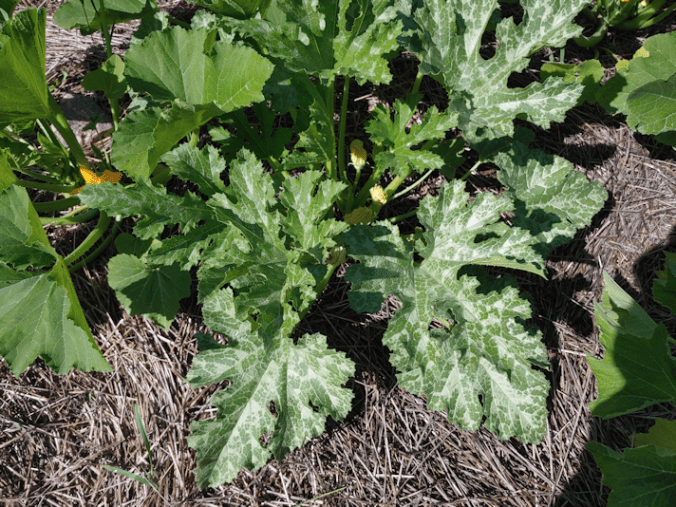
Here is another comparison. These two squash plants, with the mottled leaves.
They look pretty much like the same kind of plant, don’t they?
Now look at the developing squash.
They’re completely different!
I’m looking forward to being able to start harvesting these. My favourite way to eat them is raw, with dip. No need for anything else, when they’re at just the right stage. :-)
It was looking at the chokecherry trees that I am really seeing what a difference even minor changes in conditions makes.
This first one is at the south side of the garden where the squash beds are.
This one gets sun in the mornings, but for most of the day, it is shaded by spruce and maple trees to the South and West of it. It is not crowded by other trees. It has quite a lot of berries that are looking big and juicy (well… as much as chokecherries can be! ;-) ). Even last year, during the drought, it had larger berries. While I do not specifically water this tree, I do sometimes water the little patch of flowers and raspberries on one side of it, and the black current bush (my sister confirmed what it was for me) on the other side, so it does get extra water from that. While is has larger berries, it also ripens later. As you can see, the berries are still very much on the red side of things.
This next one is the chokecherry tree that is engulfed by lilacs.
This one gets full sun for most of the day, though it does get slightly shaded at the end of the day, by the trees my mother left to grow after she moved the raspberries they’d self-sown in between, years ago. This whole area gets quite dry, and we do not make any effort to try and water anything here.
The berries themselves are noticeably smaller than in the previous tree, and there are less of them, but they are also ripening faster.
Then there is this tree, right nearby.
This is the top of a young, small tree that was self-sown and allowed to grow (rather than get mowed over, like all the other saplings) in a grassy band between the old garden area (with the row of trees mentioned previously) and the lilac hedge. It might get some shade towards the end of the day, but otherwise gets full sun. Our first summer here, it did not produce fruit yet, and I wasn’t even completely sure what kind of tree it was. Our second summer, it had a few berries. This year, it has matured enough to produce quite a lot of berries. With full sun most of the day, not at all crowded, and little moisture, the berries are still not as big as the ones closer to the house, but the clusters are dense and ripening quickly.
You can see how this tree is situated in the background of the next photo, below. This next chokecherry is also among the lilacs, but on the edge of the hedge, not in the middle of them.
Here, it gets no shade at all. It has lots of berries that are already ripe. As you can see, though, some of the leaves are turning yellow. Only a few branches are like this, not all of them. It’s not stopping them from heavily fruiting! Like the other two along this side of the old garden, the berries are not as large as the trees nearer the house.
This next one was a surprise find, along with the Saskatoon berries. This area had been full of spirea that I had pulled up. It’s starting to grow back, so I’ll have to do it again, as pulling them up has been a good thing for other trees. The Saskatoons thrived this summer, and we discovered another chokecherry tree among them.
This area is under spruce trees, both living and dead, getting very little sun. In the above photo are the berries on the North side of the tree, where it gets even less sun. As you can see, they are just turning from green to red here.
This next photo is of the same tree, but on the South side.
That little bit more sunlight sure makes a noticeable difference in how fast they ripen!
Again, while I have not really been watering these trees, they are near the horseradish, and with the spirea taken out, wildflowers have come up and I’ve been watering those. So they will have benefited a bit from that, too. Mostly, though, being under the spruces as they are, they don’t get the full heat of the day, so the soil doesn’t dry out after a rainfall as quickly, either.
Then there is this one…
That’s a chokecherry in the middle of the photo. I had cleared a path to the junk pile you can see part of, to try and find useful pieces of wood in it, but that’s as far as I got so far. The tree itself is not crowded by other, large trees, and is shaded only in the morning hours. It’s surrounded by spirea and thistles, so we can’t get at it right now, but it appears to be just loaded with ripe chokecherries.
Finally, there is this one.
This is the top of a chokecherry tree among the cherries. I can get close to it, but not enough to be able to harvest it until I clear away the cherries around it; mostly cherries that had been killed off by last year’s horrible spring, and the bits that are now growing up from the bases. They create a formidable barrier!
This tree also gets shade in the morning hours only. Our last two summers, I don’t recall seeing any flowers or berries at all. Last summer, I’d cleared away the old wood pile, which turned out to be a much, much larger job than I expected. You can read about it in this series of posts (all links should open in new tabs, so you won’t lose your place!); parts one, two, three, four, five, six, seven, eight.
Did I mention it turned out to be a really huge job?
Yeah.
So while there is still lots to clean up to work our way into the spruce grove, what has been done so far made a big difference. I’m thinking that, had the cherries not been so damaged by the previous spring conditions, they would have improved, too. Mind you, the one cherry tree I kept because it managed to actually produce a few berries, and is not at all crowded, did not produce even a blossom this year.
It’s amazing how the same type of tree, while not really all that far apart from each other, are so different based on even minor changes in sun, shade, moisture, etc. When it comes time for us to plant more food trees, the differences among these chokecherry trees is providing us with a lot of information.
It’s a hot day today, but it’s going to get even hotter throughout the week, hitting above 30C/86F in a few days. Plus, I’ll be doing a lot of driving throughout the week. I figured if my brother could be out baling hay in this heat today, I can prune some deadwood!
There were two trees in particular I wanted to get at. Here is the first I worked on.
I had already cut the dead parts of the main tree, our first summer here. What was left were the suckers growing out the base. As the main part was grafted, what grew out the base was not the same type of apple as what had already died.
When I first worked on it, the live parts were bending low, so I left tall stumps of the original tree and used them as supports to tie the live ones to. One, growing out the middle, didn’t need the support.
As you can see in the photo, that’s the one that is now dead.
It actually did have leaves and even flowers this spring, but they didn’t last. As I cut it away, I was surprised it managed even that much. It was so dead and dry, I could only cut about half way, and then it was easier to break it off by hand.
One of the live branches was hanging down again, even though part of it was supported, so I got creative.
I found what was probably an old mop handle and zip tied it to one of the old stumps at the bottom, and to another live branch higher up. Then I lifted the bent branch and attached it to the support. Hopefully, this will be enough for it to start growing straight – or at least straighter – on its own. If nothing else, I won’t be getting my hair caught in it when I mow past it, anymore!
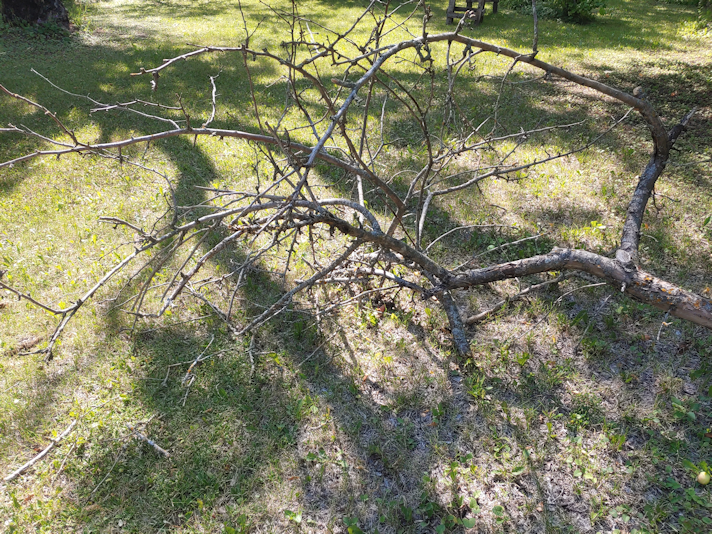
The next tree was a bigger job.
I’d actually thought I would be working on an old plum tree, but it was another apple tree that needed help.
There are two large branches on the apple tree that have died. In the background, you can see the dark coloured plum tree meandering its way up. The branches are so tangled, it was hard to see what belonged were, but it seemed that the plum branch still had live branches and little plums at the top.
I would see better, after the apple was cleared.
I took the slightly smaller branch off first (on the left of the trunk, in the above photo) using the reciprocating saw, and it came down fairly well. The branches at the ends were tangled with live branches, so it ended up standing upright on its cut end when it fell. Once I cleared that, it was time to get the big one down.
When cutting larger branches like this, you always have to be careful when it gets past a certain point, depending on the angle and weight of the branch. Once it starts breaking under its own weight, things can go in unexpected directions.
This one was a bit different.
It didn’t fall.
You can see the one live branch growing out the side, so I made sure to cut above it.
I cut right through, and it just sat there!
Hmmm… I wonder why that would be…
The live plum and apple branches were holding it up!
There was a lot to get tangled on!
For this tree, I used pruning spray on the cut branches, to protect the main trunk a bit.
There is still one branch alive on this tree, and it’s got quite a few apples on it.
The plum in the background does have a lot of dead branches, but at the top, it’s still alive. I am leaving it for now.
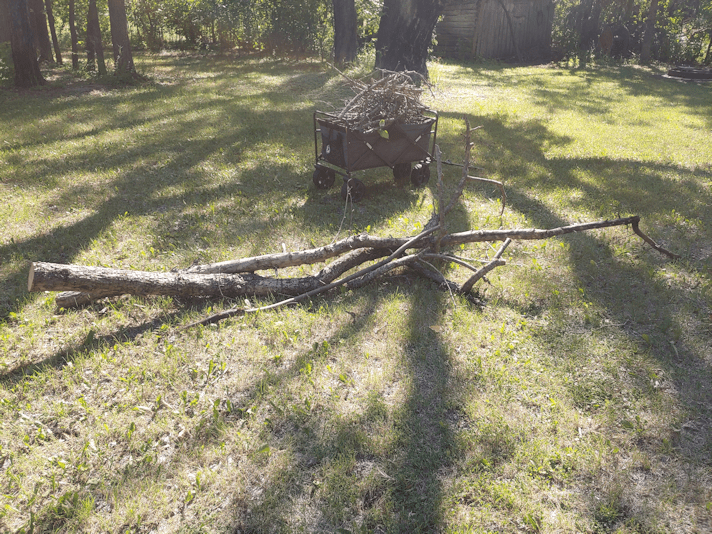
Usually, for stuff like this, I would have broken down the branches a bit, but otherwise just hauled it over to one of the piles of branches we’ve made while cleaning up over the past couple of years. I did things differently this time.
The small branches, I cut short and loaded into the wagon, to be used as kindling in the fire pit.
The large pieces will wait until I can co-ordinate with one of the girls to work on them.
The wood looks surprisingly solid. I’m going to see if anything can be salvaged for carving. If not, they’ll be cut to fire pit size for use during cook outs.
It isn’t much, but I’m happy to have gotten at least this bit done. There is another tree, an elm, near the fire pit area that is mostly dead. I actually thought it was dead our first year here, but after a rainfall, it perked up. Last year’s drought seems to have done it in, though. It’s quite large, though, so we’ll have to be more careful taking down the dead parts.
When I got back from the city with our new washing machine, I just had to go around back to see how the painting went for the girls.
The first coat of paint is done!
You know, when I first picked up this shade, I was afraid that once it was on large surfaces like this, it would be too much. I’m happy to say that, now that I see it, I’m loving it even more!
The bird feeder had also been started.
Since these photos were taken, the girls were able to go back and do another coat on the picnic table, then flip the bird feeder to finish the rest of the top side and give the roof a second coat.
I might have to get another can of this paint! The window frame for the basement screened window didn’t get done, but that’s okay. There is no rush on that. We’re also going to wait for the paint to fully cure before we add the spray on rubber stuff for the bottoms of the picnic table legs. Since they’ve already been painted, there’s no rush on that, either.
These are going to look great, once they’re done and set up in the yard!
Which is quite a surprise, since we got a call from the shipping company a couple of days ago, letting us know they didn’t have it, and that they’d call when they did. Home Depot gets weekly deliveries, so we were expecting to get a call next Thursday.
Then, I got a call today.
It was an automated survey to determine delivery satisfaction.
Delivery?
What delivery?
So I hung up on the survey, then phoned the store. It’s been a while, so while I got the guy who sold it to me, he didn’t remember the details of our particular order. He was just as confused about the survey call as we were. Once I mentioned we thought the store itself might have it, and he realized it was supposed to be delivered to them, he said he would check and call me back.
Sure enough, it was there!
So I basically dropped everything and headed out! :-D The girls prepped the entry for dragging the box through, then worked on painting, while I was gone.
Once the washing machine was loaded in the van, I took advantage of the situation and found some of the spray rubber stuff, for the bottoms of the picnic table legs.
Like the stove, it juuuuuust fit through the doorway – and because of the arm bar, we had to pull it in on its side. This time, I was able to back the van up so that the bumper was over the steps, which made getting it to and through the door that much easier!
Getting it open was easier, too. The bottom piece was not attached to the box, so once the straps were cut off, we could just lift the whole thing.
Then we set it up where the old machine was, while my younger daughter stayed squeezed in the back to hook it up.
We found one potential problem. The drain hose is shorter than the old machine’s. It just barely reaches the stand pipe. If we could have the machine with its back to that wall, it would be fine, but then we wouldn’t be able to use the machine.
So it is not tight against the side wall, and right up against the step leading into the dining room. It should be fine, but there is no wiggle room on that.
Thankfully, now that the old kitchen and sun room are done, my husband’s walker is now in the sun room. This way, he doesn’t have to do any stairs to get to the walker, nor does he have to lift it up and down the steps to the main entry. Being a larger than average man, he’s got a much larger walker than typical, making it heavier, too. Not something a person with a back injury should be struggling with! We used to keep it folded up right in front of the washing machine, but now that the machine has to be so far forward, there’s no room for his walker.
Once it was hooked up, we leveled it.
It turns out the floor sags a fair bit towards the middle, but my daughter was able to adjust the legs on one side. Then she squeezed out and we pushed the dryer back, moving it forward to line up with the washer.
There is now quite a lot of space behind the machines.
I’m sure the cats will enjoy it. :-D
While going through the manual, I found that it has a “test before using” function. So I tried that.
I don’t know if it worked.
The manual said to turn the power on, then push the spin and soil buttons simultaneously, until a particular letter/number code showed up on the screen.
The code never came up. A number did. I tried hitting start anyhow, and the machine started doing things, but I wasn’t sure if it was doing what it was supposed to!
In the end, I ended up powering it off. I noticed that the machine only uses the HE type of detergent. The detergent we have isn’t HE.
So I headed off to town to pick some up.
Once the water is no longer needed for anything else, I’ll try again, then start some laundry.
I’ve never been this excited to do laundry before!!!
This spring, the cherry tree near the house has many flowers.
Unfortunately, they did not translate into very many cherries this year. There are just a few, scattered about.
Walking past it today, I noticed some seemed to be nice and ripe. After trying a couple, I picked the rest that I could reach, and brought them in for my daughters.
Yup. That’s it! Counting the one I’d already taste tested, it was a whole 8 cherries.
There are others that are not quite ripe yet, but we’re not going to get anywhere near what we had last year – and that was just barely enough to fill a medium slide-lock freezer bag.
They were, however absolutely delicious. Wonderfully sour, with just a bit of sweetness. A lovely, tiny little treat!
When we first moved here, three winters ago, there was a bird feeder mounted on a metal post at the opposite end of the flower garden where we currently have the platform feeder.
One of the first things I noticed about it was that there was a rock sitting on one corner of the base. I quickly discovered why it was there, when I lifted the top to add birdseed.
The whole thing tipped over to one side.
The rock was a counterweight, so it wouldn’t tip when birds landed on it, or in the wind.
Eventually, I took a look and discovered that the feeder had a metal mounting that fit over the post, so it could easily be lifted off.
Also, there were only 2 screws on one side, holding it in place, and that’s why the feeder kept tipping. Rather than add more screws. someone just put on the rock.
I’d set it aside for cleaning and painting, and for the past two years, it’s been sitting upside down on the bench near the main entry. I just kept forgetting about it.
This evening, my daughter wanted to add a second coat of paint to the bottoms of the picnic table legs, so I went out with her. We’d made a dump run, and I needed to hose out the plastic bin we put the cat litter bags into until we do. As I was putting the cleaned bin back next to the bench, I saw the feeder and realized this was the perfect time to prep it for painting. I just needed to take the two screws out and remove the post mount, first.
Of course, they were two completely different types of screws, that needed different screwdrivers.
One of them was actually bent.
That would be from the bird feeder tipping! I’m surprised they weren’t both bent.
Here is the feeder, after hosing it down to get rid of debris.
And spider webs.
I don’t know how much the birds would have used it, considering it was basically surrounded by the lilac, plus the maple tree that was growing through the middle of the lilac at the time. I’ve since removed the maple and pruned the lilac, so the post is now clear enough that I think the birds will use it, once we put it back again.
I suspect being engulfed in greenery had a lot to do with the feeder being so covered in lichen.
I scrubbed it as best I could, though there are still some crevices the brush I was using couldn’t fit into.
Which is fine. We’ll just paint over it.
I noticed there were holes drilled into the base to allow water to drain off. Considering much much water collected from the hose while I scrubbed, I don’t think they’re enough. I might drill a few more before we paint it.
If I remember… ;-)
I then flipped it upside down to scrub the bottom, then let it dry.
I see absolutely no sign that this was ever painted.
Yeah, the wood is definitely showing signs of rot.
It’s still pretty solid, though. Once it’s painted and the mount is properly secured, it will probably last for many more years.
The plan for tomorrow will be to head into the city for the rest of our monthly shop. Only one of my daughters will be coming along. I believe my other daughter is planning to do the first coat on the top of the picnic table while we are gone, when she takes a break from work. There should be plenty of paint to do the bird feeder, too.
I am also planning on painting the frame of the screened window I made for the old basement.
We are back from our city shopping trip and stocked up with most of what we need. We will still have to make another trip to get the rest. After that, we should be set for the month, and anything we need, we can get locally.
I am hoping my mother’s car will be ready for pick up by this weekend. I made a doctor’s appointment for her – they’re actually seeing patients for physicals now, instead of only doing phone in appointments – next week, and it would be great to surprise her with her own car. :-)
That, and her car has working air conditioning… ;-)
Before we headed out, I did the morning rounds and, of course, checked on the picnic table that got scrubbed yesterday evening. Check out how different it looks from last night to this morning!
The first two pictures are before scrubbing, after scrubbing, and then the last one is after drying overnight. The wood looks so much lighter! I expected it to be more grey, just from aging.
It’s still quite damp in places, mostly where the wood is most rotten, so it’s a good thing we weren’t going to be able to paint it right away anyhow. We should be able to get to it, tomorrow (Thursday). There are predictions of rain on Friday (which would be great!), though. My daughter has a 10′ x 10′ canopy tent she used when doing art markets before the move. If we set that up, we can paint it and not have to worry about rain while it’s drying. The underside will get just one coat of paint, so if all goes well, we should be able to flip it and do the top on Saturday. Friday will likely be when we make our second trip to the city, so it should get plenty of time to dry.
I think after that trip, I will be more than done with being around so many people!!
Meanwhile, I had another find this morning, that was much less pleasant.
Some time after I came in from my rounds and was uploading trail cam files, the kittens trashed our dining table.
Last night, the girls discovered the cats had knocked one of our plant pots in the living room onto the carpet. The little jade tree in it was a rescue from previous cat damage! The girls vacuumed up the mess, then put the pot with the plant and remaining soil on the dining table to be dealt with in the morning. Instead, the cats dealt with it before we could. :-(
The table had a lot of other stuff on it, too. You know how it goes. Any flat surface must get covered with stuff! :-D
My husband discovered the mess. Everything on the table was covered in dirt! As soon as I got most of the stuff off the table, I then had to fight off kittens who kept jumping up onto it to play in the dirt! I was able to clean that up before we left. One of my daughters stayed home to work, so she was kind enough to clean up the mess that spilled onto the floor while we were gone.
Keeping the kittens out of the plants has been quite a battle. They just love dirt! I have a very large pot with several avocado seedlings growing in it, and Nicco in particular has been repeatedly caught curled up in the middle of it, sleeping! One of the seedlings now no longer has any leaves!
If all goes to plan, by the time this post is published, I should be in the city with one of my daughters, doing half of our monthly shop. While going over our list, we realized we will have to split it into two trips.
Of the various outdoor projects we need to work on, I decided to start on the picnic table. It meant working in the shade, and with water, so being out shortly after the hottest part of the day would be less of an issue.
I had company.
Creamsicle tired himself out, rolling in the dirt where the picnic table has been for the past couple of summers. :-)
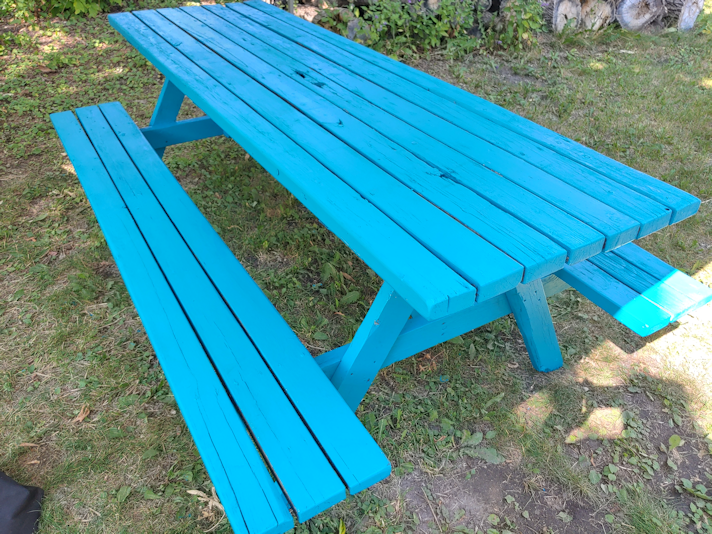
We will be painting the picnic table a ridiculously bright blue that I found, but first, it needed to be scrubbed.
I started with the underside, since that required the most time. Here is how it looked before I started.
I had kinda hoped those white patches were old paint but, alas, they were not.
They were old, dry mold.
I spent the next while methodically scrubbing away everything but the underside of the table top.
Which revealed a fair bit, such as the state of these two legs.
There were rotten pieces that just sloughed off as I scrubbed.
I intend to paint the underside of the table, and especially the bottoms of the legs.
This old picnic table has a lot of rot on it, but it is still strong enough to sit at. The goal is to make it more pleasant to sit at, until such time as we can replace it. The paint may even add some years to it, but I don’t expect it to.
You can actually see the colour of the wood, now! :-D
At this point, I’ve scrubbed everything except the underside of the tabletop and only managed a cursory scrub of the few inches above it. Here, it became an issue of mobility. I don’t bend and reach very well anymore, which meant I needed to find a way to raise the whole thing higher.
The area I was working in is near the old garden shed, which is an area I was able to clean up of a lot of stuff, our first summer here. Among those things was a stack of what I eventually learned are chimney liners. They and the chimney blocks we are now using as a retaining wall/planters (with more in the basement) were intended to replace the crumbling chimney for the wood burning furnace.
They were acquired shortly after my parents bought the property. The chimney had needed replacing even then (about 50 years or so ago), but it just never happened!
So now I have the inserts stacked by the back of the house, waiting until I can figure out what to do with them.
So I grabbed three of them and set them up.
… after hosing off all the spiderwebs, first…
They were perfect. I wish I’d thought of using them earlier. It made things SO much easier on my back!
Here is the underside of the table top, with years of dirt and mold scrubbed away.
I can also see where some attempts had been made to strengthen and stabilize it. We had lived in a building my parents bought as an investment property in the “downtown” of our little hamlet, years ago. After many years of problem tenants costing them thousands in damages, they didn’t want to rent the house out anymore, so we lived there for a couple of years before moving out of province. While there, we got this picnic table for a whole $5. The municipality was replacing the picnic tables in public parks and selling off the old ones for next to nothing. So it was already old when we got it, but still in great shape. It just needed a paint job. Which we never got to do, before we left the province. So my late brother brought it to the farm. He is likely the one to add the angled braces supporting the middle board. That bar across the middle was an addition, too. It looks like a hole had been drilled though to support a shade umbrella, which is probably why the braces and support bar were added. Then there’s the other piece, with a lager hole drilled through it, to support an umbrella with a larger post. I’m pretty sure we have the umbrella that was used in there, stored in the sun room now. When we’re done painting, I plan to see if it fits.
Then it was time to flip it over.
I know my mother did make efforts to protect this from the elements. She’s the last person so have painted it, and she told me how she would cover it with a plastic table cloth over the winter, to protect the wood (she used thumbtacks to secure it, and some of them are still stuck in the wood!).
It has been a long time since anyone has done anything to protect it, since. She has been living where she is now for about six years, so it’s definitely been longer than that.
Long enough for lichen to start growing on it!
The top was a lot easier to scrub. :-)
There was red paint at one corner of the table top, as well as the seat below. I suspect someone used the table to do something else, and made a mess on the table. Whatever kind of paint it was, parts of it actually dissolved and washed away with the water!
I had to use the hose almost constantly as I scrubbed. Otherwise, it all just sort of smeared. !! There was also debris packed into the spaces between some of the boards that not even the jet on the hose nozzle could blast out. Among the nearby junk around the old garden shed, I found some wire sturdy enough that I was able to get the debris loose and clear.
When we first got this table, it was a sort of reddish brown colour. I think the provincial parks department got some sort of deal on the paint because, for a while, all park benches and picnic tables were painted that same colour! There’s no sign of it now, though I can see that someone did paint it a different grey some time before my mother’s final coat of blue-grey.
So the table is now prepped for painting!
When they had a chance, the girls came out to see how it looked, then we flipped it upside down over the chimney inserts again. Since we’ve got at least 1 city shopping day to do first, it won’t be right away but, hopefully, it can be done before we go back to get the rest of what we need for the month.
Hhmm. I should probably pick up another paint brush or two. You never know. We might have more than one person available to work on it at the same time! :-D
Once it’s painted and ready, we’re thinking of setting it up near the fire pit. We will be making sure to pick up things we can cook over the fire, and I’m hoping we’ll be able to use the fire pit quite a few times this year. The picnic table will get some good use, once it’s no longer nasty to sit at! :-D
One thing about the new washing machine taking a while to come in (still no word on a new delivery/pickup date!) is that moving the old machine kept getting delayed.
Yesterday, my younger daughter wrestled it out of the house, and we “walked” it over to the junk pile.
Unfortunately, it was impossible to completely drain the washer when it broke down, and what was left in there stunk to high heaven! Ick. When we got it near the old stove, we took the lid off, then turned it upside down to drain as much as we could. Even then, we could still hear sloshing as we righted it.
While it was upside down, we had a chance to take a look.
Aside from the oil leak, I was actually surprised by how clean and new it looked under there. The exterior belied the interior!
We also found where those screws came from.
The entire bottom of the washer was rusted out. This metal bar was completely loose, having been held by only those two screws we’d found.
When this machine was in the basement, it had been on a pallet to keep it off the wet. Clearly, the wet still managed to reach the bottom of the washing machine!
I recently had a conversation with my mother about the laundry being upstairs now, instead of downstairs. She had been asking me if this was still around, and was that still around; she still seems to think the house should have stayed exactly the way she left it. :-/ She’d commented about my brother moving the washer and dryer upstairs, so we couldn’t have to go into the basement to do laundry. Of course, my response was to extol the virtues of my brother, and gratitude for him doing that. It was a HUGE job to get the electrical set up for the drier, even with my younger daughter being there to help. That was harder than moving the machines, themselves. My mother responded with how my brother was more concerned about making things “easy” than about how things looked. One of the things she’d been asking about is what happened to a mirror she’d had hanging in the entryway. I don’t remember it, and it was already gone before we moved here. When the addition had been built, my dad had a sink installed in the entryway, so we could wash up after coming back from the barn or whatever. My mother hated having a sink there, so when they retired from farming, she had the sink covered to be a sort of counter, and added plants and other stuff. She was much more concerned about how things looked. Well, at least on the surface. She then went on about how wonderful she had made it look, and how it was so nice, that when the carolers came to sing and were invited inside after, they said they didn’t want to leave the entry, it was so nice in there.
I was a caroler one year, so I know what really would have happened. Before every house we stopped at, we had to decide whether or not to accept invitations, usually to partake in alcohol, once inside. My parents were among those who would offer a glass of wine. Or vodka. Whichever. ;-)
With some homes, we were never given a choice! *L* By the end of it, we were really singing. :-D
My brother had wondered why our parents hadn’t moved the washer and dryer upstairs years ago, so they wouldn’t have to struggle up and down those stairs as their mobility decreased.