The second one was much faster to build than the first. :-D
For those who are new to this blog *waves hello* you can catch up on the project with part one and part two. Links will open in new tabs, so you don’t lose your place here. :-)
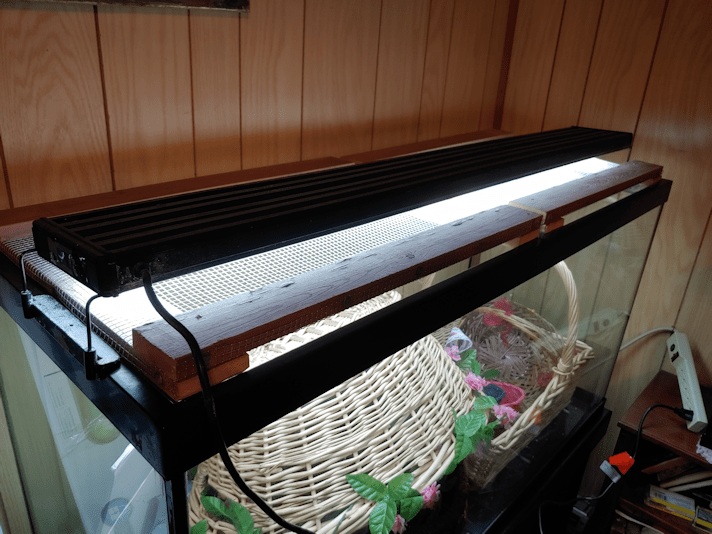
Once the second cover was done, I unpacked the light fixture, which has been sitting in its box next to the tank since the move, and tested it out. Considering what a disaster the movers were, I would not have been surprised to find the bulbs shattered or something.
It worked just fine! :-)
Of course, as soon the covers were on, cats were on it! So far, they have not tried to climb on the light fixture, but there is no doubt that they will, at some point. Hopefully, it will hold up okay.
I was concerned that the frame would create shadows in the tank, but that does not seem to be an issue at all!
Now I have to figure out how to set the time and program it to turn on and off. It’s been years since it was last done! There is time to look that up, though.
We still need to cover the sharp edges of the wire mesh, and I still want to put felt pads in the corners to protect the tank a bit, but other than that, the covers are done.
We still have the original light that came with the tank, which rested right on top of the original covers. The tanks will only hold so many seed trays. With things like the onion seeds needing to be started so much earlier than anything else, I can see us rotating trays out from the tanks and into the sun room (which should be warm enough, by the time the next groups of seeds need to be started), and using the second light there.
Now I need to figure out where to store my baskets, then line the inside of the tank with foil to reflect more light. Since this room is rather chilly, I plan to use pieces of rigid insulation on the bottom and around the sides, too. We will likely cover the insulation with foil on one side to make it easier to take it in and out, but I will see how the seed trays fit inside, first. If the insulation takes up too much space, I’ll put them on the outside of the tank.
Progress has been made! :-)
I am so looking forward to gardening this year! :-)
Yesterday, I got started on making covers for our big fish tank, to keep the cats out. Today, I assembled the first one.
Of course, things did not go to plan.
Does anything ever? :-D
One of the things I needed to figure out was how to secure the hardware cloth to the frame pieces, for those inevitable times when a cat jumps on them. All I’ve got for materials is whatever we can find lying around the farm. While doing my rounds this morning, I went digging in the side of the garage where we store the lawnmowers and snow blowers. I knew there were some roofing nails in there, so I grabbed a while bunch and brought them inside.
Here is the first problem.
All of the nails were huge. There was only a single smaller size, and it was still too large. What I wanted to do was secure the mesh to the tops/bottoms of the boards making up the frame. Previously, we’ve used a staple gun to do that, but these were not for things where the wire mesh was expected to hold weight. Particularly not the sudden weight of a cat leaping onto it from above.
The mesh was going to have to be secured along the sides.
That meant cutting it with a half inch overlap on all sides.
I’m getting closer to the end of my roll of 1/8 inch mesh, and it really does not want to unroll at this stage! :-D I had all the boards on there to hold it down, and it still kept rolling itself back up again!
Once the mesh was cut to side and flattened, I affixed it to one side.
Normally, I would have used the staple gun to tack it in place, but I couldn’t find it anywhere. Which is really weird, because I’m the only person who uses it!
So it had to be tacked in place by screwing in the cross piece, holding the wire as taught as I could in the process.
Then I took out one of the screws in each corner.
I had placed the wood in place on the tank and marked each one with pencil, but once the hardware cloth was in place, I couldn’t really see my marks anymore. Plus, with the cross pieces a fraction too long, I had to make sure I didn’t line the side pieces up to the other end, or the while thing would be to big.
So I quickly drilled a pilot hole in each of the other corners of the cross pieces, then went back to the tank.
This way, I could place the long pieces where they were meant to sit, line everything up, then add a couple of screws through the pilot holes to hold them in place.
Then it was back to the basement to continue.
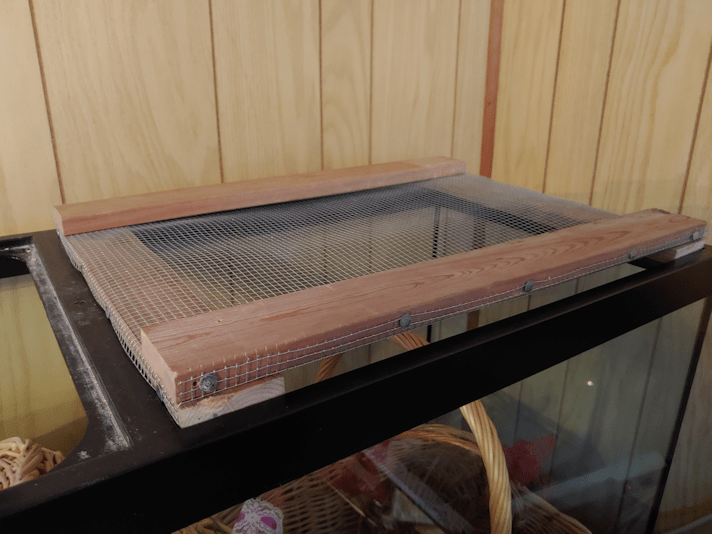
Once each corner was secured with a pair of screws, it was time to bend the wire mesh. Since the sides would be bent in one direction, and the ends in the other direction, I first cut out the corners.
The wood pieces may have been lined up to the tank, but no matter how careful I tried to be, the wire mesh ended up uneven.
Ah, well.
Once the mesh was bent, I drilled pilot holes for each nail (to prevent the wood from splitting) and hammered them in. The flat tops of the roofing nails were perfect for securing the mesh. Very different from how I had to do it with the larger mesh on the screen “door” we made to keep the cats out of the old basement.
Time to test it out again!
Oh, dear.
The addition of mesh and nails – especially the nails – made it wider. It wasn’t so much that it no longer fit. I could have let it just rest on the nail heads, I suppose. They would, however, damage the tank’s frame.
There was a very easy solution to this problem.
Flip it upside down.
With the cross pieces being every so slight too long, I used my Dremel to take off the corners at roughly a 45 degree angle.
It now fits!
Unfortunately, the wood is a bit warped, so it doesn’t sit flat, but it should still do the job.
There are still a couple of things I need to do. One is to find some way to cover the edges of the hardware cloth, for safety reasons. I’ll probably just use Gorilla Tape, if we still have some.
The other is to find my self-adhesive felt pads. The kind that’s meant to go on the bottoms of chair legs or the like, to protect floors. Since the bottom is now the top, the screw heads are facing down, and each corner screw is sitting on the plastic ledge in the corners of the tank. It wouldn’t be an issue, if I weren’t expecting cats to jump on it, so a bit of padding would be a good thing. I haven’t seen them since we packed for the move, though. :-/
Aside from those 2 things, this cover is done.
The other one will wait for another day! :-D The earliest we should be starting any seeds is in late March, so we have time! :-)
I have spent some time thinking about how we can convert our big fish tank into a greenhouse to start seeds in, while also making sure the cats couldn’t jump in.
The original covers the tank came with would have been ideal, but the hinges on those broke long ago.
Since a piece of the filtration system broke during the move, it’s just been sitting in a corner. To keep the cats out, we cut pieces of foam core to fit across the top, then covered the whole thing with a huge table cloth. It turned out to be a great place to store baskets in, and the top became a favorite place for the cats to hang out.
Until they broke through.
We ended up cutting some rigid insulation to fit and taping it in place, which worked much better. With their jumping from the piano onto the top of the tank, though, they’ve knocked even that right off!
What this means is that the cats are used to having access to the top of this tank. If I set it up as a greenhouse to start seeds, they’re just going to jump in, unless I find a way to cover it.
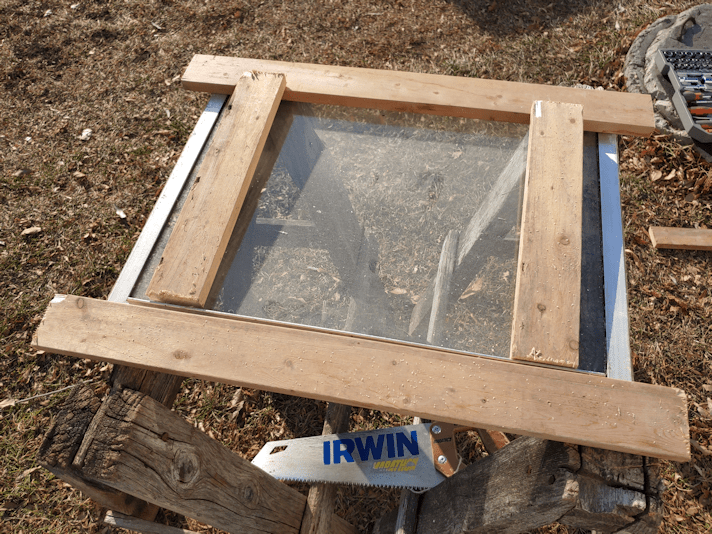
The tank has a bar across the centre and, after thinking about it for a while, I decided to make a pair of wood frames with hardware cloth, that will fit on each side of that centre bar. That way, if I need to get at the seed trays inside, I just need to lift one smaller cover at a time, rather than struggling with one large cover.
I fully expect the cats to jump on while I try to do anything in there!
Today, I got started.
The first thing was to take a tape measure to the inside of each half of the top, as well as the lip the original covers used to sit on. Each side is 16 3/4 inches by 22 3/4 inches. The ends and centre bar have a 1/2 inch lip, while the sides have a 1/4 inch lip.
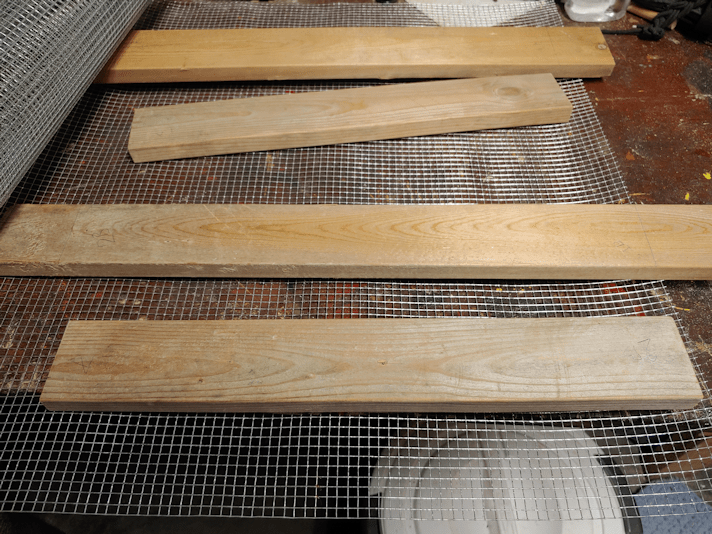
I then grabbed a couple of pieces of wood I’d salvaged from a shed and started by cutting the long sides. Once I had 4 of them cut, I double checked that they fit properly.
They fit just fine, with a little bit of play that will make putting them in and taking them out easier.
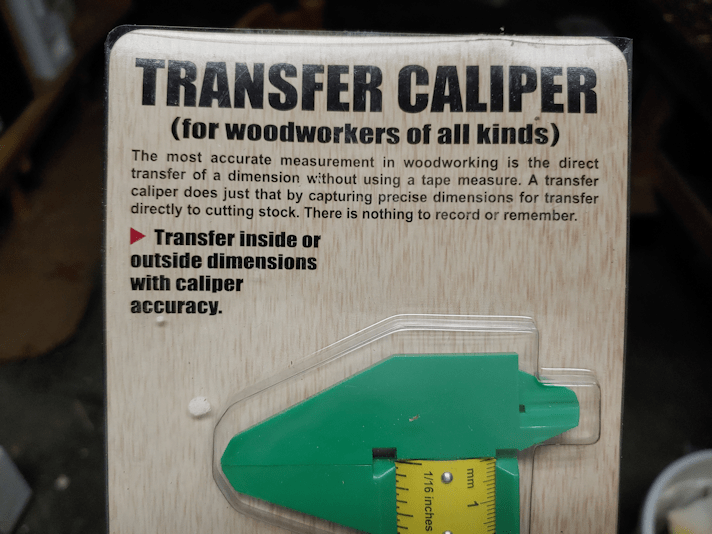
While I was checking the fit, my daughter came by. As we were talking, she reminded me of one of her Christmas gifts to me.
I wish I’d remembered them before I took the measurements! This thing is MUCH easier for me to read than the tiny lines and numbers on my tape measure. It made marking the distance to cut the short pieces a lot easier, too.
Another reason I wish I’d remembered them before I took the measurements.
When I checked the short pieces, they were just a hair too long! The difference is so slight, I could probably sand it to size.
But I shouldn’t need to.
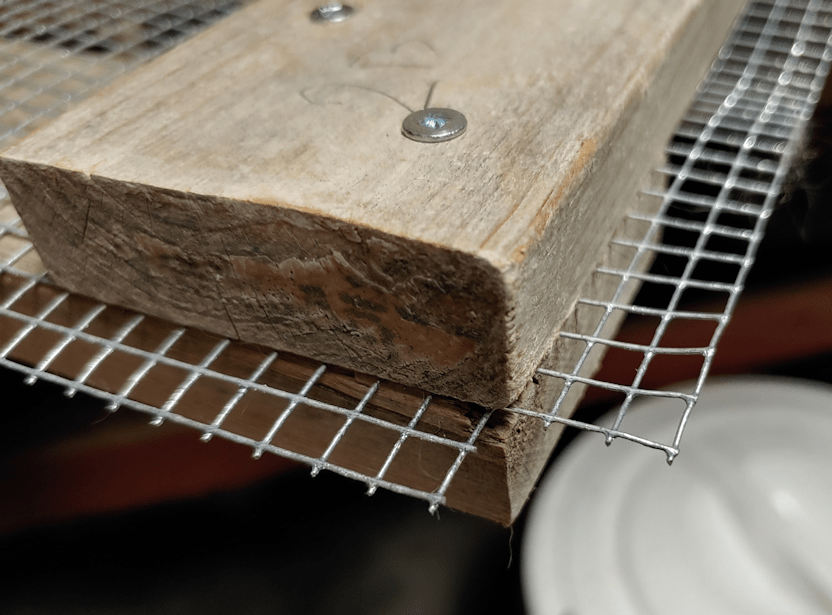
This is how the frame will be laid out. The hardware cloth will be sandwiched between the top and bottom pieces at the corners. I haven’t figure out what I can use to secure the hardware cloth best. Ideally, the wire mesh would be sandwiched between wood all the way around, not just at the corners, but I just don’t have the wood to do that. Nor can I think of anything we have that could be used in a similar way. Whatever I come up with will have to not just support the weight of a cat that’s decided to lie on it, but the force of a cat jumping onto it from the top of the piano. All sorts of ideas some to mind, and get discarded just as quickly. :-/
The thing I’m holding in place in the photo is one of the supports for the light fixture. The L bars insert into ports at the bottom of the light’s frame, so where they are is where the bottom of the light fixture will be.
Once I double checked how everything was going to fit together, I moved on to the next step.
Washing the pieces of wood.
They were probably sitting in the shed I found them in for more than 10 years. My mother tells me that shed was full of lumber when she moved off the farm, some 7 years ago, so what little we found in there was the junk that wasn’t worth stealing, I guess. :-/ Still better than nothing, I suppose. Anyhow. There was a whole lot of grime on them, so I gave the pieces of wood a quick scrub. They don’t need to be really clean. I just need to be able to handle them without getting filthy, and trying to scrub them after the hardware cloth is in place is just not a good idea! :-D
So they are now all laid out in the basement with a fan on them, do dry. I will continue to work on the frames tomorrow!
One of the recommendations for using grow lights to start seeds is to have the lights very close to the soil, and gradually increase the distance as the seedlings grow.
That won’t be an option with this set up.
I’m thinking of lining the inside of the tank with aluminum foil to reflect more light onto the seedlings. It doesn’t need to be from top to bottom; just at seed tray height. Which means I could probably get away with lining all 4 sides with foil in the big tank. I will probably line 3 sides of the 20 gallon tank, too.
The other thing to consider is warmth. We don’t have grow mats, and it’s unlikely we will be able to get any. We do, however, have more pieces of rigid insulation that we can put under the trays, or even along the sides closest to the walls. The LED lights won’t generate heat, but I’m sure we could find some way to warm up the tanks enough for seeds to germinate.
Progress on the set up has, at least, finally begun!
For those of you who have been following this blog for a while, you may be wondering what happened with our cider vinegar.
Yeah. The stuff we were supposed to taste test 2 months ago, to see if it was done!
It’s been sitting in the old kitchen all this time.
Given how cold it gets in there, I wasn’t too worried about it.
For those who are new to this blog (welcome! Happy to see you!), you can check these posts out. All the links will open in a new tab, so you won’t lose your place here. :-)
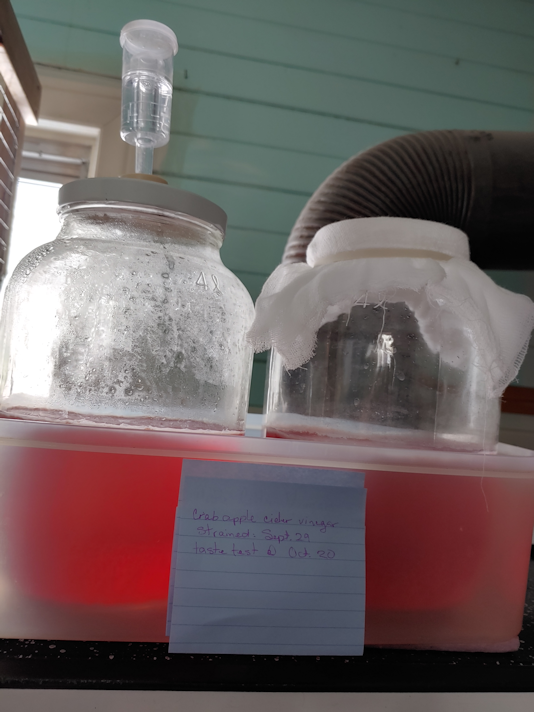
One of the issues I had was, what to store the vinegar in? The last time I made it, I could just use a quart jar. What did I have that was big enough, easy to pour from, and that I could close? I discovered that one of our 1 gallon (4L) glass jug that we have for making mead has a top that fits the same caps from the 3L jugs currently holding hard apple cider vinegar (which is also ready for bottling), so I was able to use that.
Once I had the bread dough rising, I brought the ACV in out of the cold!
Both of them had visible mothers, floating on top. There was very little visual difference between the airlock and the cheesecloth jars. The airlock one had some condensation near the top of the jar, and that was about it.
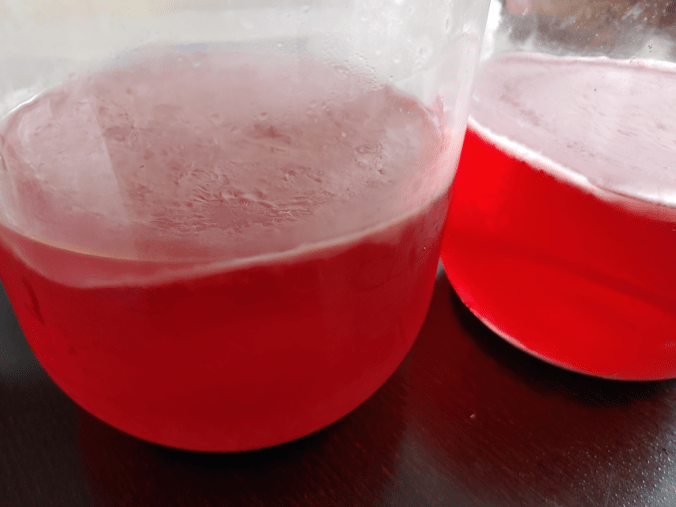
I drew some out of each jar, using a turkey baster, to taste test.
Both of them had a mild, vinegar smell to them. Both of them were also had a VERY strong vinegar taste!
The girls taste tested them, too, and we all agreed that there was a slight difference in taste between them. The cheesecloth one (the girls did not know which glass was from which jar when they tasted them) has a slightly milder, more pleasant taste.
Meanwhile, I did a bit of research on what to do with the mother. We won’t be making this again until next fall. Can the mothers be kept for that long?
It turns out they can.
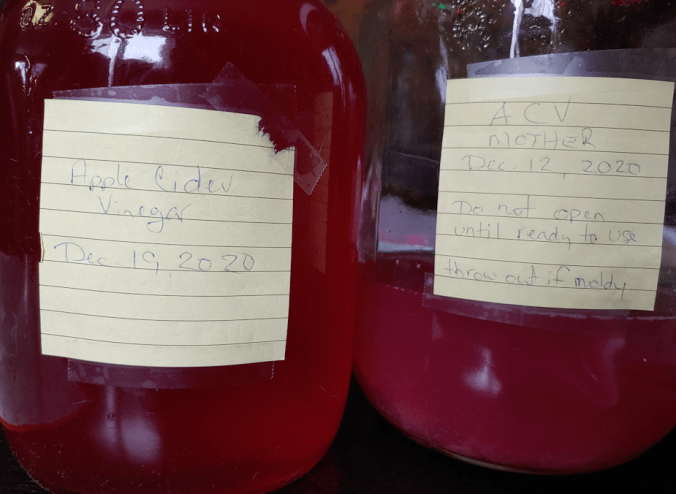
I was able to remove the mother from the cheesecloth jar before pouring, but didn’t have as much lock with the airlock jar. :-D So I put a small strainer over my funnel when I poured the vinegar into the cleaned and scalded jug. There wasn’t enough room for both jars in the jug, though. Yes, I mixed them together. I’d have kept them separate, if I’d had another small jug, but I did not.
Which was okay. I read that the mother has to be immersed in vinegar, and kept air tight, for storage. So the remaining vinegar was left in the jar, along with both mothers.
The gallon jug of ACV will go into the fridge for later use.
The jar with the mothers was sealed, and is now back in the old kitchen for storage.
I am quite happy with how this turned out. Having left it for so long, it’s a lot stronger than if we’d bottled it back in October, like we originally intended, but that’s okay. Using our own crab apples, from the one tree with the best, sweetest apples, not only resulted in a gorgeous colour, but it’s own unique flavour.
We will definitely be doing this again! Next time, though, we will just use cheesecloth and skip the airlock.
Now we just have to do a hydrometer test on the hard apple cider and see how it is. It would be awesome to have some of our own hard crab apple cider to enjoy with Christmas dinner! :-) Hopefully, I can get that done in the next day or two.
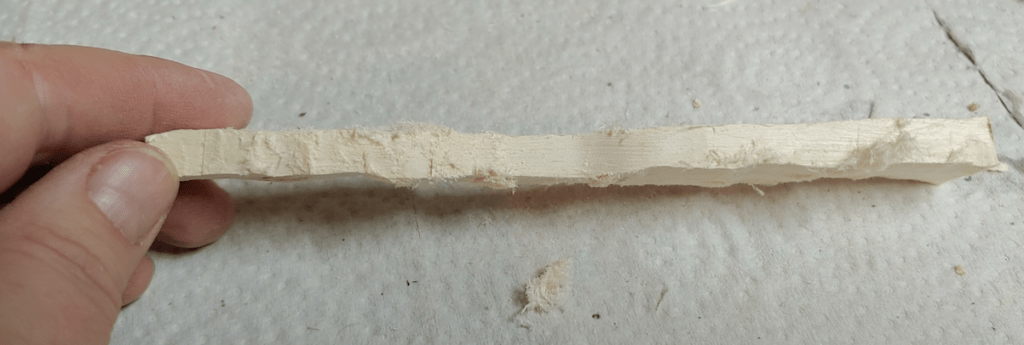
Having made an olive server, using my new gouge, I thought it would be good to use some of the remaining wood to make a spreader and olive fork.
After cutting a length off, the first thing I did was split the wood down the middle.
Here, you can clearly see the rotted out core that I had to work around with the olive server.
The utensils I wanted to make would be well away from that core, though, so this was okay. I split off some excess wood from the opposite sides, then debarked the remains.
In sketching out the spreader and fork, I decided not to include the knot at one end. It may have added visual interest, but I just didn’t want to fight with it.
Once rough sketches were made, I rough cut away excess wood. A band saw would make the job easier, but I don’t have one that works, so I made do with a little Japanese pull saw that I got last summer, and a coping saw. The coping saw has been a problem, as it won’t lock at the handle end anymore, so it tries to rotate while I’m using it!
For the spreader, I added another rough sketch on what would become the top. I wanted a slightly wider bit at the start of the spreader blade as a sort of stopper, more for visual interest than anything else. I wasn’t too worried about matching the sketch closely, since it would depend more on how much I had to cut away from the core of the wood.
Next up was using carving blades to do more shaping and trim away excess wood at the core, to take out that rotten strip.
Then I broke out the Dremel.
After trying out different tips, I ended up just using the sanding tips. They are a course grit and did a good job of taking off the excess wood, grinding away the remaining saw cuts, and shaping it more.
Then it was back to the carving knives for more delicate clean up and shaping, then sanding.
Ready for oiling!
That knot in the blade was why I switched to the Dremel. I like how it looks in there, but my goodness, it was brutal to work around!
Next, the olive fork.
For this, I just went straight to the Dremel and used the sanding tips to rough shape it.
I then used carving knives to clean it up and work on the tines end to narrow it down even more. Once it reached the point where I would otherwise have started sanding, I made the tines.
My Dremel set includes tips for carving and engraving, and I used one of them to drill a hole where I wanted the tines to join. Then I used a cutting wheel down the length of it.
There was a knot right in the middle. The Dremel cutter did NOT like going through that knot!! :-D
After that, it was back to doing more detailed shaping until it was ready to sand.
Doing those tines was a real pain in the butt!
It actually worked out much better than I thought it would, though.
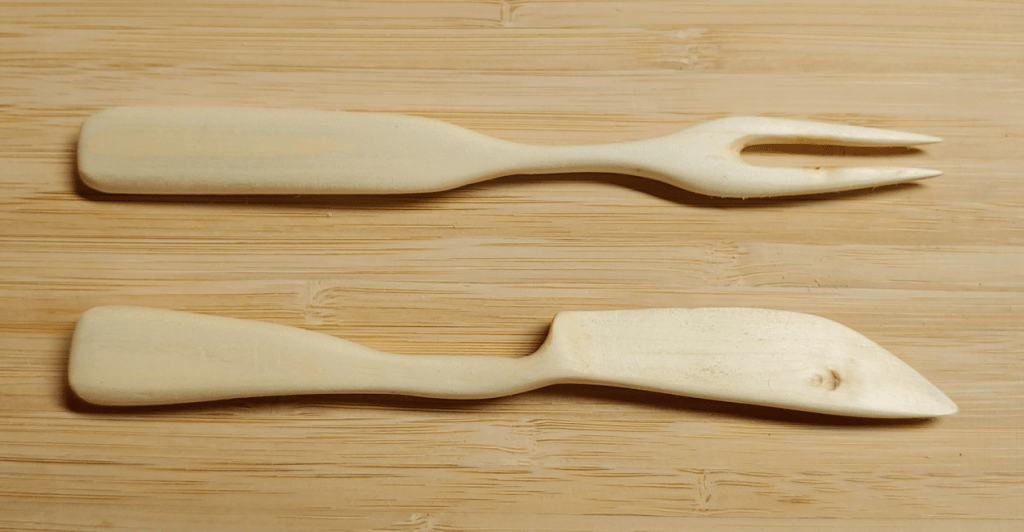
For both the spreader and the olive fork, I worked my way through increasingly fine grits of sandpaper, finishing with 220 grit. Because that’s the finest grit sandpaper I have.
There they are, ready for oiling!
You can see the edges of the knot that was cut through to make the tines much more clearly, after oiling!
The slightly wider bit on the spreader turned out to be a perfect thumb rest!
When sanding the blade of the spreader, I actually had to be a careful not to make it too sharp. It’s meant for spreading, not cutting! It’s remarkable how sharp a wooden blade can get.
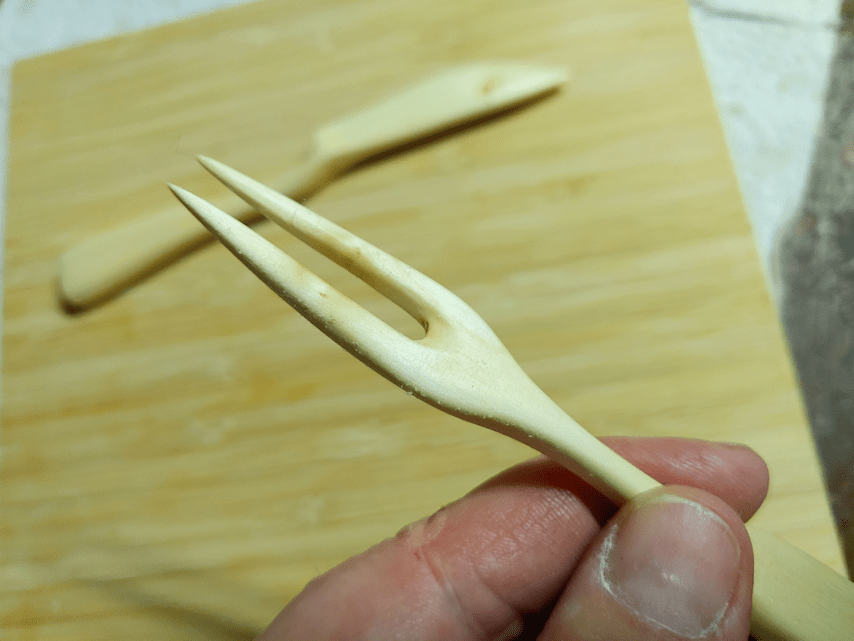
A closer look at the tines of the olive fork.
Then I wiped off all the sanding dust that got onto the oiled surface! :-D
They fit! I had not actually planned this, but it makes sense, since they’re from the same piece of wood, but I’m really happy to discover they fit so perfectly inside the olive server.
I am quite pleased with these. Not only with how they turned out, but how quickly they worked up, too.
Lo and behold, I had an open day today! Which means I finally had the chance to do a bit of wood carving and test out the wood gouge I got a month ago.
I had a particular piece of maple from clearing behind the pump shack that I wanted to use. After looking at ideas for a while, I decided to make an olive server. Something along the lines of this.
It took me about 5 or 6 hours, but I got it done! :-D
Photo heavy post ahead! :-D
Here is what I started with.
This is about half the length of the original piece. The length was decided by a bend in the wood. :-)
I now needed to create a slightly flat bottom, and take about 1/3 off the opposite side to create the top of the bowl.
I used what tools I had on hand, which was this beast of a knife.
We’ve dragged this thing around for many moves! I’ll have to get my husband to tell the story behind it. :-D It turned out to be perfect for the job. Especially that little sunken in part of the blade, near the handle. It was the perfect width to set at an end of the wood, then I hammered it with a rubber mallet to split off the pieces I needed to remove
Then I used it as draw knife to debark it!
Once that was done, I made a rough sketch on the wood.
The narrower end is where I placed the handle, and I decided to leave a little bit of a “foot” for an extra touch of stability.
Before I started carving, though, I decided I should try and use my new angle grinder to level off the flat parts, take off excess wood, and maybe even shape that handle.
It came with 2 metal grinding wheels. Not wood.
I tested it anyhow, just to get to know the machine. All it really did was leave some marks in the wood. :-/ Ah, well!
Finally, it was time to use the gouge!
This thing is awesome! Oh, my goodness, it cut through the maple like nothing. I could also switch hands with it. I can use my right hand, but I am left dominant. The sloyd knife from my carving kit is for righties. I can use it with my left hand, but it takes some doing, and I still need to use my right hand to control the blade. I did use the sloyd knife a bit, to give my hands a break, since it is held in a completely different way. As I got deeper, though, it just wasn’t possible to use the sloyd knife any more.
Which is exactly why I wanted the gouge!
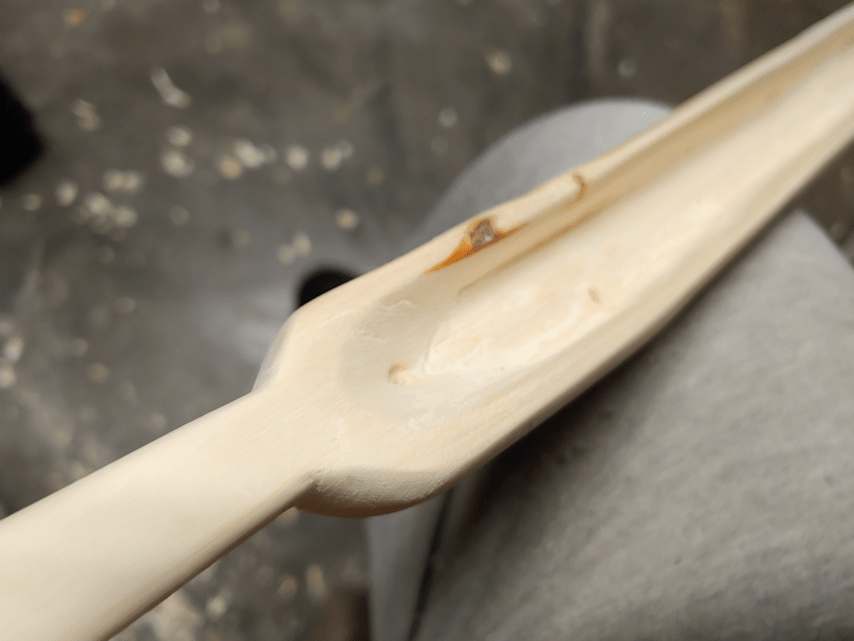
As I went deeper, I hit the middle heart wood, and discovered it was rotten!
This would not be an issue for the bowl part of the server, since I would be cutting it out completely, but would it affect the handle or the end?
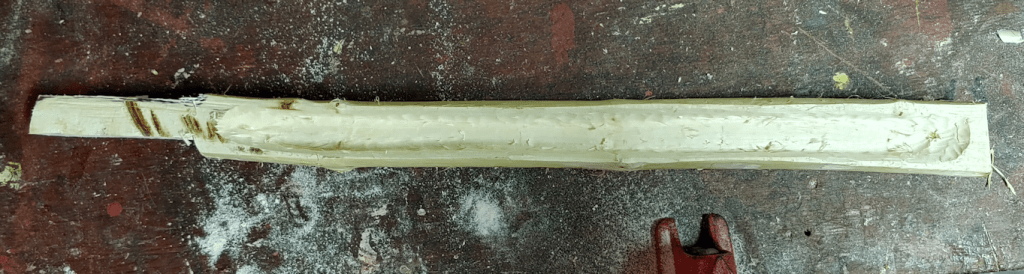
The bowl portion is done!
Along with the gouge, I used carving knives to thin the wood at the top edges, which made it easier to set the gouge to go deeper.
You can see a spot of discoloration at the near end of the bowl. That’s the heartwood. It’s really small, so I’m hoping it won’t be an issue.
The next thing to do was remove excess wood to shape the outside.
I was going to use my coping saw for the handle part, but the darn thing keeps trying to spin on me. So I used a different hand saw, and a chisel to take off the wood under the handle. I almost took off a bit too much, though. !!
The next several hours were spent using carving blades to shape the handle and ends, and smooth out the inside. The handle and the ends were a real pain to work on!
Then it was finally time to sand.
Sanding the inside of the bowl was also a real pain! Getting the curved ends smooth was the worst of it, but sanding the inside in general was really awkward. Still, working my way through ever finer grits of sandpaper, I finally got it to where I was happy with it. It’s a good thing I wanted to keep some of the “rustic” texture in there!
Here it is, all sanded.
It was worth the fight! :-D I am quite happy with it.
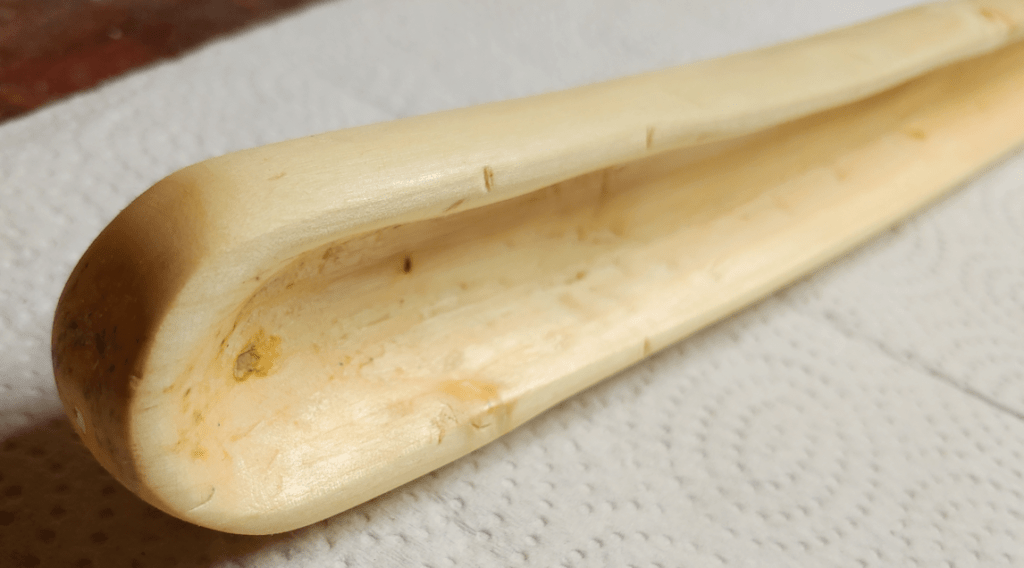
Here’s a closer look at the handle end of the bowl.
Hmm… Do you see that little divot?
That’s the heartwood.
While shaping the handle, I did end up reaching the soft heartwood from underneath, so I was very careful not to expose any more of it.
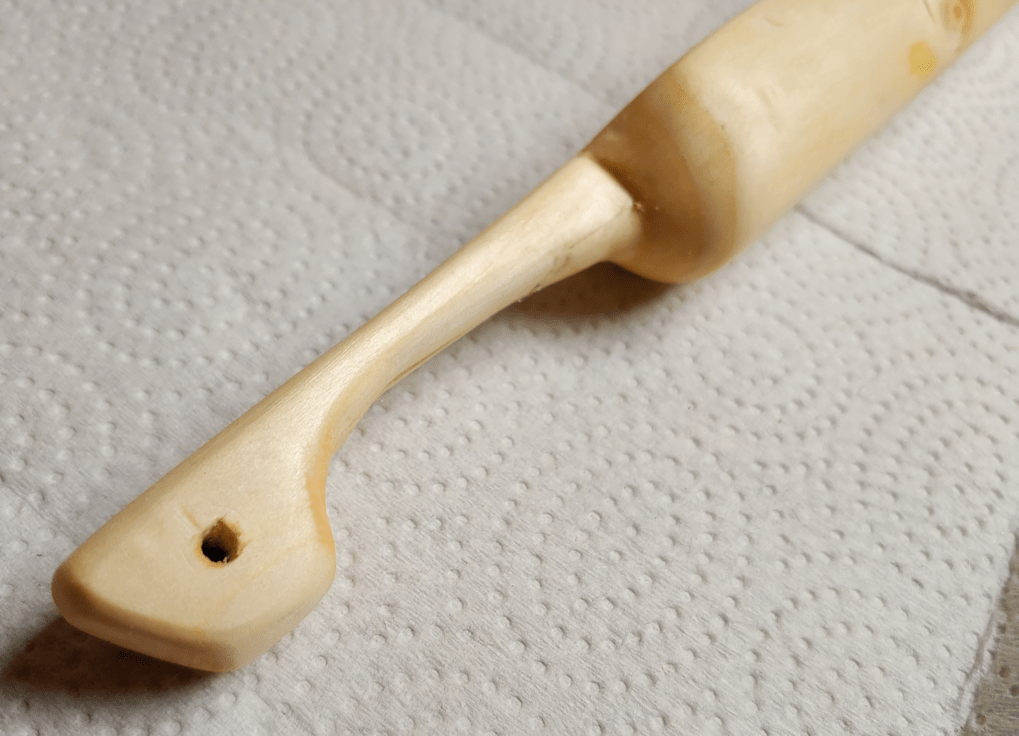
Oiling the wood should help protect it. Before I did that, though, I made a last minute change.
I decided to drill a hole though the “foot” of the handle, for a hanging cord of some kind.
Finally, it was time to oil it! I use mineral oil, as it is food safe, and does not go rancid.
I love how the oil brings out the beauty of the wood, as well as protecting and preserving it!
Just a couple more detail shots. :-)
I have since threaded some twin that’s almost the same colour as the wood, though the hole.
I think I will give this to my brother. They may never use it, but I know he and his wife will appreciate it. Especially since it was made using wood from maples I had to clear away to fix the pump shack window. :-) A little piece of the farm!
The other experiment I tried was to make a baking soda and cornstarch dough (which I wrote about here), which was supposed to be good to roll out and use cookie cutters on. These are supposed to result in a bright white final product, that was also quite hard and durable, which would take paint or other embellishments well. The dough ended up way too soft and sticky, so my daughters used it to make more sculptural stuff, though one did try and do some cookie cutter ones when the dough seemed to have dried up enough for it.
After leaving them to dry for a while, we ended up having to put them in a cool oven (they were supposed to dry slowly, to avoid cracking), because… cats.
Cats who leave paw prints behind, as they do dastardly things!
All of the cookie cutter ones have had to be thrown out. They just crumbled.
Plus, the cats seem to be desperate to get at them! I had to take them out of the oven to put the decorated orange slices in, and had to get really creative in covering them, while still giving them air flow to dry. There is still some hope for the more sculptural pieces, but they will need at least a few more days to fully dry.
If we can keep the cats out.
As for the orange slices, the cats have been after them, too! They ended up knocking over the tray on the table they were laid out on.
I’m happy to say that the glue worked very well.
Several of the decorations were scattered on the floor and, while the glue was not yet completely dry, it held! This was a bottle of WeldBond that came with a case of crafting materials given to us. I have no idea how many years it was there, but it was long enough that the plastic and cardboard pieces of the original packaging came apart.
Clearly, the cats are not put off by the orange slices and cinnamon sticks.
Today, I decided to add ground spices to 7 of the 13 slices.
First, I rigged up a cardboard box that I could use to spray them with adhesive.
I also decided to use a combination of ground cloves, allspice and nutmeg, with a tiny sieve to apply them evenly.
After crowding the decorations close together, I tried to spray just the orange slices, not the strings, then dusted them with the ground spice mix.
They are now set aside for the spray adhesive to set. The box set up allowed me to put something over them in case a cat decided to jump into it.
Since I started writing this, I’ve had to go put the cover back and add weight to it, because the cats had already knocked it off.
The main thing about doing this craft was that citrus and all these spices that smell so good to humans are supposed to deter cats.
Our cats apparently did not get that memo.
*sigh*
I’m still holding out hope to having a tree, somehow, but these spicy, fragrant decorations are definitely not going to keep them away. If anything, it seems to be attracting them, instead!
Today, I finally started working on the Christmas decorations I was planning to make with the dehydrated orange slices I’d prepared earlier.
Of course, things didn’t work out to plan! :-D
Do they ever? ;-)
I was going to use cinnamon sticks, plus some little decorations I’d saved from Christmas crackers over the years – they would have been the perfect size – to decorate the orange slices.
I couldn’t find them.
Many of these were collected before we moved, and now I’m second guessing myself. Did I bring them along with my other craft stuff, or did I give them away before the move? I had to pare things down quite a lot for the move.
And yet… I’m sure I saw them since the move, as I’ve had to reorganize my crafting materials a couple of times, since unpacking them.
No worries, though, I decided to use some pine cones I’d gathered from our spruces a while back.
I didn’t have enough to put two on each slice, though. We kept finding them with our feet, around the house, before I discovered one of our cats digging in the container they were in, stealing a pine cone, and running off!
I had enough left for this project, though. I just made sure the biggest cones went on the smaller slices, and paired up the smallest cones on the bigger slices.
Now, I just need to see if the adhesive will work. If not, I’ll break out the hot glue gun, but it’s not like anything is going to stick to dried orange slices very well! :-D
I haven’t decided if I will do more to these or now. I might use a spray adhesive on them, and dust them with ground cloves. It’s more about making them smell unappetizing to cats than anything else! :-D
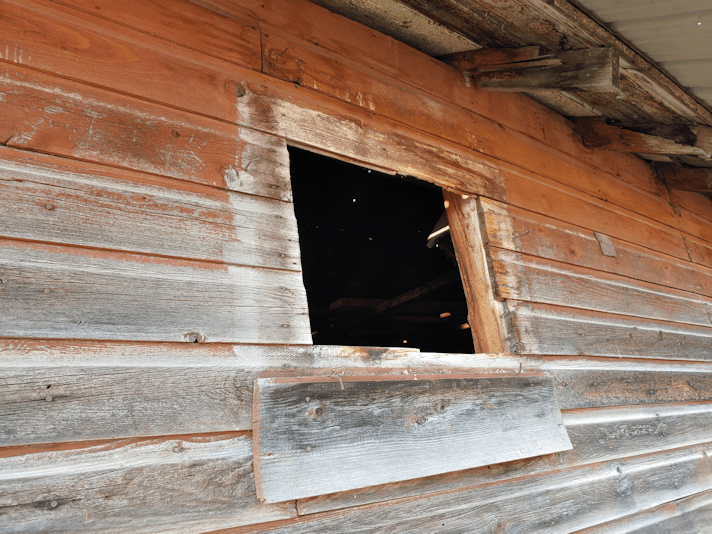
I got a couple of bigger jobs done in preparation for winter. The smaller one was taking care of a window on one of the sheds. This is the one my brother and I had patched the roof of earlier in the year, and is one of the few sturdier sheds left.
My original intention had been to simply board it up, but the window is pretty much the only source of light in the shed, and I had a vague memory of seeing a window in the barn that was about the same side. So I took some measurements, then went looking around.
I found the window, and it turned out to be almost exactly the same dimensions!
And when I say “almost the exact dimension”, I mean the hole in the wall. The frame makes it just barely bit enough that it doesn’t just fall through!
It also looks like it came off of a storm door.
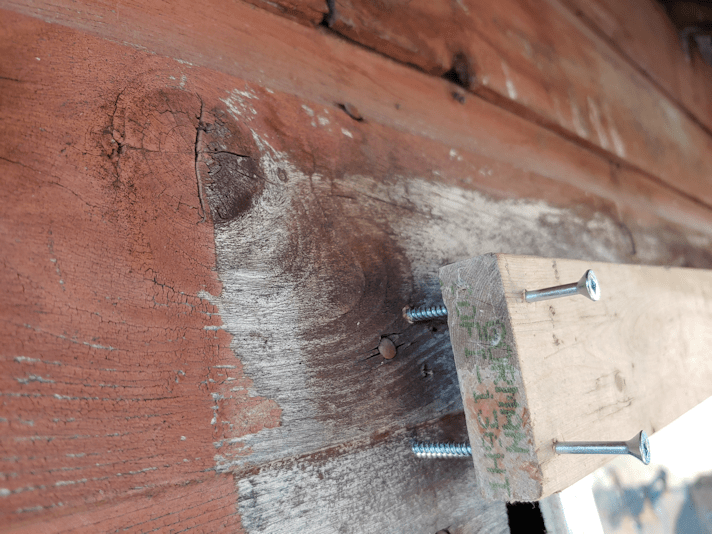
I grabbed a piece of salvaged wood and cut a new “frame” for the window.
If you look at the first photo, you can see the parts of the window that would have been used to slide it up. One of them is flush with the outer edge, the other is flush with the glass. The one flush with the outer edge will be resting on a piece of wood at the top.
This is the window opening. It is, literally, a hole cut in the wall, between two joists.
I also picked up as many pieces of the old window as I could, and some of the bigger pieces of glass. I couldn’t get all of it, though. They are too buried in the grass. This concerns me, as the renter’s cows could hurt themselves. I’ll have to do something about that.
Since I didn’t feel like fighting with an extension cord to the barn, I pre-drilled holes in the wood and put the screws partway through, before I brought everything over. I even cleaned the dirt off the glass, too! :-D
I forgot about the cladding creating gaps, though. I ended up having to replace the screws in the top and bottom pieces with longer ones. I didn’t bother changing the screws in the side pieces, since they don’t need to support anything; just cover any potential gaps from the uneven cut of the opening.
I ended up moving the side pieces in a bit, butting them up against the metal strip on top of the bottom piece. It made them a bit more secure.
There’s one screw at the top right hand corner I couldn’t screw in all the way. I think I hit something in the joist; probably a nail.
Speaking of nails, if you look around the window, you can see several bent nails. There’s two at the top, one on each side, and two at the bottom. I’m pretty sure they’re all that held the old window in place! Well, that and the board hammered onto the wall underneath. No wonder it fell off!
I’m rather happy with how this turned out – and very happy not to have to board it up.
Now I just have to board up some windows in the pump shack. I don’t think I’m going to luck out and find old windows to fit, like I did with this one! That, however, will wait for another day. For today, I had a much bigger job to move on to, and that one will get it’s own post! :-)
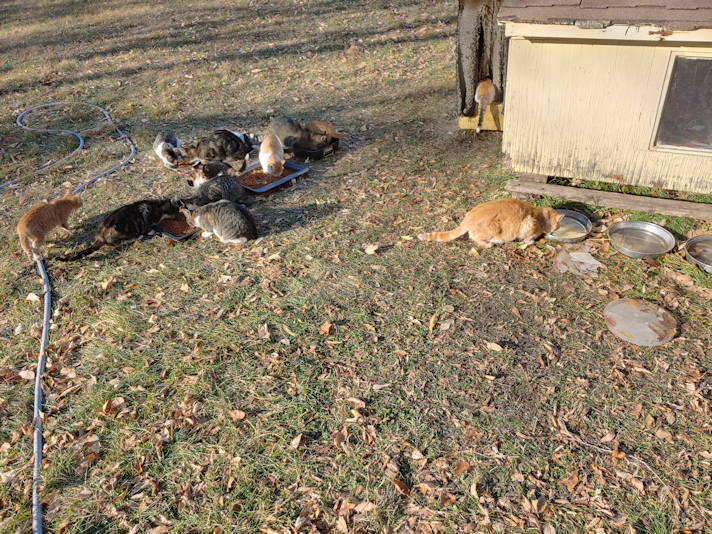
There are 12 cats in this picture. Happily, Rolando Moon is still hanging around, busily hissing at any cat that comes near. We haven’t seen Creamsicle in a while, though. I hope he is all right.
The cat butt sticking out of the entry is a hoot. That is Rosencrantz’s baby, and she seems to be the shiest of the bunch.
As you can see by the frozen blocks of ice, artistically embedded with leaves, it’s been getting a bit cold out at night! It did warm up a few degrees above freezing. Not good for paint, but it had to be done.
I can now officially say that replacing the door on the sun room is DONE!! I just came in from outside a little while ago, and the paint was dry enough I could close the door. What’s supposed to be blue is now blue, what’s supposed to be white is now white, and nary the twain shall have contact with each other!
Yaaah!!
No, I didn’t take pictures. I’m am tired of taking pictures of that door! :-D
The next project is the shelter for the cat food. It will be placed about where the kibble containers currently are. I want to position it so that it will also provide extra shelter for the entrance to the cat house. The heated water bowl can be plugged in, inside, but the bowl has to be outside, since there’s no way I’m going to be lifting that roof every morning to refill their water. ;-) The shelter for the food containers will help keep the snow off the water bowl, too.
It took a couple of hours, but I got the end pieces of the frame done.
Working with this wood we salvaged from the barn has been a challenge. Nothing is even, so about the only thing I can measure is length. After that, I basically just made sure all the pieces matched and lined up. Not being able to just take measurements meant I had to get creative in lining up the pilot holes. Just making the pilot holes was an issue! My drill bits that were the right diameter for the pilot holes are just barely long enough to drill through the wood. I went hunting in the basement and the garage and, while I did find longer drill bits, they were all too large.
Thankfully, the bits I did have were long enough that, after drilling the pilot holes in one piece, I could position them on the other piece, “drill” though the pilot holes again, and make a mark on the other piece.
It worked most of the time. With the uneven wood, there were a couple of spots where the bit just wasn’t long enough to leave a mark.
Once I’d marked the pieces, I could drill more pilot holes, then screw them together.
When we used this wood to make the goat catcher, I had 3 inch screws, and only used two per corner. This was meant to be temporary, but I still didn’t expect it to be so wonky, it would end up bending and breaking the screws! So this time, I got 3 1/3 inch screws, and there’s 4 in each corner.
That thing is solid!
I started by attaching the 2 ft cross piece on the bottoms. The first corner was screwed together manually. Even with the pilot holes, it was not easy – and with arthritis in my wrists and fingers, rather painful. Our new drill isn’t a quick release type, and I didn’t want to be switching from drill bit to screwdriver tip, over and over, so I decided to use an old drill that we “inherited” to put in the screws.
That worked much faster!
Once the cross pieces were in, I got out a tape measure and figured out how much of an overhang I wanted on the roof supports. I decided to make the roof supports 3 1/2 feet long.
Lining those up at an angle was a pain in the butt! Once again, it was more about making sure the pieces matched, because there was no way I was going to be able to take usable measurements. I managed to get them lined up and the pilot holes done. By the time I was putting in the last set of screws, though, the drill was starting to complain, so I set them as far as I could before the drill started having a hard time, planning to screw them the rest of the way by hand.
When I took the screw driver tip off the drill, I realized I was seeing smoke coming out of the drill!! I remember that happening when we used it before. This old thing overheats very quickly!
By then, it was getting too cold to keep working outside, so I will continue the rest tomorrow. Once I have the 6 foot horizontal supports in place, we can take some measurements for the floor and wall boards.
The good thing is, we’ll be using the scrap wood in the junk pile. They are a lot thinner. That means I can finally use the table saw, and do all the cutting at once. :-) Those will be nailed into place; in cleaning up the basement, we found an old ice cream bucket full of nails that are just the right size for this job.
We can also go hunting in the barn or sheds for something to use as a roof. The roof supports are 3 1/2 feet long, but I hope to be able to have a sheet that’s 4 ft. The roof will be the last thing put in place.
After that, it’ll be done for this year. It’ll need to be painted, but we’ll be using it right away, so that will wait until spring. The one exception might be the roof, depending on what we find to use for that.
I hope to get a lot more done tomorrow, but that will really depend on the weather! At least they’re no longer predicting snow flurries, but who knows what the day will actually bring!
That reminds me. We need to bring the sheets of rigid insulation stored in the garage, back to the house. We’ll have to find a better way to get the sheets for the sun room windows to stay in place, though. At least this winter, we won’t be keeping the doors to outside propped open for the cats to go in and out, now that they have their own heated house! :-)
Lots to do before winter sets in, that’s for sure! :-)