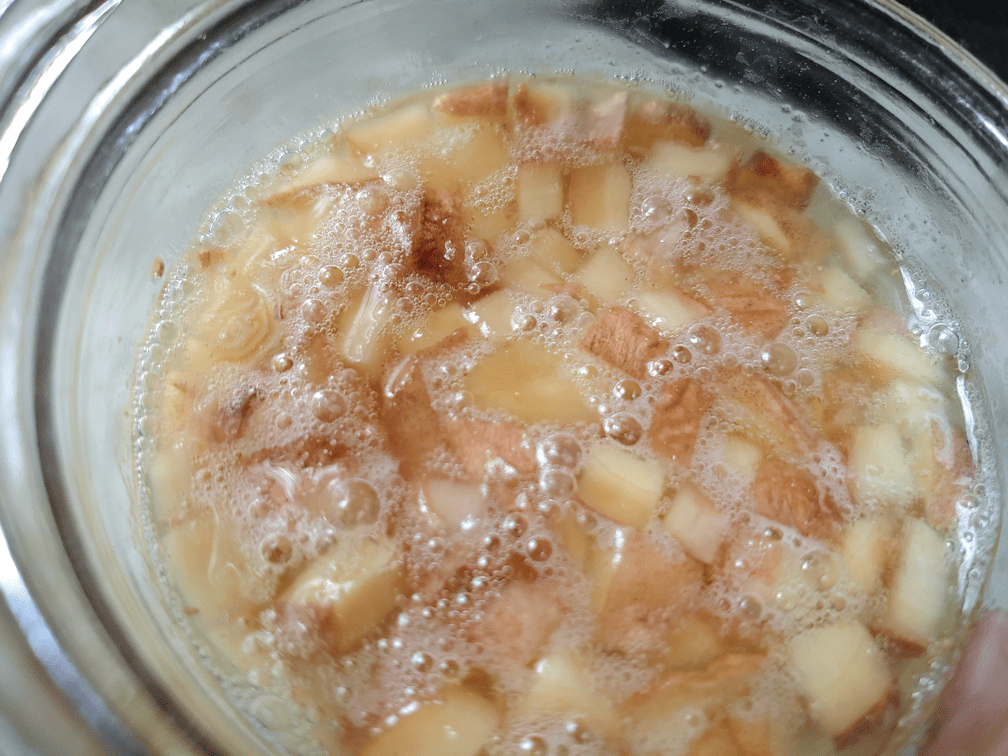
Well, we are into our third day of starting our ginger bug. It got its third feeding last night, and third morning stir today.
Look at those bubbles!
While researching how to make this, I saw sites that said it could be used after three days. Others said to wait four to ten days. All seemed to agree that it could be used once it starts bubbling.
Which means we should be able to start fermenting some pop, any time now!
I picked up some cranberry-raspberry juice to try first. There should be enough for at least two or three 8 cup batches. The recipes I’ve been reading said to use 7 1/2 cups juice to 1/2 cup ginger bug. Eight cups is not a lot, though.
Time to go back over the various instructions I’ve found and confirm the next steps we need to take. Then I have to decide on what container to use. Depending on what we go with, we might do a double recipe. We shall see!
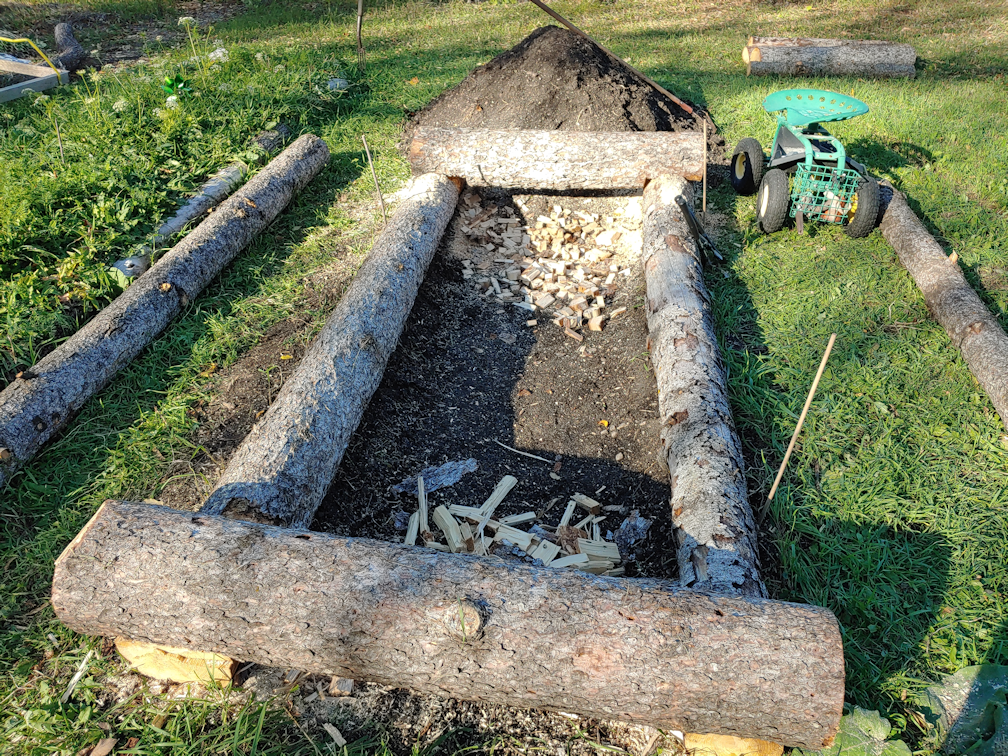
After several days of rain, I was finally able to get a bit more work done on the high raised bed that is being built.
Such slow going!
I was able to cut the four notches to fit the end piece on, but it is not done. I made as many cuts as I could with the baby chain saw, then used the hammer and chisel to take off the excess wood while the batteries charged. Unfortunately, I finished with the chiselling faster than the batteries charged, so when it came time to use the baby chainsaw to do the finishing, I didn’t get very far.
I’ll have to get back at it, later. It’s the notches on the side logs that need to be deepened more.
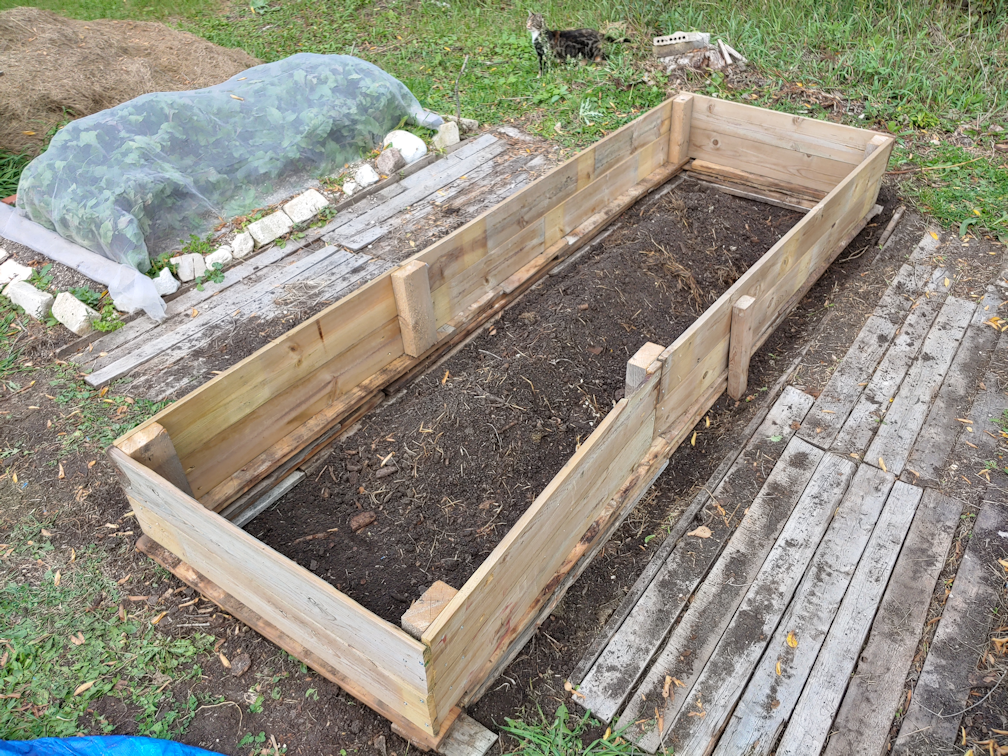
You can read about the first raised bed I did, here and here. Things were done a bit different this time, so here is another step-by-step post with lots of photos! :-) I actually started this bed over a week ago. This is how it looked then.
This bed has been almost completely untouched since the garlic was harvested, letting the weeds get fairly large. This made them easier to pull.
Along with pulling the weeds, with as much of the roots as I could, I lengthened the bed to match the size of the box. Right away, I could tell this one was going to need a “foundation” under the box, too. I was definitely hitting rocks, and a whole lot of roots, while trying to loosen more soil and remove grass and weeds.
Once the weeding and loosening of soil was done, it was left to sit so that any weeds I missed would have a chance to start growing again.
When I started working on it today, the first thing I did was go over the area again, pulling out any new growth by the roots. Then it was time to start shoveling!
Like the previous bed, this one had been originally amended by burying the contents of our compose pile and straw. So I only wanted to remove up to the straw, basically.
In the process, I was finding a LOT more roots! It looks like the cherry trees are encroaching again.
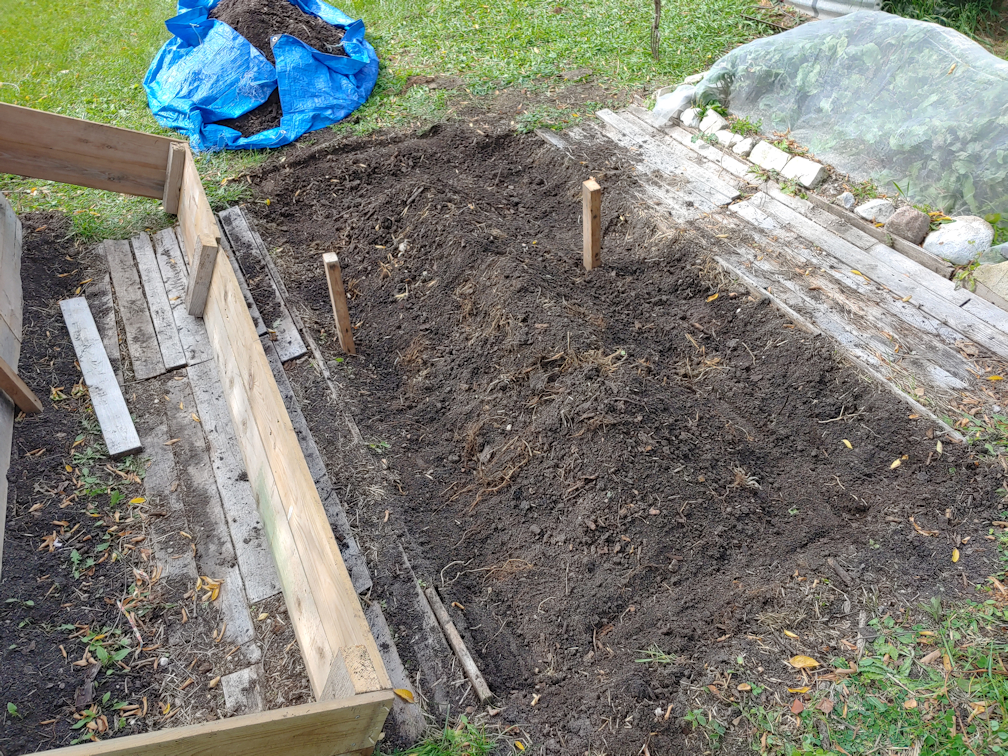
Once I was satisfied with how much of the topsoil I had removed, I raked around the edges to try and level the soil where the box would be resting, as much as possible, while heaping it all in the middle.
Then the box was laid down and, once I had it where I wanted it, I used a sledge hammer to hammer in the supports on either side, at the middle, to prevent the long sides from bowing out when filled with soil. I also hammered down the corners and such, to leave marks in the soil that I could use as guide lines.
The ground wasn’t anywhere near as level as I probably should have made it, but that’s okay. Things will settle and adjust over time, and these boxes can be easily replaced in the future, if need be.
The next step was to raid the pile of old, salvaged boards that the groundhogs have made their den under, and build up a foundation to support the box. Once that was in place, a daughter came out to help me carefully place the box on top of the foundation, and in between the support posts.
Then it was just a matter of shifting the foundation boards a bit, to make sure the box was fully supported. Again, not quite level, but that’s okay.
The soil heaped in the middle was then raked out to the sides, covering the foundation boards and creating more of a recess in the centre.
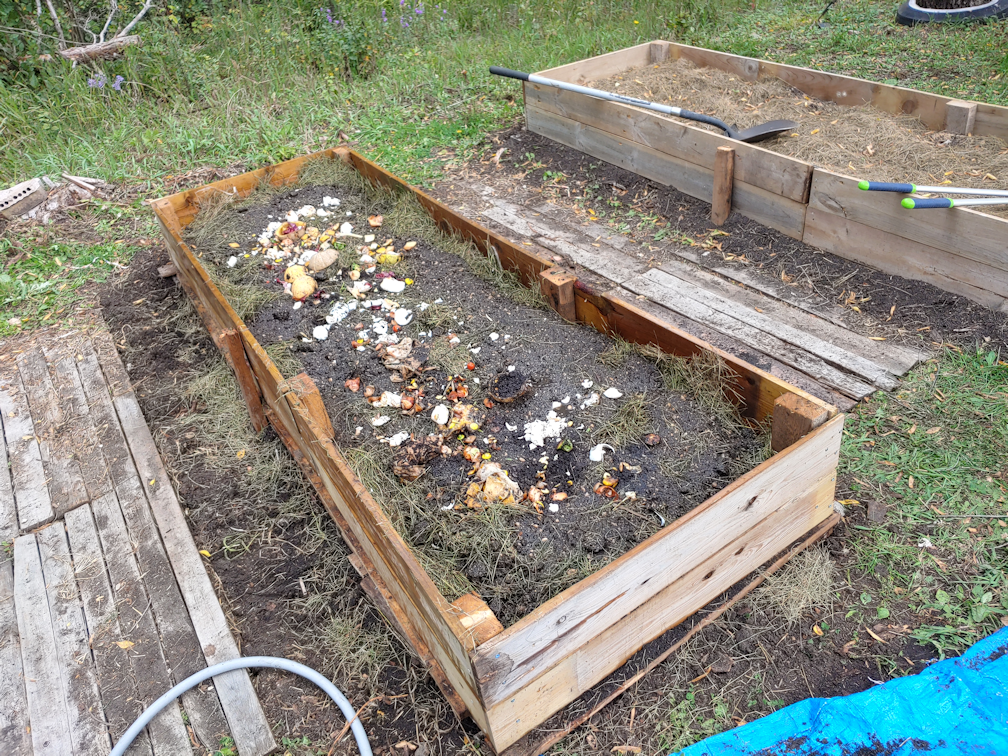
Then it was time to add the first layer of fill, and raid the branch pile. This time, I added more and larger branches than with the first bed I did.
This, unfortunately, left a lot of gaps and air pockets. They will fill in as the wood decomposes and everything settles and sinks, but that will take time. To help fill in spaces and speed up the decomposition process, I started adding back some of the soil. After returning about a quarter of the soil, I hosed it down thoroughly, so wash it further down into the gaps, then added about another quarter of the soil and soaking it down again.
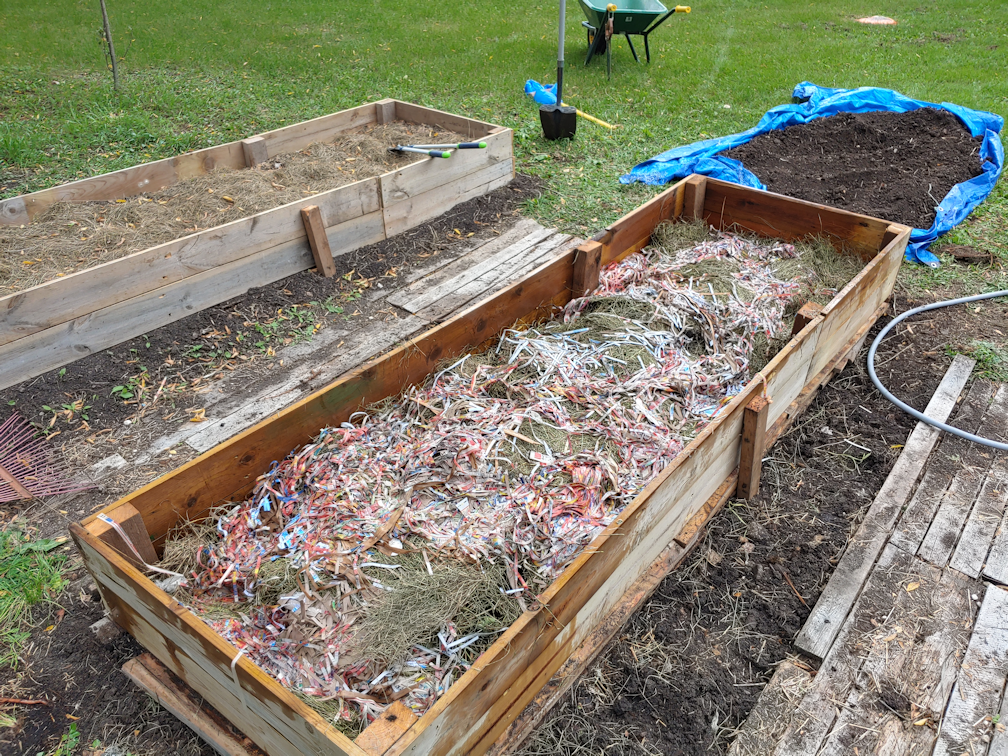
The next layer was contents from the compost heap, most of which was greenery I’d cleared from around the dead spruce trees that were cut down. This got another soak, another scattering of soil, and yet another soak.
The next layers were grass clippings and shredded paper. This time, after soaking it all down, I walked back and forth over the whole thing, to try and compact and break the buried branches more.
It as at times like this that being a woman of generous proportions comes in handy. ;-)
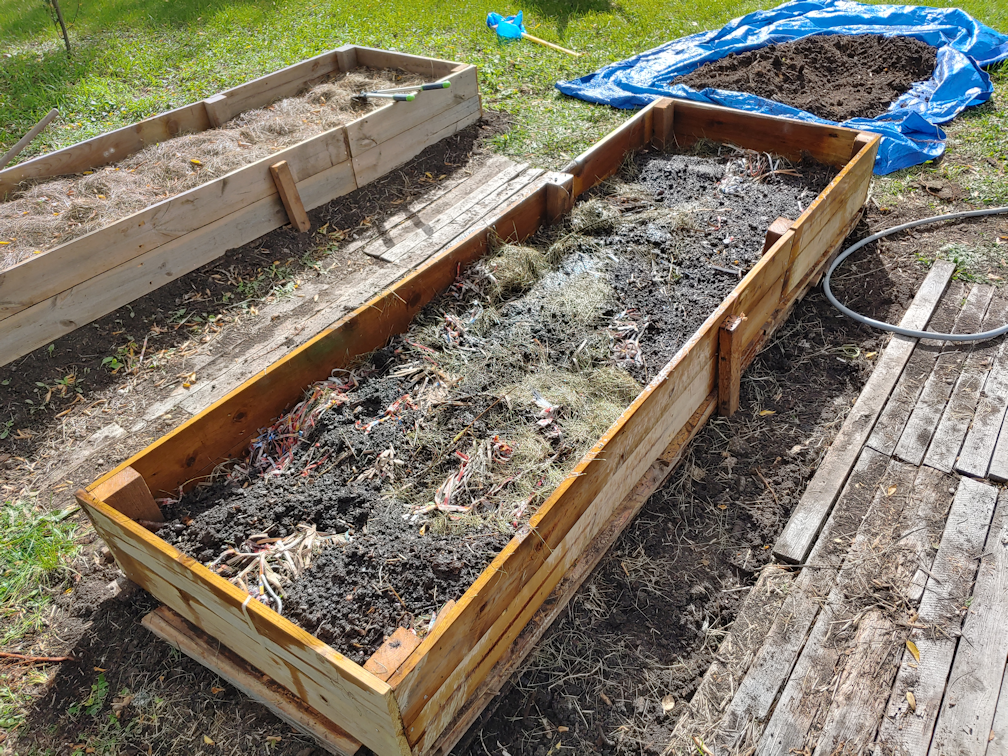
Yet another thin layer of soil was added and soaked down.
Note the gap between the box and the board path. By this point, it had become a bit of a safety hazard! Without the soil to hold them in place, the boards at the edge kept moving and catching on my feet, and I was constantly catching myself to avoid twisting my ankle in the loose and lumpy soil in the gap.
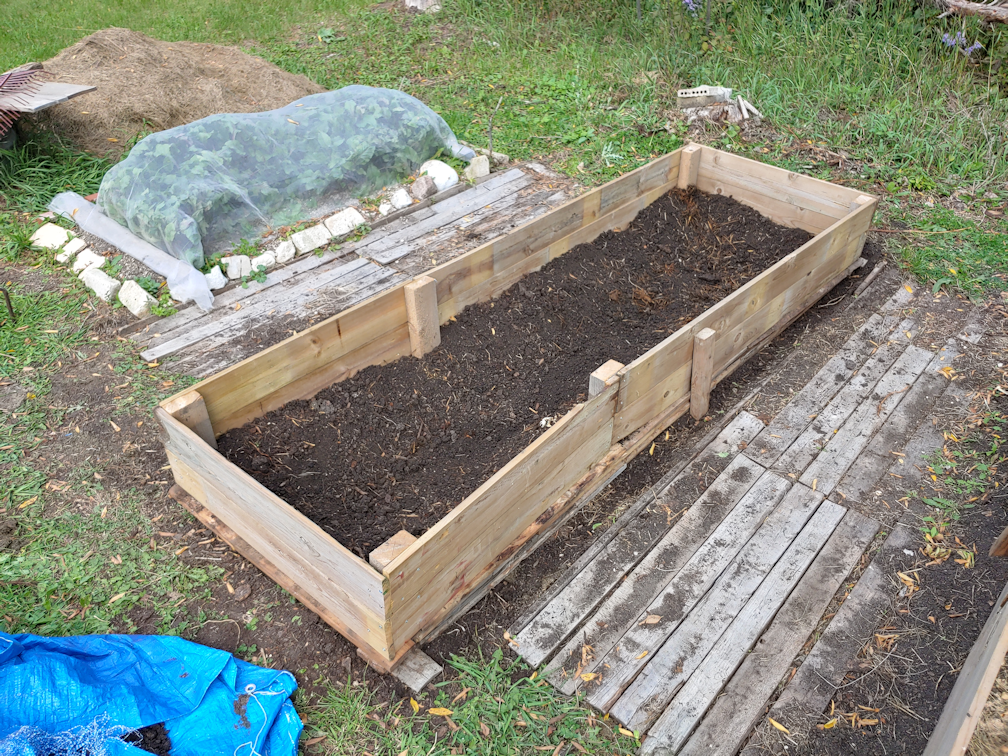
Another thin layer of grass clippings was added and hosed down. At this point, the fill in the new raised bed is about the same level as in the first one. Adding the extra and larger branches made a noticeable difference, even after being tromped down.
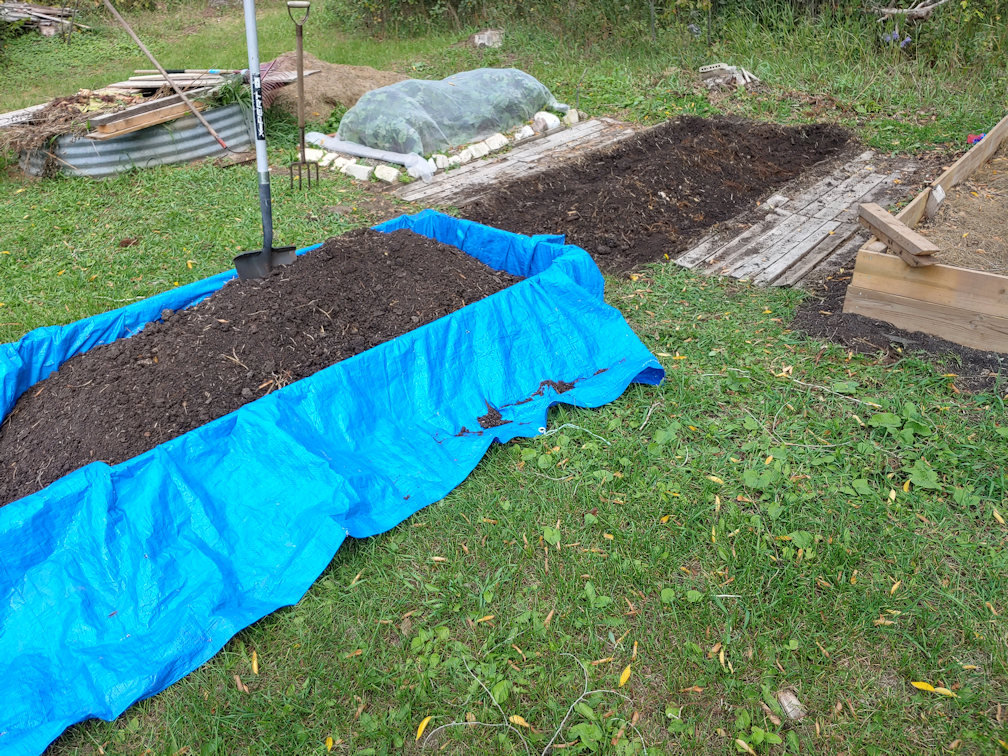
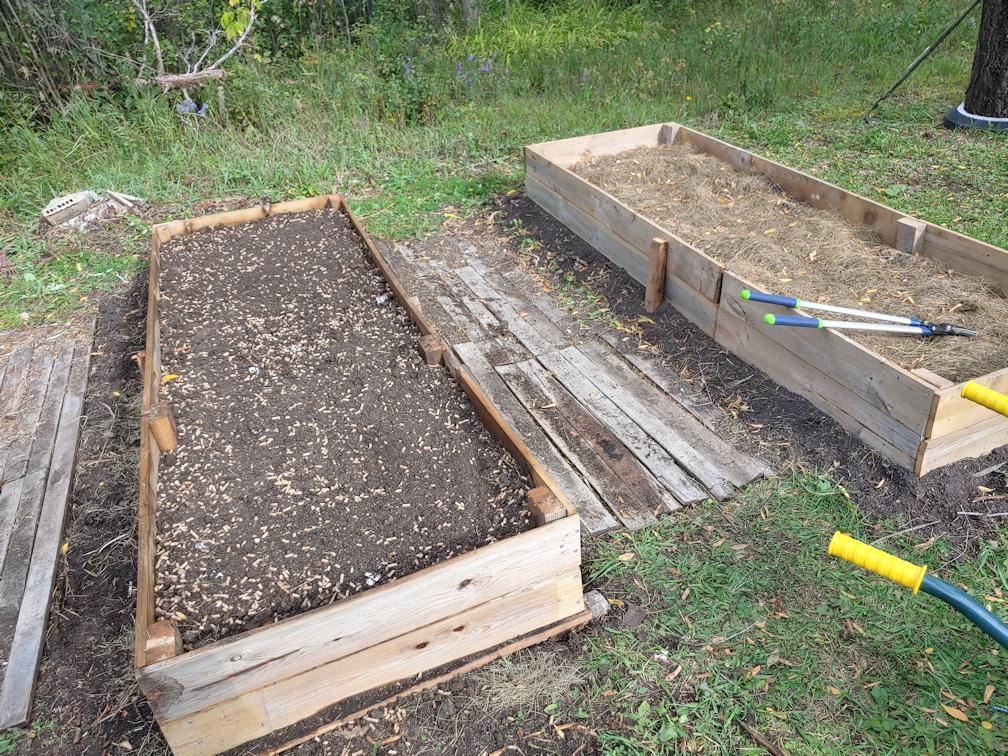
Once this was done, it was time to amend the remaining soil on the tarp. I added about half a 40 pound bag of wood pellets, as was done in the first raised bed, and then a couple of wheel barrow loads of new garden soil was brought over; one added to the soil and wood pellets on the tarp, and the other added directly on top of the grass clippings, then raked out as evenly as I could.
It was about this time that a daughter came out with the kitchen compost buckets, so that got added straight into the raised bed and spread out, then hosed down again.
The next while was spent mixing the soil and wood pellets together, as much as I could, before adding it to the bed.
Once the soil was added, it was raked out evenly. This layer was NOT hosed down, though.
One more layer of grass clippings was added as mulch, then it got one last, very thorough, soak with the hose. This was the time to clean up the sides and edges, too.
This is as much as will be done in the bed, this year. Both beds will get more amendments added to them in the spring, after they’ve had a winter to settle and sink.
Also, remember the gap in the path on the other side of the bed?
I was going to work on filling that to make it safe, but I had reached my limit. A daughter will be working on that for me later. As these beds have been worked on, and rocks were found, I had been tossing them next to a nearby stump; you can see it in the background, with some bricks on it. Those can be gathered to use as fill in the large gap on the far side of the bed, and more boards will be added, and whatever else my daughter can thing of to make it safe to walk on. The eventual plan is to cover the board paths with sand and gravel.
After this, there is still the third bed in this location to be made, but with the beets still growing, there is no hurry. The last bed will be just one board high, as that is all the wood of this type we have left, but these boards are slightly wider, plus we still have plenty of the scrap wood bits to use as a foundation, so it shouldn’t be too much of a difference.
There was a break in the rain, giving me a chance to test out my squash hammocks.
This is a melon, not a squash, but “melon hammock” doesn’t roll off the tongue as well. :-D
I’ve made three of these so far. I think I got the size right. None of the melons or winter squash will get much bigger than this. The ties need to be a bit longer, though.
For those who want to know, it’s basically just a filet crochet square, with chain stitch ties woven through the openings on opposite sides that act as drawstrings, to keep the fruit snug. I used medium weight cotton yarn and a 6mm – J/10 hook.
I think I’ll make a few more to have handy, if needed.
Sadly, we didn’t get any more rain today, but it has been very windy. Enough that we lowered the canopy tent as far as it can go, so reduce the chances of wind damage. It still has our camp chairs and makeshift table that we were using to cure onions on a screen, under it, and we can still duck under to sit in it.
I feel like a little kid in a fort. It’s awesome!
But I digress!
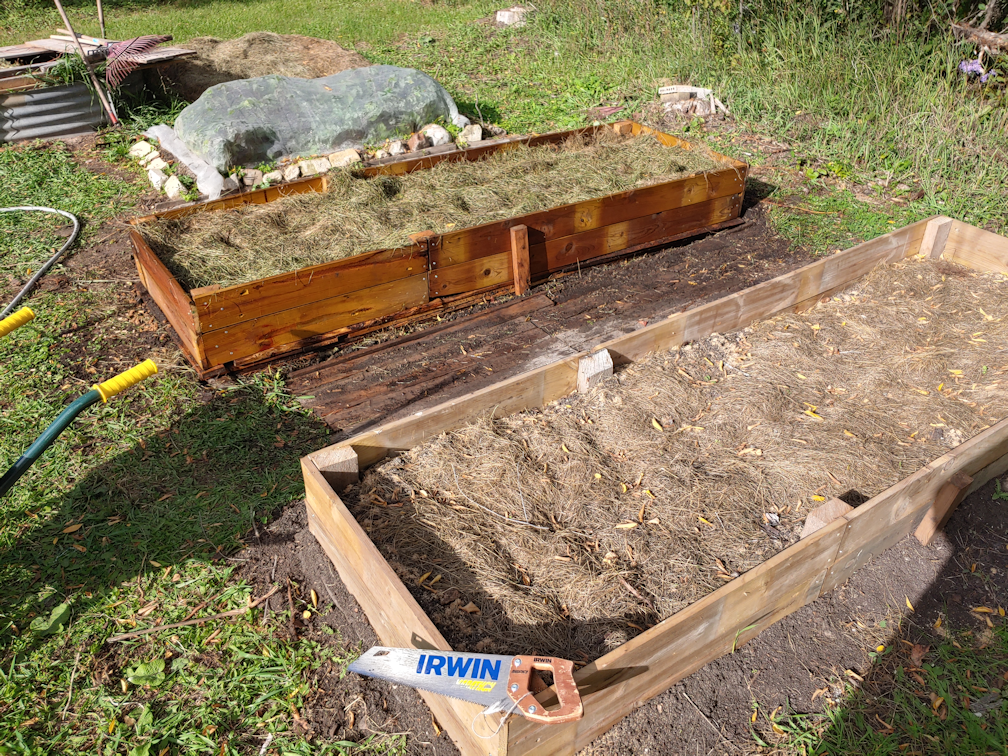
There was a break in the wind, and I took advantage of it to build the second low raised bed box to go where the garlic had been.
The build went much faster than the first one, now that we’ve got it figured out.
With stuff we’ve got going on over the next few days, we won’t be able to work on the third one, nor prep the empty beds for next year, until after the weekend. Which rather sucks, because the next couple of days are going to be really nice, then by Sunday, we’re expected to hit 33C/91F, and stay above 30C/86F for at least a few days. At least there is the possibility of more rain as well.
The third box will be a very quick build, since it will be only 1 board high. The bed it’s going to go on still has beets growing in it, so there is no hurry on that one. :-)
We meant to bottle these months ago, but time and space and other priorities kept delaying things.
Today, I finally broke down and did it.
Well. Half of it.
We didn’t want to use corked wine bottles for this, so we’ve been saving up our screw top bottles for a while now. Only recently did we get enough to bottle the hard cider, anyhow. We just don’t buy wine-bottle sized things very often. I suppose that’s a downside of our buying habits. Not a lot of materials left over to reuse.
I only did one of the two carboys we had fermenting. They are 3L each, so I needed at least four 750ml sized bottles. After sterilizing them, I didn’t siphon the cider into them. I have problems with using the siphon. We don’t have an auto siphon, and have not been able to find one that will fit in anything smaller than the large carboy that came with our wine making kit, so it’s gotta be done old school. I always end up disturbing the sediment, and splashing all over when moving from bottle to bottle, so today I just gently poured it from the carboy through a sterilized funnel.
For the last bottle, I added a coffee filter to the funnel, just in case.
It actually worked out MUCH better than fighting with a siphon. Not only did I barely disturb the sediment at all, but there was no mess. I’m sure I committed some major faux pax by not using a siphon to fill from the bottom up, and getting all that air in there, but… it is what it is. I still wiped the bottles with vinegar water, but there really wasn’t anything to clean up.
Of course, I then had to do a taste test!
This was poured from the partially filled bottle, so if there was any sediment that got through, this would be the bottle that has it.
As you can see, it is very clear.
There is a very strong smell of alcohol from this, but you can also really smell “crab apple” as well.
I just love that colour! Sadly, it doesn’t look like we’ll have many crab apples at all this year, never mind from this particular tree with it’s very red little apples, so we won’t be making more hard cider, nor cider vinegar, with our crab apples this year.
We still have the second carboy to bottle, though, and that will leave us with hard cider to last us a while.
Ah, but how does it taste?
The first thing that hits is SOUR! This is a remarkably sour cider! Not a bitter kind of sour, though. It really wakes up the taste buds. I think this would be good with game. Or with a really strong flavored dessert.
For all that it smells of strong alcohol, there isn’t a strong alcohol flavour. I don’t actually enjoy the taste of alcohol, but I can drink this. And yes, there is a light, fruity apple taste, too.
I find myself thinking this would be nice with a spot of sugar or honey added to it. Perhaps I’ll try some with a bit of our vanilla sugar added. Or to include it in a fruit punch.
I did not take a hydrometer reading. I wasn’t up to digging it out this time. Based on previous readings, it was just under 11% alcohol. After tasting it, I would not be surprised for that to have remained unchanged. This is strong stuff, even if it does take a while to feel it!
This is definitely a “sip it slowly” kind of drink.
It should be interesting to see if the flavour changes after they’ve had a few days to rest after being bottled without a siphon.
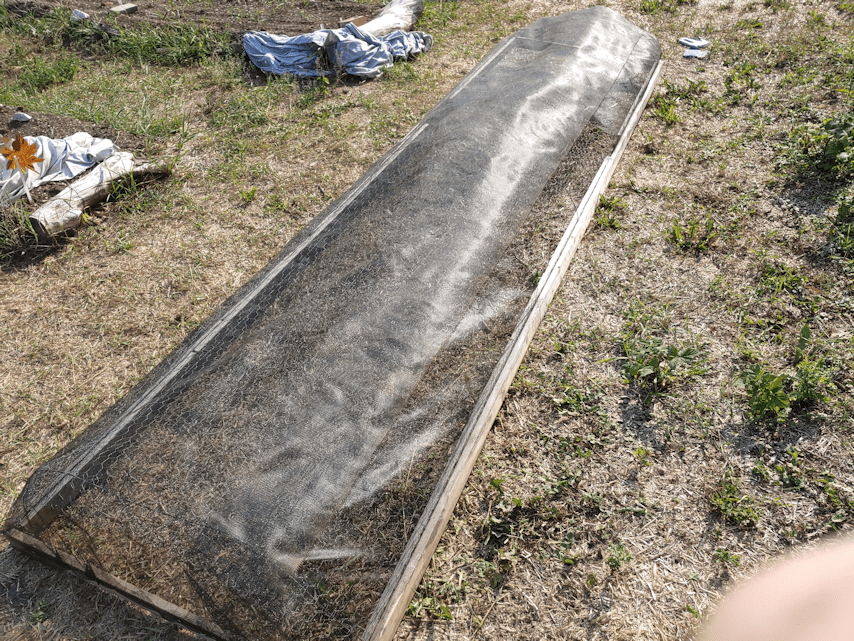
When we planted for a fall harvest, we did as much as we could to make row covers to protect our seedlings. We had enough materials for only two chicken wire covers, then made do with other materials for the third bed.
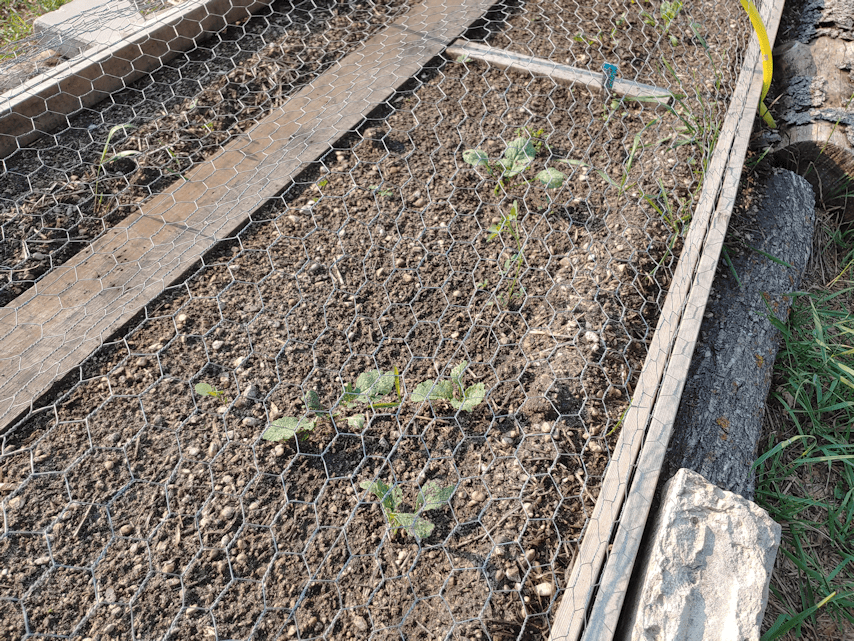
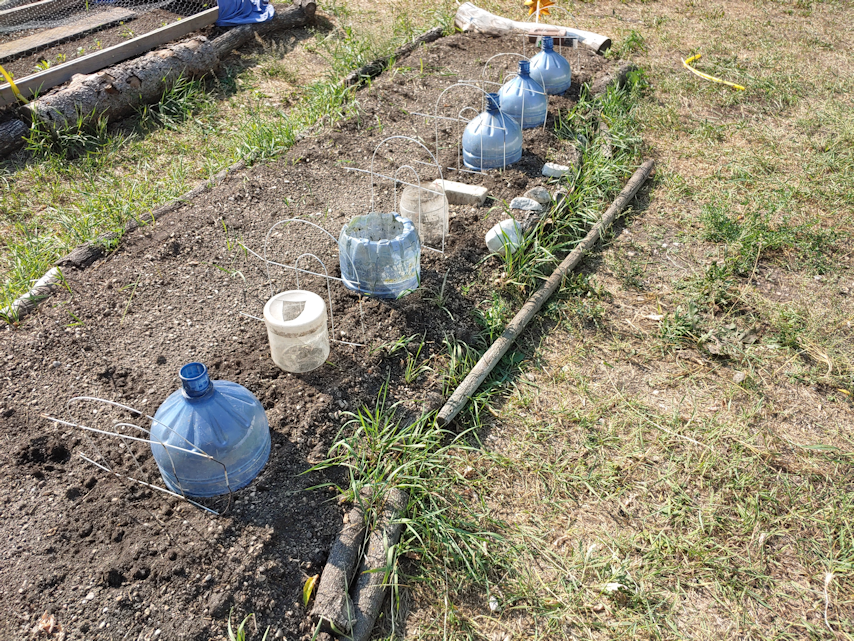
We rigged what we could to protect the last bed, but the grasshoppers really did a number on the seedlings. I ended up using old water bottles with their bottoms cut off to protect the remaining bits of seedlings, hoping they would recover. As you can see by the green in some of the bottles, there has been growth!
They can’t stay under the bottles, though, as they need wind and air to be strong. However, if we just took off the bottles, they’d only get eaten by critters.
The bed nearby was pretty much wiped out by the grasshoppers.
Even though the ends of the covers were open, the critters didn’t seem to want to go under them, but there is no such barrier for the grasshoppers!
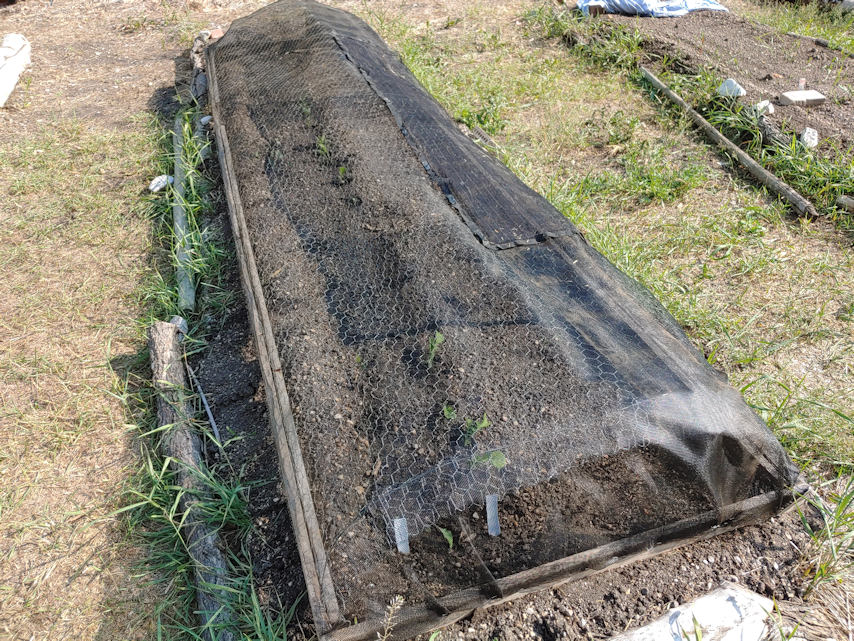
The third bed is doing a bit better. The radishes may have lots of damage to them, but they’re the biggest ones we’ve got right now. The only surviving chard is in this bed, too.
Since the middle bed was the most damaged, I decided to modify the cover and move it to another bed. In cleaning up the new part basement, we found a roll of window screen. I’d used some of it to make covers for the rain barrles, but there was still quite a bit left.
The cover is wider than the mesh. One length of it was enough to cover most of the chicken wire, but after cutting the remaining mesh in half and adding it, I was left with a small gap.
The edges of the screen were stapled to the wood frame, including enough to cover the ends. I tided down the mesh to the chicken wire just enough to keep it from moving.
A dear friend had sent us a couple of those mesh curtains that are meant to go over doors. The idea being, the mesh would keep the bugs out, but still allow wind in. They are tacked to the door frame, and the middle is held closed with magnets. The hope was that we could set them up in the old basement door, to keep the cats from going in there, but they could just push their way through the magnets. :-(
One of the panels was perfect to cover the gap.
The outer edge is stapled to the frame. The fabric is reinforced there, since it’s supposed to be tacked onto a door frame, so there is no damage there. Amazingly, the magnets are holding to the chicken wire enough to keep it one!
Once it was ready, it was time to set up the garden bed.
Even covered by water bottles, there was still grasshopper damage!! Some had never recovered from being eaten, at all. While removing the bottles, the soil wanted to stick to the them, too, and that quite nearly pulled up several of the plants. :-(
After making sure those that had been disturbed had soil pressed in for supper, it was time to add the new cover.
I’m quite happy with this.
It will be worthwhile to get more window screen mesh!
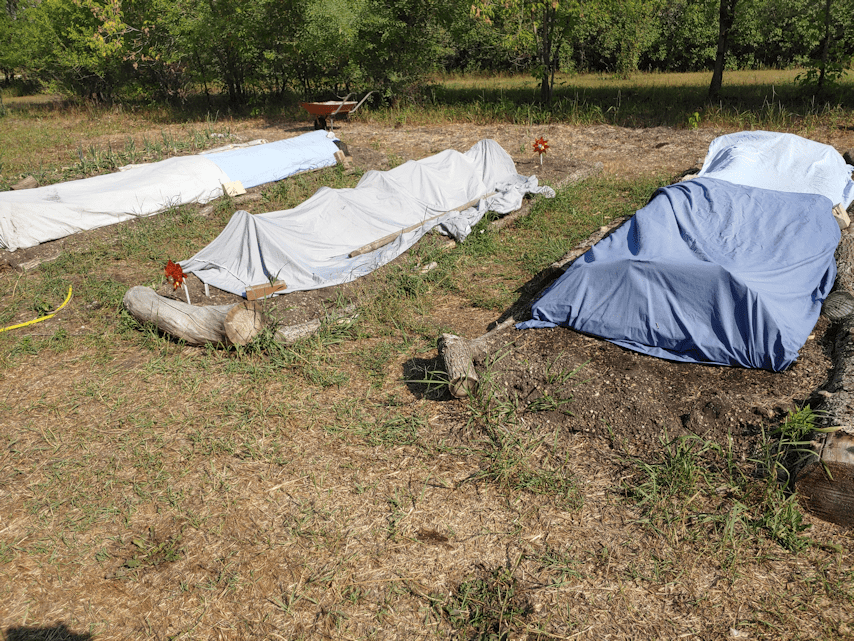
Since the ends are covered with window screen, it made it easier to add the shade cloth.
The surviving seedlings in the now-uncovered bed to things much bigger than little water bottles to protect them. The grasshoppers can still get in, but it’s still better than nothing.
Then all the beds got their shade cloths to protect them from the heat of the day.
When we make our permanent raised beds, they will be shorter. I actually like the length of these – they’re about 15 feet long – but it makes the protective covers awkward to handle, and we just didn’t have the materials to make them the same length. The covers are only about 13 feet long. I’m thinking 10 feet will work better, but we shall see when the time comes.
Until we can get the materials to build them, it’s a moot point, anyhow!
Whatever we end up with, having window screen mesh on a frame to keep the insects out seems to be more practical than the mosquito netting we’re using as floating row covers.
I had cleaned up the dead spruce tree I’d cut down, a few days go, but only now got to continue working in the area.
Because of how the tree had landed, I used the baby chainsaw to clear away all the non-weight bearing branches first, and was left with this giant insectoid shape! :-D After clearing away the last of the branches, I was going to break the trunk down further with the electric chain saw, but when that turned out to not be working properly, I just left the trunk to the side. We’ll have to take care of it later.
Today, I broke out the reciprocating saw and used it to finish trimming the top of the stump.
Happily, the wood in this stump is nice and solid.
The other trunk, from the tree we took down 3 summers ago? Not only did it have ant damage, but as I was trimming it with the reciprocating saw, it was vibrating at root level!
Well. That changed my plans.
At first, I figured I would just make a seat instead of a bench, but I really wanted a bench.
I used one of the boards that would be a horizontal support to mark off and cut the stump, using the reciprocating saw. At this point, I was still thinking of making a seat, but figured this stump was solid enough to support a bench. I cut the support pieces to a couple of inches shorter than the board that would be the seat, found the middles, then drilled pilot holes.
Despite using a level when positioning the support pieces, they still ended up uneven!
Though at least part of that is because one of the boards was warped.
Ah, well. I wasn’t going to start over! The only thing I did have to do was trim the top of the stump with a hand saw a bit, to make it even with the support pieces.
Then it was time to screw on the board for the seat.
You can see on the far right, that there was a substantial gap! I ended up making a wedge from a scrap piece of wood and jamming it in, then screwing the board in place, though the wedge and into the horizontal support.
As I was doing that, I could feel the bench wobbling a bit and decided the ends needed extra support. I didn’t want to put too much stress on the screws holding it to the stump, even though there are quite a few of them, and they are longer than needed. I had the pieces of wood I’d cut off the horizontal supports, so I trimmed those to size and added them at the ends to make legs. The main support is still the stump. The legs are just enough to give a little extra support, if there is too much weight at an end. The ground under them is soft, so if they were to be weight bearing, I would have wanted to add something solid under them, like a brick or some flat rocks
And there we have it! Our very first tree stump bench. :-D And I must say, it felt SO good to have someplace to sit down when I was done! It was the perfect height for me and my messed up knees, too. In fact, I used my knees to judge what height to trim the stump down to, and with the height added by the thickness of the seat board, it worked out just right.
Now it just needs a good scrubbing and a paint job to protect it from the elements. The board I found for the seat still has some paint on it, so it’s not too urgent.
I am quite pleased with how this turned out. We have so many dead trees in the spruce grove that need to be cut down, with some of them fairly close to each other. My thought was to cut them to leave stumps that could be used to make seats and tables, making sure that some of the seats are a bit higher, for my husband to be able to use comfortably. This bench is the first experiment to see if the idea is viable, and I’m happy to say that it is. Most of the greenery you can see behind the bench are a flower patch that we uncovered when cleaning up in this area, and have been leaving alone, as we mow or trim around it. Which means that, over time, we’ll be able to sit here in the shade, surrounded by lovely yellow flowers. :-)
Over time, we will have many seats like this, scattered all around the the inner yard, as we continue to clean up among the trees, and turn the inner yard into a lovely haven.
Well, we had at least one good thing happen today.
I was able to finish the chive blossom vinegar.
The bottle has had two weeks in the cupboard to infuse. Any time we went into the cupboard for something, we’d turn the bottle upside down a few times, to get the blossoms out of the bottle neck and mix with the vinegar.
I was curious how the colour would turn out. The site I’d found instructions on had a final product that was bright pink. I used white wine vinegar, though, which is pale yellow.
The final colour is quite dramatic, isn’t it?
After straining the vinegar, the bottle got cleaned and scaled, the vinegar added back, and we replaced the little plastic thing in the top, that controls the flow of vinegar when pouring.
We haven’t tried it in anything yet, but the smell of it is absolutely fabulous!! I can’t wait to try it!
Today has been another day of rain and high winds.
After today, we’re going to be back to high temperatures and sun. My Weather Network is forecasting 37C/99F on Wednesday! I think that must be some kind of typo, because I’m not seeing that anywhere else. The highest I’m finding is on my phone’s app, which is forecasting 27C/81F on the same day. Even so, it’s going to get hot again, and I am really, really glad we’re getting this rain right now!
In between rainfalls, we managed a trip into town, and I even got a bit of weeding done in the garden. We’re going to need to do a LOT of weeding once this rain passes. The weeds are loving the rain as much as the things we actually planted.
Speaking of which, while weeding among the corn earlier, I did find some radish sprouts. They are recent sprouts, not the ones that came up before the corn did, then disappeared. So we will have at least a couple of radishes. Unless these sprouts disappear, too!
Gosh, I’m just watching the trees outside my window as I write this. If a section of that big maple came down right now, it wouldn’t surprise me at all!
With this weather, our internet is seriously cutting out. It’s taken me more than an hour just to be able to start this post, and I still can’t get images to load. So this will be a quick one!
I wanted to share some of the new things we’re trying this year. The chives are blooming, and we decided to try making chive blossom vinegar.
I got a small bottle of white wine vinegar, and we’re simply putting clean, dry chive blossoms into it (after removing a bit of vinegar to make space. Some of the blossoms are left whole, while others had the bit at the bottom taken off, so all the individual flowerettes are loose. We’ve been adding to the bottle as more blossoms open up, then we’ll let it sit for a couple of weeks, in a cool, dark place, giving it a few turns every now and then. After that, the vinegar will be strained and re-bottled. I’m looking forward to seeing how this turns out!
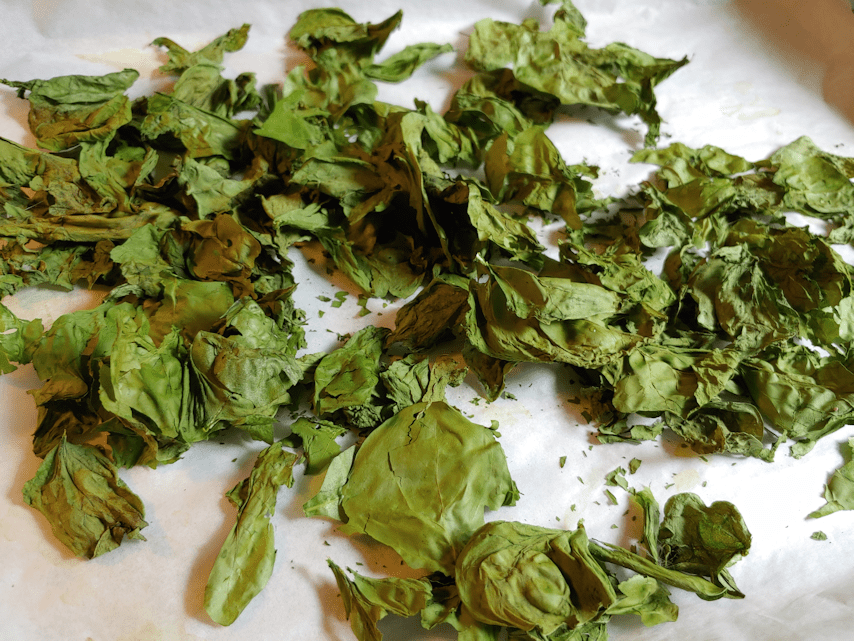
I’ve also started to dehydrate spinach leaves.
I use our oven to dehydrate things, using the “warm” setting, reduced to it’s lowest temperature of 145F (default is 170F). For something as light and thin as spinach leaves, I shut it off and let the oven light on to stay warm. We can only fit two trays in the oven at a time, but after I went to turn the leaves and found they’d shrunk enough, I combined them into one pan and left it for the night. In the morning, I just crushed them lightly, and put them in an air tight canister. There’s maybe 1/3rd of a cup of dried, crushed leaves from the 2 trays. We’ll keep doing small batches like this and, eventually, we’ll reduce them to a powder instead of flakes. It kind of reminds me of dehydrating celery. You start off with what looks like so much, but by the time it’s completely dehydrated, it looks like there’s nothing there! :-D
Now it’s time to see if I have enough connection to publish this!