Old kitchen garden, retaining wall progress

I am so happy I was able to get back to working on this today!

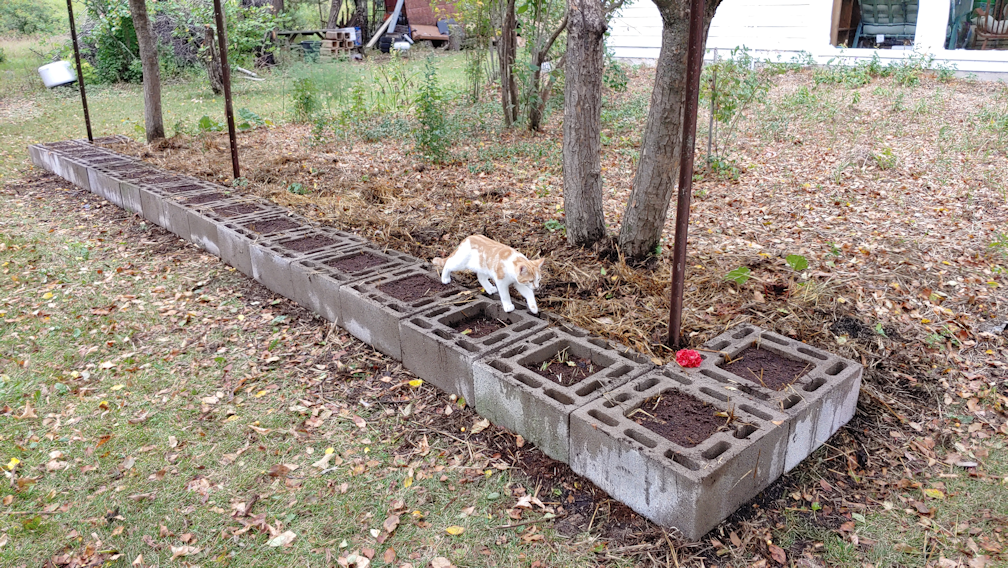
It is now basically finished for this year!

Here is where I started today.

I loosened the soil and leveled off the space where we could fit 1 more of the chimney blocks. In the process, I realized that I could completely miss the bunch of chives. However, I wanted to add a block to form a corner, so I decided to dig some out for transplanting, first.

After discussing what we wanted to put in these in the future, we decided to transplant just some of the chives into two blocks, just inside the corner. The bottoms were stuffed with mulch, then topped with peat, before transplanting. More peat was added, later.

I then went to work on the opposite corner, which had a bit of a problem.

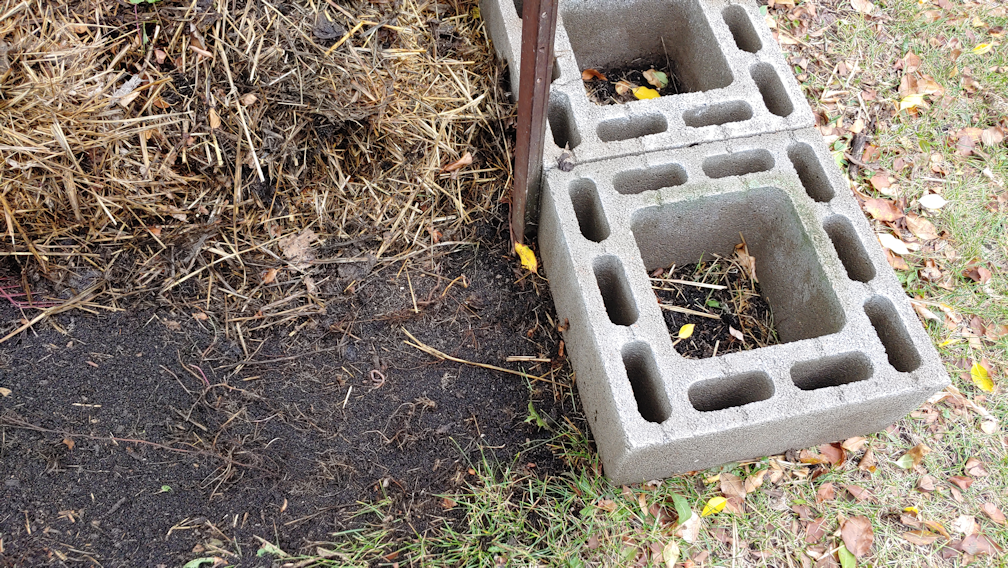
That metal fence post is every so slightly in the way.

The ground here also started to slop upwards towards the house on this side, so I had to level the area by taking soil away from the area. On the other side, I had to level the soil by adding to it!

As for placing the block, I found I could push the metal post aside, just enough for it to line up right.

After everything we jammed in and settled into place, the post ended up being very close to straight, still. So I was happy.

On to the next step!

I raked the mulch I had moved aside, right up against the blocks, then used some of it to jam into the openings until they were filled to about an inch or two from the tops.

Next, I put a layer of peat on top of the mulch.

As I worked my way down the line, I added more mulch to some of them before adding the peat, just to make sure there was a deep, tamped down layer.

I then gave all of them a thorough watering, to give the decomposition process a bit of a head start – and wash off the tops of the blocks a bit.

As it breaks down, I expect the mulch and peat to sink by an inch or two. That will give us the space to add soil as we plant things in them.

As for the small openings, my daughter and I talked about filling them with sand or gravel. I don’t mind the idea of filling them with soil and planting things in them, though they are really too small for that. Even just leaving them empty will serve as a layer of insulation to protect the soil in the middle. However, if we were to put sand in them, it would keep unwelcome things from starting to grow in there, plus give a nice base to add garden stakes, supports, or even solar lights for lighting up pathways.

Since we’re stuck with those metal posts anyhow, I like the idea of using them to string decorative LED lights across, too. :-)

I’m pretty happy with how this area is starting to shape up.

For those new to this blog, here is what the area was like, when I started cleaning it up last year.

Part one
Part two
Part three
Part four

We’ve made a lot of progress here! :-)

The Re-Farmer

Clean up: old dog houses moved

Brrr, today has turned out to be chilly!

With some help from my daughter, though, I was able to get a lot more done outside than I expected.

First on the list was to move the old dog houses to what I hope will be a permanent – or at least long term – location.

Unfortunately, things are really level in the area I wanted to put them. After discussing it a bit, we decided which space was the most level, then hoisted the dog houses over.

Continue reading

Morning company

In the last while, the kittens have become more interested in following me around as I do my morning rounds. Especially when I go to switch the memory card in the trail cam. Usually, it’s just one or two kittens, though.

This morning, my daughter came along, and that really got their attention, so we had 4 of them from the start. :-D

Continue reading

Some manual labour, and getting things started

After dropping one daughter off at work, my other daughter and I did a whole bunch of manual labour around the yard.

The first thing we did was haul away the stuff I’d clean up in the old wood pile area, including moving the pile of debris to the back of the outhouse, and sorting through the pile of found objects and garbage.

Continue reading

Clean up: old wood pile, progress

I was able to get about an hour of clean up in the old wood pile area. I made sure to check the temperature before I headed out, and it was only 22C. Thank God it wasn’t any hotter, because even that felt way too hot.

Y’know, I’ve always wanted to travel, and go vacation on some tropical island. I still want to do that, but I am realizing that I’d just die in the heat! :-D

So this is where I left off, yesterday.

Continue reading

Chokecherries, ready to freeze

The chokecherries I picked this morning are all done for now.

Nice to see my colander so full of berries! All clean and ready to pick over.

I got all the stems (of course, I found one I missed after I took this photo!) and the ones that were damages or whatever. I filled two 9×13 jelly roll pans with berries when I was done.

They are now in the deep freeze, to be transferred to freezer bags when they are frozen solid. After that, they can wait until we decide how we want to use them this year. :-) The freezing will help them release their juices later, too.

So… what shall we make? More chokecherry vinegar? Or try a jam or jelly this year?

The Re-Farmer

Bitty Baby Gooseberry

While picking chokecherries, I also checked out one of the gooseberry bushes.

This is the biggest of the gooseberry bushes, and the one that got the most water over the summer, since I had the sprinkler going on the raspberry transplants. It has a fair few berries on it, while the others have either no berries at all, or almost none. The really dark berries I am holding are “ripe”, but so small, they’re practically inedible.

Note for future: transplant the gooseberries out from under other trees, and put them somewhere where they will get both sun and rain!

The Re-Farmer

Chokecherries

This morning, I grabbed a bucket and checked out the chokecherry trees.

After my last visit with them, I thought I might be too late for the one tree; either they would be over ripe, or the birds would have got them by now.

Happily, there were plenty of perfectly ripe (very dusty!) berries!

I was even able to pull branches down and get lots from the top.

This is how much I got, from just the one tree – minus the many that went flying or rolling out of my hands onto the ground! :-D

Which is quite noticeably better than last year.

20180802.bucket.of.chokecherries

That was all what I was able to pick from both trees near the road, last year.

This year, that second tree is not doing as well.

There were very few berries, they were really small, and not consistently ripening.

I left this tree alone.

Then I went for the tree closer to the house. The berries there were much plumper, but the berries were also mostly out of reach. The lower branches don’t get anywhere near as much light, so there were fewer berries and they were redder. My daughter was able to come out and help by pulling the upper branches down so I could reach to pick them.

Check them out!

While there were a fewer berries, they had almost as much volume as the berries from the other tree.

Yes, they are also a lot more red and not as ripe. This is okay, as the less ripe berries have more natural pectin.

As I write this, the chokecherries are sitting in cold water to get rid of any critters that might have come along for the ride, and get the bulk of the dust from the gravel road off. Later, I will give them a thorough wash in cold water, then pick them over to get rid of stems and any messed up berries.

Last year, we made chokecherry vinegar, to use mostly as a drink mix, with our berries. I have not yet decided if we will do the same thing this year. I’ll go through some ideas with my daughters later. I rather like the idea of making a jelly, but that vinegar was really good!

At the very least, we’ll set some aside to freeze and use to make chokecherry mead at some point. :-)

The Re-Farmer